
- Posts: 9436
- Thank you received: 19043
Big Dragon 2
- Quorneng
-
 Topic Author
- Offline
- Forum Master
-

Less
More
11 Feb 2018 13:23 - 11 Feb 2018 13:26 #1
by Quorneng
Big Dragon 2 was created by Quorneng
The original Big Dragon was a Depron 150% version (60" span) of the itself a highly modified, part Depron, 'pod and boom' pusher Wing Dragon.
The Big Dragon went through several rebuilds and ultimately looked like this but unfortunately it is no more.
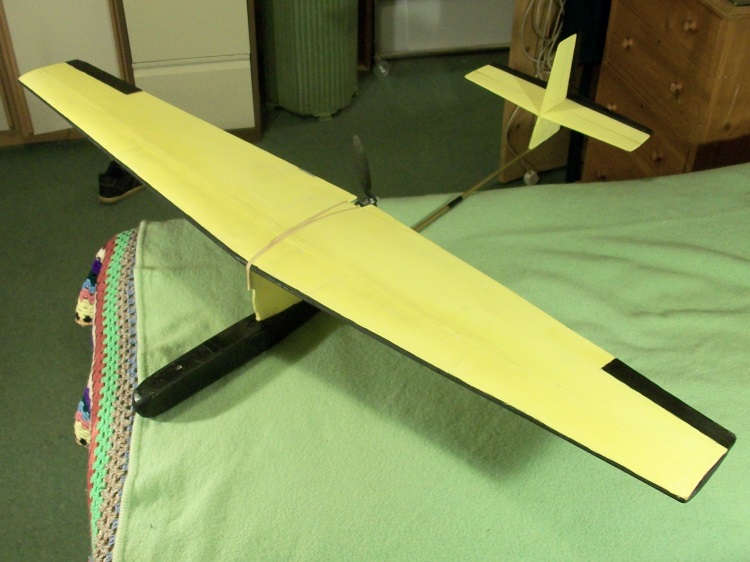
Or rather just the boom and tail feathers remain.
Having decided to build a Depron 'test' wing using the lightweight 'printed' wing ribs.

It seemed logical to build the wing big enough to be suitable to use the old Big Dragon tail (and its motor, ESC and battery!) as a resurrected Big Dragon 2.
The original 60" wing was tapered 2:! but the new 'test' wing will be constant chord so can have a similar area at just 52" span.
The construction will be similar with balsa spar flanges over a Depron shear web. The big difference will be the use of the 'printed' ribs.
The lower skin (incorporating the balsa spar flange) and the Depron shear web.

The 0.1 mm 'skin' side of the ribs.

The next stage is to add the top spar flange along with the leading edge top skin. This will in effect create a "D" box which will make the wing plenty strong enough for the full span to be completed and the aileron servos installed before the rear potion of the upper skin is added.
Then just a new 'pod' fuselage will be required. I tempted to 'print' that as well!
The Big Dragon went through several rebuilds and ultimately looked like this but unfortunately it is no more.
Or rather just the boom and tail feathers remain.
Having decided to build a Depron 'test' wing using the lightweight 'printed' wing ribs.
It seemed logical to build the wing big enough to be suitable to use the old Big Dragon tail (and its motor, ESC and battery!) as a resurrected Big Dragon 2.
The original 60" wing was tapered 2:! but the new 'test' wing will be constant chord so can have a similar area at just 52" span.
The construction will be similar with balsa spar flanges over a Depron shear web. The big difference will be the use of the 'printed' ribs.
The lower skin (incorporating the balsa spar flange) and the Depron shear web.
The 0.1 mm 'skin' side of the ribs.
The next stage is to add the top spar flange along with the leading edge top skin. This will in effect create a "D" box which will make the wing plenty strong enough for the full span to be completed and the aileron servos installed before the rear potion of the upper skin is added.
Then just a new 'pod' fuselage will be required. I tempted to 'print' that as well!
Last edit: 11 Feb 2018 13:26 by Quorneng.
Thanks: Klipkopwildlife, The Beard, Mowerman, THE BLACKBIRD, boz, Robin Colbourne, Squirrelnet
Please Log in or Create an account to join the conversation.
- Quorneng
-
Topic Author
- Offline
- Forum Master
-
Less
More
- Posts: 9436
- Thank you received: 19043
12 Feb 2018 16:15 #2
by Quorneng
Replied by Quorneng on topic Big Dragon 2
The LH wing brought up to the "D" box stage.
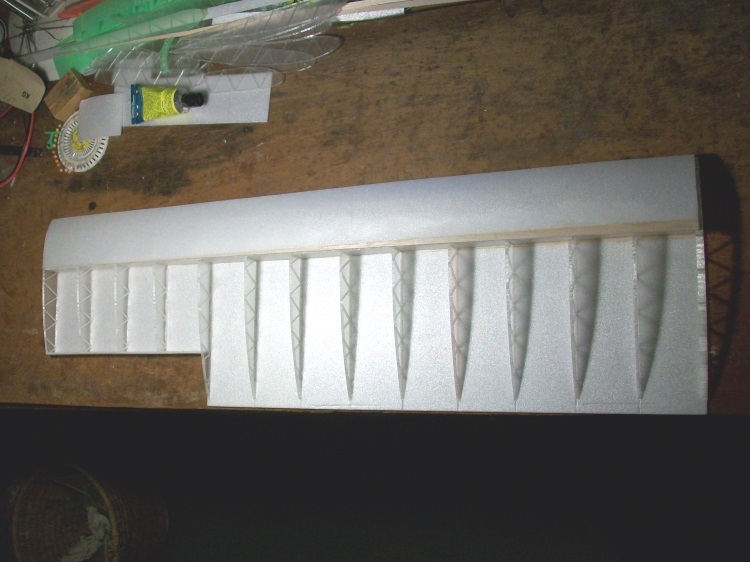
As I hoped even with 2/3 of the upper skin missing it is remarkably strong and stiff.
The other half of the wing is next and also start thinking about how to 'print' the fuselage. .
As I hoped even with 2/3 of the upper skin missing it is remarkably strong and stiff.
The other half of the wing is next and also start thinking about how to 'print' the fuselage.
.
Thanks: Klipkopwildlife, boz
Please Log in or Create an account to join the conversation.
- one tenor
-

- Offline
- Forum Veteran
-

- johnpcalex@gmail.com
12 Feb 2018 16:52 - 12 Feb 2018 17:10 #3
by one tenor
Anything will fly given enough power
Replied by one tenor on topic Big Dragon 2
Looking at your ribs reminds me.I have a pair of foam wings which have ( should have ) two wings with centre ribs which engage with each other. One rib is missing. ( ripped out ). If I took a casting of the existing rib, say in Epoxy, and gave it to someone like yourself would it be possible to copy it in say ABS . It would be a copy required not a casting of it as it would be a casting of it's mating rib already which is what is needed. If you get what I mean. They would be solid though not lightweight like yours.
Anything will fly given enough power
Last edit: 12 Feb 2018 17:10 by one tenor. Reason: Addition
Please Log in or Create an account to join the conversation.
- Quorneng
-
Topic Author
- Offline
- Forum Master
-
Less
More
- Posts: 9436
- Thank you received: 19043
12 Feb 2018 22:09 #4
by Quorneng
Replied by Quorneng on topic Big Dragon 2
OT
The problem is I would have to draw the rib wing section using the tools I have available in FREECAD. (which is not a lot!) so I could not guarantee the printed rib would be exactly like the Epoxy master, or in other words be a good fit in the other rib.
This is the down side of 3D printing.
A given dimension in CAD does not necessarily print exactly so it can take quite a bit of trial and error adjustment of all the dimensions that make up the rib before it finished up the correct shape and a good fit.
Of course once you do have it right then you can print over and over and each will be exactly the same.
Thanks: boz
Please Log in or Create an account to join the conversation.
- one tenor
-
- Offline
- Forum Veteran
-
- johnpcalex@gmail.com
12 Feb 2018 23:13 #5
by one tenor
Anything will fly given enough power
Replied by one tenor on topic The Café (There is no Topic)
I'm playing with the idea of getting one of these to mend some poorly engines. Anyone had experience with them?
www.banggood.com/NBC-200A-Miller-MIG-Spo...BwE&cur_warehouse=CN
I'm asking questions on Bang Good site regarding power/gas etc.
www.banggood.com/NBC-200A-Miller-MIG-Spo...BwE&cur_warehouse=CN
I'm asking questions on Bang Good site regarding power/gas etc.
Anything will fly given enough power
Thanks: boz
Please Log in or Create an account to join the conversation.
- one tenor
-
- Offline
- Forum Veteran
-
- johnpcalex@gmail.com
12 Feb 2018 23:44 #6
by one tenor
Anything will fly given enough power
Replied by one tenor on topic Big Dragon 2
Thanks Q. I did wonder about that sort of thing.I suppose I'll need to find something I can cast a rib from Glass cloth and epoxy maybe or change both ribs with some way of locking together but remaining knockoffable. I don't even know what glider it is. Big though.. I'll have to wait til I'm on my feet again.
Anything will fly given enough power
Please Log in or Create an account to join the conversation.
- Quorneng
-
Topic Author
- Offline
- Forum Master
-
Less
More
- Posts: 9436
- Thank you received: 19043
13 Feb 2018 14:54 #7
by Quorneng
Replied by Quorneng on topic Big Dragon 2
All the printed ribs glued on to the RH wing.
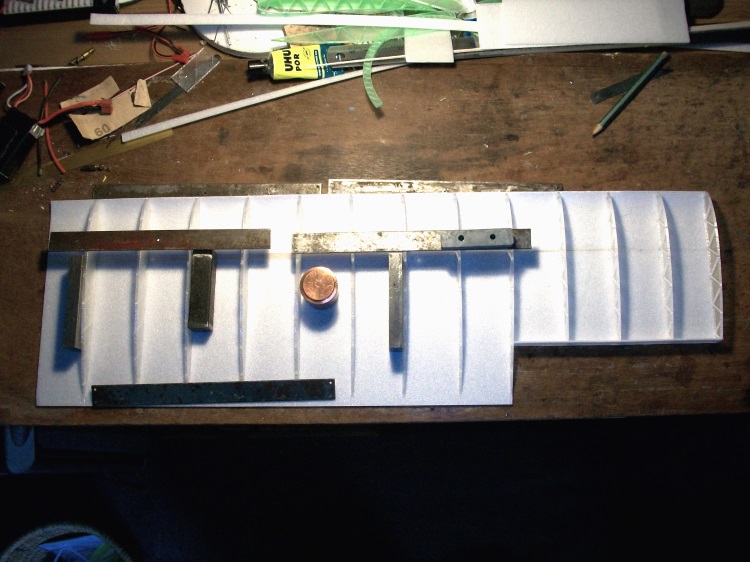
And I ever so nearly built two LH ones!
As about half the wing strength comes from the small balsa spar flanges joining the two wing halves, with a bit of dihedral, will require some delicate balsa scarf joints. The Depron is easier as with the right glue and a close fit a simple butt joint is as strong as the Depron itself.
As the wing will be held on with rubber bands the area between the inner ribs will have to be significantly reinforced to withstand the pressure of the bands.
Thanks: Klipkopwildlife, boz
Please Log in or Create an account to join the conversation.
- Quorneng
-
Topic Author
- Offline
- Forum Master
-
Less
More
- Posts: 9436
- Thank you received: 19043
14 Feb 2018 13:40 - 14 Feb 2018 13:45 #8
by Quorneng
Replied by Quorneng on topic Big Dragon 2
The original Big Dragon was rather a 'minimum' plane with the pod just, but in reality not quite, big enough to hold the battery, ESC and radio in a line. I have in mind to do similar with no 2.

Just a first go to see what could be done.
The wing and motor will be mounted on top of a streamlined 150 mm tall pylon to give clearance for the 10" pusher prop.
Too big to print it will have to be in 2 or 3 pieces.
One advantage of 'printing' is the fuselage can be made a 'close fit' around the battery!
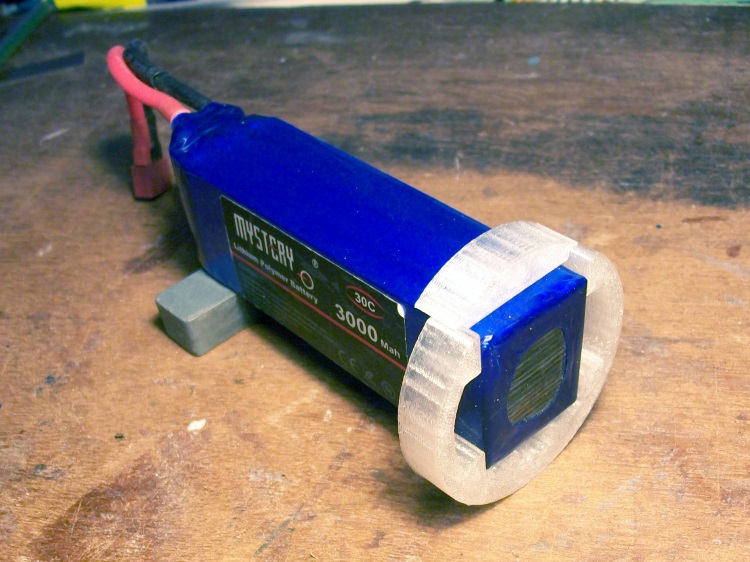
Just a first go to see what could be done.
The wing and motor will be mounted on top of a streamlined 150 mm tall pylon to give clearance for the 10" pusher prop.
Too big to print it will have to be in 2 or 3 pieces.
One advantage of 'printing' is the fuselage can be made a 'close fit' around the battery!
Last edit: 14 Feb 2018 13:45 by Quorneng.
Thanks: Klipkopwildlife, THE BLACKBIRD, Ralpharr2001, boz, Squirrelnet
Please Log in or Create an account to join the conversation.
- Quorneng
-
Topic Author
- Offline
- Forum Master
-
Less
More
- Posts: 9436
- Thank you received: 19043
17 Feb 2018 00:30 #9
by Quorneng
Replied by Quorneng on topic Big Dragon 2
Just for fun and I had a quiet day I printed out the nose section of the pod fuselage primarily to check the 3000 mAh 3 s would a) fit and b) could be got in and out in the space available.


One advantage is the battery hatch can be made an exact fit.
The rear portion of the pod with the wing pylon only just fits within the printer limits and will look something like this.

The motor mount and wing platform are still to be added.
It will take over 7 hours to print! :ohmy:
One advantage is the battery hatch can be made an exact fit.
The rear portion of the pod with the wing pylon only just fits within the printer limits and will look something like this.
The motor mount and wing platform are still to be added.
It will take over 7 hours to print! :ohmy:
Thanks: Klipkopwildlife, THE BLACKBIRD, Ralpharr2001, boz, Squirrelnet
Please Log in or Create an account to join the conversation.
- Quorneng
-
Topic Author
- Offline
- Forum Master
-
Less
More
- Posts: 9436
- Thank you received: 19043
18 Feb 2018 00:08 - 18 Feb 2018 00:09 #10
by Quorneng
Replied by Quorneng on topic Big Dragon 2
This getting close to what the all printed "pod" will look like.

The complete pod will be 395 mm (15.5") long and 56 mm (2.2) diam. The glass fibre boom will stick a further 750 mm (29.5") out the back.
The wing pylon is 130 mm ( 5.1") tall to give clearance for the 10" prop and 216 mm (8.5") long to match the chord of the 'printed rib' wing which currently looks like this.
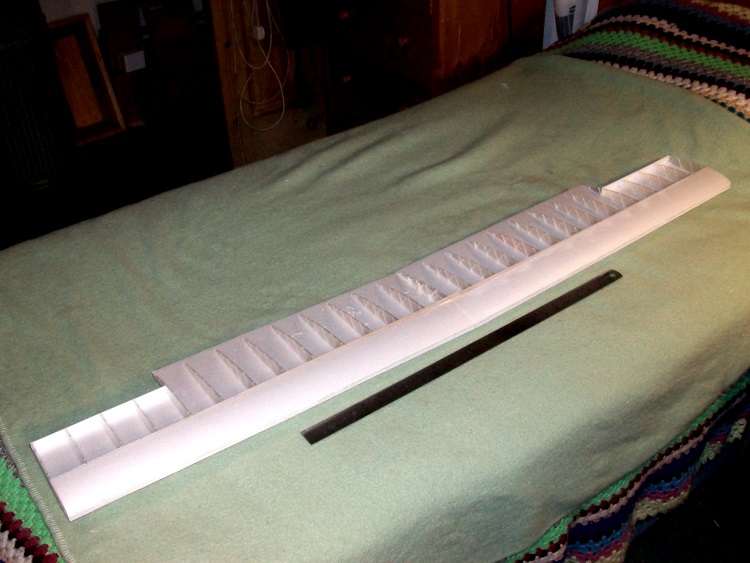
I am not ar all convinced printing big bits like this really makes sense. Its not the printing time (hours!) so much as the time it takes to design and check it actually prints which is measured in days! I could build the same in balsa or Depron in less time and its not as if I am ever likely to want to build another.
Still it good mental exercise.
The complete pod will be 395 mm (15.5") long and 56 mm (2.2) diam. The glass fibre boom will stick a further 750 mm (29.5") out the back.
The wing pylon is 130 mm ( 5.1") tall to give clearance for the 10" prop and 216 mm (8.5") long to match the chord of the 'printed rib' wing which currently looks like this.
I am not ar all convinced printing big bits like this really makes sense. Its not the printing time (hours!) so much as the time it takes to design and check it actually prints which is measured in days! I could build the same in balsa or Depron in less time and its not as if I am ever likely to want to build another.
Still it good mental exercise.
Last edit: 18 Feb 2018 00:09 by Quorneng.
Thanks: Klipkopwildlife, THE BLACKBIRD, boz, Squirrelnet
Please Log in or Create an account to join the conversation.
- Mowerman
-

- Offline
- Elite Member
-

Less
More
- Posts: 218
- Thank you received: 139
18 Feb 2018 11:06 - 18 Feb 2018 11:08 #11
by Mowerman
Replied by Mowerman on topic Big Dragon 2
I guess you see every step as a new challenge to be overcome and it keeps me watching in admiration
Last edit: 18 Feb 2018 11:08 by Mowerman.
Please Log in or Create an account to join the conversation.
- Quorneng
-
Topic Author
- Offline
- Forum Master
-
Less
More
- Posts: 9436
- Thank you received: 19043
19 Feb 2018 00:37 #12
by Quorneng
Replied by Quorneng on topic Big Dragon 2
As the pod will have such a long printing time the only way to test things is to print small parts of it.
The intention is to mount the ESC vertically inside the pylon. A logical place as it will be directly between the battery and the motor.
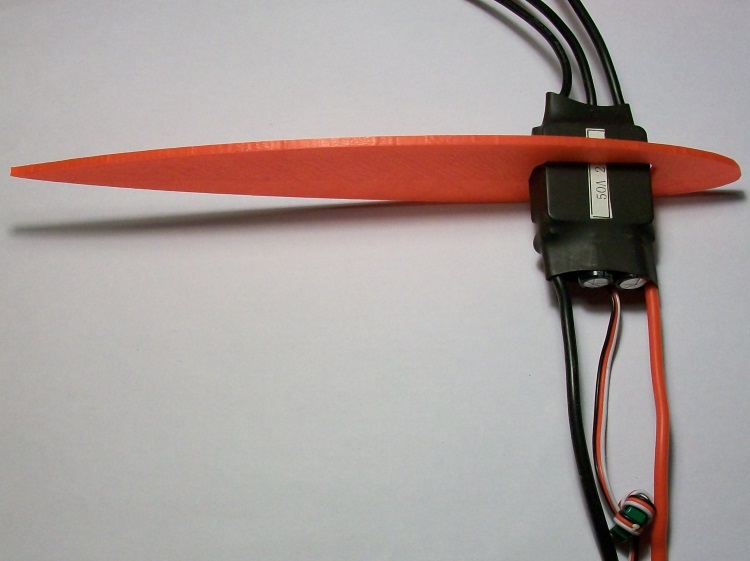
First a small section of the pylon with a hole in it that just fits the ESC.
The ESC will be inserted down from the top so the front portion of the wing mount that sits on top of the pylon to check that the ESC can go in that way.

The mid portion of the pylon which will actually hold the ESC will have a nose cooling air inlet with exhausts either side.

Even these three pieces take nearly 2 hours to print (and 3 times as long to design :woohoo: ) but better that than printing for nearly 9 hours and finding the ESC physically won't go in! :ohmy:
The pylon now looks like this.

I shall have to actually print the thing soon!
The intention is to mount the ESC vertically inside the pylon. A logical place as it will be directly between the battery and the motor.
First a small section of the pylon with a hole in it that just fits the ESC.
The ESC will be inserted down from the top so the front portion of the wing mount that sits on top of the pylon to check that the ESC can go in that way.
The mid portion of the pylon which will actually hold the ESC will have a nose cooling air inlet with exhausts either side.
Even these three pieces take nearly 2 hours to print (and 3 times as long to design :woohoo: ) but better that than printing for nearly 9 hours and finding the ESC physically won't go in! :ohmy:
The pylon now looks like this.
I shall have to actually print the thing soon!
Thanks: Klipkopwildlife, THE BLACKBIRD, boz
Please Log in or Create an account to join the conversation.
- Quorneng
-
Topic Author
- Offline
- Forum Master
-
Less
More
- Posts: 9436
- Thank you received: 19043
19 Feb 2018 23:40 - 19 Feb 2018 23:42 #13
by Quorneng
Replied by Quorneng on topic Big Dragon 2
I have decided that printing such a big piece all in one go (now some 10 hours!) is just too much risk that either something goes wrong or physical limitation means the ESC is impossible to fit.
The answer is to print the rear pod, pylon and wing mount as 3 pieces and simply glue them together. Glue should be quite adequate provided it is given suitable flat surfaces. To do this the rear of the pod is given just enough 'pylon' so it ends in a flat surface.


It still took 4 hours to print!
Remarkably strong and stiff it weighs 36 g (1.27 oz).
The same thing will be done with the wing mounting thus leaving a simple pylon piece to be glued in between them but only after the ESC has been installed in it!
The latest complication was to arrange for 2 degrees incidence on the wing mount (the boom and tail plane are at zero) along with the same 'down' to the motor mount.
If and when it flies I can only hope it justifies all the bother!
The answer is to print the rear pod, pylon and wing mount as 3 pieces and simply glue them together. Glue should be quite adequate provided it is given suitable flat surfaces. To do this the rear of the pod is given just enough 'pylon' so it ends in a flat surface.
It still took 4 hours to print!
Remarkably strong and stiff it weighs 36 g (1.27 oz).
The same thing will be done with the wing mounting thus leaving a simple pylon piece to be glued in between them but only after the ESC has been installed in it!
The latest complication was to arrange for 2 degrees incidence on the wing mount (the boom and tail plane are at zero) along with the same 'down' to the motor mount.
If and when it flies I can only hope it justifies all the bother!
Last edit: 19 Feb 2018 23:42 by Quorneng.
Thanks: Klipkopwildlife, THE BLACKBIRD, boz, Squirrelnet
Please Log in or Create an account to join the conversation.
- Mowerman
-
- Offline
- Elite Member
-
Less
More
- Posts: 218
- Thank you received: 139
20 Feb 2018 10:27 #14
by Mowerman
Replied by Mowerman on topic Big Dragon 2
WHEN it flies , the satisfaction will justify the bother.
Please Log in or Create an account to join the conversation.
- one tenor
-
- Offline
- Forum Veteran
-
- johnpcalex@gmail.com
20 Feb 2018 16:01 #15
by one tenor
Anything will fly given enough power
Replied by one tenor on topic Big Dragon 2
It certainly will. I can't wait for the finished result. :woohoo: :woohoo:
Anything will fly given enough power
Please Log in or Create an account to join the conversation.
Time to create page: 0.944 seconds