
- Posts: 524
- Thank you received: 1476
Tony Nijhuis Concorde build
- Ralpharr2001
-
 Topic Author
- Offline
- Elite Member
-

Less
More
25 Dec 2020 11:27 #1
by Ralpharr2001
I'm currently unsupervised. I know it freaks me out as well, but the possibilities are endless!!
Tony Nijhuis Concorde build was created by Ralpharr2001
Merry Christmas every one. So my Christmas build starts. It is the Tony Nijhuis Concorde with 4 50mm FMS edf's. I bought the short kit, plans and vac forms to get a quick start. I will use my dwindling stock of balsa for the sheeting. Tony does a nice set of build photos to guide you through the build.
First up is the wings. No major dramas here. Just packing under the leading edge, slot the ribs into place, check alignment and drip some thin CA into each joint. Repeat for the other side.
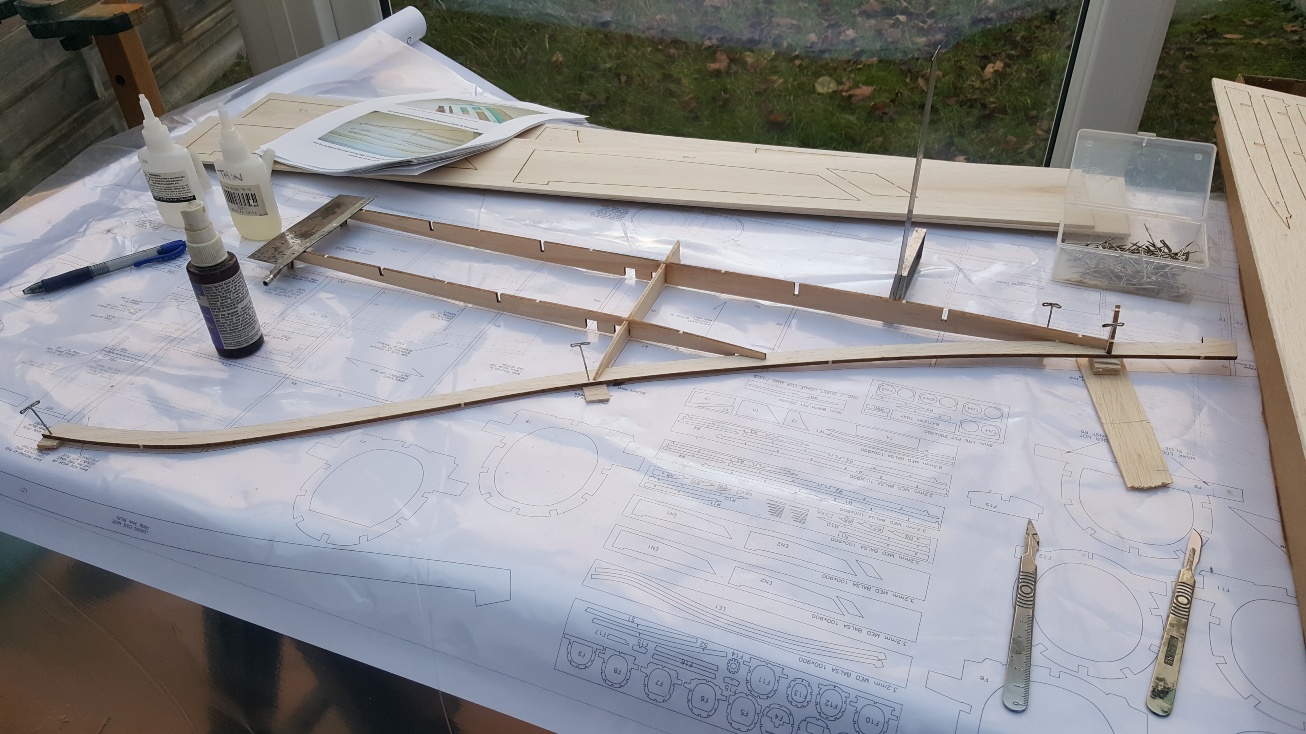


First up is the wings. No major dramas here. Just packing under the leading edge, slot the ribs into place, check alignment and drip some thin CA into each joint. Repeat for the other side.
I'm currently unsupervised. I know it freaks me out as well, but the possibilities are endless!!
Attachments:
Thanks: Eric, Klipkopwildlife, Flytilbroke, Quorneng, THE BLACKBIRD, old fart, paul d, crash happy
Please Log in or Create an account to join the conversation.
- paul d
-
- Offline
- Forum Veteran
-

Less
More
- Posts: 2074
- Thank you received: 2292
25 Dec 2020 21:08 #2
by paul d
balsa is best.
Replied by paul d on topic Tony Nijhuis Concorde build
looking good Ralph! Not keen on using cyno on balsa joints myself, I know it's quick but it does make a brittle joint.
balsa is best.
Thanks: Klipkopwildlife, Ralpharr2001
Please Log in or Create an account to join the conversation.
- Ralpharr2001
-
Topic Author
- Offline
- Elite Member
-
Less
More
- Posts: 524
- Thank you received: 1476
26 Dec 2020 18:01 - 26 Dec 2020 18:23 #3
by Ralpharr2001
I'm currently unsupervised. I know it freaks me out as well, but the possibilities are endless!!
Replied by Ralpharr2001 on topic Tony Nijhuis Concorde build
I agree Paul and normally I would use aliphatic but as this will be a gentle flyer, after all it is a passenger jet, it wont be subjected to much abuse!  The sheeting is glued with aliphatic. I read a post somewhere about applying sheeting. The guy suggested putting glue on the formers / ribs. Laying the sheeting on, lifting the sheeting off adding some more glue on both the sheeting and formers / ribs, then let it dry. Once dry put the sheeting on, line it up then run a covering iron set on low heat across the sheeting pressing down and moving slowly. The heat softens the glue which then goes rigid when the heat goes. No need for pins or clamps. So I tied it and it does work but I still needed some pins and clamps. More practice required but a useful exercise.
Cracked on again today with the build after I changed brake pads on my car. Wasn't happy with the old pads, bad brake fade under heavy braking so went up a grade to some road/track day pads. Seems to have made a positive difference. Anyway, I put the top sheeting on each wing, added the fuselage formers and put some longerons in. Built the nose section. Took quite a bit of time to make sure everything was straight and the wings were sitting on the build tabs so no twists. Started installing the wiring and servo extensions.


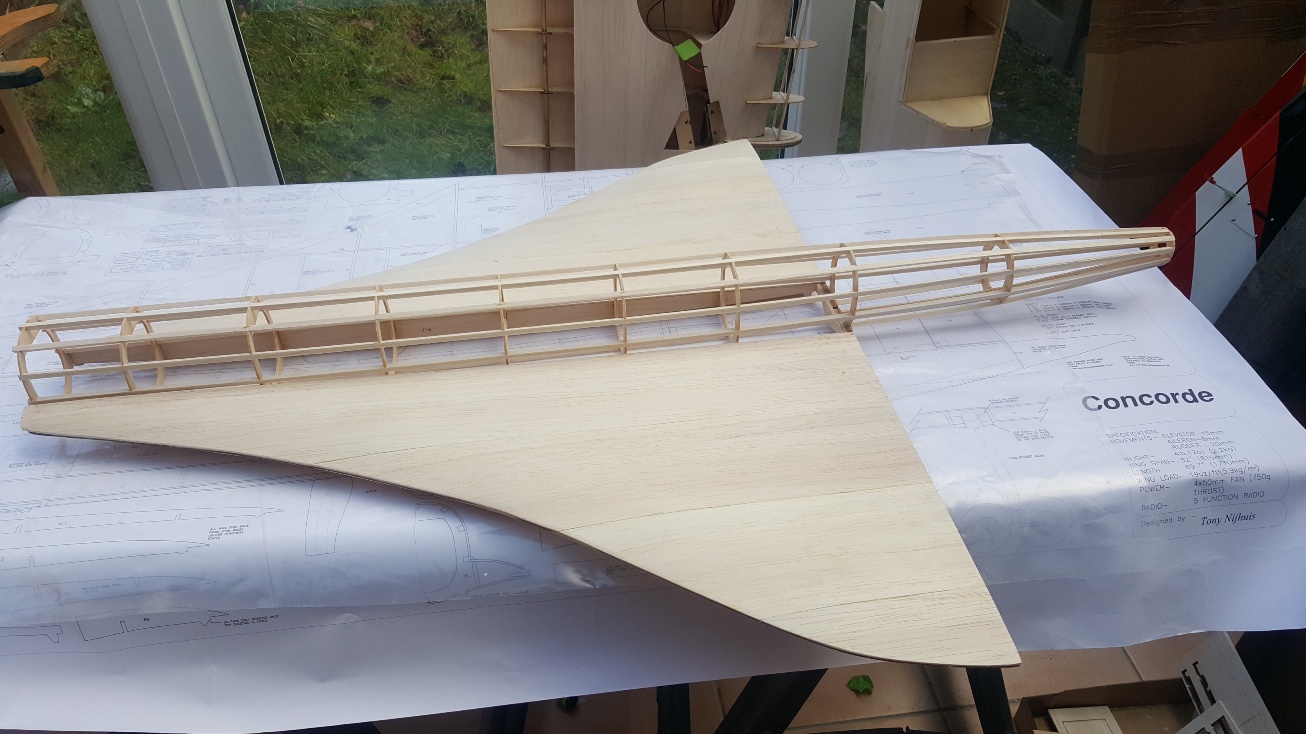
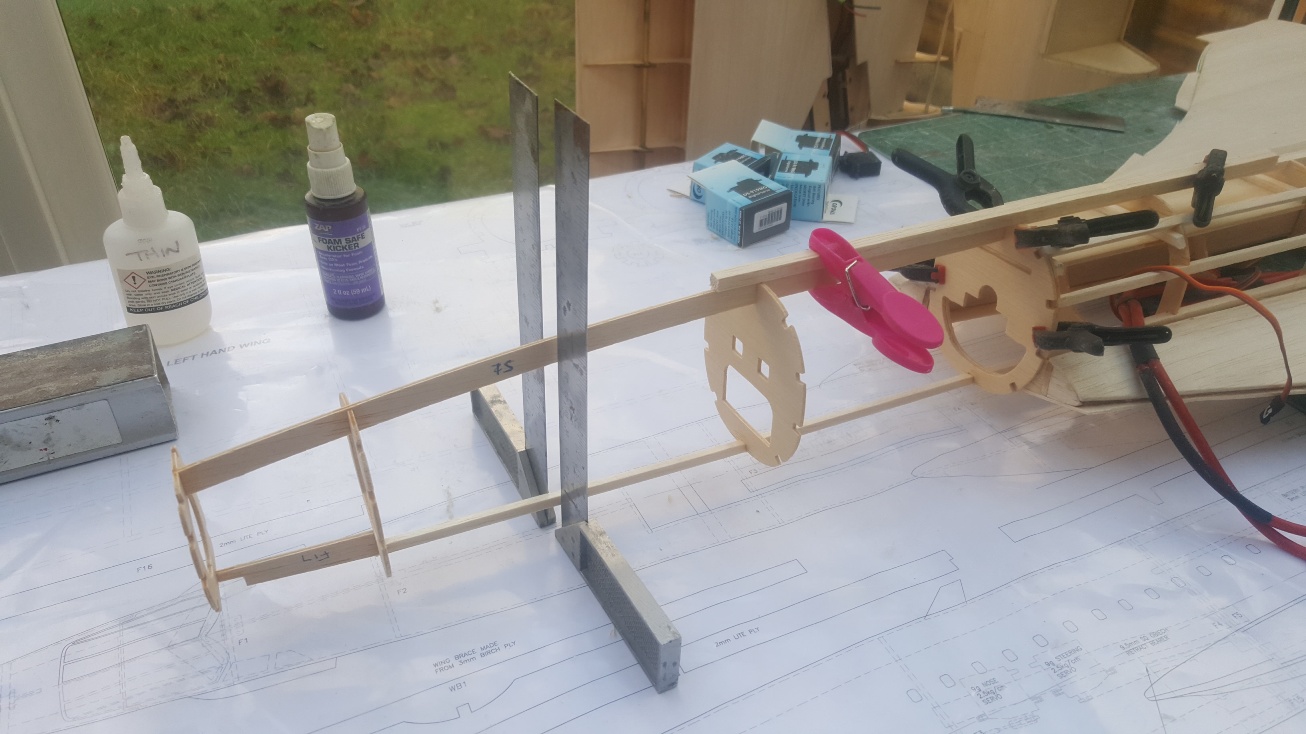

The sheeting is glued with aliphatic. I read a post somewhere about applying sheeting. The guy suggested putting glue on the formers / ribs. Laying the sheeting on, lifting the sheeting off adding some more glue on both the sheeting and formers / ribs, then let it dry. Once dry put the sheeting on, line it up then run a covering iron set on low heat across the sheeting pressing down and moving slowly. The heat softens the glue which then goes rigid when the heat goes. No need for pins or clamps. So I tied it and it does work but I still needed some pins and clamps. More practice required but a useful exercise.Cracked on again today with the build after I changed brake pads on my car. Wasn't happy with the old pads, bad brake fade under heavy braking so went up a grade to some road/track day pads. Seems to have made a positive difference. Anyway, I put the top sheeting on each wing, added the fuselage formers and put some longerons in. Built the nose section. Took quite a bit of time to make sure everything was straight and the wings were sitting on the build tabs so no twists. Started installing the wiring and servo extensions.
I'm currently unsupervised. I know it freaks me out as well, but the possibilities are endless!!
Attachments:
Last edit: 26 Dec 2020 18:23 by Ralpharr2001.
Thanks: Eric, Klipkopwildlife, Quorneng, THE BLACKBIRD, old fart, crash happy
Please Log in or Create an account to join the conversation.
- paul d
-
- Offline
- Forum Veteran
-
Less
More
- Posts: 2074
- Thank you received: 2292
26 Dec 2020 21:38 #4
by paul d
balsa is best.
Replied by paul d on topic Tony Nijhuis Concorde build
Coming along nicely Ralph, I've heard that dodge about ironing sheeting on, must give it a go.
Road n track pads won't help.with fade, just give more "feel" ( I like EBC green stuff pads) sounds like your due a fluid change tbh, brake fluid is hydroscopic.
Road n track pads won't help.with fade, just give more "feel" ( I like EBC green stuff pads) sounds like your due a fluid change tbh, brake fluid is hydroscopic.
balsa is best.
Thanks: THE BLACKBIRD, Ralpharr2001
Please Log in or Create an account to join the conversation.
- Ralpharr2001
-
Topic Author
- Offline
- Elite Member
-
Less
More
- Posts: 524
- Thank you received: 1476
26 Dec 2020 22:47 #5
by Ralpharr2001
I'm currently unsupervised. I know it freaks me out as well, but the possibilities are endless!!
Replied by Ralpharr2001 on topic Tony Nijhuis Concorde build
I've fitted EBC Red. Seems to have improved it. Yes, I do need a fluid change. The car is in for a service next month so will have it done then.
I'm currently unsupervised. I know it freaks me out as well, but the possibilities are endless!!
Thanks: Klipkopwildlife
Please Log in or Create an account to join the conversation.
- Klipkopwildlife
-

- Offline
- Administrator
-

- I'm supposed to be retired!
27 Dec 2020 08:00 #6
by Klipkopwildlife
Do it now, you may never get another chance
Replied by Klipkopwildlife on topic Tony Nijhuis Concorde build
So it's Aliphatic glue that your using with the 'iron on' process Ralph?
Do it now, you may never get another chance
Please Log in or Create an account to join the conversation.
- crash happy
-

- Offline
- Platinum Member
-

- Oops. did I say that out loud!
Less
More
- Posts: 1250
- Thank you received: 1203
27 Dec 2020 08:43 #7
by crash happy
Replied by crash happy on topic Tony Nijhuis Concorde build
As with all your builds that looks very nice Ralph. What is the estimated all up weight & how much thrust do the EDF's produce ?
Thanks: Ralpharr2001
Please Log in or Create an account to join the conversation.
- Klipkopwildlife
-
- Offline
- Administrator
-
- I'm supposed to be retired!
27 Dec 2020 10:00 #8
by Klipkopwildlife
Do it now, you may never get another chance
Replied by Klipkopwildlife on topic Tony Nijhuis Concorde build
Off topic, but, in a previous life I had a 1964 E type FHC, the last 3.8 before they ruined to concept for the American market. I did the Blackpool sprint, the braking area after the finish line was very short before you got to the holding point which was a raised, planked area, every run I went sailing through the holding point coming to a halt just short of the railings on the other side! Moisture in the rear brake fluid!
Do it now, you may never get another chance
Thanks: Eric, paul d
Please Log in or Create an account to join the conversation.
- Ralpharr2001
-
Topic Author
- Offline
- Elite Member
-
Less
More
- Posts: 524
- Thank you received: 1476
27 Dec 2020 16:50 - 27 Dec 2020 16:56 #9
by Ralpharr2001
I'm currently unsupervised. I know it freaks me out as well, but the possibilities are endless!!
Replied by Ralpharr2001 on topic Tony Nijhuis Concorde build
Hi Klippy. The brakes were bled this time last year but it is due a complete fluid change. I know that sinking feeling when you hit the brakes and not a lot happens. Spent many years rallying and learnt the Scandinavian flick very quickly to get the cars to slow down. Not so easy in my current 4 wheel drive car on tarmac!
Anyway, on with the build. Crash, it will weight around 5lbs, Tony Nijhuis recons 4.85lbs (2.2kg). The FMS fans on 4S give about 700g thrust, so just over 1:1 power to thrust.
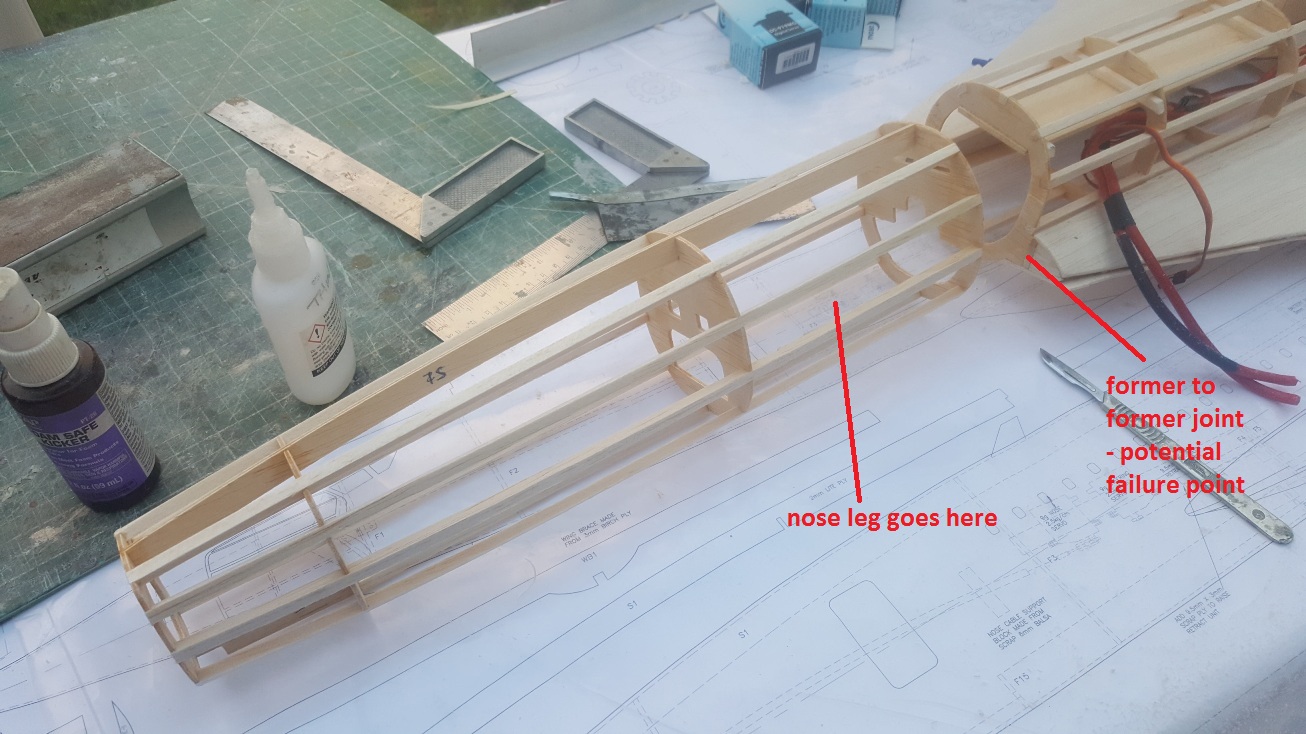
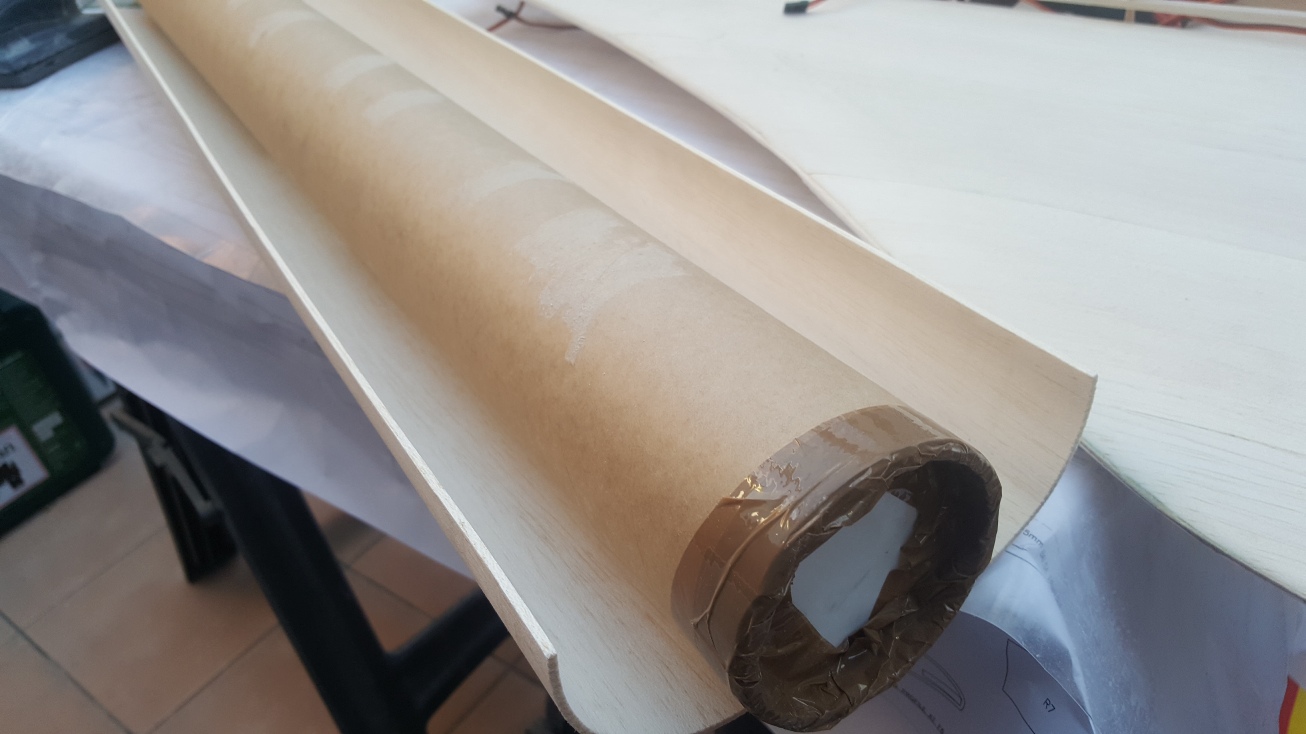
Today was sheeting the underside of the wings and fuselage. I preformed the fuselage sheet over a plans tube I had that was a close diameter to the fuselage. Just apply water to one side, clamp around the tube and bake until dry! On the plans Tony shows the fuse sheeting goes from the front of the wing to the rear. I am worried that the nose section join at this point is a potential stress point as none of the longerons run through into the nose. The nose worries me as that carries the front nose leg. So I decided to run the sheeting just (about 50mm) forward and aft of the front and rear formers to spread the load into the sheeting.


Cut and trimmed the vacuum forms for the nose.

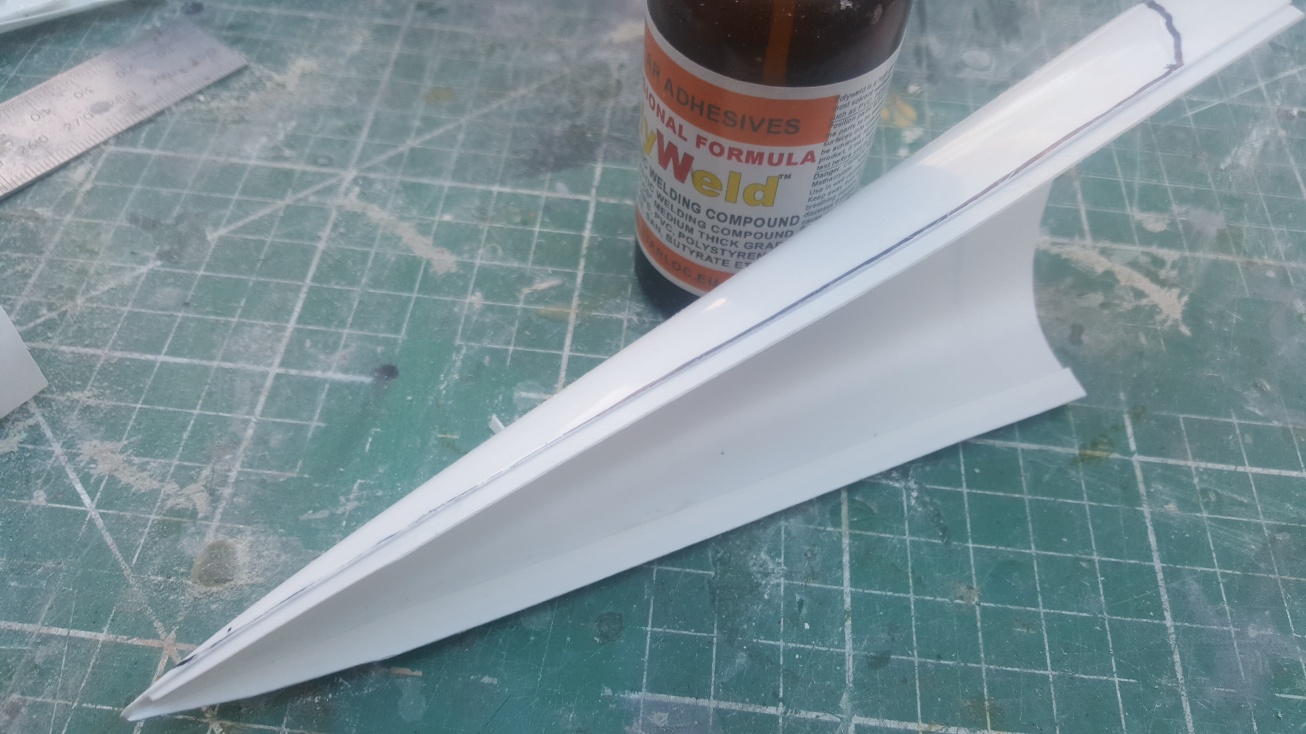
Added a plastic strip to join the two halves together. This gives a supported joint and is easy to fill.
Anyway, on with the build. Crash, it will weight around 5lbs, Tony Nijhuis recons 4.85lbs (2.2kg). The FMS fans on 4S give about 700g thrust, so just over 1:1 power to thrust.
Today was sheeting the underside of the wings and fuselage. I preformed the fuselage sheet over a plans tube I had that was a close diameter to the fuselage. Just apply water to one side, clamp around the tube and bake until dry! On the plans Tony shows the fuse sheeting goes from the front of the wing to the rear. I am worried that the nose section join at this point is a potential stress point as none of the longerons run through into the nose. The nose worries me as that carries the front nose leg. So I decided to run the sheeting just (about 50mm) forward and aft of the front and rear formers to spread the load into the sheeting.
Cut and trimmed the vacuum forms for the nose.
Added a plastic strip to join the two halves together. This gives a supported joint and is easy to fill.
I'm currently unsupervised. I know it freaks me out as well, but the possibilities are endless!!
Attachments:
Last edit: 27 Dec 2020 16:56 by Ralpharr2001.
Thanks: Eric, Klipkopwildlife, Quorneng, old fart, paul d, crash happy
Please Log in or Create an account to join the conversation.
- Ralpharr2001
-
Topic Author
- Offline
- Elite Member
-
Less
More
- Posts: 524
- Thank you received: 1476
28 Dec 2020 18:58 - 28 Dec 2020 19:01 #10
by Ralpharr2001
I'm currently unsupervised. I know it freaks me out as well, but the possibilities are endless!!
Replied by Ralpharr2001 on topic Tony Nijhuis Concorde build
Evening. Completed the sheeting and did a little sanding, again!

Played around with the nose vac forms. Got the cockpit one on by installing a dummy former to support it. Installed the snake to lower and lift the nose. The main nose cone needed some fettling. It wasn't the right profile to go over the cockpit section, need adjusting to make it more oval in cross section. So applied a little heat to manipulate it and wham it distorted!! Must have been the built up stresses from the vac forming process. Well thats my excuse. So spent over an hour trying to get it straightened out with less heat and lots of forming with bits of wood to force it intro shape. Its ok but I think i'll buy another one. First I'll take another look at it it the morning and see before I do order a new one.
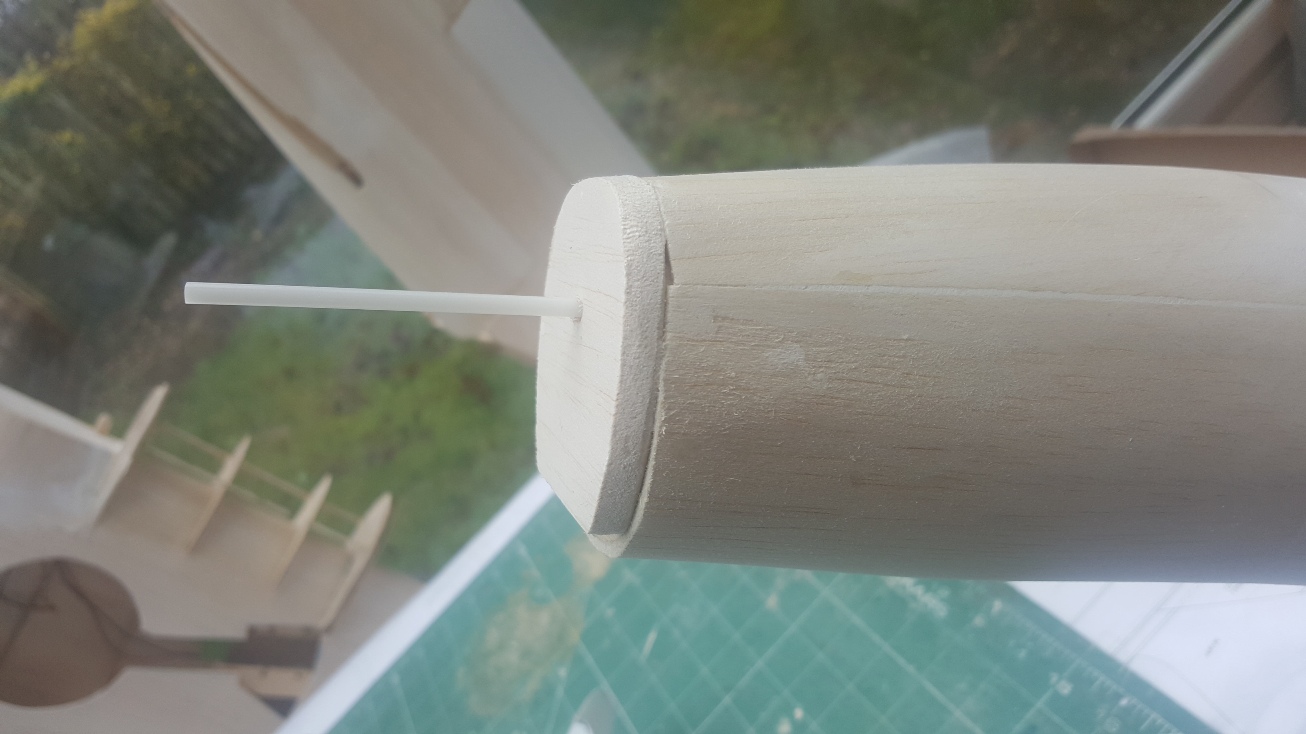

Made the control surfaces and epoxied them onto the torque rod that goes over the engine nacelle. Used a piece of ally angle to to get the alignment.

I'm still waiting for my EDF units to arrive. So that will limit me installing the nacelles. Anyway I can still build and cover them then glue them on later. Getting close to the covering stage. I'm going to cover it in white solarfilm or oracover, whatever I have in the drawer.
Played around with the nose vac forms. Got the cockpit one on by installing a dummy former to support it. Installed the snake to lower and lift the nose. The main nose cone needed some fettling. It wasn't the right profile to go over the cockpit section, need adjusting to make it more oval in cross section. So applied a little heat to manipulate it and wham it distorted!!
Must have been the built up stresses from the vac forming process. Well thats my excuse. So spent over an hour trying to get it straightened out with less heat and lots of forming with bits of wood to force it intro shape. Its ok but I think i'll buy another one. First I'll take another look at it it the morning and see before I do order a new one.
Made the control surfaces and epoxied them onto the torque rod that goes over the engine nacelle. Used a piece of ally angle to to get the alignment.
I'm still waiting for my EDF units to arrive. So that will limit me installing the nacelles. Anyway I can still build and cover them then glue them on later. Getting close to the covering stage. I'm going to cover it in white solarfilm or oracover, whatever I have in the drawer.
I'm currently unsupervised. I know it freaks me out as well, but the possibilities are endless!!
Attachments:
Last edit: 28 Dec 2020 19:01 by Ralpharr2001.
Thanks: Eric, Klipkopwildlife, Flytilbroke, Quorneng, THE BLACKBIRD, old fart, crash happy
Please Log in or Create an account to join the conversation.
- Quorneng
-

- Offline
- Forum Master
-

Less
More
- Posts: 10058
- Thank you received: 19043
28 Dec 2020 20:05 #11
by Quorneng
Replied by Quorneng on topic Tony Nijhuis Concorde build
Impressive!
Quite correct Ralph
Vac forming leaves considerable stresses in the plastic. Only with a moulding process where all the material remains fully plastic until the final shape is obtained will the residual stresses be eliminated or at least very substantially reduced.
Wow a drooping nose!
Of course to be true scale the 'drooping' is a two stage process. The canopy shield first, then the nose.
Quite correct Ralph
Vac forming leaves considerable stresses in the plastic. Only with a moulding process where all the material remains fully plastic until the final shape is obtained will the residual stresses be eliminated or at least very substantially reduced.
Wow a drooping nose!
Of course to be true scale the 'drooping' is a two stage process. The canopy shield first, then the nose.
Thanks: Klipkopwildlife, Ralpharr2001
Please Log in or Create an account to join the conversation.
- paul d
-
- Offline
- Forum Veteran
-
Less
More
- Posts: 2074
- Thank you received: 2292
28 Dec 2020 20:14 #12
by paul d
balsa is best.
Replied by paul d on topic Tony Nijhuis Concorde build
I like that a lot Ralph! looking great.
balsa is best.
Thanks: Klipkopwildlife, Ralpharr2001
Please Log in or Create an account to join the conversation.
- Ralpharr2001
-
Topic Author
- Offline
- Elite Member
-
Less
More
- Posts: 524
- Thank you received: 1476
29 Dec 2020 15:41 #13
by Ralpharr2001
I'm currently unsupervised. I know it freaks me out as well, but the possibilities are endless!!
Replied by Ralpharr2001 on topic Tony Nijhuis Concorde build
Good progress again today. Cut the battery hatch. Tony's design only calls for one hatch but as the receiver is just behind the battery I decided to cut a second one for convenience.
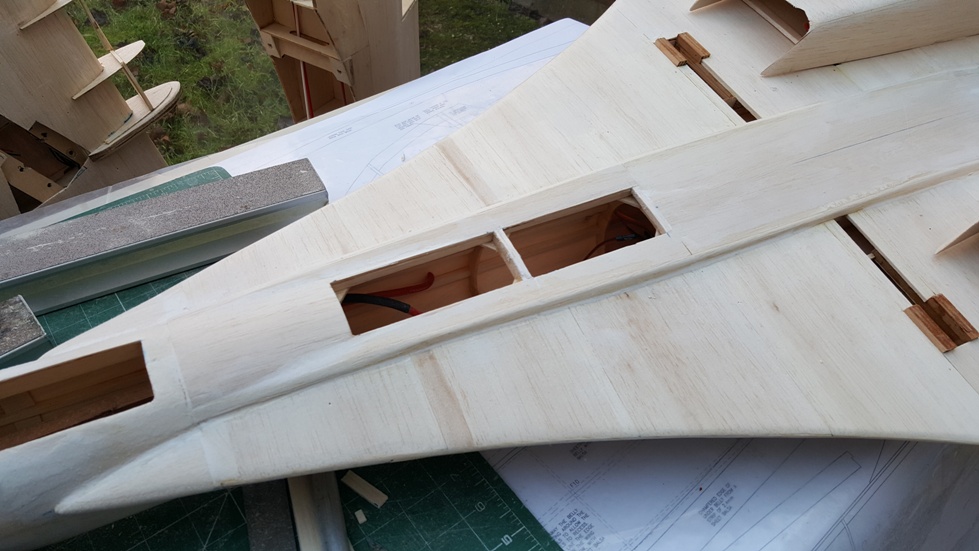
Needed some servo covers and was about to design some on Fusion but thought I would check on Thingiverse. I found these, www.thingiverse.com/thing:2901556 and printed a pair. Really nice design and the designer included the drawings in his files so you can see the size of the covers. He does two sizes. That saved a lot of time.

Decided to make a start to the engine nacelles. Quite simple construction. Tony used his normal method for rounded corners, he uses large triangle section into each corner then sand away most of it. I don't have the EDF units yet, they are on a slow boat from China for the third time. First time they never arrived after 6 weeks so got a refund. Then they shipped again and they were returned to the supplier from Chinese customs for a security issue. So third time they have been shipped and are hopefully on their way. So without the EDF's I have built the nacelles off the plane straight off the plan. Using the Dremel (what would we do without one of these??) I managed to get a nice internal radius to the triangle section. Overall quite pleased.

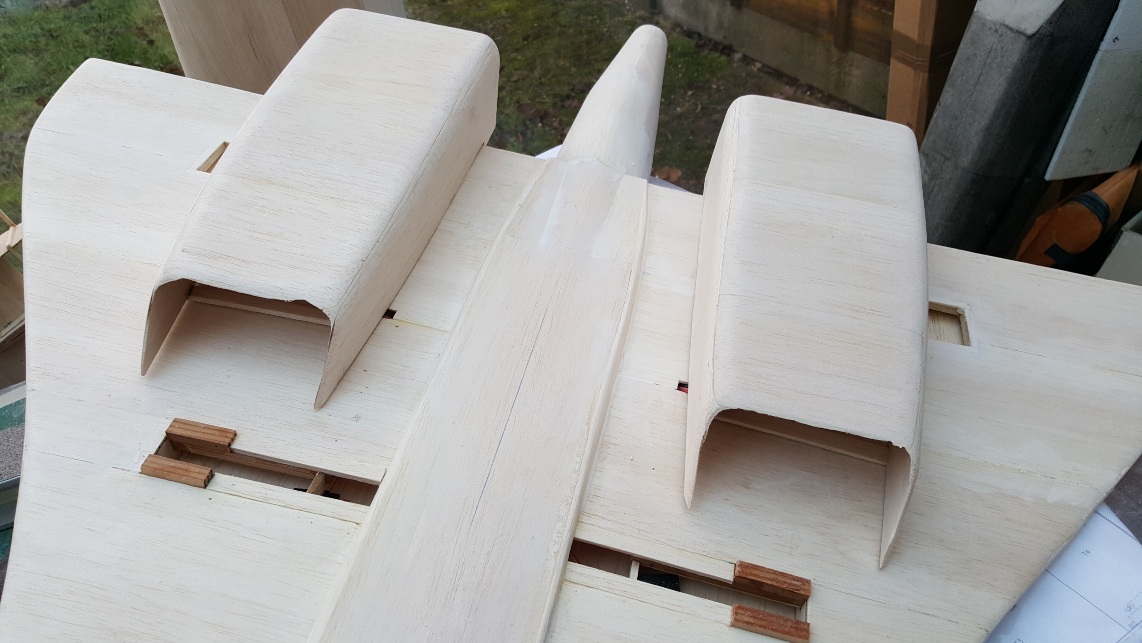
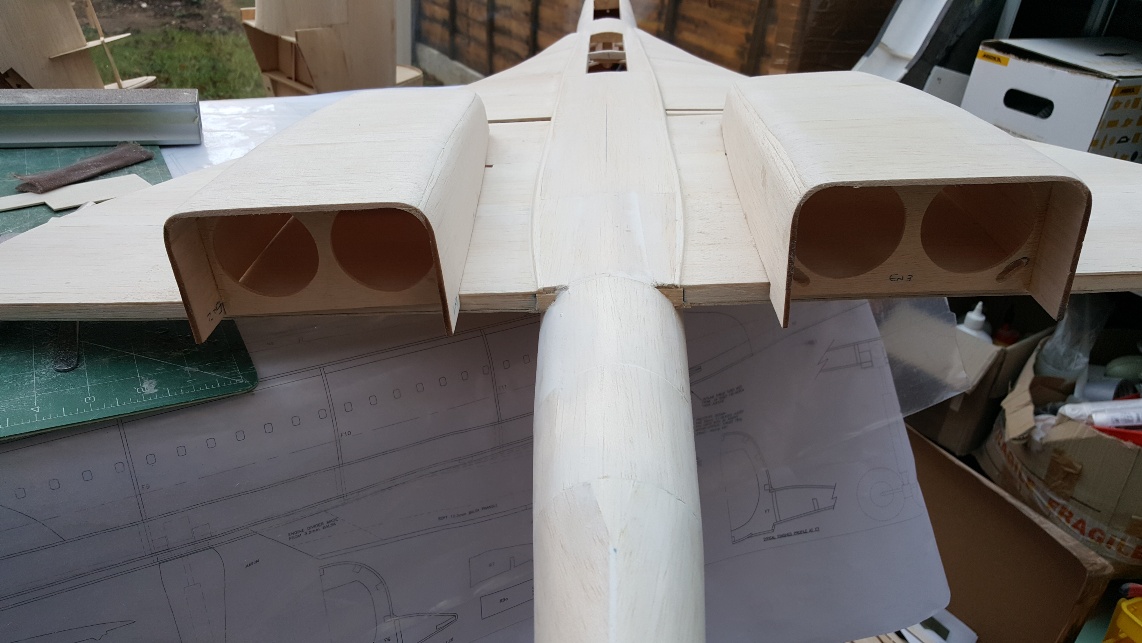
Needed some servo covers and was about to design some on Fusion but thought I would check on Thingiverse. I found these, www.thingiverse.com/thing:2901556 and printed a pair. Really nice design and the designer included the drawings in his files so you can see the size of the covers. He does two sizes. That saved a lot of time.
Decided to make a start to the engine nacelles. Quite simple construction. Tony used his normal method for rounded corners, he uses large triangle section into each corner then sand away most of it. I don't have the EDF units yet, they are on a slow boat from China for the third time. First time they never arrived after 6 weeks so got a refund. Then they shipped again and they were returned to the supplier from Chinese customs for a security issue. So third time they have been shipped and are hopefully on their way. So without the EDF's I have built the nacelles off the plane straight off the plan. Using the Dremel (what would we do without one of these??) I managed to get a nice internal radius to the triangle section. Overall quite pleased.
I'm currently unsupervised. I know it freaks me out as well, but the possibilities are endless!!
Attachments:
Thanks: Klipkopwildlife, old fart, crash happy
Please Log in or Create an account to join the conversation.
- supertigrefan
-

- Offline
- Elite Member
-
Less
More
- Posts: 470
- Thank you received: 513
29 Dec 2020 16:54 #14
by supertigrefan
Stay low, Move fast, Trust no-one....
Replied by supertigrefan on topic Tony Nijhuis Concorde build
Interested in how you got such a nice, even internal radius on the nacelles Ralph?
Stay low, Move fast, Trust no-one....
Thanks: Klipkopwildlife
Please Log in or Create an account to join the conversation.
- Ralpharr2001
-
Topic Author
- Offline
- Elite Member
-
Less
More
- Posts: 524
- Thank you received: 1476
29 Dec 2020 20:55 #15
by Ralpharr2001
I'm currently unsupervised. I know it freaks me out as well, but the possibilities are endless!!
Replied by Ralpharr2001 on topic Tony Nijhuis Concorde build
Hi ST, easy, skill, patience and years of practice!! 
Actually none of the above! I used a dremel with a flexi shaft and 12mm drum sander. I marked a centre line on the triangle section, created a trough with the drum sander following the line then flared the edges of the trough out. Final finish was by hand using Mirka sanding pads. The Mirka sanding pads are one of the best tools that has been recommended to me. I dont use sandpaper anymore just Mirka pads. They last ages and with the vacuum attachment reduce sawdust to manageable levels. I got mine from Axminster Tools.
www.axminstertools.com/mirka-dust-free-s...branet-sheets-101148
Expensive to start with but like any professional tool worth its weight. I bought this kit about 5 years ago and only used about a dozen abrasive pads and I build a lot. Either they dont wear out or i'm tighter than the proverbial ducks bum under water, or both!!

Actually none of the above!
I used a dremel with a flexi shaft and 12mm drum sander. I marked a centre line on the triangle section, created a trough with the drum sander following the line then flared the edges of the trough out. Final finish was by hand using Mirka sanding pads. The Mirka sanding pads are one of the best tools that has been recommended to me. I dont use sandpaper anymore just Mirka pads. They last ages and with the vacuum attachment reduce sawdust to manageable levels. I got mine from Axminster Tools.www.axminstertools.com/mirka-dust-free-s...branet-sheets-101148
Expensive to start with but like any professional tool worth its weight. I bought this kit about 5 years ago and only used about a dozen abrasive pads and I build a lot. Either they dont wear out or i'm tighter than the proverbial ducks bum under water, or both!!
I'm currently unsupervised. I know it freaks me out as well, but the possibilities are endless!!
Thanks: Klipkopwildlife, Flytilbroke, crash happy, supertigrefan
Please Log in or Create an account to join the conversation.
Time to create page: 0.312 seconds