
- Posts: 10058
- Thank you received: 19043
×
Flying models without a radio
Peanut Scale Westland Woodpigeon
- Ex-Member
- Topic Author
- Visitor
-

24 Jul 2014 15:01 #1
by Ex-Member
Peanut Scale Westland Woodpigeon was created by Ex-Member
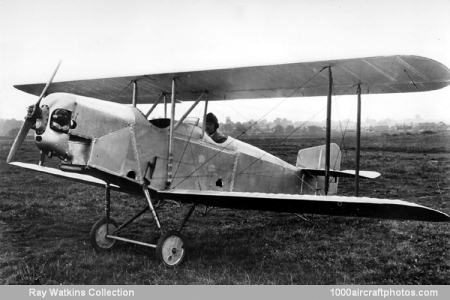
So, I need a competitive Peanut model (13" span with a static element and duration element in the competition) and I also need a model to use for some artwork I've decided to create, hence the Woodpigeon. I hesitate to call it another of my 'unfinished' models, but we shall see what transpires.........
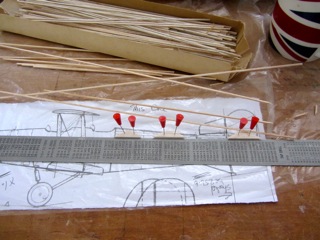
The first thing I need is a test model to see what I need to do to make the design perform, so I'm building the prototype off the three-view. Starting with the fuselage sides in 1/16" sq balsa, I make up a jig from twice size support pieces (1/8" balsa) lined up with a straight edge:
Next, I build one fuselage side, cutting duplicate parts for the second side as I go along:

Side one is now built; I'll leave it to dry for a couple of hours before building side 2 directly on top:

The first thing I need is a test model to see what I need to do to make the design perform, so I'm building the prototype off the three-view. Starting with the fuselage sides in 1/16" sq balsa, I make up a jig from twice size support pieces (1/8" balsa) lined up with a straight edge:
Next, I build one fuselage side, cutting duplicate parts for the second side as I go along:
Side one is now built; I'll leave it to dry for a couple of hours before building side 2 directly on top:
Please Log in or Create an account to join the conversation.
- Quorneng
-

- Offline
- Forum Master
-

Less
More
24 Jul 2014 18:14 #2
by Quorneng
Replied by Quorneng on topic Peanut Scale Westland Woodpigeon
I think the original was as ugly as sin but it does have long nose. Good for rubber power. 
Thanks: Ex-Member
Please Log in or Create an account to join the conversation.
- Ex-Member
- Topic Author
- Visitor
-
24 Jul 2014 19:00 #3
by Ex-Member
He He...but it aint as ugly as a Lacey.........
Seriously, the long nose is useful, but it also has a wide and deep fuselage to contain a fair cross-section of rubber, a long tail moment and some dihedral on the lower wing. The only thing it doesn't have is a complex colour scheme, but I'll live with that provided I can get it to fly for over a minute indoors. The other issue may be the full span flaps which will require extra wood to model, which could effect lateral stability. But again, I'll know the answer to that when she's flown.
Replied by Ex-Member on topic Peanut Scale Westland Woodpigeon
Quorneng wrote: I think the original was as ugly as sin but it does have long nose. Good for rubber power.
He He...but it aint as ugly as a Lacey.........
Seriously, the long nose is useful, but it also has a wide and deep fuselage to contain a fair cross-section of rubber, a long tail moment and some dihedral on the lower wing. The only thing it doesn't have is a complex colour scheme, but I'll live with that provided I can get it to fly for over a minute indoors. The other issue may be the full span flaps which will require extra wood to model, which could effect lateral stability. But again, I'll know the answer to that when she's flown.
Please Log in or Create an account to join the conversation.
- Ex-Member
- Topic Author
- Visitor
-
30 Jul 2014 21:01 #4
by Ex-Member
Replied by Ex-Member on topic Peanut Scale Westland Woodpigeon
Finally got around to doing a bit on the Woodpigeon today.
Side 2 was built on side one and when dry, the pair were lifted off the board:

Several strengthening pieces were then added to one side - identical parts for side two can be seen on the board and will be fitted when the parts on side one have dried. The horizontal re-inforcement is for the lower wing mount and the three upright pieces are for three possible motor rear peg holders. I want to find out for sure, hw the length between the pegs affects duration....it is a test model after all.

Side 2 was built on side one and when dry, the pair were lifted off the board:
Several strengthening pieces were then added to one side - identical parts for side two can be seen on the board and will be fitted when the parts on side one have dried. The horizontal re-inforcement is for the lower wing mount and the three upright pieces are for three possible motor rear peg holders. I want to find out for sure, hw the length between the pegs affects duration....it is a test model after all.
Please Log in or Create an account to join the conversation.
- Ex-Member
- Topic Author
- Visitor
-
03 Aug 2014 19:17 #5
by Ex-Member
Replied by Ex-Member on topic Peanut Scale Westland Woodpigeon
I decided to neglect the lawn/garden/unit/garage etc and treat myself to a trip to the model room this afternoon.
The fuselage continues but is not worth photographing yet. The other side reinforcing pieces have been added and it will be sanded, drilled and then split when fully dry.
The next job was amuse myself with the wing and empennage tips. All have been laminated from soft 1/16" x 1/32" balsa, that had been first soaked in water, glued with watered down PVA (about the consistency of single cream) and taped to a 1/16" balsa form.
Pic 1 shows the balsa patterns, cut 1/16" smaller all round than the required finished shape and marked with the limiting point where the shaped tip will be cut.

Pic 2 is the 16 strips of balsa cut from soft 1/32" sheet. I needed at least 14 strips, so two spare were cut in case of breakage. For info, the complete set of strips weighed 0.66 gm. Note the substantial straight edge and sharp blade in the balsa knife - both are essential for such work.

The last pic shows a few of the completed tips. Note that the forms have been wrapped on the edge with Sellotape to stop the tips from sticking to the form and the laminations have been fixed with 'elastoplasts, made by fixing a strip of tissue to 50mm masking tape and cutting slices off the end - the master 'elastoplast is on the low left and some cut 'elastoplasts' are low right. Note also that all of the tips have been made oversize and will be cut to length when ready for use.

The fuselage continues but is not worth photographing yet. The other side reinforcing pieces have been added and it will be sanded, drilled and then split when fully dry.
The next job was amuse myself with the wing and empennage tips. All have been laminated from soft 1/16" x 1/32" balsa, that had been first soaked in water, glued with watered down PVA (about the consistency of single cream) and taped to a 1/16" balsa form.
Pic 1 shows the balsa patterns, cut 1/16" smaller all round than the required finished shape and marked with the limiting point where the shaped tip will be cut.
Pic 2 is the 16 strips of balsa cut from soft 1/32" sheet. I needed at least 14 strips, so two spare were cut in case of breakage. For info, the complete set of strips weighed 0.66 gm. Note the substantial straight edge and sharp blade in the balsa knife - both are essential for such work.
The last pic shows a few of the completed tips. Note that the forms have been wrapped on the edge with Sellotape to stop the tips from sticking to the form and the laminations have been fixed with 'elastoplasts, made by fixing a strip of tissue to 50mm masking tape and cutting slices off the end - the master 'elastoplast is on the low left and some cut 'elastoplasts' are low right. Note also that all of the tips have been made oversize and will be cut to length when ready for use.
Please Log in or Create an account to join the conversation.
- Ex-Member
- Visitor
-
03 Aug 2014 19:27 #6
by Ex-Member
Replied by Ex-Member on topic Peanut Scale Westland Woodpigeon
very nice but very fiddly work sir.
i think i would need more than two spare strips if i were to try it.
i think i would need more than two spare strips if i were to try it.
Please Log in or Create an account to join the conversation.
- Ex-Member
- Topic Author
- Visitor
-
03 Aug 2014 19:35 #7
by Ex-Member
Thanks Tony....in the end, I finished with one and a half strips spare....but only because I broke two on the fin and had enough left to complete the job without using the spares. Can't remember where the single one broke......

Replied by Ex-Member on topic Peanut Scale Westland Woodpigeon
Tony B wrote: very nice but very fiddly work sir.
i think i would need more than two spare strips if i were to try it.
Thanks Tony....in the end, I finished with one and a half strips spare....but only because I broke two on the fin and had enough left to complete the job without using the spares. Can't remember where the single one broke......
Please Log in or Create an account to join the conversation.
- alan cantwell
-

- Offline
- Inactivated User
-

Less
More
- Posts: 2290
- Thank you received: 1918
03 Aug 2014 19:38 #8
by alan cantwell
i have 2 sides
no you dont,
yes i do,
Replied by alan cantwell on topic Peanut Scale Westland Woodpigeon
Strewth 
i have 2 sides
no you dont,
yes i do,
Please Log in or Create an account to join the conversation.
- Ex-Member
- Visitor
-
03 Aug 2014 20:19 #9
by Ex-Member
Replied by Ex-Member on topic Peanut Scale Westland Woodpigeon
thats what i thought Alan. 
Please Log in or Create an account to join the conversation.
- Flytilbroke
-

- Offline
- Platinum Member
-

- Not Tired, long retired "Bob"
Less
More
- Posts: 1981
- Thank you received: 1978
03 Aug 2014 22:08 #10
by Flytilbroke
Have a nice Day, unless I don't like you.
Replied by Flytilbroke on topic Peanut Scale Westland Woodpigeon
Doo-in well Andy
Have a nice Day, unless I don't like you.
Thanks: Ex-Member
Please Log in or Create an account to join the conversation.
- Ex-Member
- Topic Author
- Visitor
-
04 Aug 2014 17:44 - 04 Aug 2014 17:45 #11
by Ex-Member
Replied by Ex-Member on topic Peanut Scale Westland Woodpigeon
Had a bit of spare time this afternoon, sooooooooo.........
Removed some of the laminated outlines from the forms by cutting the 'elastoplasts' through at the tissue bit and folding them back, then carefully twisting the lams off the form. I started with the empennage and lightly sanded the edges to ensure they were square - they'll be sanded to semi-circular section when the surfaces have been built.
Fuselage sides have also been sanded and the motor peg holes drilled. The sides are ready for splitting prior to further fuselage assembly.

Removed some of the laminated outlines from the forms by cutting the 'elastoplasts' through at the tissue bit and folding them back, then carefully twisting the lams off the form. I started with the empennage and lightly sanded the edges to ensure they were square - they'll be sanded to semi-circular section when the surfaces have been built.
Fuselage sides have also been sanded and the motor peg holes drilled. The sides are ready for splitting prior to further fuselage assembly.
Last edit: 04 Aug 2014 17:45 by Ex-Member.
Please Log in or Create an account to join the conversation.
- Ex-Member
- Topic Author
- Visitor
-
04 Aug 2014 20:43 #12
by Ex-Member
Replied by Ex-Member on topic Peanut Scale Westland Woodpigeon
Five minutes here and five minutes there........the result: believe it or not, but there's the outline of a fin and rudder somewhere under those pins.....

Please Log in or Create an account to join the conversation.
- Ex-Member
- Visitor
-
04 Aug 2014 20:48 #13
by Ex-Member
Replied by Ex-Member on topic Peanut Scale Westland Woodpigeon
where
oh hang on i think i can see it.
oh hang on i think i can see it.
Please Log in or Create an account to join the conversation.
- THE BLACKBIRD
-

- Offline
- Forum Master
-
Less
More
- Posts: 6781
- Thank you received: 10722
04 Aug 2014 20:51 #14
by THE BLACKBIRD
Replied by THE BLACKBIRD on topic Peanut Scale Westland Woodpigeon
Incredable Andy, hats off to you sir
Think ill stick to the biguns as my dumb fingers and eyes could not cope with those tiny bits
Think ill stick to the biguns as my dumb fingers and eyes could not cope with those tiny bits
Thanks: Ex-Member
Please Log in or Create an account to join the conversation.
- Quorneng
-
- Offline
- Forum Master
-
Less
More
- Posts: 10058
- Thank you received: 19043
05 Aug 2014 01:18 #15
by Quorneng
Replied by Quorneng on topic Peanut Scale Westland Woodpigeon
Excellent.
What a lot of work for something so small!
Now if it were done in 2mm Depron it could just be simply cut out of the sheet and it would be completely water proof too.
What a lot of work for something so small!
Now if it were done in 2mm Depron it could just be simply cut out of the sheet and it would be completely water proof too.
Thanks: THE BLACKBIRD
Please Log in or Create an account to join the conversation.
Time to create page: 0.277 seconds