
- Posts: 10058
- Thank you received: 19043
×
Flying models without a radio
Pistachio Lacey M-10
- Ex-Member
- Topic Author
- Visitor
-

08 Oct 2016 07:54 - 08 Oct 2016 08:01 #1
by Ex-Member
Pistachio Lacey M-10 was created by Ex-Member
Yes, it's yet another new one...but this time, with a difference! I'm trying to publicise the Pistachio Class ahead of next year's BMFA Scale Indoor Nationals and AeroModeller have kindly agreed to publish an update to the series of articles I wrote on the subject back in 1993. They'll be illustrated with a Model of the Lacey M-10 and a pack of suitable bits and pieces will be available through SAMS Models.
I've decided to start a thread on it to link in with the article when published, but you'll need to buy the magazine as well to get the full details!
Pistachio models are rubber powered scale models that are judged statically for workmanship and complexity and fly for duration. They must be based on a full-size man-carrying aircraft that has flown and are limited to 8 inches (203.2 mm) span or 6 inches (152.4 mm) length.
So, how far have I got?
I've sketched a plan - this will develop as the model progresses:

Cut a template for the wing ribs:

Cut a set of ribs, with a few spares:

and laid down the basics of the wing:

I've decided to start a thread on it to link in with the article when published, but you'll need to buy the magazine as well to get the full details!
Pistachio models are rubber powered scale models that are judged statically for workmanship and complexity and fly for duration. They must be based on a full-size man-carrying aircraft that has flown and are limited to 8 inches (203.2 mm) span or 6 inches (152.4 mm) length.
So, how far have I got?
I've sketched a plan - this will develop as the model progresses:
Cut a template for the wing ribs:
Cut a set of ribs, with a few spares:
and laid down the basics of the wing:
Last edit: 08 Oct 2016 08:01 by Ex-Member.
Please Log in or Create an account to join the conversation.
- Quorneng
-

- Offline
- Forum Master
-

Less
More
08 Oct 2016 10:33 - 08 Oct 2016 10:39 #2
by Quorneng
Replied by Quorneng on topic Pistachio Lacey M-10
Andy
Are the dimensions (8" and 6") the only limits?
Or put another way will the competition be using these rules?
Are the dimensions (8" and 6") the only limits?
Or put another way will the competition be using these rules?
Last edit: 08 Oct 2016 10:39 by Quorneng.
Please Log in or Create an account to join the conversation.
- Ex-Member
- Topic Author
- Visitor
-
08 Oct 2016 12:24 #3
by Ex-Member
Replied by Ex-Member on topic Pistachio Lacey M-10
The BMFA Scale Indoor Nationals competition will be run to the current BMFA rules which are in the BMFA Scale Rule Book, which can be downloaded here:
bmfa.org/DesktopModules/Bring2mind/DMX/D...PortalId=0&TabId=219
The current rules are similar to your link, but there have been one or two minor changes since their publication. The short answer, however, is yes, the only model limitations are wing span or length. Either limit can be chosen depending on the prototype modelled.
For info, next years BMFA Scale Indoor Free Flight Nationals, the competition I'm referring to above, will be held on Sunday 23rd April 2017 at Wolverhampton University Sports Centre, Walsall, Birmingham.
It would be nice to see you there as a spectator, Q!
bmfa.org/DesktopModules/Bring2mind/DMX/D...PortalId=0&TabId=219
The current rules are similar to your link, but there have been one or two minor changes since their publication. The short answer, however, is yes, the only model limitations are wing span or length. Either limit can be chosen depending on the prototype modelled.
For info, next years BMFA Scale Indoor Free Flight Nationals, the competition I'm referring to above, will be held on Sunday 23rd April 2017 at Wolverhampton University Sports Centre, Walsall, Birmingham.
It would be nice to see you there as a spectator, Q!
Please Log in or Create an account to join the conversation.
- Ex-Member
- Topic Author
- Visitor
-
09 Oct 2016 17:10 #4
by Ex-Member
Replied by Ex-Member on topic Pistachio Lacey M-10
There has been slight progress over the last day or so. The wing has been lifted off the board:

...and tidied:

One fuselage side has been laid down - parts for side 2 have been cut at the same time to exactly match side 1 and temporarily stored over the alternate fuselage side drawing on the plan:

and tailplane construction has commenced with the LE:

...and tidied:
One fuselage side has been laid down - parts for side 2 have been cut at the same time to exactly match side 1 and temporarily stored over the alternate fuselage side drawing on the plan:
and tailplane construction has commenced with the LE:
Please Log in or Create an account to join the conversation.
- Ex-Member
- Topic Author
- Visitor
-
12 Oct 2016 15:58 #5
by Ex-Member
Replied by Ex-Member on topic Pistachio Lacey M-10
The build progresses, albeit slowly.
The basic empennage construction is now complete, but still on the building board.
Supports for the fin outline in place:

...and the fin, as built:

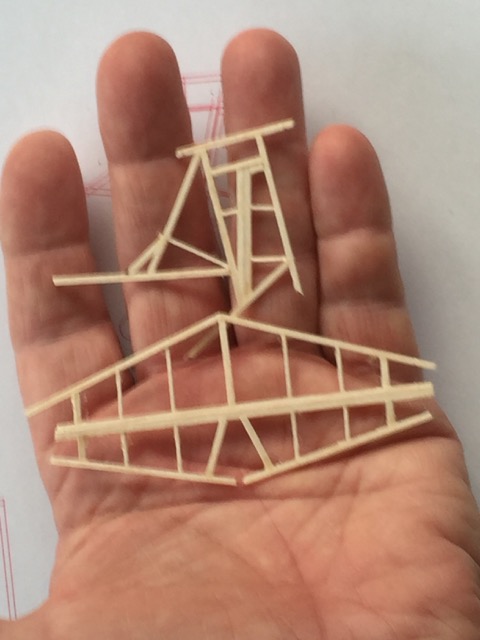
Fin with builders hand for scale...note use of tweezers to ease the parts in place:

Ditto for the tailplane:

....and the second fuselage side has been built over the first:

The basic empennage construction is now complete, but still on the building board.
Supports for the fin outline in place:
...and the fin, as built:
Fin with builders hand for scale...note use of tweezers to ease the parts in place:
Ditto for the tailplane:
....and the second fuselage side has been built over the first:
Please Log in or Create an account to join the conversation.
- Septic
-
- Offline
- Elite Member
-

Less
More
- Posts: 314
- Thank you received: 690
12 Oct 2016 17:53 #6
by Septic
tap - tap.......rivet
Replied by Septic on topic Pistachio Lacey M-10
I like the way you outline the plan with scrap wood and then build against it, neat trick for making sure the outline doesn't quietly grow when you aren't looking 
tap - tap.......rivet
Thanks: Ex-Member
Please Log in or Create an account to join the conversation.
- Ex-Member
- Topic Author
- Visitor
-
12 Oct 2016 19:38 #7
by Ex-Member
It also negates the need to put a pin through the airframe wood and if the jig wood is chosen at the correct size, the built airframe can be held flat against the plan without crushing by pinning a piece of scrap wood over the top.
Replied by Ex-Member on topic Pistachio Lacey M-10
Septic wrote: I like the way you outline the plan with scrap wood and then build against it, neat trick for making sure the outline doesn't quietly grow when you aren't looking
It also negates the need to put a pin through the airframe wood and if the jig wood is chosen at the correct size, the built airframe can be held flat against the plan without crushing by pinning a piece of scrap wood over the top.
Please Log in or Create an account to join the conversation.
- Septic
-
- Offline
- Elite Member
-
Less
More
- Posts: 314
- Thank you received: 690
12 Oct 2016 19:58 #8
by Septic
Just dont use a whicking glue or everything will become one
tap - tap.......rivet
Replied by Septic on topic Pistachio Lacey M-10
Andy Sephton wrote:
Septic wrote: I like the way you outline the plan with scrap wood and then build against it, neat trick for making sure the outline doesn't quietly grow when you aren't looking
It also negates the need to put a pin through the airframe wood and if the jig wood is chosen at the correct size, the built airframe can be held flat against the plan without crushing by pinning a piece of scrap wood over the top.
Just dont use a whicking glue or everything will become one
tap - tap.......rivet
Please Log in or Create an account to join the conversation.
- Ex-Member
- Topic Author
- Visitor
-
12 Oct 2016 20:06 #9
by Ex-Member
I'm glad you brought that up Septic. Wicking glues are a big no-no on models such as this one. They soak into the wood increasing weight, but more importantly, they harden the wood making a weak point in the structure. The balsa used is very soft and the strength of the model lies partly in it's bendability. If the wood is hardened for part of it's length, it'll eventually break at that point.
I'm using balsa cement diluted 50:50 with thinners. In the limit, and if I need to, the joints can be broken apart using thinners and re-glued when the thinners have dried.
Replied by Ex-Member on topic Pistachio Lacey M-10
Septic wrote:
Just dont use a wicking glue or everything will become one
I'm glad you brought that up Septic. Wicking glues are a big no-no on models such as this one. They soak into the wood increasing weight, but more importantly, they harden the wood making a weak point in the structure. The balsa used is very soft and the strength of the model lies partly in it's bendability. If the wood is hardened for part of it's length, it'll eventually break at that point.
I'm using balsa cement diluted 50:50 with thinners. In the limit, and if I need to, the joints can be broken apart using thinners and re-glued when the thinners have dried.
Please Log in or Create an account to join the conversation.
- Ex-Member
- Topic Author
- Visitor
-
13 Oct 2016 08:28 - 13 Oct 2016 08:29 #10
by Ex-Member
Replied by Ex-Member on topic Pistachio Lacey M-10
The parts built so far came off the board this morning. The extra bits will be tidied with a razor blade, but in the meantime, they make a convenient hand hold....
I decided not to build the scale lateral piece on the LE, so the tailplane has a pointed front end, which should hide within the fuselage:

There's a random extra piece of wood on the fin plan which is not on the full-size or model. There's also a lot of extra balsa on the fin that will have to be tidied, again with a razor blade.


I'll need to make up a windscreen and add a rear motor peg support before separating the fuselage sides, so that will be the next job...
I decided not to build the scale lateral piece on the LE, so the tailplane has a pointed front end, which should hide within the fuselage:
There's a random extra piece of wood on the fin plan which is not on the full-size or model. There's also a lot of extra balsa on the fin that will have to be tidied, again with a razor blade.
I'll need to make up a windscreen and add a rear motor peg support before separating the fuselage sides, so that will be the next job...
Last edit: 13 Oct 2016 08:29 by Ex-Member.
Please Log in or Create an account to join the conversation.
- Quorneng
-
- Offline
- Forum Master
-
Less
More
- Posts: 10058
- Thank you received: 19043
13 Oct 2016 17:48 #11
by Quorneng
Replied by Quorneng on topic Pistachio Lacey M-10
And I was just about to comment on that redundant triangulation in the fin! 
There does seem to be a lot of wood in the fin/rudder.
Is the rudder going to be movable?
There does seem to be a lot of wood in the fin/rudder.
Is the rudder going to be movable?
Please Log in or Create an account to join the conversation.
- Ex-Member
- Topic Author
- Visitor
-
13 Oct 2016 18:10 #12
by Ex-Member
The rudder and elevators will be separate and fixed; static marks are given for separate control surfaces in BMFA Competition.
I agree that there is a lot of 'meat' in the empennage construction, Q. I would normally make such a model out of 1/32" sq, but that takes a certain level of skill and practice. This model is an introduction to Pistachio Scale and for beginners to try their hand in the class. Ergo, I've used wood that can be obtained over the counter at a model shop rather than specialist indoor wood. Hence the empennage (and fuselage for that matter) has been based on 1/16" x 1/16" wood, with selected bits made out of 1/32" x 1/16".
Replied by Ex-Member on topic Pistachio Lacey M-10
Quorneng wrote: And I was just about to comment on that redundant triangulation in the fin!
There does seem to be a lot of wood in the fin/rudder.
Is the rudder going to be movable?
The rudder and elevators will be separate and fixed; static marks are given for separate control surfaces in BMFA Competition.
I agree that there is a lot of 'meat' in the empennage construction, Q. I would normally make such a model out of 1/32" sq, but that takes a certain level of skill and practice. This model is an introduction to Pistachio Scale and for beginners to try their hand in the class. Ergo, I've used wood that can be obtained over the counter at a model shop rather than specialist indoor wood. Hence the empennage (and fuselage for that matter) has been based on 1/16" x 1/16" wood, with selected bits made out of 1/32" x 1/16".
Please Log in or Create an account to join the conversation.
- Ex-Member
- Topic Author
- Visitor
-
16 Oct 2016 12:15 #13
by Ex-Member
Replied by Ex-Member on topic Pistachio Lacey M-10
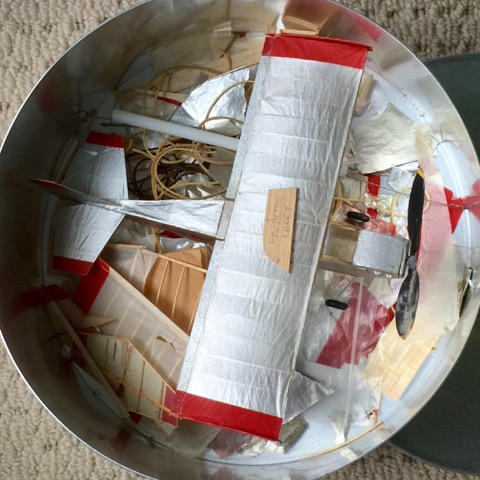
Here's one I made earlier.....about 25 years earlier, in fact. it was built for the first BMFA Pistachio contest and ended up in first place!  About 15 years later, I replaced the tailplane and wing (the originals can be seen low left in the photo) and re-entered the model in that years Nats - it didn't place! Anyway, I raided the box this morning to find the original windscreen shapes in order to laminate a set for the new model. I could only find one, which is sitting on the model in the below photo:
This morning I cut two new canopy shapes...

....covered them in sellotape, pulled two strips of 1/32" x 1/16" balsa around the form, glued them together and pinned them in place. The pins are outside the area I'm interested in, so the holes will not show on the final result.

While the above was drying, two strips of 1/16" balsa were cut to length and cemented behind the cabin to act as a rear-rubber peg support.

About 15 years later, I replaced the tailplane and wing (the originals can be seen low left in the photo) and re-entered the model in that years Nats - it didn't place! Anyway, I raided the box this morning to find the original windscreen shapes in order to laminate a set for the new model. I could only find one, which is sitting on the model in the below photo:
This morning I cut two new canopy shapes...
....covered them in sellotape, pulled two strips of 1/32" x 1/16" balsa around the form, glued them together and pinned them in place. The pins are outside the area I'm interested in, so the holes will not show on the final result.
While the above was drying, two strips of 1/16" balsa were cut to length and cemented behind the cabin to act as a rear-rubber peg support.
Please Log in or Create an account to join the conversation.
- one tenor
-

- Offline
- Forum Veteran
-

- johnpcalex@gmail.com
16 Oct 2016 17:31 - 16 Oct 2016 17:32 #14
by one tenor
Anything will fly given enough power
Replied by one tenor on topic Pistachio Lacey M-10
Just a bit puzzled Andy. That model in pic looks OK . Why not recover it.? Or are you lightening the structure in the new one ? 
Anything will fly given enough power
Last edit: 16 Oct 2016 17:32 by one tenor. Reason: additional script
Please Log in or Create an account to join the conversation.
- Ex-Member
- Topic Author
- Visitor
-
16 Oct 2016 17:35 #15
by Ex-Member
Replied by Ex-Member on topic Pistachio Lacey M-10
You need to read the first post John, this is a new model to illustrate a series on building Pistachio models for AeroModeller.
Please Log in or Create an account to join the conversation.
Time to create page: 0.370 seconds