
- Posts: 667
- Thank you received: 1284
covering with solar film
- a4kskyhawk
-
 Topic Author
- Offline
- Elite Member
-

Less
More
12 Oct 2012 08:51 #1
by a4kskyhawk
covering with solar film was created by a4kskyhawk
i have been asked for this so im going to start this one from the tools to putting on
Thanks: Sarah-Jane Smith
Please Log in or Create an account to join the conversation.
- The Beard
-

- Offline
- Forum Master
-

Less
More
- Posts: 9272
- Thank you received: 2167
12 Oct 2012 14:42 - 12 Oct 2012 14:54 #2
by The Beard
Replied by The Beard on topic Re: covering with solar film
Ive covered 2 models with Solartex using a modelling iron and scissors mainly,bur have seen some people have used pinking shears to cut the covering .Because of the zigzag cut it helps hide the joins.On some vintage models you use the civering to create hinges and some people actually stitch the hinges in to help form them.
Last edit: 12 Oct 2012 14:54 by .
Please Log in or Create an account to join the conversation.
- a4kskyhawk
-
Topic Author
- Offline
- Elite Member
-
Less
More
- Posts: 667
- Thank you received: 1284
20 Oct 2012 05:17 - 20 Oct 2012 13:56 #3
by a4kskyhawk
Replied by a4kskyhawk on topic Re: covering with solar film
for a start you are going to need some tools
1 temp controlled iron they are better to use than a standard iron
2 scissors
3 a sharp knife

1 temp controlled iron they are better to use than a standard iron
2 scissors
3 a sharp knife
Last edit: 20 Oct 2012 13:56 by .
Thanks: Sarah-Jane Smith
Please Log in or Create an account to join the conversation.
- a4kskyhawk
-
Topic Author
- Offline
- Elite Member
-
Less
More
- Posts: 667
- Thank you received: 1284
20 Oct 2012 05:19 #4
by a4kskyhawk
Replied by a4kskyhawk on topic Re: covering with solar film
the next step is to have a hole to repair in the wing or body
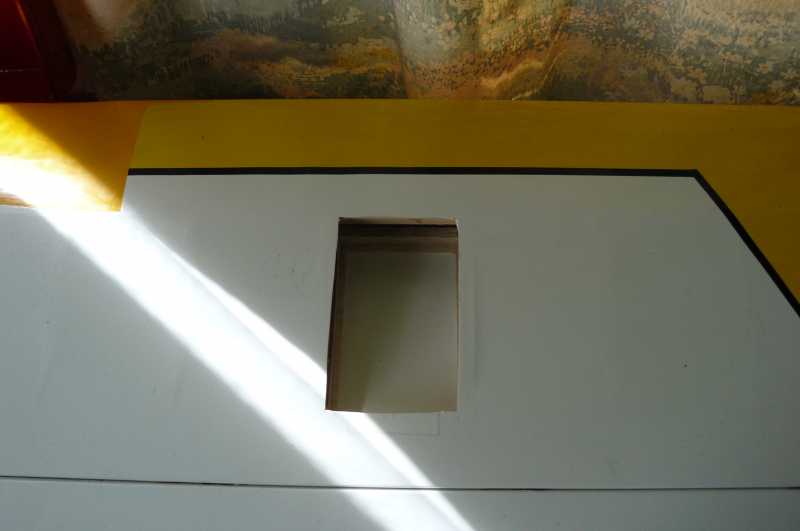
Thanks: Sarah-Jane Smith, SmarTmartY
Please Log in or Create an account to join the conversation.
- Eric
-

- Offline
- Moderator
-

Less
More
- Posts: 15406
- Thank you received: 14306
28 Oct 2012 18:27 #5
by Eric
if you are calm and collected when all about you are going berserk - you've missed something important!
Replied by Eric on topic Re: covering with solar film
Covering with Solarfilm
(and other heat-shrink materials)
I thought Sky was going to do this, but he seems to have skipped the beginning, and gone straight to repairs!
So, this is my way of using Solarfilm,it may not be the correct way, and is possibly not the best way, but it works for me.
First off, build your airframe. (That might sound stupid, but it's easy to forget a vital part, like the rudder, or something!)
Assuming it is a wooden airframe, when you have finished sanding everything down, spray it lightly with plain tap water, using one of those plant-sprayer bottles you can get for a pound or so from any DIY store or Garden centre. Let it all dry, then look at your nice,smoothly sanded balsa – it will have gone all hairy! What has happened is that the moisture has relaxed the wood grain, and the ends of the fibres have all stood up. (No rude comments, thank you!). Sand it down again. Spray, dry, sand again. It might take two or three goes before the surface STAYS flat.
THEN – remove ALL the dust from the various parts of the model, by brushing, preferably outside, so the breeze carries the dust away, or gently vacuum it, all over.
Then remove all the dust and debris from your work-surface and yourself, too, with the vacuum.
Why? Because as soon as you start handling the plastic covering film, you will create static electricity, and all the dust and bits of debris will promptly stick all over the nice clean film! Because the film is so thin, any lumps and bumps will show through like mountains on a bowling green!
When everything is spotless, (including yourself!), unroll the sheet of film. Then you will find that you have mislaid your scissors. Having found them again, in the kitchen drawer, lay the sheet of film over a part of the airframe. Start with the big bits, ie the wing, then offcuts of film can be used for fairings, etc. If you begin with the small bits, you will find the piece you want to cover the wing with has a hole in the middle, or something!
Set the temperature of your shrinking iron. Give it time to warm up and stabilize, then start at about 1/3, and try tacking a scrap of film to a scrap piece of wood. If it doesn't stick, turn the heat up a little. If the film shrivels into a sticky mess, that is TOO HOT! I use a 'travel iron' because it is a convenient size and weight, and find it works best at the cool end of the cotton setting. BUT all irons are different, so check first!
Should you manage to iron the 'wrong side' and get colour all over the sole-plate, don't panic! Leave the iron plugged in, (and hot!), and use a piece of damp nylon-type pan-scourer, (in the UK, scotchbrite, or similar) that looks like a sheet of wire wool, only it isn't metal! The colour will transfer to the scourer with little difficulty (except hot fingers!)
Remember – ALL JOINS FACE DOWNWIND!
Begin on the UNDERSIDE of the wing.
Cut a piece of film that is slightly bigger than the panel. Leave a little bit un-cut, then when you tear this 'tag' off, because the film will break at a different tension to the backing sheet, you will get a 'starter edge' to work from.
If it is a one-piece wing, start from just over the centreline, out to one tip. Leave the trailing edge edge (er!) longer, you will see why, soon.
Peel a little bit of the backing away, to expose the tacky-feeling adhesive side, at the root-end of the film. With your hot iron – (No, not a soldering iron!) - tack (just touch the iron to the film and wing on a tiny point) the film to the wing just inside the front corner, at the root. Gently tug the film straight along the half-span, and the chord, and tack just inside the corner of the tip edge, at the root when you are happy that the film will cover all the wing area.
Then carefully peel off the rest of the backing sheet, pulling it from underneath, back on itself, working out to the wing-tip, pressing the film onto the wood as you go with a soft cloth. This merely stops the film from behaving like the well-known 'sticky-back plastic', and sticking to itself in a snarled mess that is almost impossible to separate! (and if you do, pulls the colour off!)
Tack the film down, with the iron, at the tip, like you did at the root.
Then tack along the leading edge, a little way in from the very edge, at about 12” spacing - (that's 30 cm if you use those weird dimensions!) - but the distance isn't critical, it is just to hold everything still.
Next comes the tricky bit, the trailing edge.
First decide where your inset aileron starts and ends, and cut slits in the film from the trailing edge – inwards, to the hinge-line, to allow the surface to move!
Then draw the film gently taut, and tack it along the hinge-line edge, NOT the aileron edge!
Leave that for a minute, now, and use a couple of scrap off-cuts to cover the EDGES of the aileron, because you won't be able to do it after!
Back to the wing again. Remember we are covering the underside. Put the wing the right way up, on the bench, and place the aileron on it, with the hinge-line to the hinge line, so the aileron is upside down, and facing trailing edge forwards. Pull your covering film up and round then tack it down to the underside (which is now on top) of the aileron, as we did before.
Then you can heat-shrink the film onto what will be the inner under edges of the wing/aileron hinge, all the way along the length. DO NOT shrink it onto the aileron underside yet.
Turn the wing over again, so it is upside down, careful that the aileron doesn't fall off, and work along all the edges except the trailing edge, leave a little bit along the edge loose. – NOT the aileron!- cutting off all the surplus film and sealing the film down all the way around. The film at the leading edge can be cut very slightly short, leaving a few millipedes or an eighth of an inch of bare wood. Why? We'll deal with that later.
Do the other underside half exactly the same, with a small overlap of film at the root.
Now we can cover the top surface.
Start in exactly the same way, cutting an oversize piece of film, peel back a little of the backing, tack it down, etc.
This time, though, at the LEADING edge, fold it round and under, and tack it on the underside so it overlaps the underside covering. This has put your first film overlap joint in a downstream position, so the airflow of the flying model cannot peel the film off!
When you get to the aileron, bend it down as far as it will go, then tack the film to the top surface along the hinge-line, then fold the aileron back over the top again, while we do the next fiddly bit.
Trim the film so it is a few centipedes longer than the aileron, and tack it to the underside of the aileron trailing edge (which is upside down, remember?). When you are happy with it, heat-shrink it on, just along the edge.
THEN you can bring the wing underside covering – that we left loose - over the top cover that you have wrapped round, and shrink it on. - So your second joint is also downstream!
Now recalling that the wing is the right way up, bend the aileron into the fully down position, and shrink on the film along the top edge.
You now have a fairly floppy, gap-free, hinge!
Cover the other half-wing upper surface in the same way.
Carefully, now, shrink all the film, all over the wing surfaces, until it is taut. You can assist in the adhesion by pressing the film on with a soft cloth, as you heat it down.
An under-cambered wing is a bit more tricky. You have to use the toe (the point) of your iron, and your cloth, and ONLY heat the film where it touches a cap-strip, pressing it down with the cloth until it cools and grips. Don't tack the trailing edge yet. Work one rib at a time. Then you can very carefully shrink the film in the panels between ribs. If it begins to lift off, press and hold with the cloth, until it cools, and if need be, re-iron that little bit of the cap-strip, where the film lifted, and HOLD it on again with the cloth. Do the root rib, then the tip, then one in the middle, and so on, allowing time for the film adhesive to cool before heating the next adjacent rib. Do the trailing edge last, as this will allow the film to be pulled round the curvature.
Where you have a deliberate hole in the wing, ie a servo hatch, temporarily pretend it isn't there, and shrink the film as normal. When the film is cool, find your hatch, and using a sharp knife, cut an X across corners. Trim off most of the surplus film, and then coax the edges round into the hole, and shrink them on with the toe of the iron.
The Fuselage.
Do this pretty much the same as the wing. Do the underside first, then try to get the top and both sides from one sheet. This puts the joins underneath, out of sight.
Cover the fin first, so you can 'wrap' the film onto the fuselage at the fin base, then the slit in the fuz cover won't glare at you if the cut wobbled a bit!
When you get to the nose-block or cowl, whichever, remember to overlap downstream. Starting from the last flat bit, work forwards, snipping slits, if needed, in the film, to allow it to go around the sharp corners. Your first attempts will probably look a bit like a fishes scales, but keep practising! You can always disguise horrible bits with a cheat-line of a different coloured trim!
All that is left is the tailplane and elevator, which is done exactly the same as the main wing.
For a larger/more powerful model, I would make the hinges in a slightly different way, for more security.
Cut a narrow strip of film (I prefer the stronger Solartex for this) and then cut it into short lengths. Stick two pieces together, back into a longer strip, but with the sticky sides together at the join, so you now have one sticky side facing down, and one facing up. The join is now your hinge-line. Before starting to cover the surfaces, shrink one piece onto the wing on top, and almost touching – another underneath, and repeat at the spacing you prefer for 'normal' mechanical hinges. Then working along, cross the strips over, and shrink them to the aileron, so you have a series of X's along the span, exactly as we used to do in 'the old days' when we would 'sew' a surface onto a wing. Then cover the wing, as above.
With a little bit of luck, you have now covered your model, and can put everything away, before going to the first-aid box for the tube of Savlon, to treat the burn where you ironed your fingers!

(and other heat-shrink materials)
I thought Sky was going to do this, but he seems to have skipped the beginning, and gone straight to repairs!
So, this is my way of using Solarfilm,it may not be the correct way, and is possibly not the best way, but it works for me.
First off, build your airframe. (That might sound stupid, but it's easy to forget a vital part, like the rudder, or something!)
Assuming it is a wooden airframe, when you have finished sanding everything down, spray it lightly with plain tap water, using one of those plant-sprayer bottles you can get for a pound or so from any DIY store or Garden centre. Let it all dry, then look at your nice,smoothly sanded balsa – it will have gone all hairy! What has happened is that the moisture has relaxed the wood grain, and the ends of the fibres have all stood up. (No rude comments, thank you!). Sand it down again. Spray, dry, sand again. It might take two or three goes before the surface STAYS flat.
THEN – remove ALL the dust from the various parts of the model, by brushing, preferably outside, so the breeze carries the dust away, or gently vacuum it, all over.
Then remove all the dust and debris from your work-surface and yourself, too, with the vacuum.
Why? Because as soon as you start handling the plastic covering film, you will create static electricity, and all the dust and bits of debris will promptly stick all over the nice clean film! Because the film is so thin, any lumps and bumps will show through like mountains on a bowling green!
When everything is spotless, (including yourself!), unroll the sheet of film. Then you will find that you have mislaid your scissors. Having found them again, in the kitchen drawer, lay the sheet of film over a part of the airframe. Start with the big bits, ie the wing, then offcuts of film can be used for fairings, etc. If you begin with the small bits, you will find the piece you want to cover the wing with has a hole in the middle, or something!
Set the temperature of your shrinking iron. Give it time to warm up and stabilize, then start at about 1/3, and try tacking a scrap of film to a scrap piece of wood. If it doesn't stick, turn the heat up a little. If the film shrivels into a sticky mess, that is TOO HOT! I use a 'travel iron' because it is a convenient size and weight, and find it works best at the cool end of the cotton setting. BUT all irons are different, so check first!
Should you manage to iron the 'wrong side' and get colour all over the sole-plate, don't panic! Leave the iron plugged in, (and hot!), and use a piece of damp nylon-type pan-scourer, (in the UK, scotchbrite, or similar) that looks like a sheet of wire wool, only it isn't metal! The colour will transfer to the scourer with little difficulty (except hot fingers!)
Remember – ALL JOINS FACE DOWNWIND!
Begin on the UNDERSIDE of the wing.
Cut a piece of film that is slightly bigger than the panel. Leave a little bit un-cut, then when you tear this 'tag' off, because the film will break at a different tension to the backing sheet, you will get a 'starter edge' to work from.
If it is a one-piece wing, start from just over the centreline, out to one tip. Leave the trailing edge edge (er!) longer, you will see why, soon.
Peel a little bit of the backing away, to expose the tacky-feeling adhesive side, at the root-end of the film. With your hot iron – (No, not a soldering iron!) - tack (just touch the iron to the film and wing on a tiny point) the film to the wing just inside the front corner, at the root. Gently tug the film straight along the half-span, and the chord, and tack just inside the corner of the tip edge, at the root when you are happy that the film will cover all the wing area.
Then carefully peel off the rest of the backing sheet, pulling it from underneath, back on itself, working out to the wing-tip, pressing the film onto the wood as you go with a soft cloth. This merely stops the film from behaving like the well-known 'sticky-back plastic', and sticking to itself in a snarled mess that is almost impossible to separate! (and if you do, pulls the colour off!)
Tack the film down, with the iron, at the tip, like you did at the root.
Then tack along the leading edge, a little way in from the very edge, at about 12” spacing - (that's 30 cm if you use those weird dimensions!) - but the distance isn't critical, it is just to hold everything still.
Next comes the tricky bit, the trailing edge.
First decide where your inset aileron starts and ends, and cut slits in the film from the trailing edge – inwards, to the hinge-line, to allow the surface to move!
Then draw the film gently taut, and tack it along the hinge-line edge, NOT the aileron edge!
Leave that for a minute, now, and use a couple of scrap off-cuts to cover the EDGES of the aileron, because you won't be able to do it after!
Back to the wing again. Remember we are covering the underside. Put the wing the right way up, on the bench, and place the aileron on it, with the hinge-line to the hinge line, so the aileron is upside down, and facing trailing edge forwards. Pull your covering film up and round then tack it down to the underside (which is now on top) of the aileron, as we did before.
Then you can heat-shrink the film onto what will be the inner under edges of the wing/aileron hinge, all the way along the length. DO NOT shrink it onto the aileron underside yet.
Turn the wing over again, so it is upside down, careful that the aileron doesn't fall off, and work along all the edges except the trailing edge, leave a little bit along the edge loose. – NOT the aileron!- cutting off all the surplus film and sealing the film down all the way around. The film at the leading edge can be cut very slightly short, leaving a few millipedes or an eighth of an inch of bare wood. Why? We'll deal with that later.
Do the other underside half exactly the same, with a small overlap of film at the root.
Now we can cover the top surface.
Start in exactly the same way, cutting an oversize piece of film, peel back a little of the backing, tack it down, etc.
This time, though, at the LEADING edge, fold it round and under, and tack it on the underside so it overlaps the underside covering. This has put your first film overlap joint in a downstream position, so the airflow of the flying model cannot peel the film off!
When you get to the aileron, bend it down as far as it will go, then tack the film to the top surface along the hinge-line, then fold the aileron back over the top again, while we do the next fiddly bit.
Trim the film so it is a few centipedes longer than the aileron, and tack it to the underside of the aileron trailing edge (which is upside down, remember?). When you are happy with it, heat-shrink it on, just along the edge.
THEN you can bring the wing underside covering – that we left loose - over the top cover that you have wrapped round, and shrink it on. - So your second joint is also downstream!
Now recalling that the wing is the right way up, bend the aileron into the fully down position, and shrink on the film along the top edge.
You now have a fairly floppy, gap-free, hinge!
Cover the other half-wing upper surface in the same way.
Carefully, now, shrink all the film, all over the wing surfaces, until it is taut. You can assist in the adhesion by pressing the film on with a soft cloth, as you heat it down.
An under-cambered wing is a bit more tricky. You have to use the toe (the point) of your iron, and your cloth, and ONLY heat the film where it touches a cap-strip, pressing it down with the cloth until it cools and grips. Don't tack the trailing edge yet. Work one rib at a time. Then you can very carefully shrink the film in the panels between ribs. If it begins to lift off, press and hold with the cloth, until it cools, and if need be, re-iron that little bit of the cap-strip, where the film lifted, and HOLD it on again with the cloth. Do the root rib, then the tip, then one in the middle, and so on, allowing time for the film adhesive to cool before heating the next adjacent rib. Do the trailing edge last, as this will allow the film to be pulled round the curvature.
Where you have a deliberate hole in the wing, ie a servo hatch, temporarily pretend it isn't there, and shrink the film as normal. When the film is cool, find your hatch, and using a sharp knife, cut an X across corners. Trim off most of the surplus film, and then coax the edges round into the hole, and shrink them on with the toe of the iron.
The Fuselage.
Do this pretty much the same as the wing. Do the underside first, then try to get the top and both sides from one sheet. This puts the joins underneath, out of sight.
Cover the fin first, so you can 'wrap' the film onto the fuselage at the fin base, then the slit in the fuz cover won't glare at you if the cut wobbled a bit!
When you get to the nose-block or cowl, whichever, remember to overlap downstream. Starting from the last flat bit, work forwards, snipping slits, if needed, in the film, to allow it to go around the sharp corners. Your first attempts will probably look a bit like a fishes scales, but keep practising! You can always disguise horrible bits with a cheat-line of a different coloured trim!
All that is left is the tailplane and elevator, which is done exactly the same as the main wing.
For a larger/more powerful model, I would make the hinges in a slightly different way, for more security.
Cut a narrow strip of film (I prefer the stronger Solartex for this) and then cut it into short lengths. Stick two pieces together, back into a longer strip, but with the sticky sides together at the join, so you now have one sticky side facing down, and one facing up. The join is now your hinge-line. Before starting to cover the surfaces, shrink one piece onto the wing on top, and almost touching – another underneath, and repeat at the spacing you prefer for 'normal' mechanical hinges. Then working along, cross the strips over, and shrink them to the aileron, so you have a series of X's along the span, exactly as we used to do in 'the old days' when we would 'sew' a surface onto a wing. Then cover the wing, as above.
With a little bit of luck, you have now covered your model, and can put everything away, before going to the first-aid box for the tube of Savlon, to treat the burn where you ironed your fingers!
if you are calm and collected when all about you are going berserk - you've missed something important!
Thanks: Klipkopwildlife, Sarah-Jane Smith
Please Log in or Create an account to join the conversation.
- old fart
-

- Offline
- Forum Veteran
-

Less
More
- Posts: 2571
- Thank you received: 705
28 Oct 2012 18:36 #6
by old fart
There is nothing like a dream to create the future.
Electrickery is the work of the devil.
Replied by old fart on topic Re: covering with solar film
Did you treat the overlaps with Prymol before sealing? 
There is nothing like a dream to create the future.
Electrickery is the work of the devil.
Please Log in or Create an account to join the conversation.
- The Beard
-
- Offline
- Forum Master
-
Less
More
- Posts: 9272
- Thank you received: 2167
29 Oct 2012 00:03 #7
by The Beard
Replied by The Beard on topic Re: covering with solar film
Ive used prymol its good Ive also used balsaloc as well it all helps,Although Ive done a bit of covering I gained some useful tips from you Eric thanks.
Please Log in or Create an account to join the conversation.
- THE BLACKBIRD
-

- Offline
- Forum Master
-
Less
More
- Posts: 6781
- Thank you received: 10722
29 Oct 2012 16:36 #8
by THE BLACKBIRD
Replied by THE BLACKBIRD on topic Re: covering with solar film
I thought this was Skyhawks thread, seems it's been hijacked from him and nobodys said a word,
Please Log in or Create an account to join the conversation.
- Visitor
-

29 Oct 2012 16:45 #9
by
I agree BB, but until Sky complains as the O/P , nothing much I can do about it, as it is an open thread. Also as Sky has not posted on here for 10 days the thread would have disapeared by now.
Garry
Replied by on topic Re: covering with solar film
THE BLACKBIRD wrote: I thought this was Skyhawks thread, seems it's been hijacked from him and nobodys said a word,
I agree BB, but until Sky complains as the O/P , nothing much I can do about it, as it is an open thread. Also as Sky has not posted on here for 10 days the thread would have disapeared by now.
Garry
Please Log in or Create an account to join the conversation.
- The Beard
-
- Offline
- Forum Master
-
Less
More
- Posts: 9272
- Thank you received: 2167
29 Oct 2012 16:48 #10
by The Beard
Replied by The Beard on topic Re: covering with solar film
I found Erics post very helpful and well thought out and written.
Thanks: Sarah-Jane Smith
Please Log in or Create an account to join the conversation.
- Visitor
-
29 Oct 2012 17:01 #11
by
I dont think anyone would dispute that Stephen.
Garry
Replied by on topic Re: covering with solar film
The Beard wrote: I found Erics post very helpful and well thought out and written.
I dont think anyone would dispute that Stephen.
Garry
Please Log in or Create an account to join the conversation.
- Ex-Member
- Visitor
-
30 Oct 2012 17:40 #12
by Ex-Member
Replied by Ex-Member on topic Re: covering with solar film
My first attempt at this iron on stuff.
Not sure if i like it though.

Not sure if i like it though.
Please Log in or Create an account to join the conversation.
- Klipkopwildlife
-

- Offline
- Administrator
-

- I'm supposed to be retired!
30 Oct 2012 18:05 #13
by Klipkopwildlife
Do it now, you may never get another chance
Replied by Klipkopwildlife on topic Re: covering with solar film
Looks Ok to me.
Do it now, you may never get another chance
Please Log in or Create an account to join the conversation.
- Ex-Member
- Visitor
-
30 Oct 2012 18:08 #14
by Ex-Member
Replied by Ex-Member on topic Re: covering with solar film
it looks ok, just don't like using the stuff all that much. 
But i will have to get up to date with this covering stuff on the light weight planes.
the bigger stuff ie:- scale warbirds/ civil will still be heavy weight tissue and polyc, then painted.
But i will have to get up to date with this covering stuff on the light weight planes.
the bigger stuff ie:- scale warbirds/ civil will still be heavy weight tissue and polyc, then painted.
Please Log in or Create an account to join the conversation.
- Ex-Member
- Visitor
-
31 Oct 2012 00:29 #15
by Ex-Member
Replied by Ex-Member on topic Re: covering with solar film
struggling with the fuselage top, cant get it to go round the curve without creasing like mad, had 3 goes and ripped it off each time. 
Please Log in or Create an account to join the conversation.
Time to create page: 0.297 seconds