
- Posts: 524
- Thank you received: 1476
Episode F3a
- Ralpharr2001
-
 Topic Author
- Offline
- Elite Member
-

Less
More
12 Mar 2017 17:38 - 12 Mar 2017 17:40 #1
by Ralpharr2001
I'm currently unsupervised. I know it freaks me out as well, but the possibilities are endless!!
Episode F3a was created by Ralpharr2001
The Gannet and Curare have taken a back seat for a few weeks whilst I build my F3a model. It is a BJ Craft Episode bought from Bondaero in the UK. Bondaero were offering it as a end of line special deal which included the airframe, motor, ESC and prop. So it is not a current state of the art airframe but about a 4 year old design but still way more than my flying abilities.
The fuse is composite moulded with built up wings and tailplane. The only thing in the fuse is a couple of formers so all the fitting out has to be from scratch which includes making most of the bits. Well not strictly true there are some laser cut ply parts.
The motor is a Hacker Q80 - 13S with a ZTW programmable with data logger 120A opto ESC. I am using Spektrum HV servos. Batteries will be Zippy Compact 5S 5000 mAh with 2 in parallel to give 10S.

The fuse is composite moulded with built up wings and tailplane. The only thing in the fuse is a couple of formers so all the fitting out has to be from scratch which includes making most of the bits. Well not strictly true there are some laser cut ply parts.
The motor is a Hacker Q80 - 13S with a ZTW programmable with data logger 120A opto ESC. I am using Spektrum HV servos. Batteries will be Zippy Compact 5S 5000 mAh with 2 in parallel to give 10S.
I'm currently unsupervised. I know it freaks me out as well, but the possibilities are endless!!
Last edit: 12 Mar 2017 17:40 by Ralpharr2001.
Thanks: Klipkopwildlife, THE BLACKBIRD, boz, Squirrelnet
Please Log in or Create an account to join the conversation.
- Ralpharr2001
-
Topic Author
- Offline
- Elite Member
-
Less
More
- Posts: 524
- Thank you received: 1476
12 Mar 2017 17:59 - 12 Mar 2017 18:01 #2
by Ralpharr2001
I'm currently unsupervised. I know it freaks me out as well, but the possibilities are endless!!
Replied by Ralpharr2001 on topic Episode F3a
First challenge is mounting the motor. So i've spent the last few weeks researching way to mount the motor. The motor design is quite unusual in that the armature is quite a large diameter but narrow and there is a 'top hat' section to provide support for the front bearing. This also acts as a stand off to allow the large diameter outrunner section to clear the nose of the fuselage.
The motor design I liked with was by a German F3a competitor. A bit more complex than normal motor mounts but by using shim washers it is possible to set down and side thrust very accurately.

However, he only made them to fit 85mm and 83mm diameter noses. So I copied the design and made my own to fit the Episodes 70mm nose. The shim washers are from Model Fixings.


The motor design I liked with was by a German F3a competitor. A bit more complex than normal motor mounts but by using shim washers it is possible to set down and side thrust very accurately.
However, he only made them to fit 85mm and 83mm diameter noses. So I copied the design and made my own to fit the Episodes 70mm nose. The shim washers are from Model Fixings.
I'm currently unsupervised. I know it freaks me out as well, but the possibilities are endless!!
Last edit: 12 Mar 2017 18:01 by Ralpharr2001.
Thanks: Klipkopwildlife, Quorneng, THE BLACKBIRD, boz, Nigel, Squirrelnet
Please Log in or Create an account to join the conversation.
- one tenor
-

- Offline
- Forum Veteran
-

- johnpcalex@gmail.com
12 Mar 2017 18:27 #3
by one tenor
Thanks: Ralpharr2001
Please Log in or Create an account to join the conversation.
- Squirrelnet
- Offline
- Elite Member
-
Less
More
- Posts: 809
- Thank you received: 2067
12 Mar 2017 18:38 #4
by Squirrelnet
Replied by Squirrelnet on topic Episode F3a
Impressive looking model Ralph and even more impressive motor. I'll be interested to hear how you get on with it. Interested to hear that F3A models have changes to thrust line , excuse my ignorance I only fly FF and RC gliders but I'm guessing these changes are to make the model neutral ?
Chris
Chris
Please Log in or Create an account to join the conversation.
- Ex-Member
- Visitor
-

12 Mar 2017 19:33 #5
by Ex-Member
Replied by Ex-Member on topic Episode F3a
Interesting model sir.
nice bit of work with the motor mount.
i shall enjoy watching your exploits.
Tony B
nice bit of work with the motor mount.
i shall enjoy watching your exploits.
Tony B
Please Log in or Create an account to join the conversation.
- Ralpharr2001
-
Topic Author
- Offline
- Elite Member
-
Less
More
- Posts: 524
- Thank you received: 1476
12 Mar 2017 19:38 #6
by Ralpharr2001
I'm currently unsupervised. I know it freaks me out as well, but the possibilities are endless!!
Replied by Ralpharr2001 on topic Episode F3a
Hi Chris,
Yes it is to trim the model to fly to suit the pilots preferences. I tend to fly with a little bit of back stick on the elevator (bad habit!!) so I trim the model to have a little rearward CofG. So on inverted uplines the plane tracks straight. Its all about accuracy in a set manoeuvre and constant speed throughout the schedule.
The wings have variable incidence so you can adjust the wing incidence again to set the plane up how you like to fly. The latest models have tail plane incidence adjusters as well.
The motor is not favoured by most of the top pilots as they fly contra prop systems to eliminate the torque transmitted to the airframe. They use an inrunner onto a gearbox, look up Brenner contra unit. I don't run one because its way more than I am capable of flying and secondly I can't afford one, £1500 new, £750 second hand plus props at £160 a pair!!!
Yes it is to trim the model to fly to suit the pilots preferences. I tend to fly with a little bit of back stick on the elevator (bad habit!!) so I trim the model to have a little rearward CofG. So on inverted uplines the plane tracks straight. Its all about accuracy in a set manoeuvre and constant speed throughout the schedule.
The wings have variable incidence so you can adjust the wing incidence again to set the plane up how you like to fly. The latest models have tail plane incidence adjusters as well.
The motor is not favoured by most of the top pilots as they fly contra prop systems to eliminate the torque transmitted to the airframe. They use an inrunner onto a gearbox, look up Brenner contra unit. I don't run one because its way more than I am capable of flying and secondly I can't afford one, £1500 new, £750 second hand plus props at £160 a pair!!!
I'm currently unsupervised. I know it freaks me out as well, but the possibilities are endless!!
Thanks: Klipkopwildlife, Ex-Member, THE BLACKBIRD, boz, Squirrelnet
Please Log in or Create an account to join the conversation.
- boz
-

- Offline
- Platinum Member
-

Less
More
- Posts: 1392
- Thank you received: 1420
12 Mar 2017 20:01 #7
by boz
Replied by boz on topic Episode F3a
I'm in, love your build threads, boz 
Thanks: Ralpharr2001
Please Log in or Create an account to join the conversation.
- Squirrelnet
- Offline
- Elite Member
-
Less
More
- Posts: 809
- Thank you received: 2067
12 Mar 2017 20:19 #8
by Squirrelnet
Replied by Squirrelnet on topic Episode F3a
Thanks Ralph . Sounds like your model is an ideal alternative to some very expensive kit and way, way beyond anything I could fly. I have a small slope racer - RCRCM Sunbird which is fun and I can just about manage inverted but nothing like the pattern stuff this machine can do. Look forward to seeing it progress.
Thanks: Ralpharr2001
Please Log in or Create an account to join the conversation.
- THE BLACKBIRD
-

- Offline
- Forum Master
-

Less
More
- Posts: 6781
- Thank you received: 10722
12 Mar 2017 20:54 #9
by THE BLACKBIRD
Replied by THE BLACKBIRD on topic Episode F3a
Very nice model Ralph and they do fly very good once you get them set up, and that's a proper F3A motor you have there
Thanks: Ralpharr2001
Please Log in or Create an account to join the conversation.
- Klipkopwildlife
-

- Offline
- Administrator
-

- I'm supposed to be retired!
13 Mar 2017 07:15 #10
by Klipkopwildlife
Do it now, you may never get another chance
Replied by Klipkopwildlife on topic Episode F3a
Err, post #1, 2 x 5s in parallel is 5s2p, in series will give you 10s1p. I suspect you meant series?
Do it now, you may never get another chance
Thanks: THE BLACKBIRD, boz
Please Log in or Create an account to join the conversation.
- Ralpharr2001
-
Topic Author
- Offline
- Elite Member
-
Less
More
- Posts: 524
- Thank you received: 1476
13 Mar 2017 12:06 #11
by Ralpharr2001
I'm currently unsupervised. I know it freaks me out as well, but the possibilities are endless!!
Replied by Ralpharr2001 on topic Episode F3a
You're right Klipy my error. The only thing i'm good at with electrics is letting the magic smoke out and I seem to be an expert at that!! 
I'm currently unsupervised. I know it freaks me out as well, but the possibilities are endless!!
Please Log in or Create an account to join the conversation.
- Ralpharr2001
-
Topic Author
- Offline
- Elite Member
-
Less
More
- Posts: 524
- Thank you received: 1476
13 Mar 2017 20:18 #12
by Ralpharr2001
I'm currently unsupervised. I know it freaks me out as well, but the possibilities are endless!!
Replied by Ralpharr2001 on topic Episode F3a
Test fitted the motor and made measurements of the rear engine mount and rear mount support brackets that are epoxied onto the fuselage sides. The rear engine beam has a bearing that fits into the back of the motor. The whole beam is adjustable by slotted holes. Made the beam and epoxied the supports into place.


I'm currently unsupervised. I know it freaks me out as well, but the possibilities are endless!!
Thanks: Klipkopwildlife, Ex-Member, Quorneng, THE BLACKBIRD, boz
Please Log in or Create an account to join the conversation.
- Ralpharr2001
-
Topic Author
- Offline
- Elite Member
-
Less
More
- Posts: 524
- Thank you received: 1476
19 Mar 2017 15:33 - 19 Mar 2017 15:39 #13
by Ralpharr2001
I'm currently unsupervised. I know it freaks me out as well, but the possibilities are endless!!
Replied by Ralpharr2001 on topic Episode F3a
Managed to get some time in on the Episode this weekend.
To get the fuselage shape of the rear motor mount supports that are epoxied into the nose I used a bit of solder and pushed it into the shape of the cheek. Then used that as the outline to make a paper template and then trimmed that to suit. Marked the glass sheet, cut and epoxied with Hysol into place.

Then I fitted the rear motor mount into place and hey presto engine is mounted. The rear motor mount has horizontal slots and the cheek supports have vertical slots to give maximum adjustment. Then I made up the receiver tray and epoxied that into place.


The CofG is adjusted by moving the batteries around. To get the battery tray in the right position I used a Vanessa CofG rig.
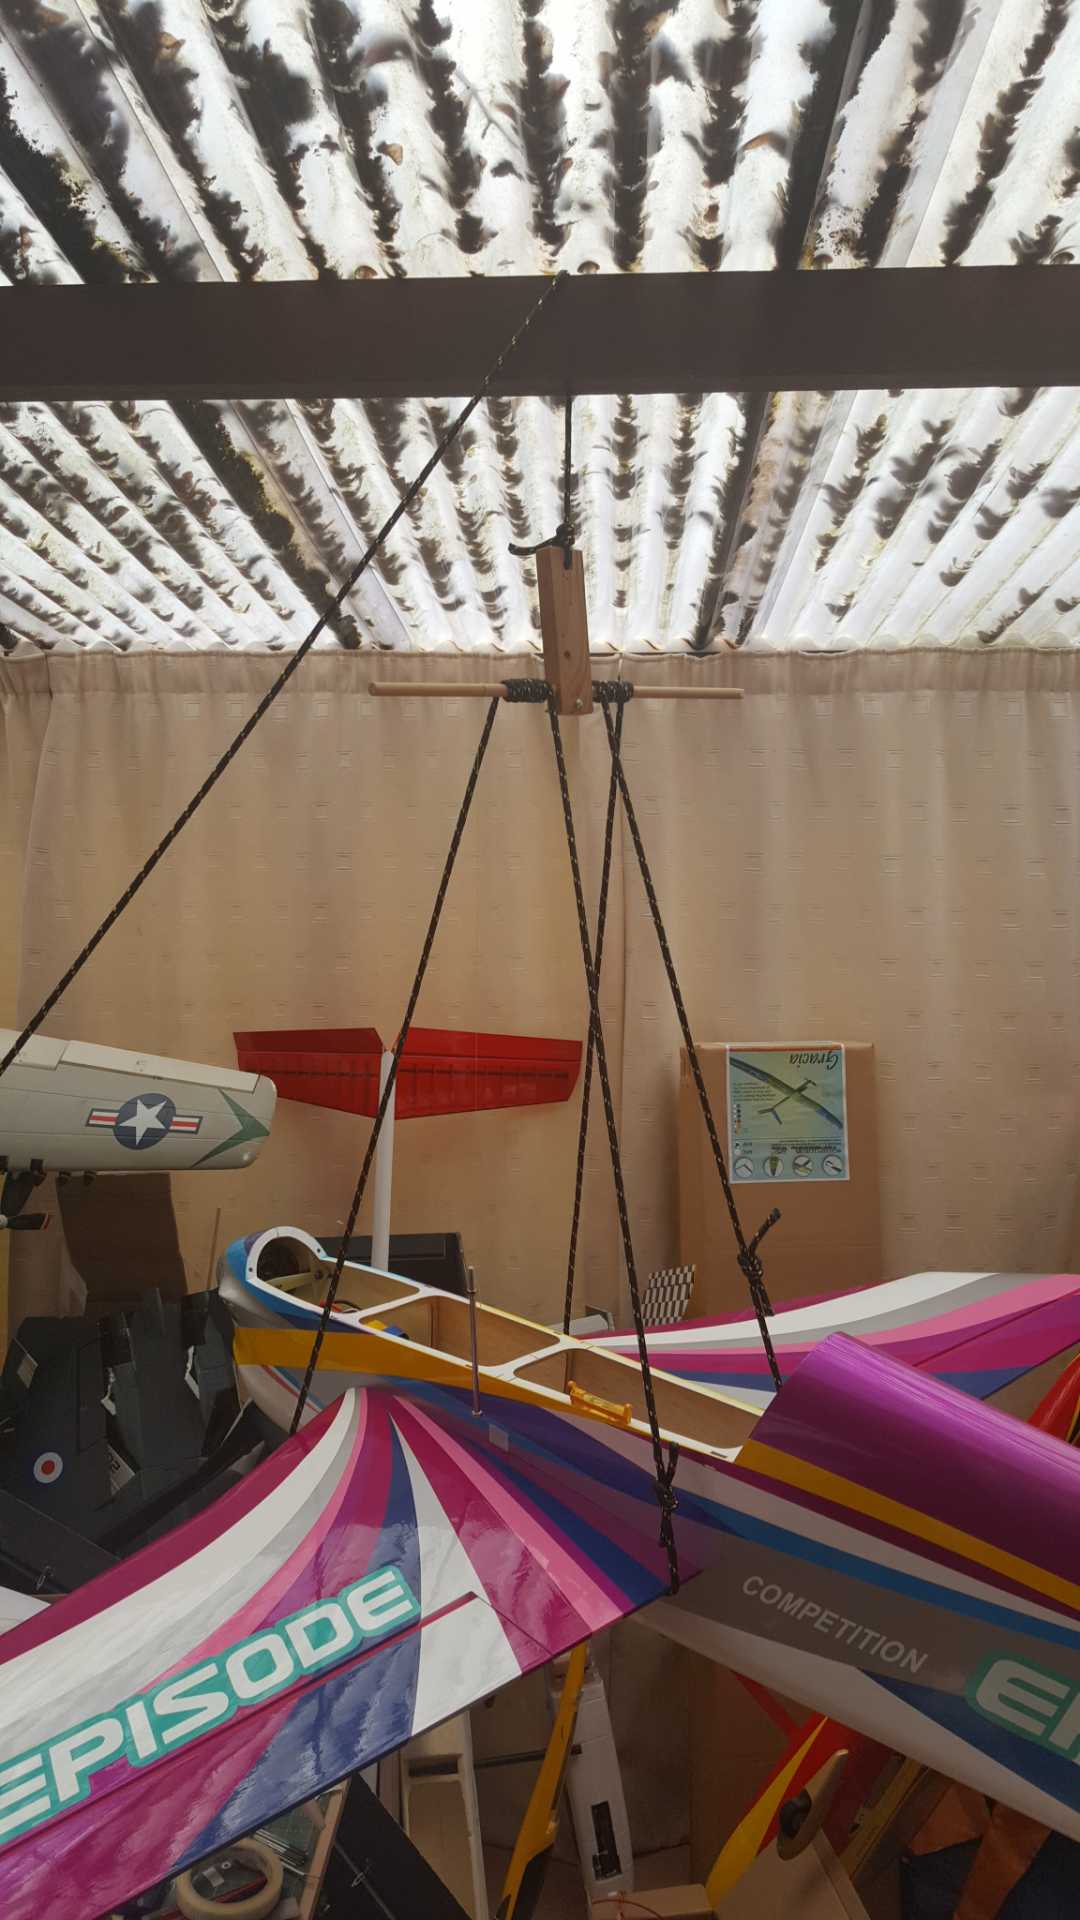
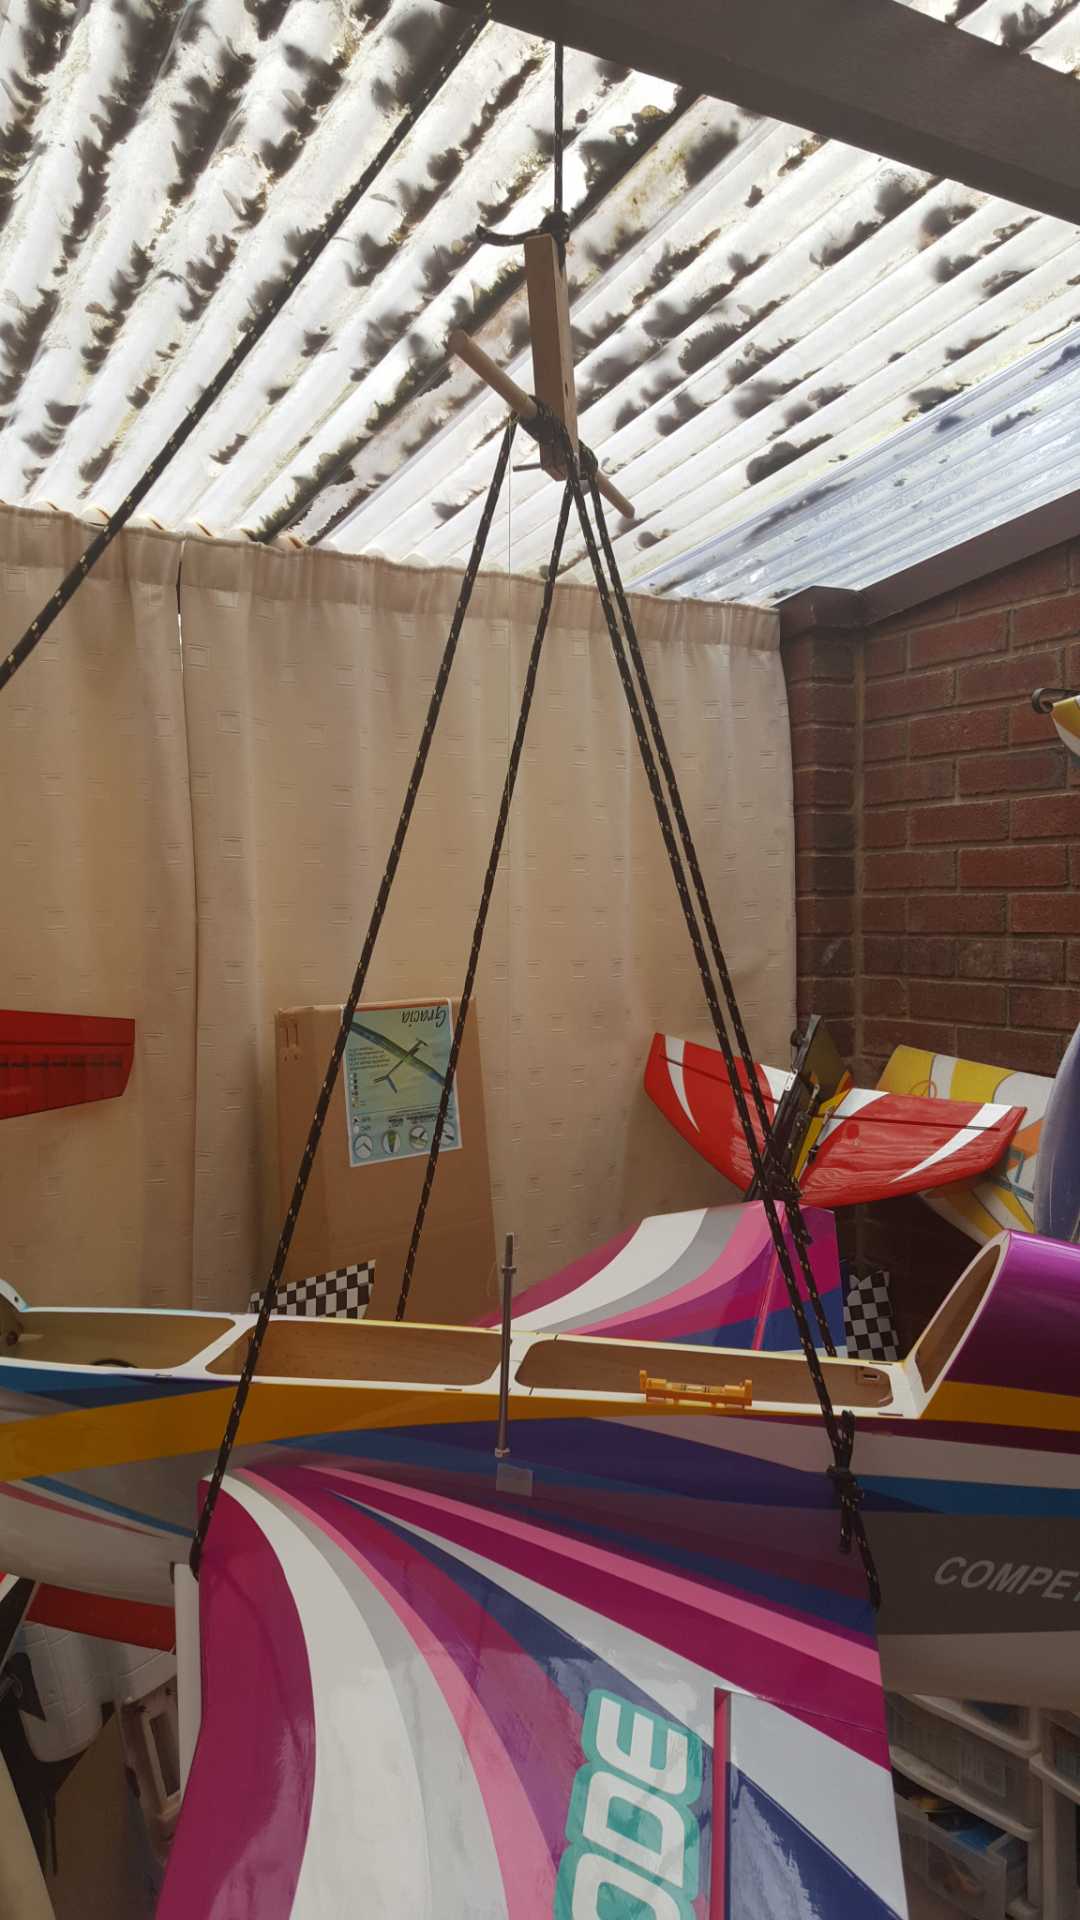
To get the fuselage shape of the rear motor mount supports that are epoxied into the nose I used a bit of solder and pushed it into the shape of the cheek. Then used that as the outline to make a paper template and then trimmed that to suit. Marked the glass sheet, cut and epoxied with Hysol into place.
Then I fitted the rear motor mount into place and hey presto engine is mounted. The rear motor mount has horizontal slots and the cheek supports have vertical slots to give maximum adjustment. Then I made up the receiver tray and epoxied that into place.
The CofG is adjusted by moving the batteries around. To get the battery tray in the right position I used a Vanessa CofG rig.
I'm currently unsupervised. I know it freaks me out as well, but the possibilities are endless!!
Last edit: 19 Mar 2017 15:39 by Ralpharr2001.
Thanks: Klipkopwildlife, Ex-Member, Quorneng, THE BLACKBIRD, boz
Please Log in or Create an account to join the conversation.
- Ralpharr2001
-
Topic Author
- Offline
- Elite Member
-
Less
More
- Posts: 524
- Thank you received: 1476
19 Mar 2017 18:34 #14
by Ralpharr2001
I'm currently unsupervised. I know it freaks me out as well, but the possibilities are endless!!
Replied by Ralpharr2001 on topic Episode F3a
Just to finish the weekend off managed to get a bit more done.
Fitted the battery tray.

Made the rudder servo mount and fitted that.


Bolted the undercarriage on, nice sweep back makes its look sleek.

Fitted the battery tray.
Made the rudder servo mount and fitted that.
Bolted the undercarriage on, nice sweep back makes its look sleek.
I'm currently unsupervised. I know it freaks me out as well, but the possibilities are endless!!
Thanks: Klipkopwildlife, Ex-Member, Quorneng, boz
Please Log in or Create an account to join the conversation.
- Nigel
- Offline
- Elite Member
-
Less
More
- Posts: 204
- Thank you received: 405
24 Mar 2017 00:11 #15
by Nigel
Replied by Nigel on topic Episode F3a
Nice model, nice motor, nice work - thanks for taking the time to poist.
Can I ask, how do you ensure compatibility between fuselage material (glass with resin?) with your epoixy board (is it?) and the epoxy glue? What is Hysol? The cheap 'glass' fuselages I've had experience with didn't stick well to (fast) epoxy.
Thanks
Nigel
Can I ask, how do you ensure compatibility between fuselage material (glass with resin?) with your epoixy board (is it?) and the epoxy glue? What is Hysol? The cheap 'glass' fuselages I've had experience with didn't stick well to (fast) epoxy.
Thanks
Nigel
Please Log in or Create an account to join the conversation.
Time to create page: 0.265 seconds