
- Posts: 71
- Thank you received: 237
A4b crash 03August26
- SimonC
- Topic Author
- Offline
- Senior Member
-

Less
More
10 Oct 2026 11:14 - 10 Oct 2026 11:18 #1
by SimonC
A4b crash 03August26 was created by SimonC
As I reported in "Been flying" I had a major incident with the A4b with wings that ended up in a tree. After recovery it looks like this

With not insignificant damage to both wings.


With wings repaired a start had to be made on the much bigger complete rebuild of the nose.
First a new printed former replaced the damaged topmost one that still had a complete circle of fuselage skin around it, F9

To get access all the "electrics" and servos had to be removed.
When the glue was set it meant I had a firm(ish?) base from which to build the nose up to the removable nose cone using formers F8 to F4.

The nose cone itself will be a repeat of a LW-PLA structure that has three LW-PLA formers inserted into it.
Just as well I still have all the stl files!
Looking back over the record the nose of the A4b has been rebuilt 6 times over the last 8 years! Jul 18, Aug 23, Sep 23, May 24, Aug 25.
The Aug 23 repair was also a major rework to replace the 70mm EDF on a 3s with a UAV motor driving a 5 inch 4 blade prop on a 5s, a process that shaved nearly 20% of the all up weight.
VTO does have risks, anyway, on with the 7th nose rebuild.

With not insignificant damage to both wings.
With wings repaired a start had to be made on the much bigger complete rebuild of the nose.
First a new printed former replaced the damaged topmost one that still had a complete circle of fuselage skin around it, F9
To get access all the "electrics" and servos had to be removed.
When the glue was set it meant I had a firm(ish?) base from which to build the nose up to the removable nose cone using formers F8 to F4.
The nose cone itself will be a repeat of a LW-PLA structure that has three LW-PLA formers inserted into it.
Just as well I still have all the stl files!
Looking back over the record the nose of the A4b has been rebuilt 6 times over the last 8 years! Jul 18, Aug 23, Sep 23, May 24, Aug 25.
The Aug 23 repair was also a major rework to replace the 70mm EDF on a 3s with a UAV motor driving a 5 inch 4 blade prop on a 5s, a process that shaved nearly 20% of the all up weight.
VTO does have risks, anyway, on with the 7th nose rebuild.
Attachments:
Last edit: 10 Oct 2026 11:18 by SimonC.
Thanks: Eric, Klipkopwildlife
Please Log in or Create an account to join the conversation.
- SimonC
- Topic Author
- Offline
- Senior Member
-
Less
More
- Posts: 71
- Thank you received: 237
Yesterday 21:56 - Yesterday 21:58 #2
by SimonC
Replied by SimonC on topic A4b crash 03August26
Hopefully the tricky part of the nose rebuild is over with four full length planks supporting the top former (F4). Former F8 is also glued in. To save Depron as much as possible of the existing nose skin is retained allowing some of the planks to be significantly short.

The positions of the three intermediate formers (F7,F6 & F5) are marked on all 4 planks so it's just a job of glueing them in

As additional planks are added the structure get more and more rigid.
Whilst waiting for glue to dry I printed a new nose cone in LW-PLA with a 0.4mm wall "vase" printed.

Slow but it does give a smooth finish with zero blemishes.
As it is just a "skin" it has 3 LW-PLA formers glued inside for stiffness.
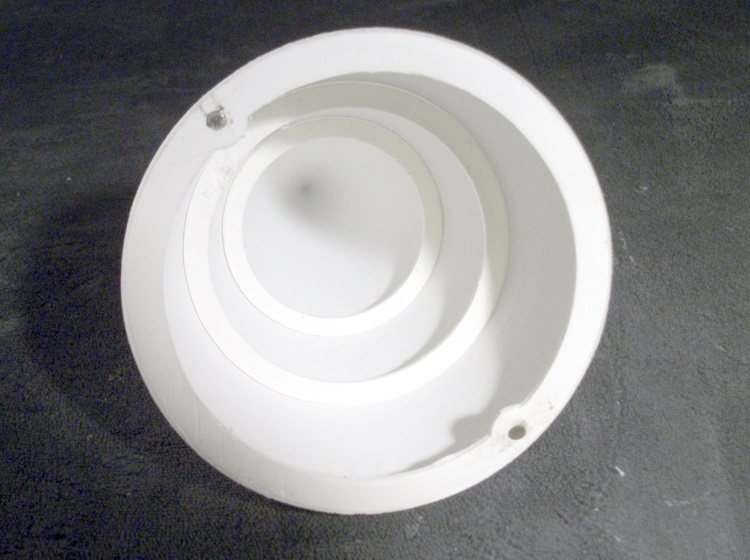
The bottom one is virtually identical to the top fuselage former and with magnets set to opposite polarity. The complete nose cone weighs 10.2g

Next task is to complete the planking.
The positions of the three intermediate formers (F7,F6 & F5) are marked on all 4 planks so it's just a job of glueing them in
As additional planks are added the structure get more and more rigid.
Whilst waiting for glue to dry I printed a new nose cone in LW-PLA with a 0.4mm wall "vase" printed.
Slow but it does give a smooth finish with zero blemishes.
As it is just a "skin" it has 3 LW-PLA formers glued inside for stiffness.
The bottom one is virtually identical to the top fuselage former and with magnets set to opposite polarity. The complete nose cone weighs 10.2g
Next task is to complete the planking.
Attachments:
Last edit: Yesterday 21:58 by SimonC.
Please Log in or Create an account to join the conversation.
- Eric
-

- Offline
- Moderator
-

Less
More
- Posts: 15461
- Thank you received: 14427
Yesterday 23:01 #3
by Eric
if you are calm and collected when all about you are going berserk - you've missed something important!
Replied by Eric on topic A4b crash 03August26
Slightly off-topic, but this might interest Q, amongst others -
if you are calm and collected when all about you are going berserk - you've missed something important!
Please Log in or Create an account to join the conversation.
Time to create page: 0.589 seconds