
- Forum
- Forum Categories
- Reviews - Model Flying Shops, Products, Kits
- Focke-Wulf Fw 190 ... Pol's assembling his ARTF.
Focke-Wulf Fw 190 ... Pol's assembling his ARTF.
- Phil Wood
-
 Topic Author
- Offline
- Inactivated User
-

I was looking for an ARTF fun model and I went to the tent where I bought my Nemesis the previous year. (Century Models)
I came across this FW190 from "Top RC" that was supposed to be reduced from £159.95 to just under £70.00 ... not bad I thought

I've since found their website and sure enough the model is listed at £159.95
Here's the link to their website & the advert for the model.
www.centuryuk.com/RC-Planes/Scale-Planes...FW190-Focke-Wulf-PNP
I've since found out that HobbyKing are selling the same model from their UK warehouse for £97.49 .... I think it was about £70.00 from their international warehouse but obviously the postage would bump that up loads.
Here's the link to the model at HobbyKing.
www.hobbyking.com/hobbyking/store/__2902...html?strSearch=fw190
At first glance it looks like a great kit (ARTF) ... but on closer inspection a few minor gremlins did show up on mine, I'll get to them as we go along. Here's what you get at first sight.
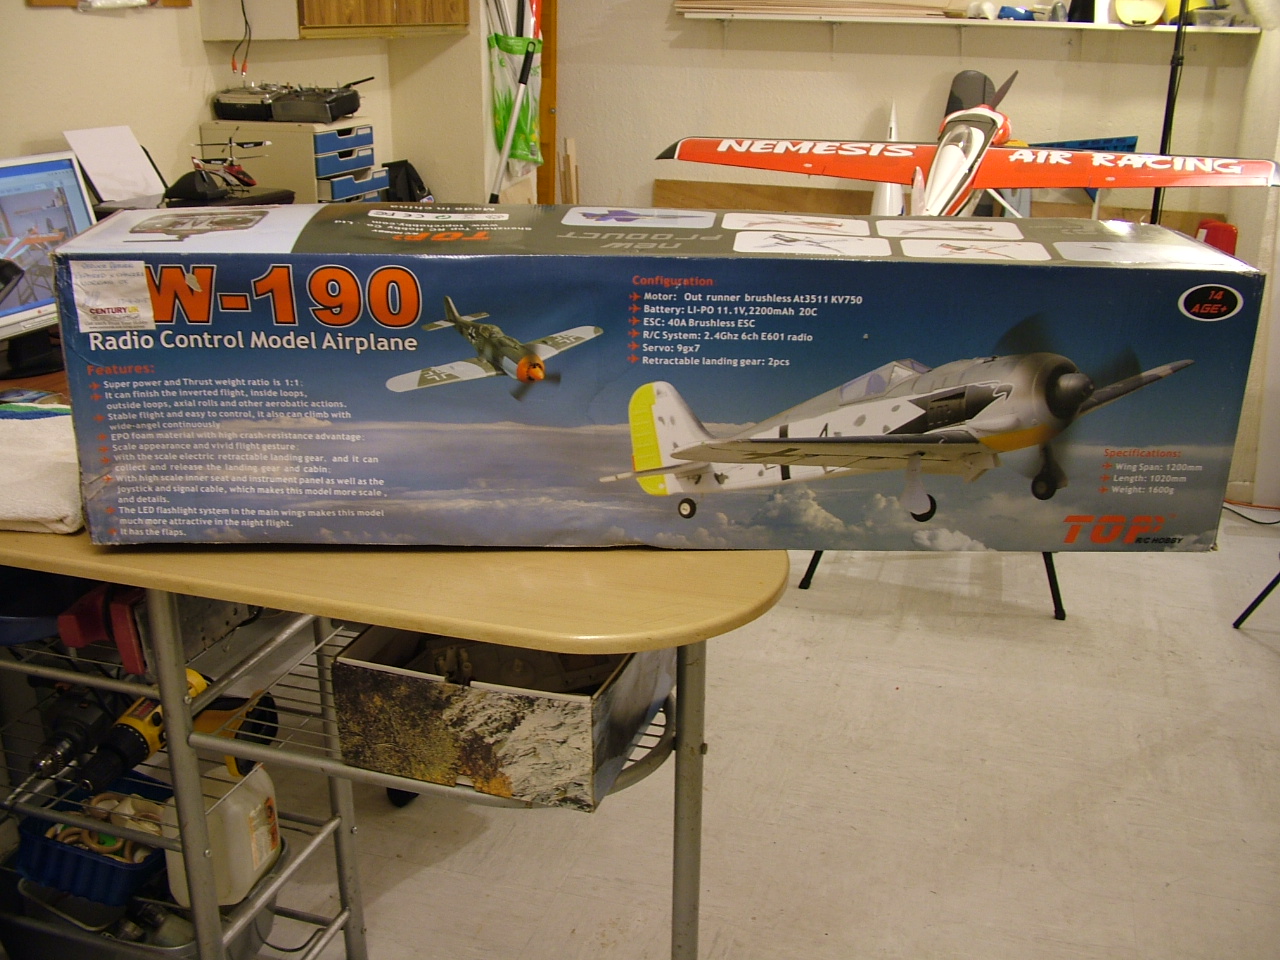
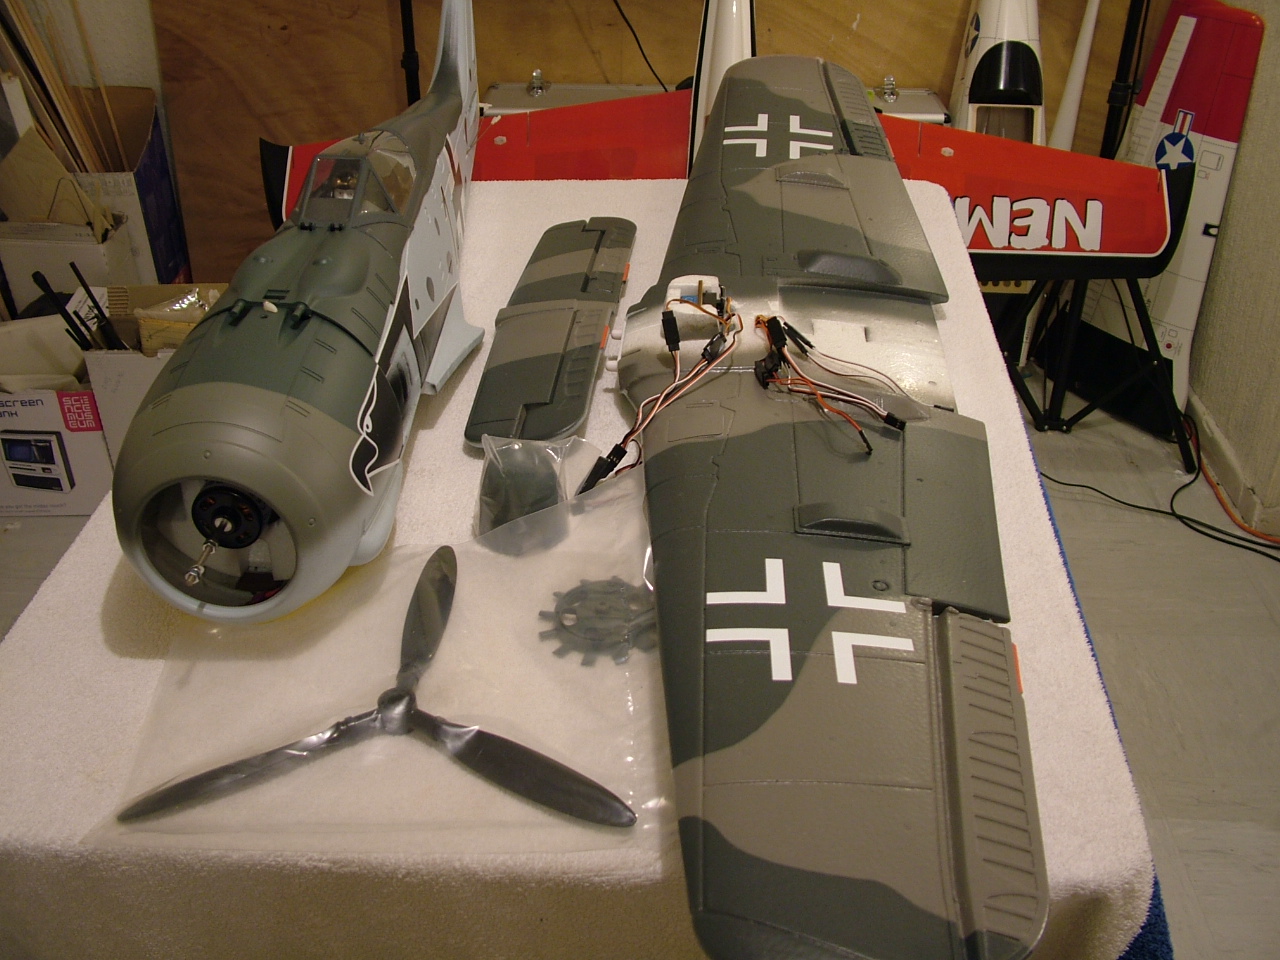
Not at all bad so far, doesn't look like much work so I should have it up flying soon.
![[badass]](/media/kunena/emoticons/bad_boys_20.gif "[badass]")
I just own the forum .... you guys make it great thanks.
Please Log in or Create an account to join the conversation.
- Phil Wood
-
Topic Author
- Offline
- Inactivated User
-

The cowl is hard plastic so no bubbles there, it's really well molded and heavy, far heavier than I would have expected for a model of this size, but if the all up weight is as advertized (1600g) then fair enough.
The rest of the fuselage is "Bubbly Foam" but you have to get right up close to notice .... it's certainly good enough for me.

I've never bothered with pilots in my models before but I've grown quite attached to this bloke so I think I'll use them in future.


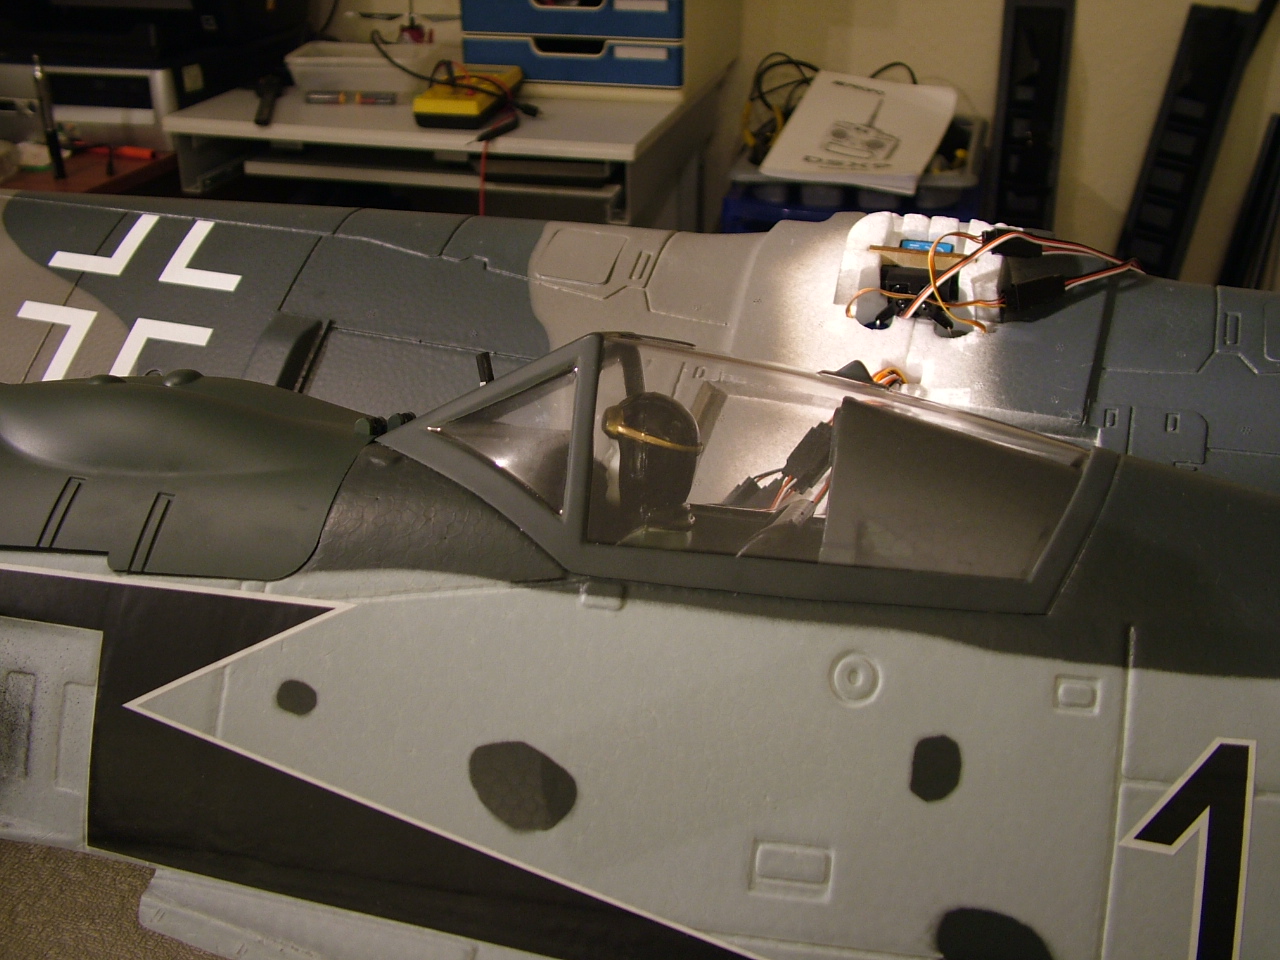
There shouldn't be any problem with cooling with that massive hole at the front..... plus the fact that it's concealed with a scale fan driving cool air over the motor & ESC.
The ESC positioning is something that I'm not really happy with, unless I'm just not looking properly, please jump in when I get to that bit and tell me what you think.

Pol.
I just own the forum .... you guys make it great thanks.
Please Log in or Create an account to join the conversation.
- boz
-

- Offline
- Platinum Member
-

- Posts: 1392
- Thank you received: 1420
Please Log in or Create an account to join the conversation.
- Phil Wood
-
Topic Author
- Offline
- Inactivated User
-
No Boz, with this model you have to supply your own Transmitter (Tx) your own Receiver (Rx) and however many flight batteries you want.boz wrote: Looks very nice, does it come complete with everything ready to fly?
Most basic entry level transmitters are 6 channel, but to get everything out of this model you need a 7 channel Tx & Rx all because it's fitted with flashing LED's on the wing tips. ... If you didn't want to use these you could get away with a 6 channel set up.
The seven channels are Rudder, ailerons, elevator, throttle, undercarriage, flaps & the flashing LED lights.
This is why we sometimes tell beginners to buy the best transmitter they can afford when starting out.... You soon advance and want more & more channels.
I just own the forum .... you guys make it great thanks.
Please Log in or Create an account to join the conversation.
- Eric
-

- Offline
- Moderator
-

- Posts: 15406
- Thank you received: 14306
if you are calm and collected when all about you are going berserk - you've missed something important!
Please Log in or Create an account to join the conversation.
- Phil Wood
-
Topic Author
- Offline
- Inactivated User
-
Damn!!! too late to take it back and complain now Eric, I'll just have to rip him out and see if one of my Barbie Dolls fit.Eric wrote: The pilot is too small, Pol, the FW, just like the ME109, had one major gripe, the pilot kept banging his head on the roof!
Now for the ESC.... I was initially torn between two options here, but after talking to Garry & Tony I think my mind is made up. Here were my 2 options anyway.
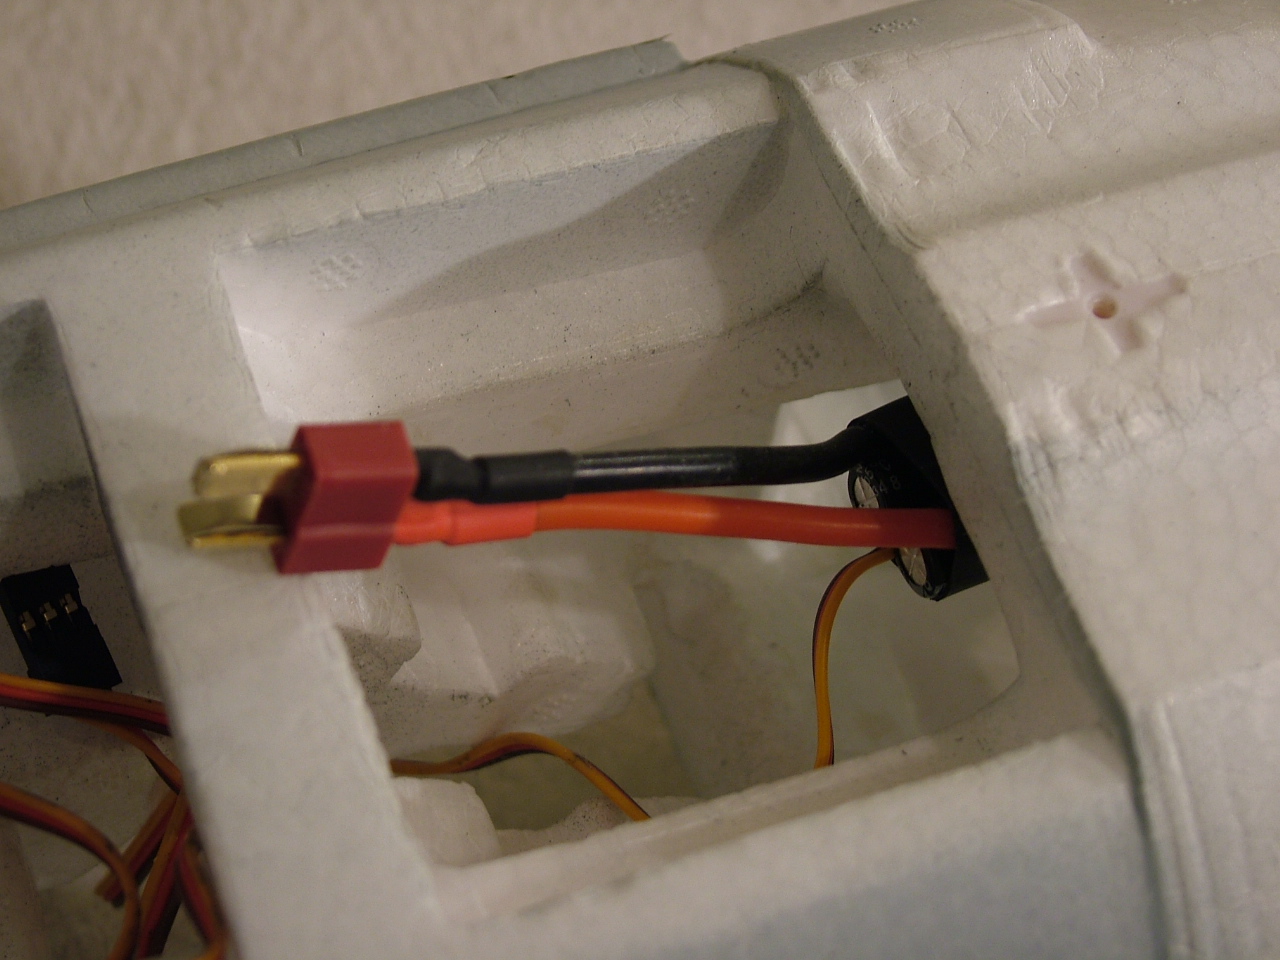
There's a neat hole right abovethe motor that the ESC would fit into & still have plenty of room around it for cooling ... but it wouldn't have a clear airflow all the way through. I was tempted by this because it brings the wiring out in a good position to attach to the lipo'.
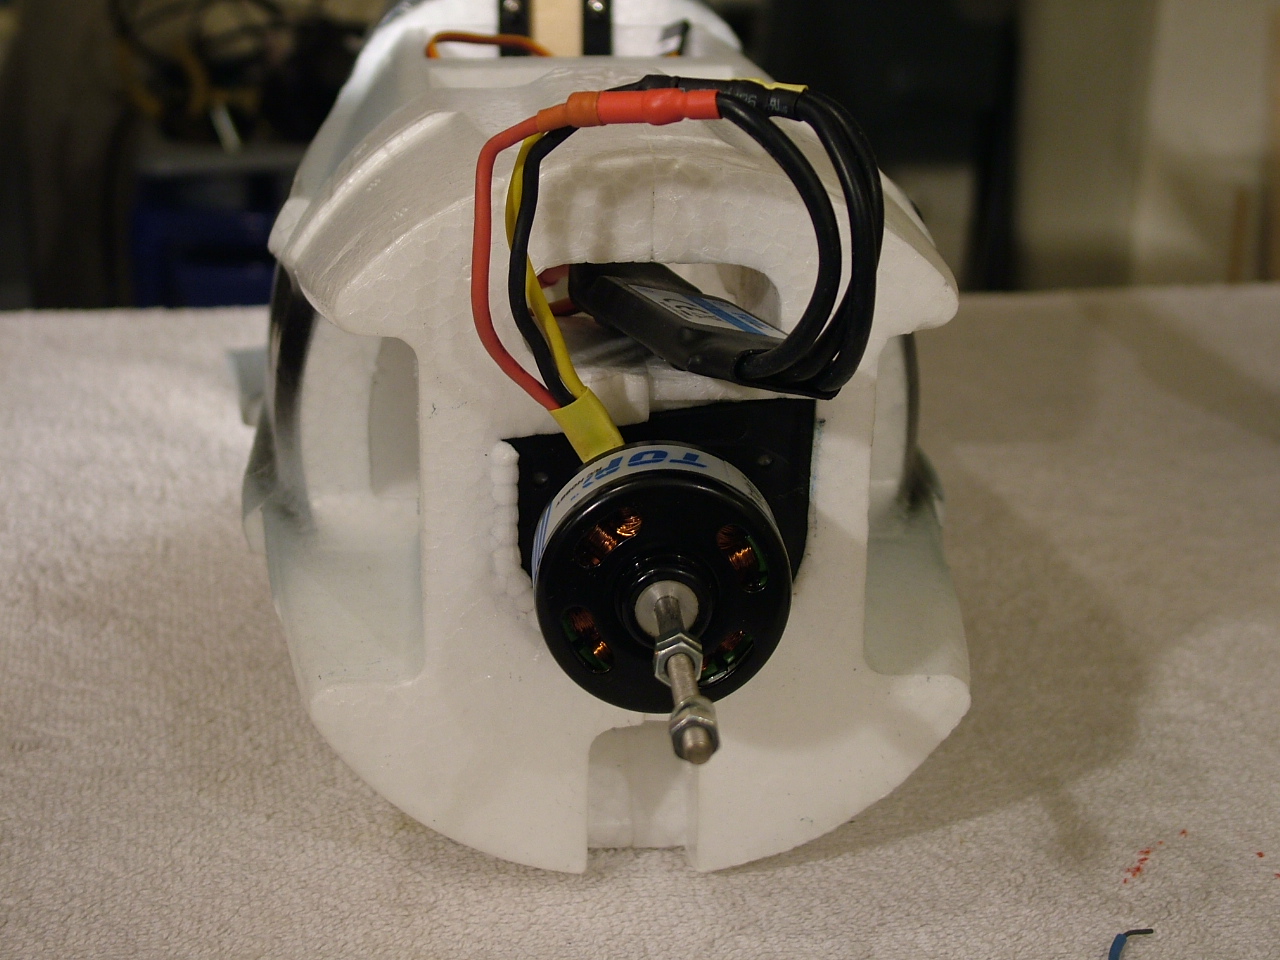
This brings the wires out at the top of the battery bay where connection is easy without having to stuff the wires down the side of the lipo.
The excess battery wire could easily coil up under the hatch & above the battery.
Option 2 is probably the one the manufacturers intended and the one I'll probably use. This is in the side of the model and the foam molding allows air to escape through the rear of the cowl.
There's a lot of excess wiring that I'm not happy about but it's not a good idea to try shortening the wires on brushless motors, many of them are multiple stranded wires with each strand enamel coated. Once you strip back the wire it's a pain in the rear to remove the enamel insulation before re-soldering.
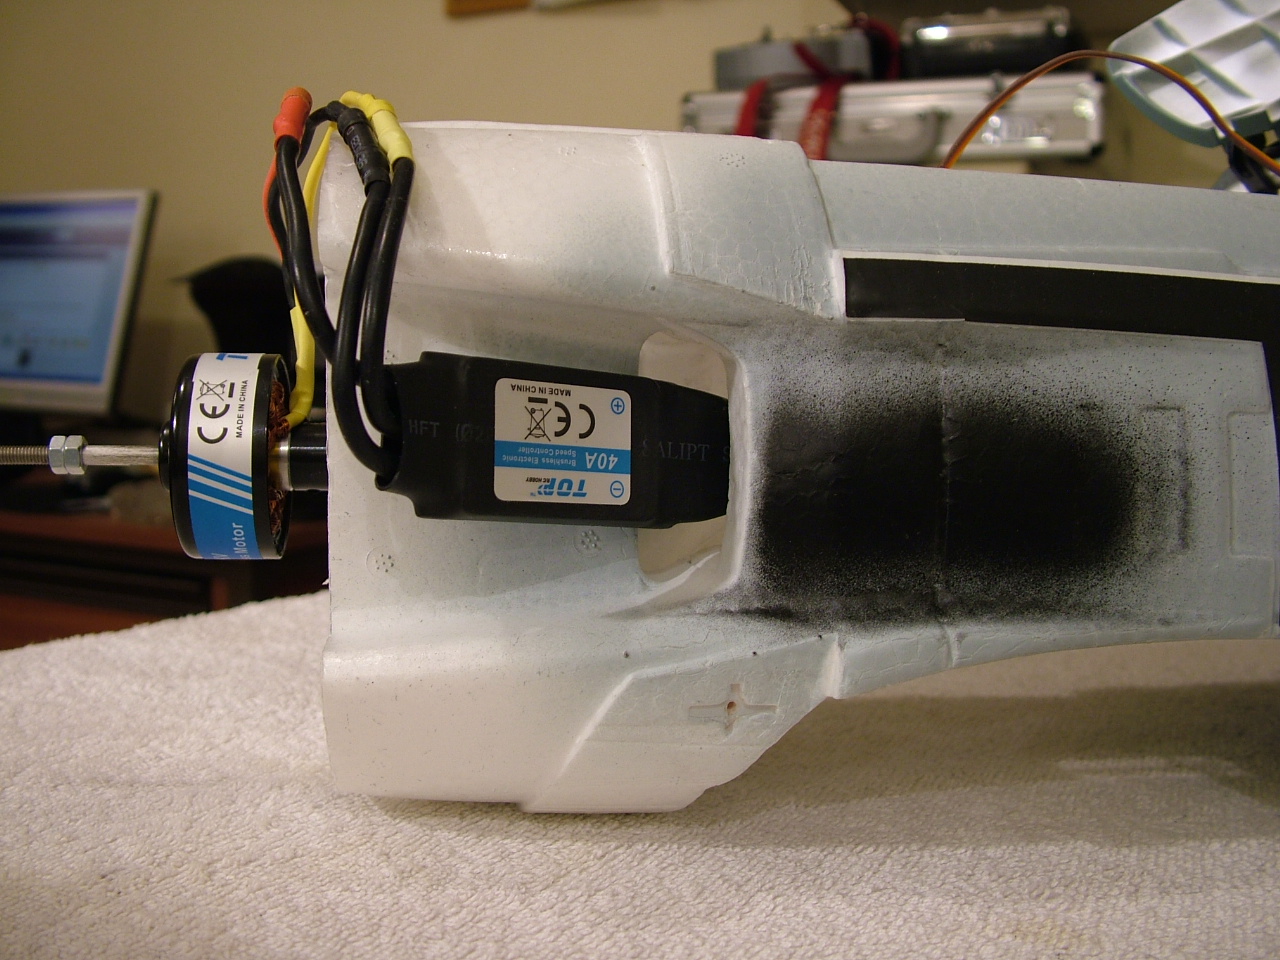
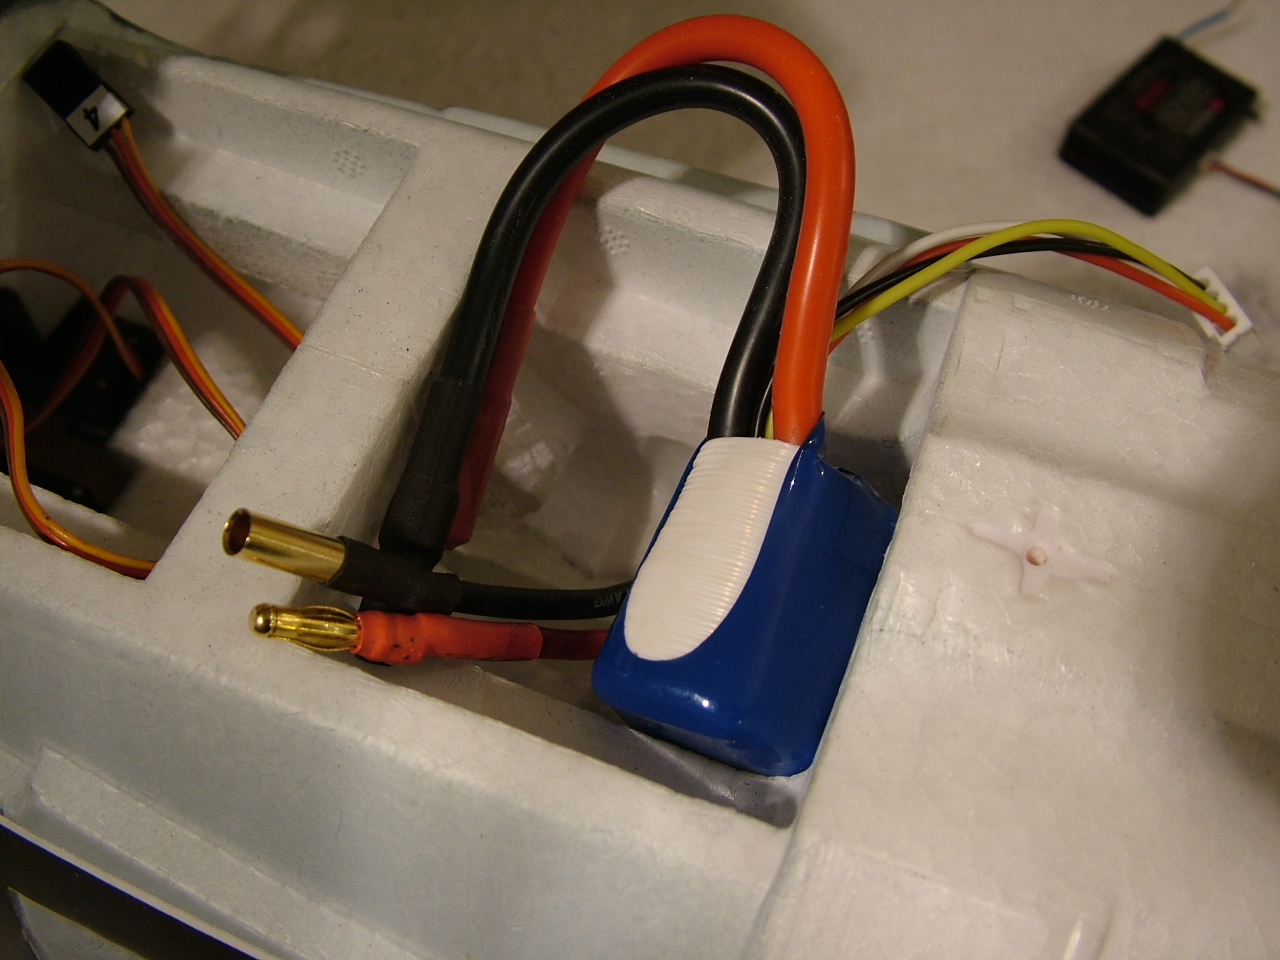
This brings the wires out at the bottom of the battery bay so they have to run up the side of the lipo. The fitted wires are also too short to reach the battery unless you've got small fingers and can reach inside the bay, attach the lipo and then drop it into place.

As it happens the ESC is fitted with a Deans connector and I use Bullet connectors on my lipo's... so I need a short adapter and this gives me the correct length needed. I won't be using the one shown, but you get the idea.


I've got eight brand new 3S 2,200mAh 45C lipo's and they slot in there very nicely, that should be enough to keep me going for an afternoon flying, especially with a few other models to put through their paces as well.
I just own the forum .... you guys make it great thanks.
Please Log in or Create an account to join the conversation.
- Quorneng
-

- Offline
- Forum Master
-

- Posts: 10058
- Thank you received: 19043


Cant imagine you can do much about it though.
One of the penalties of a ARTF "box of chocolates"!
Please Log in or Create an account to join the conversation.
- Phil Wood
-
Topic Author
- Offline
- Inactivated User
-
Ha ha, well spotted Simon,Quorneng wrote: Given that the pilot would be unable to see out to shoot at anything anyway but it looks like it would not do the top of the cowling much good if he did!
However, being the finicky sod that I am, I just had to have a close look at those guns and see if you're right.
The verdict is that they do clear the cowling so Mr Midget can blast away to his hearts content.

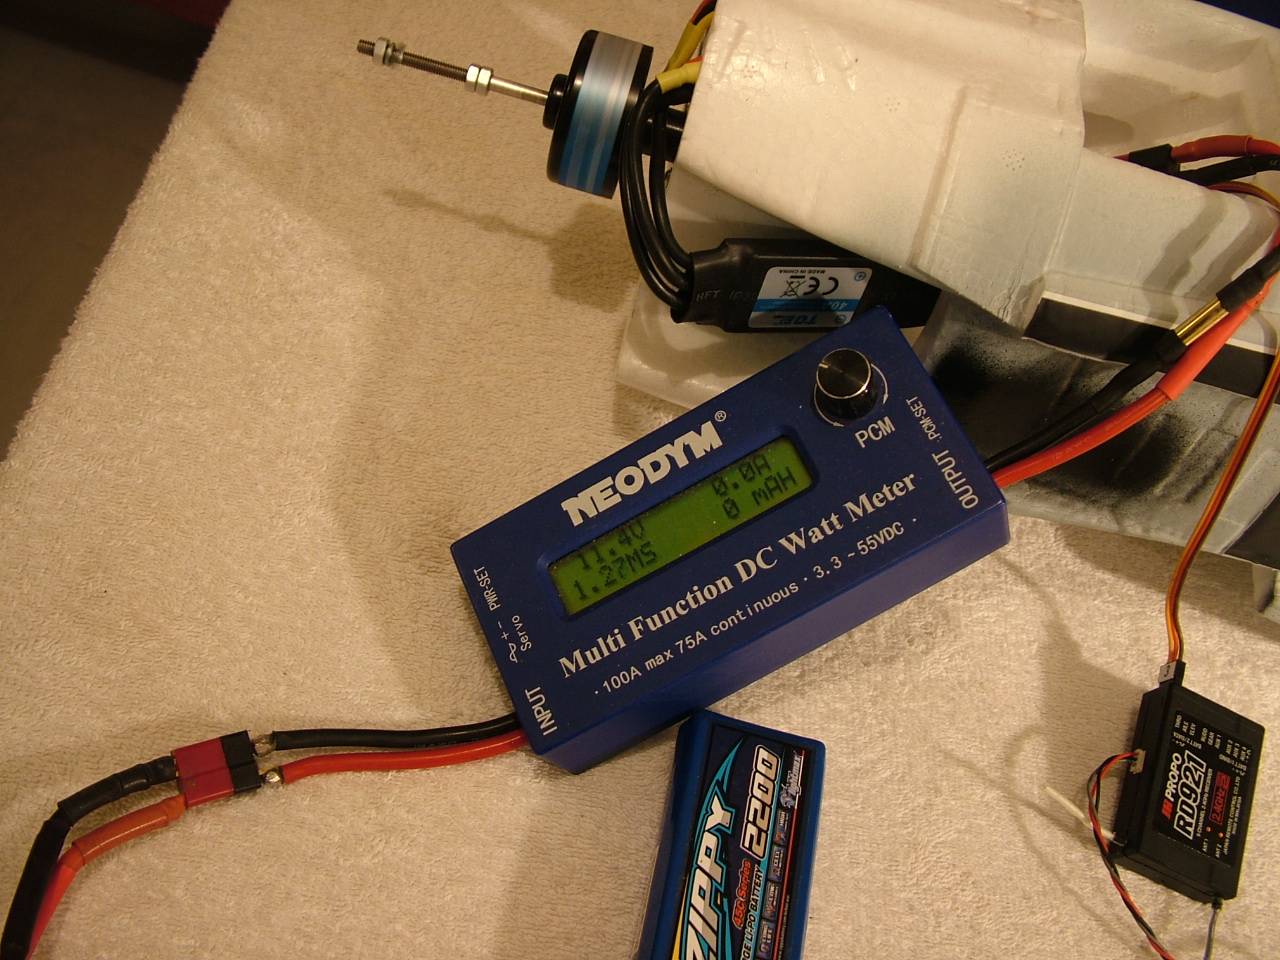
Next job was a quick check of the motor & ESC.... The motor runs up nicely & in the right direction.... Now to fasten the ESC in place making sure the airflow can get to both sides. Ignore the shoddy connections on my power meter, I'm in the middle of changing the Deans to Bullets.
I just own the forum .... you guys make it great thanks.
Please Log in or Create an account to join the conversation.
- Quorneng
-
- Offline
- Forum Master
-
- Posts: 10058
- Thank you received: 19043
but it looks like you've tweeked the position of the cowling a bit from the initial photo.
Please Log in or Create an account to join the conversation.
- Phil Wood
-
Topic Author
- Offline
- Inactivated User
-
There was a couple of millimeters side to side movement available to check & change the distance from wing tip to tail tip and make sure they're the same..... I couldn't be bothered running upstairs to my other workshop to get the steel rule, but a stick of wood can measure just as well.
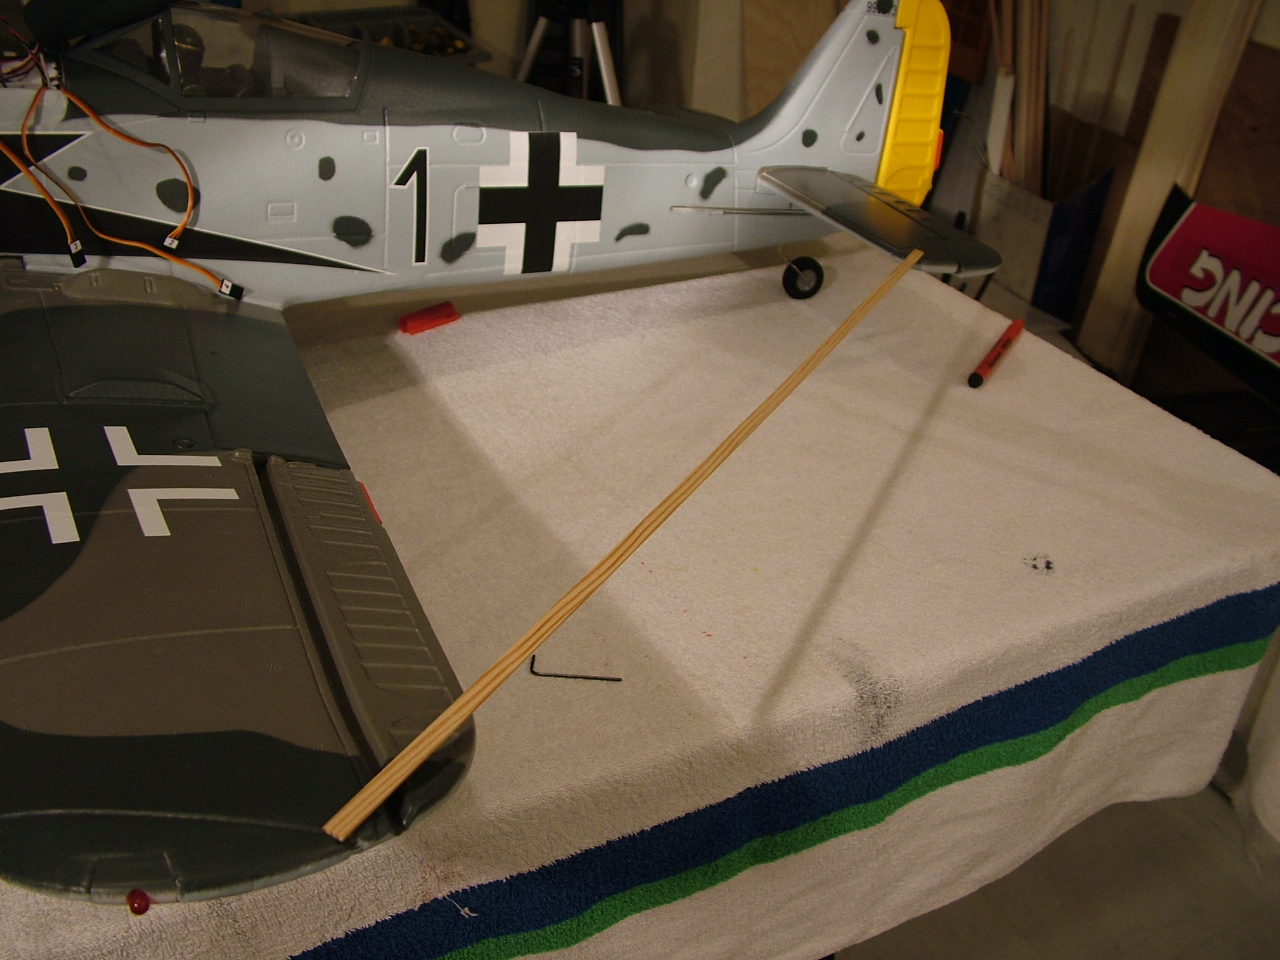
I just own the forum .... you guys make it great thanks.
Please Log in or Create an account to join the conversation.
- Phil Wood
-
Topic Author
- Offline
- Inactivated User
-
This is where disaster struck. ... You know that rule about not standing in front or to the side of a prop when it's spinning?.... well it's a good one.

I was a bit concerned about vibration when I first opened the kit & saw the length of the motor shaft and that huge plastic fan & spinner, I wasn't convinced the shaft was straight & was pretty sure the fan was warped.
Not the less I powered it up and was standing slightly in front and to the side. .... well the whole prop/motor assembly detached itself and took a slice at my arm.

Luckily the bullet connectors came apart and cut the power before the prop hit my arm, otherwise I'm sure there would have been a lot more than just this scratch.

It looks like the grub screw that holds the motor into its mounting had not been tightened up enough at the factory (maybe vibration helped? ... I'll have to check) and I failed to check it. .... That's not a mistake I'll make again in a hurry.

I just own the forum .... you guys make it great thanks.
Please Log in or Create an account to join the conversation.
- Garry Pollard
- Visitor
-

Garry
Please Log in or Create an account to join the conversation.
- Eric
-
- Offline
- Moderator
-
- Posts: 15406
- Thank you received: 14306
I had been warned to check that the motor mounting screws were tight, so I did, and they weren't, so tightened them up onto the firewall.
What I didn't know is that the motor was fitted into a flange, just like the FW, and the grubscrews were also slack, so the motor could turn in the mount.
The model went up alright - in flames - as the motor span round the opposite way to the prop, wound the wires tight, chafed them through on the 'bell', and blew up the speedo - whilst in flight. The speedo blew a hole in the glass fuz, and set fire to the woodwork of the lipo mount, the firewall, and a couple of stringers in the area.
I managed to save the tailplane and fin.

if you are calm and collected when all about you are going berserk - you've missed something important!
Please Log in or Create an account to join the conversation.
- Quorneng
-
- Offline
- Forum Master
-
- Posts: 10058
- Thank you received: 19043
It does not take much vibration for the 'noses' of the grub screws to locally deform the ally, work loose and off comes the whole motor assembly.
Its a good system for motor replacement
buta) get everything as well balanced a possible.
b) check the grub screws are tight regularly.
My Bombardier Q400 has the biggest heaviest prop/spinner combination of my planes with drum mounts.
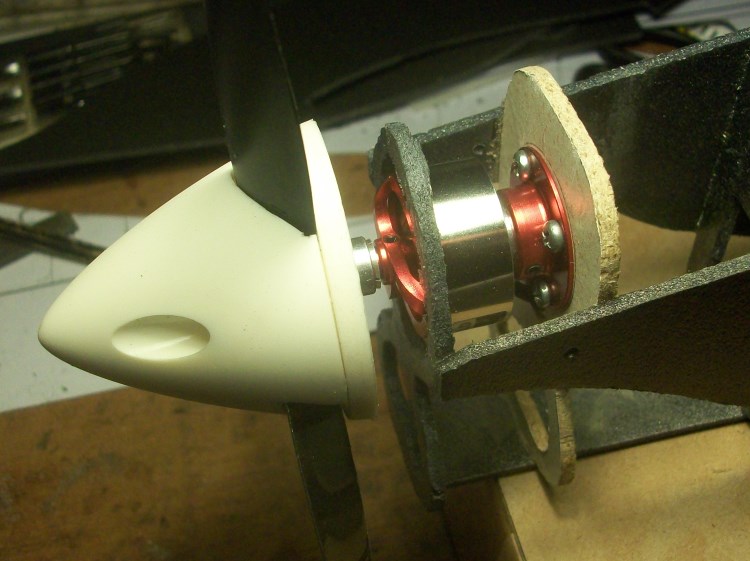
You can see the tiny holes either side in the nacelle skin so I can get in an allen key to check the grub screws are tight.
Please Log in or Create an account to join the conversation.
- Phil Wood
-
Topic Author
- Offline
- Inactivated User
-
I re-fitted the motor and spun it slowly whilst holding a steel rule from the table top to the center of the shaft.... I couldn't see any sign of the shaft being bent. This is making me think that what I originally thought was a bent shaft, was in fact the whole motor moving on its mount, so with the Fan, Prop, & Spinner all fitted I wound it up slowly.

Well I cranked it up to over 320 Watts+ and 33 Amps so with a 40A ESC I'm quite happy.
Vibration was negligible but I'd be a lot happier if the was some way of checking the balance with the fan & spinner fitted.I forgot to check the RPM so I'll do that today. I'm going to fasten her down & let her run just to make sure that grub screw stays in place. I'm not going to loctite it just in case it does cut into the mount and need more tightening.
Here's some pic's of the front end, all I've got to do now is some "Snagging" to one faulty aileron hinge & change a couple of horrible flimsy clevises that I just don't trust...... Oh, I've also got to pack away all those servo wires somewhere.


I just own the forum .... you guys make it great thanks.
Please Log in or Create an account to join the conversation.
- Forum
- Forum Categories
- Reviews - Model Flying Shops, Products, Kits
- Focke-Wulf Fw 190 ... Pol's assembling his ARTF.