
- Posts: 10058
- Thank you received: 19043
Cassna Bits
- Quorneng
-
 Topic Author
- Offline
- Forum Master
-

Less
More
26 Jun 2024 10:43 - 26 Jun 2024 10:45 #1
by Quorneng
Cassna Bits was created by Quorneng
Whilst putting some planes temporarily in the loft I came across the Depron Cessna Bits. It has been there for at least 2 years

So called because it is made up of bits (wings) from the now defunct Cessna Skymaster.
Fully complete with 35 meg Rx but testing showed a rather questionable LH aileron servo. This was probably why it was in the loft.
Anyway 2 days back it was calm in the evening so I chose to fly it anyway. It always did fly very well and it still does except as I was coming in to land the LH aileron decided to stick almost full up. No chance to correct the roll so it went in nose first.
Did the usual Depron trick of crushing the nose almost back to the wing leading edge but no other damage.
A nose rebuild.

The motor mount, the nose former and spinner are printed components for which I still have the stl files.
You would be hard put to even notice the new LH aileron servo.

Nice simple Depron building. Makes a change from the tricky EDF stuff.
So called because it is made up of bits (wings) from the now defunct Cessna Skymaster.
Fully complete with 35 meg Rx but testing showed a rather questionable LH aileron servo. This was probably why it was in the loft.
Anyway 2 days back it was calm in the evening so I chose to fly it anyway. It always did fly very well and it still does except as I was coming in to land the LH aileron decided to stick almost full up. No chance to correct the roll so it went in nose first.
Did the usual Depron trick of crushing the nose almost back to the wing leading edge but no other damage.
A nose rebuild.
The motor mount, the nose former and spinner are printed components for which I still have the stl files.
You would be hard put to even notice the new LH aileron servo.
Nice simple Depron building. Makes a change from the tricky EDF stuff.
Attachments:
Last edit: 26 Jun 2024 10:45 by Quorneng.
Thanks: Eric, Klipkopwildlife
Please Log in or Create an account to join the conversation.
- Klipkopwildlife
-

- Offline
- Administrator
-

- I'm supposed to be retired!
26 Jun 2024 11:59 #2
by Klipkopwildlife
Do it now, you may never get another chance
Replied by Klipkopwildlife on topic Cassna Bits
If it's going to fail, it will, at the most inconvenient time!
Do it now, you may never get another chance
Please Log in or Create an account to join the conversation.
- Eric
-

- Offline
- Moderator
-

Less
More
- Posts: 15406
- Thank you received: 14306
26 Jun 2024 12:03 #3
by Eric
if you are calm and collected when all about you are going berserk - you've missed something important!
Replied by Eric on topic Cassna Bits
Things put away temporarily! -


if you are calm and collected when all about you are going berserk - you've missed something important!
Thanks: Klipkopwildlife
Please Log in or Create an account to join the conversation.
- Quorneng
-
Topic Author
- Offline
- Forum Master
-
Less
More
- Posts: 10058
- Thank you received: 19043
26 Jun 2024 23:16 #4
by Quorneng
Replied by Quorneng on topic Cassna Bits
Nose now structurally complete.

The glue has to fully harden before sanding and painting.
Teste everything works as it should.
Mightbe finished to fly tomorrow evening.

The glue has to fully harden before sanding and painting.
Teste everything works as it should.
Mightbe finished to fly tomorrow evening.
Attachments:
Thanks: Eric, Klipkopwildlife
Please Log in or Create an account to join the conversation.
- Quorneng
-
Topic Author
- Offline
- Forum Master
-
Less
More
- Posts: 10058
- Thank you received: 19043
28 Jun 2024 23:02 #5
by Quorneng
Replied by Quorneng on topic Cassna Bits
One advantage of the "waiting for glue drying" on the Swiss Venom rebuild was it left enough time to complete the rebuild of the Cessna Bits.

One part that worked really well if fact better than the original version is the printed 2 part spinner.

The spinner back plate is just 0,2mm clear of the nose former and it runs true too.

One part that worked really well if fact better than the original version is the printed 2 part spinner.
The spinner back plate is just 0,2mm clear of the nose former and it runs true too.
Attachments:
Thanks: Eric, Klipkopwildlife, jon.in.swansea
Please Log in or Create an account to join the conversation.
- Quorneng
-
Topic Author
- Offline
- Forum Master
-
Less
More
- Posts: 10058
- Thank you received: 19043
30 Jun 2024 00:21 #6
by Quorneng
Replied by Quorneng on topic Cassna Bits
To my considerable satisfaction the Cessna Bits flies very nicely just as it always did.
Actually flew it both am and pm 5 minutes each time. I was going to video it but my video cam battery has given up the ghost.
Courtesy of a generous 9x6 prop and its light weight of 370g (13 oz) with a 1500mAh 3s on board it has both true vertical and a very low power cruise. Based on the consumption of todays flights it should be able to manage close to 30 minutes.
About my only grumble is the significant trim effects when applying power. Its current 35Meg radio has no mixes but if I change to 2.4 both proportional elevator and aileron trims could be added to substantially compensate for throttle position.
Actually flew it both am and pm 5 minutes each time. I was going to video it but my video cam battery has given up the ghost.
Courtesy of a generous 9x6 prop and its light weight of 370g (13 oz) with a 1500mAh 3s on board it has both true vertical and a very low power cruise. Based on the consumption of todays flights it should be able to manage close to 30 minutes.
About my only grumble is the significant trim effects when applying power. Its current 35Meg radio has no mixes but if I change to 2.4 both proportional elevator and aileron trims could be added to substantially compensate for throttle position.
Thanks: Eric, Klipkopwildlife, jon.in.swansea
Please Log in or Create an account to join the conversation.
- Quorneng
-
Topic Author
- Offline
- Forum Master
-
Less
More
- Posts: 10058
- Thank you received: 19043
03 Aug 2024 22:38 - 03 Aug 2024 22:41 #7
by Quorneng
Replied by Quorneng on topic Cassna Bits
Following the substantial crash on the 29Jun24.

The replacement nose is making progress.

The damage was rather more than just replacing the nose skin as the battery is now further forward requiring some modification to the fuselage internal structure.
The crash broke the 9x6 prop. These used to be "two a penny" on Ebay but are now scarce and expensive as it is not a popular size for quads. 2 pairs (CW & CCW) of 9x5s for not much more than for a single 9x6!
It does show where the demand is and its not for RC plane spares
.
The replacement nose is making progress.
The damage was rather more than just replacing the nose skin as the battery is now further forward requiring some modification to the fuselage internal structure.
The crash broke the 9x6 prop. These used to be "two a penny" on Ebay but are now scarce and expensive as it is not a popular size for quads. 2 pairs (CW & CCW) of 9x5s for not much more than for a single 9x6!
It does show where the demand is and its not for RC plane spares
.
Attachments:
Last edit: 03 Aug 2024 22:41 by Quorneng.
Thanks: Eric, Klipkopwildlife, jon.in.swansea
Please Log in or Create an account to join the conversation.
- Eric
-
- Offline
- Moderator
-
Less
More
- Posts: 15406
- Thank you received: 14306
04 Aug 2024 06:52 #8
by Eric
if you are calm and collected when all about you are going berserk - you've missed something important!
Replied by Eric on topic Cassna Bits
I've noticed - APC E-props have nearly doubled in price.
if you are calm and collected when all about you are going berserk - you've missed something important!
Please Log in or Create an account to join the conversation.
- jon.in.swansea
-

- Offline
- Elite Member
-

Less
More
- Posts: 757
- Thank you received: 1164
04 Aug 2024 07:25 #9
by jon.in.swansea
Replied by jon.in.swansea on topic Cassna Bits
Expensive props - I know quite a few folk are wary of printing props due to the usual risks. And
Tony mentioned he was using a particularly high strength PLA for bits of the
Big Bobber. Any one tried that kind of filament on a prop - it might stand up to higher revs?
Tony mentioned he was using a particularly high strength PLA for bits of the
Big Bobber. Any one tried that kind of filament on a prop - it might stand up to higher revs?
Thanks: Klipkopwildlife
Please Log in or Create an account to join the conversation.
- Klipkopwildlife
-
- Offline
- Administrator
-
- I'm supposed to be retired!
04 Aug 2024 18:44 #10
by Klipkopwildlife
Do it now, you may never get another chance
Replied by Klipkopwildlife on topic Cassna Bits
Good thought Jon, send me a link for a 13 x 8 please? I'll try it.
Do it now, you may never get another chance
Please Log in or Create an account to join the conversation.
- Quorneng
-
Topic Author
- Offline
- Forum Master
-
Less
More
- Posts: 10058
- Thank you received: 19043
04 Aug 2024 21:56 #11
by Quorneng
Replied by Quorneng on topic Cassna Bits
So far my own experience with printed props at relatively low power levels is not a lack of strength so much as a lack of efficiency.
I have not yet made a prop from a downloadable stl file for a filament printer that produces a prop matching the "thinness" of a commercial e-prop and certainly not the surface finish without considerable hand finishing that rather defeats the object of doing it in the first place.
I still wait to be amazed!
I have not yet made a prop from a downloadable stl file for a filament printer that produces a prop matching the "thinness" of a commercial e-prop and certainly not the surface finish without considerable hand finishing that rather defeats the object of doing it in the first place.
I still wait to be amazed!
Thanks: Klipkopwildlife
Please Log in or Create an account to join the conversation.
- jon.in.swansea
-
- Offline
- Elite Member
-
Less
More
- Posts: 757
- Thank you received: 1164
05 Aug 2024 06:38 #12
by jon.in.swansea
Replied by jon.in.swansea on topic Cassna Bits
Just to double check those dimensions - 13 x 8 - a seriously huge beastie. That seems a
step up size from what I remember with the Fun Cub ( I could be wrong about that)? What
sort of shaft diameter and hub thickness would you be looking to accommodate?
Cautious me would prefer testing the idea out on a 9 or 10" prop first. There are going
to be some serious stresses near the hub if RPM shifts quickly. I will have a think about this....
I remember an experiment I did with surface finishing and balancing was to brush
on a thin coating of clear resin rather than endlessly try to sand down the surface.
step up size from what I remember with the Fun Cub ( I could be wrong about that)? What
sort of shaft diameter and hub thickness would you be looking to accommodate?
Cautious me would prefer testing the idea out on a 9 or 10" prop first. There are going
to be some serious stresses near the hub if RPM shifts quickly. I will have a think about this....
I remember an experiment I did with surface finishing and balancing was to brush
on a thin coating of clear resin rather than endlessly try to sand down the surface.
Thanks: Klipkopwildlife
Please Log in or Create an account to join the conversation.
- Quorneng
-
Topic Author
- Offline
- Forum Master
-
Less
More
- Posts: 10058
- Thank you received: 19043
05 Aug 2024 22:43 - 05 Aug 2024 22:46 #13
by Quorneng
Replied by Quorneng on topic Cassna Bits
These pictures demonstrate my concern of efficiency of 3D printed props.
A comparison between a printed 9x6 stl file downloaded from Thingyverse compared to a 9x6 "slow fly" prop.
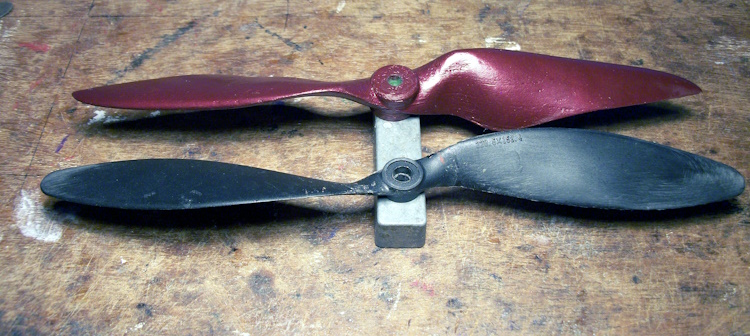
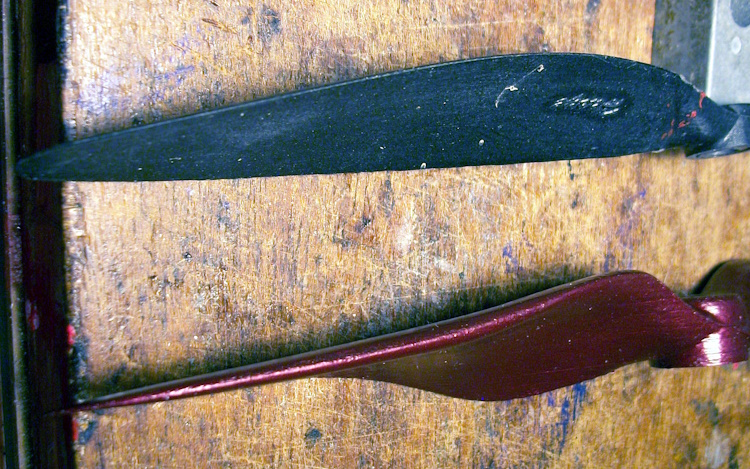
Apart from the work required to give the printed prop blades a smooth finish whilst they very strong & stiff have a much thicker section, actually16% t/c at 1/4 span. The slow fly is just 8% t/c at the same point.
I would suggest that although the printed prop was marked as an electric prop its form is much closer to an IC type.
Just out of interest I used the CURA "scale" facility to create a 10x6 and 7x6 as well.as the original 9x6.

The Cessna Bits rebuild is nearly complete.

A comparison between a printed 9x6 stl file downloaded from Thingyverse compared to a 9x6 "slow fly" prop.
Apart from the work required to give the printed prop blades a smooth finish whilst they very strong & stiff have a much thicker section, actually16% t/c at 1/4 span. The slow fly is just 8% t/c at the same point.
I would suggest that although the printed prop was marked as an electric prop its form is much closer to an IC type.
Just out of interest I used the CURA "scale" facility to create a 10x6 and 7x6 as well.as the original 9x6.
The Cessna Bits rebuild is nearly complete.
Attachments:
Last edit: 05 Aug 2024 22:46 by Quorneng.
Thanks: Eric, Klipkopwildlife, jon.in.swansea
Please Log in or Create an account to join the conversation.
- Klipkopwildlife
-
- Offline
- Administrator
-
- I'm supposed to be retired!
06 Aug 2024 08:38 - 06 Aug 2024 08:50 #14
by Klipkopwildlife
Do it now, you may never get another chance
Replied by Klipkopwildlife on topic Cassna Bits
Yup, the FunCub uses a 13 x 8, 13 x 4 or 6 is recommended but I find the lower pitches seriously lacking in 'grunt'. The Super Cub needs a 12 x 6 but uses 4S so 25% more revs.
I'd have to set up a test rig, testing in a plane would rip the motor out if a blade became detached.
6mm shaft
I'd have to set up a test rig, testing in a plane would rip the motor out if a blade became detached.
6mm shaft
Do it now, you may never get another chance
Last edit: 06 Aug 2024 08:50 by Klipkopwildlife.
Thanks: jon.in.swansea
Please Log in or Create an account to join the conversation.
- jon.in.swansea
-
- Offline
- Elite Member
-
Less
More
- Posts: 757
- Thank you received: 1164
08 Aug 2024 12:04 #15
by jon.in.swansea
Replied by jon.in.swansea on topic Cassna Bits
Here are a couple of images of the prop I was proposing to scale up.
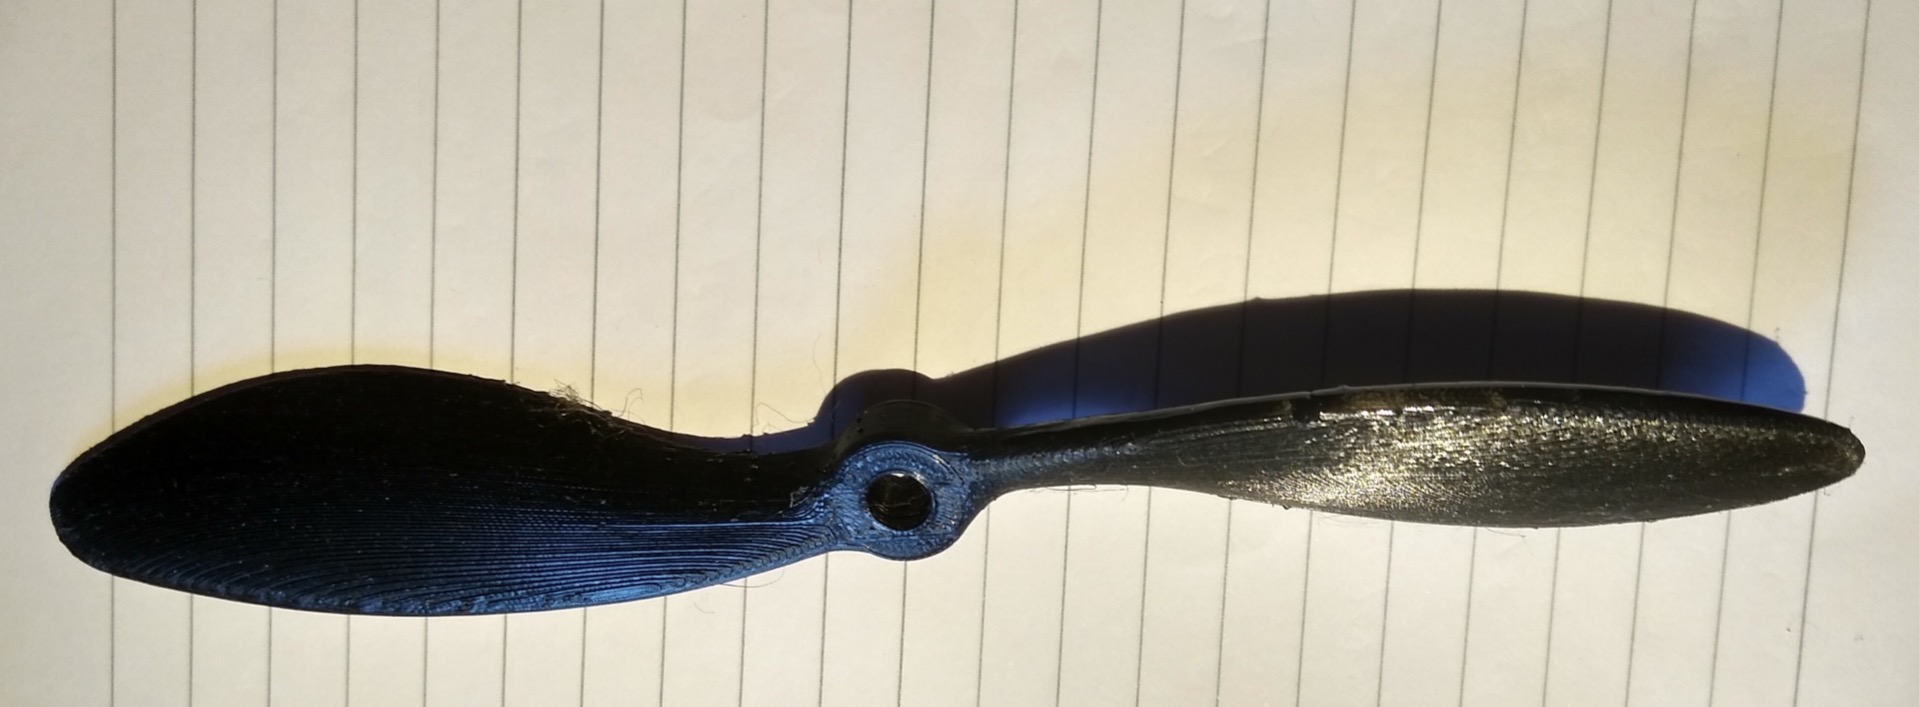

And to correct it's balance rather than 'subtractive' sanding. I would do
20-30 seconds of sanding only and then put it on the balance stand.
I brushed a thin coating of clear two part resin on the 'lighter' blade.
Take if off the balance so it could start curing in a horizontal position, wait
5 minutes to stiffen and re-check the balance and if needed brush
a bit more on. Once balanced transfer to a curing rod and mount the next prop for testing.
Then let the lot finish curing overnight.
It takes awhile for the resin to cure but saved lots of time and arm pain in the sanding. I didn't
spend much, if any, time to make the resin a beauty coat. I certainly sorts
layer lines and minor blemishes.

And to correct it's balance rather than 'subtractive' sanding. I would do
20-30 seconds of sanding only and then put it on the balance stand.
I brushed a thin coating of clear two part resin on the 'lighter' blade.
Take if off the balance so it could start curing in a horizontal position, wait
5 minutes to stiffen and re-check the balance and if needed brush
a bit more on. Once balanced transfer to a curing rod and mount the next prop for testing.
Then let the lot finish curing overnight.
It takes awhile for the resin to cure but saved lots of time and arm pain in the sanding. I didn't
spend much, if any, time to make the resin a beauty coat. I certainly sorts
layer lines and minor blemishes.
Attachments:
Thanks: Klipkopwildlife
Please Log in or Create an account to join the conversation.
Time to create page: 0.522 seconds