
Mad Hatter - F3-RES
- martynk
-
 Topic Author
- Offline
- Elite Member
-

Less
More
04 Nov 2016 14:45 #16
by martynk
--
Martyn
mad-aeromodeller.blogspot.co.uk/
Replied by martynk on topic Re:Mad Hatter - F3-RES
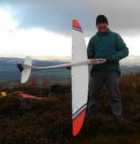
BTW, this is the 100S (100" span) F5J (Electric glider) that preceded this one, modelled by no 2 daughter. Its called 'Cheshire Cat'

Now fitted with height limiter (200m) under power and 30sec max power on time.
Now fitted with height limiter (200m) under power and 30sec max power on time.
--
Martyn
mad-aeromodeller.blogspot.co.uk/
Thanks: Eric, Firewood
Please Log in or Create an account to join the conversation.
- Ex-Member
- Visitor
-

04 Nov 2016 17:50 #17
by Ex-Member
Replied by Ex-Member on topic Re:Mad Hatter - F3-RES
Thanks for the responses Martyn. The questions were directed towards a bungee for F3-RES and to replace the 100ft of 1/4" surgical rubber that I used to use to launch my 100S model. I've never competed in gliding, but I have had many an enjoyable session thermaling off the flat and aerobating off the slope.
I bought the bungee in 1982 and used it pretty continuously until about 2005 when it finally succumbed to rot! I've been quietly looking for a replacement ever since.
I bought the bungee in 1982 and used it pretty continuously until about 2005 when it finally succumbed to rot! I've been quietly looking for a replacement ever since.
Please Log in or Create an account to join the conversation.
- martynk
-
Topic Author
- Offline
- Elite Member
-
05 Nov 2016 15:16 #18
by martynk
--
Martyn
mad-aeromodeller.blogspot.co.uk/
Replied by martynk on topic Re:Mad Hatter - F3-RES
Hi Andy
This thread may answer your question..
www.barcs.co.uk/forums/topic/5969-which-latex-surgical-tubing/
Best wishes
This thread may answer your question..
www.barcs.co.uk/forums/topic/5969-which-latex-surgical-tubing/
Best wishes
--
Martyn
mad-aeromodeller.blogspot.co.uk/
Thanks: Ex-Member
Please Log in or Create an account to join the conversation.
- martynk
-
Topic Author
- Offline
- Elite Member
-
01 Dec 2016 10:31 - 01 Dec 2016 10:33 #19
by martynk
--
Martyn
mad-aeromodeller.blogspot.co.uk/
Replied by martynk on topic Mad Hatter - F3-RES
A bit of a delay while I was waiting for the Laser Cutter to catch me up. One thing I have learnt with these high performance wing sections is that you cant compromise. The spar caps are 0.007" carbon - try cutting that slot with a scalpel.
So while I was waiting, I have covered the tail components using 5 micron aluminised Mylar. I have never really mastered this and it shows


You need to apply glue - thinned old fashioned Evo Stik Orange gunge contact adhesive and then pull the film tight over the structure and then allow to dry. Shrink using heat guns and irons as usual.
The tailplane is mounted on a Vladimir Models Carbon mount, These are works of art. I actually made one of these by moulding in a simple compression mould when I built the Bubble Dancer. However, the commercial version is much nicer.

The wing ribs arrived on Monday: They were cut by Belair
Wing construction is slightly different. Broadly, cut the full thickness webs/spars to size first. I use a vernier to get the measurement by measuring the gap at each wing rib between the caps. The terminology is a bit strange and not what I am used to. The Carbon top and bottoms are caps, the webs are spars..
Cut the 0.007" carbon to size (used in the tips, 0.014" in the middle panels and 0.025" in the inner panels)
Apply a thin coat of slow set epoxy and place the ribs and "spars" into place and then allow to dry. Its a slow process. When happy, add the top cap and press down again. Slow set epoxy is used to make sure that is gets into the spars and you keep compressing to get a good seal.

and

Wing tips laminated with 6 x 1/32 balsa plus 1 0.007" carbon strip inlaid for strength. It wont break
I still need to get this finished by 31/12/16..
Martyn
So while I was waiting, I have covered the tail components using 5 micron aluminised Mylar. I have never really mastered this and it shows
You need to apply glue - thinned old fashioned Evo Stik Orange gunge contact adhesive and then pull the film tight over the structure and then allow to dry. Shrink using heat guns and irons as usual.
The tailplane is mounted on a Vladimir Models Carbon mount, These are works of art. I actually made one of these by moulding in a simple compression mould when I built the Bubble Dancer. However, the commercial version is much nicer.
The wing ribs arrived on Monday: They were cut by Belair
Wing construction is slightly different. Broadly, cut the full thickness webs/spars to size first. I use a vernier to get the measurement by measuring the gap at each wing rib between the caps. The terminology is a bit strange and not what I am used to. The Carbon top and bottoms are caps, the webs are spars..
Cut the 0.007" carbon to size (used in the tips, 0.014" in the middle panels and 0.025" in the inner panels)
Apply a thin coat of slow set epoxy and place the ribs and "spars" into place and then allow to dry. Its a slow process. When happy, add the top cap and press down again. Slow set epoxy is used to make sure that is gets into the spars and you keep compressing to get a good seal.
and
Wing tips laminated with 6 x 1/32 balsa plus 1 0.007" carbon strip inlaid for strength. It wont break
I still need to get this finished by 31/12/16..
Martyn
--
Martyn
mad-aeromodeller.blogspot.co.uk/
Last edit: 01 Dec 2016 10:33 by martynk.
Thanks: Eric, Quorneng, Ex-Member, Firewood
Please Log in or Create an account to join the conversation.
- martynk
-
Topic Author
- Offline
- Elite Member
-
03 Jan 2017 14:32 - 03 Jan 2017 14:33 #20
by martynk
--
Martyn
mad-aeromodeller.blogspot.co.uk/
Replied by martynk on topic Mad Hatter - F3-RES
Apologies - I had forgotten about this blog.. 
Happy New Year (or in my case a hapless another year)
A bit of an update on this.
The wing construction followed basically that for the Cheshire Cat using Carbon caps on soft balsa spars/webs.Very photos - surprisingly - you will have to imagine a wing under construction - sorry.

While the wing was almost built - waiting for the spoilers to be added - I started work on the fus. F3-RES rules limit how far the boom can come forward under the wing (to prevent carbon pods being used)

My pod is made from a sandwich of 2 x 1/2" balsa with a 1/16 ply sides and 1/32 ply top and bottom. The tow hook plate is from 6mm ply bevelled in front and back and then well glued to the sides. The observant will notice that it is undrilled for a tow hook

This shot looks a bit odd. Basically I use laser alignment to get the fin and tailplane square with the wing dowel. It looks bent but as the light is not passing through water and the refractive index does not change over a metre in air I have to assume that its straight and the camera is wonky

Radio installation. I have gone for a LV setup using a 1000mAh 1S LiPo for power. Power switch in the top
The wing was covered in Black Lite-Tex (World Models - its film) over the D Box and a Polyester Tissue (red) over the TE of the wing.
I had big problems with the D box though. To try and keep weight down I used 1/32 sheet balsa. As I sanded the LE profile, the sheet kept coming detached. When I build another I will definitely use a false LE to support the D box. As the time I feeling pretty fed up. I now try and get the LE profile as accurate as I can and because I seemed to be chasing my tail on this D box sheeting kept coming away it got slightly misshaped. In cold light of day, its not too bad but the shed was full of expletives last week.

The tow hook. The second night of expletives.. After securing the R/E push rod tubes I realised that I couldn't get into the fus to secure the tow hook.
The tow hook position was calculated (based on a 40% CG) and drilled. The hook was made from a length of M3 stainless steel bolt and is clamped between a captive nut on the inside then locked with a nut on the outside. I needed to make an access hatch to be able to do this which is now semi permanently glued into place
Not ideal but it does mean that I can move the hook if needed without too much surgery

And this is what it looks like...
To balance it, I had to add 40g of lead into the nose and an incision was made, balsa hollowed and molten lead added.
AUW of the model was now just over 600g - I need to measure it again..
So - it was basically finished. LiPo charged and a calm sunny day. What could possibly go wrong
At the patch for 11:30. Quick function test - no elevator Examination showed that I had somehow managed to fracture the signal line so I pulled out the spoiler servo and popped that into the elevator servo slot and realigned everything. Ho hum
Back to basics. Checking the glide from a hand launch into long grass. A bit of elevator tweaking and it was ready for a gentle bungee launch.
Now. today was calm - absolutely not a breath of wind. Nil zilch Zero nothing. Cant ever remember a day so calm.
Pegged out the bungee, attached the tow line - about 10m stretch and it was away. But it only got about 6m high but enough to test that the glide was OK.
First flight and it was obvious that I had far too much elevator response. So reduced that by 50% (on the transmitter) and this time with a bit more stretch I tried again. Getting better but only 10-15m high but good enough for 1 minute plus flights. Still too twitchy on elevator and I am losing a lot of height trying to gain height. Not getting a good transition.
More stretch and the model is going up like a missile - but only to about 15m and still jut over 1 minute flights..
More stretch - and I break the bungee (aaaagh)
Repaired the bungee and I am now leaning back on the line - but getting slightly better transition by just letting the model glide off the line rather than trying to ping it.
By now I am doing quite a lot of walking.
Next flight - looking better but managed to hit a telegraph pole which terminated that flight. No damage
One of our members turned up to fly a Heli so I had a rest while he had a flight. The faintest breeze then came up.
Next flight - in slight sink was just under 2 minutes but getting much higher on the line although I lost the elevator setting some how and it was over elevated - lost a fair bit of height but definitely getting better
The final flight - I was already an hour late for lunch and the breeze (Beaufort 1) gave me just enough lift on the line - a perfect transition and down in 2:45 - which is what I have submitted for my first postal comp flight. I am still not getting max height. It was still very calm - the drift was about 150m in 2 minutes.
I noticed on the last launch that the wing was bending quite a bit. A nice curve but not unduly concerned. Models that bend are less likely to fracture
Until I took the joiner out.

The joiner fell apart when I bent it. it had fractured through about 90% - possibly caused with the impact of the Telegraph pole) which caused no other damage or dings but apparently CF does like impact shocks.
So - I need a plan B for a joiner. Trying to avoid Steel due to the weight but probably not many other options
That's about it.. I'll build another version later in the year after I have investigated this one a bit more
Happy New Year (or in my case a hapless another year)
A bit of an update on this.
The wing construction followed basically that for the Cheshire Cat using Carbon caps on soft balsa spars/webs.Very photos - surprisingly - you will have to imagine a wing under construction - sorry.
While the wing was almost built - waiting for the spoilers to be added - I started work on the fus. F3-RES rules limit how far the boom can come forward under the wing (to prevent carbon pods being used)
My pod is made from a sandwich of 2 x 1/2" balsa with a 1/16 ply sides and 1/32 ply top and bottom. The tow hook plate is from 6mm ply bevelled in front and back and then well glued to the sides. The observant will notice that it is undrilled
for a tow hook
This shot looks a bit odd. Basically I use laser alignment to get the fin and tailplane square with the wing dowel. It looks bent but as the light is not passing through water and the refractive index does not change over a metre in air I have to assume that its straight and the camera is wonky
Radio installation. I have gone for a LV setup using a 1000mAh 1S LiPo for power. Power switch in the top
The wing was covered in Black Lite-Tex (World Models - its film) over the D Box and a Polyester Tissue (red) over the TE of the wing.
I had big problems with the D box though. To try and keep weight down I used 1/32 sheet balsa. As I sanded the LE profile, the sheet kept coming detached. When I build another I will definitely use a false LE to support the D box. As the time I feeling pretty fed up. I now try and get the LE profile as accurate as I can and because I seemed to be chasing my tail on this D box sheeting kept coming away it got slightly misshaped. In cold light of day, its not too bad but the shed was full of expletives last week.
The tow hook. The second night of expletives.. After securing the R/E push rod tubes I realised that I couldn't get into the fus to secure the tow hook.
The tow hook position was calculated (based on a 40% CG) and drilled. The hook was made from a length of M3 stainless steel bolt and is clamped between a captive nut on the inside then locked with a nut on the outside. I needed to make an access hatch to be able to do this which is now semi permanently glued into place
Not ideal but it does mean that I can move the hook if needed without too much surgery
And this is what it looks like...
To balance it, I had to add 40g of lead into the nose and an incision was made, balsa hollowed and molten lead added.
AUW of the model was now just over 600g - I need to measure it again..
So - it was basically finished. LiPo charged and a calm sunny day. What could possibly go wrong
At the patch for 11:30. Quick function test - no elevator
Examination showed that I had somehow managed to fracture the signal line so I pulled out the spoiler servo and popped that into the elevator servo slot and realigned everything. Ho humBack to basics. Checking the glide from a hand launch into long grass. A bit of elevator tweaking and it was ready for a gentle bungee launch.
Now. today was calm - absolutely not a breath of wind. Nil zilch Zero nothing. Cant ever remember a day so calm.
Pegged out the bungee, attached the tow line - about 10m stretch and it was away. But it only got about 6m high but enough to test that the glide was OK.
First flight and it was obvious that I had far too much elevator response. So reduced that by 50% (on the transmitter) and this time with a bit more stretch I tried again. Getting better but only 10-15m high but good enough for 1 minute plus flights. Still too twitchy on elevator and I am losing a lot of height trying to gain height. Not getting a good transition.
More stretch and the model is going up like a missile - but only to about 15m and still jut over 1 minute flights..
More stretch - and I break the bungee (aaaagh)
Repaired the bungee and I am now leaning back on the line - but getting slightly better transition by just letting the model glide off the line rather than trying to ping it.
By now I am doing quite a lot of walking.
Next flight - looking better but managed to hit a telegraph pole which terminated that flight. No damage
One of our members turned up to fly a Heli so I had a rest while he had a flight. The faintest breeze then came up.
Next flight - in slight sink was just under 2 minutes but getting much higher on the line although I lost the elevator setting some how and it was over elevated - lost a fair bit of height but definitely getting better
The final flight - I was already an hour late for lunch and the breeze (Beaufort 1) gave me just enough lift on the line - a perfect transition and down in 2:45 - which is what I have submitted for my first postal comp flight. I am still not getting max height. It was still very calm - the drift was about 150m in 2 minutes.
I noticed on the last launch that the wing was bending quite a bit. A nice curve but not unduly concerned. Models that bend are less likely to fracture
Until I took the joiner out.
The joiner fell apart when I bent it. it had fractured through about 90% - possibly caused with the impact of the Telegraph pole) which caused no other damage or dings but apparently CF does like impact shocks.
So - I need a plan B for a joiner. Trying to avoid Steel due to the weight but probably not many other options
That's about it.. I'll build another version later in the year after I have investigated this one a bit more
--
Martyn
mad-aeromodeller.blogspot.co.uk/
Last edit: 03 Jan 2017 14:33 by martynk.
Thanks: blue123, Ex-Member, Septic, Kintosh
Please Log in or Create an account to join the conversation.
Time to create page: 0.187 seconds