
- Posts: 9436
- Thank you received: 19043
Petiterina
- Quorneng
-
 Topic Author
- Offline
- Forum Master
-

Less
More
09 Sep 2016 17:10 - 09 Sep 2016 17:19 #1
by Quorneng
Petiterina was created by Quorneng
As I mentioned in my proposed Comet build I had for some time been considering joining the 2016 RCM&E
Ballerina
mass build.
Well I can resist no longer!
So a Depron little Ballerina - "Petiterina"
3/4 the size giving 40" span.
The object is to use Depron as much as possible with the minimum of reinforcing and even then only balsa!
The wing plan modified to be built in 2 mm Depron with closer spaced ribs and a wide tapered spar that has balsa flanges just 0.8 mm thick. :ohmy:

I am still considering whether to use servos directly coupled to the ailerons as I used on the Endurance. Its a bit fiddly to set up but it does give a very 'clean' appearance with no external linkage.
At 3/4 the size it will only have just over half (9/16) the wing area so it will have to be less than half the weight to keep a reasonable flying speed.
The object is find out just how light it can go whilst still retaining a good performance (150W/lb?) along with a more than adequate strength.
And I haven't forgotten the Comet - I am waiting for the EDFs from China!

Well I can resist no longer!
So a Depron little Ballerina - "Petiterina"
3/4 the size giving 40" span.
The object is to use Depron as much as possible with the minimum of reinforcing and even then only balsa!
The wing plan modified to be built in 2 mm Depron with closer spaced ribs and a wide tapered spar that has balsa flanges just 0.8 mm thick. :ohmy:
I am still considering whether to use servos directly coupled to the ailerons as I used on the Endurance. Its a bit fiddly to set up but it does give a very 'clean' appearance with no external linkage.
At 3/4 the size it will only have just over half (9/16) the wing area so it will have to be less than half the weight to keep a reasonable flying speed.
The object is find out just how light it can go whilst still retaining a good performance (150W/lb?) along with a more than adequate strength.
And I haven't forgotten the Comet - I am waiting for the EDFs from China!
Last edit: 09 Sep 2016 17:19 by Quorneng.
Thanks: Klipkopwildlife, boz, Firewood
Please Log in or Create an account to join the conversation.
- Quorneng
-
Topic Author
- Offline
- Forum Master
-
Less
More
- Posts: 9436
- Thank you received: 19043
09 Sep 2016 23:33 #2
by Quorneng
Replied by Quorneng on topic Petiterina
Been pressing on. Just one wing half at the moment to identify the best way to actually make it although I am cutting out most of the bits for the other half at the same time.
The rib template.
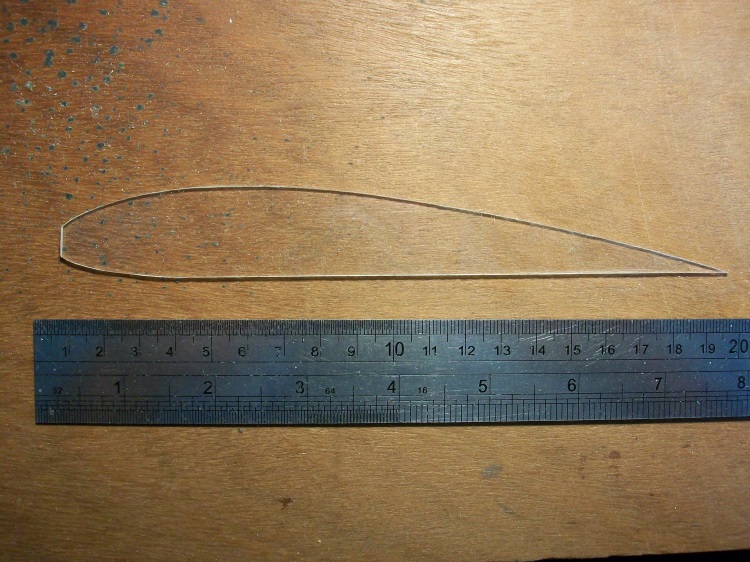
It is quite easy to accurately cut round this on 2 mm Depron - which is just as well as there are 26 to do.
The lower wing skin pieces.

When the 2 mm Depron is glued on top of the 0.8 mm balsa it does of course stand proud above te rest of the skin so it is notched with a suitable 2mm wide file.

This has the advantage as it provide a 'location' for each rib.
The ribs start to go in.

So far so good.
The rib template.
It is quite easy to accurately cut round this on 2 mm Depron - which is just as well as there are 26 to do.
The lower wing skin pieces.
When the 2 mm Depron is glued on top of the 0.8 mm balsa it does of course stand proud above te rest of the skin so it is notched with a suitable 2mm wide file.
This has the advantage as it provide a 'location' for each rib.
The ribs start to go in.
So far so good.
Thanks: Klipkopwildlife, boz, Firewood
Please Log in or Create an account to join the conversation.
- Quorneng
-
Topic Author
- Offline
- Forum Master
-
Less
More
- Posts: 9436
- Thank you received: 19043
10 Sep 2016 19:47 - 10 Sep 2016 19:51 #3
by Quorneng
Replied by Quorneng on topic Petiterina
Moving on the shear webs added

All 32 of them each individually fitted!
Then the front top skin and top spar flange.

In this state the wing is plaenty strong enough to be handled so a 6 mm Depron leading edge is added and carefully sanded to profile.

The RH wing in this state weighs 0.91 oz (25.8g)
I will make a start of the LH wing whilst I can still remember exactly how it is made! :woohoo:
Then the aileron is cut out and its servo glued in.
The original Ballerina had its undercarriage fixed into the wing using substantial hard wood mounts. I prefer a 'springy' undercarriage with significant vertical movement as this greatly reduces the shock loading on the mountings, an important consideration with a Depron 'moncoque' construction where the whole object to spread the loads as widely as possible.
Although the Petiterina will be quite a bit heavier I intend to mount the undercarriage as I did with the Depron Super Cub.
Strong acetate 'plates' glued to the side of the fuselage and carrying the relatively thin but braced undercarriage wires.
This restrains the wheel accurately but allows considerable vertical 'spring' movement.
The fuselage should look something like this.

I am not sure whether to add a steerable tail wheel. The Super Cub manages quite well with a fixed one simply relying on a burst of power to lift the tail and then steering with a boot full of rudder!
All 32 of them each individually fitted!
Then the front top skin and top spar flange.
In this state the wing is plaenty strong enough to be handled so a 6 mm Depron leading edge is added and carefully sanded to profile.
The RH wing in this state weighs 0.91 oz (25.8g)
I will make a start of the LH wing whilst I can still remember exactly how it is made! :woohoo:
Then the aileron is cut out and its servo glued in.
The original Ballerina had its undercarriage fixed into the wing using substantial hard wood mounts. I prefer a 'springy' undercarriage with significant vertical movement as this greatly reduces the shock loading on the mountings, an important consideration with a Depron 'moncoque' construction where the whole object to spread the loads as widely as possible.
Although the Petiterina will be quite a bit heavier I intend to mount the undercarriage as I did with the Depron Super Cub.
Strong acetate 'plates' glued to the side of the fuselage and carrying the relatively thin but braced undercarriage wires.
This restrains the wheel accurately but allows considerable vertical 'spring' movement.
The fuselage should look something like this.
I am not sure whether to add a steerable tail wheel. The Super Cub manages quite well with a fixed one simply relying on a burst of power to lift the tail and then steering with a boot full of rudder!
Last edit: 10 Sep 2016 19:51 by Quorneng.
Thanks: Klipkopwildlife, Ralpharr2001, boz, Firewood
Please Log in or Create an account to join the conversation.
- Quorneng
-
Topic Author
- Offline
- Forum Master
-
Less
More
- Posts: 9436
- Thank you received: 19043
11 Sep 2016 21:10 #4
by Quorneng
Replied by Quorneng on topic Petiterina
Next is the aileron. Literally cut out from the wing.

As this is a lightweight Depron build I have decided to use direct coupled ailerons servos and tiny ones at that.
The aileron is a bit shorter than the origianl but a bid wider to get the servo positioned within the skins.
With a 6 mm Depron leading edge and its top skin it can be sanded to the required nose shape. The servo horn is inset into the aileron.

So it mates up with the servo spline.

The aileron has a 'pin' hinge outboard.
With the wing top skin added the aileron can be tested.
The Tx has been programmed to give 50% differential movement.
The other wing half construction is catching up.

About time to start the fuselage.
As this is a lightweight Depron build I have decided to use direct coupled ailerons servos and tiny ones at that.
The aileron is a bit shorter than the origianl but a bid wider to get the servo positioned within the skins.
With a 6 mm Depron leading edge and its top skin it can be sanded to the required nose shape. The servo horn is inset into the aileron.
So it mates up with the servo spline.
The aileron has a 'pin' hinge outboard.
With the wing top skin added the aileron can be tested.
The Tx has been programmed to give 50% differential movement.
The other wing half construction is catching up.
About time to start the fuselage.
Thanks: Klipkopwildlife, boz, Firewood
Please Log in or Create an account to join the conversation.
- Ex-Member
- User
-

Less
More
- Thank you received: 0
12 Sep 2016 13:41 #5
by Ex-Member
Replied by Ex-Member on topic Petiterina
Very nice Q, and I do like the idea of a direct drive on the aileron - it must have numerous uses in scale models! Is this the first time you've done it that way, or do you have experience of the configuration?
Please Log in or Create an account to join the conversation.
- Eric
-

- Offline
- Moderator
-

Less
More
- Posts: 13726
- Thank you received: 14467
12 Sep 2016 17:25 #6
by Eric
if you are calm and collected when all about you are going berserk - you've missed something important!
Replied by Eric on topic Petiterina
I recall Q using this aileron drive method previously on another of his very heavy models, but I don't recall which one!
if you are calm and collected when all about you are going berserk - you've missed something important!
Please Log in or Create an account to join the conversation.
- Quorneng
-
Topic Author
- Offline
- Forum Master
-
Less
More
- Posts: 9436
- Thank you received: 19043
12 Sep 2016 19:26 #7
by Quorneng
Replied by Quorneng on topic Petiterina
Andy
I first used it on the Endurance's ailerons.
In that case simply to reduce the drag of the exposed horns.
There are 'hidden' systems but they tend to be mechanically inefficient and I needed to save the current.
The downside of direct acting is it tends to end up built in so any maintenance is a cu tout job.
Thanks: Ex-Member, boz
Please Log in or Create an account to join the conversation.
- Quorneng
-
Topic Author
- Offline
- Forum Master
-
Less
More
- Posts: 9436
- Thank you received: 19043
13 Sep 2016 20:31 #8
by Quorneng
Replied by Quorneng on topic Petiterina
The fuselage is basically 3 mm Depron.

The sides are the good Depron - its strong and flat - the formers are the softer and not flat 'aero' quality.
Built up in exactly the same way as with balsa.
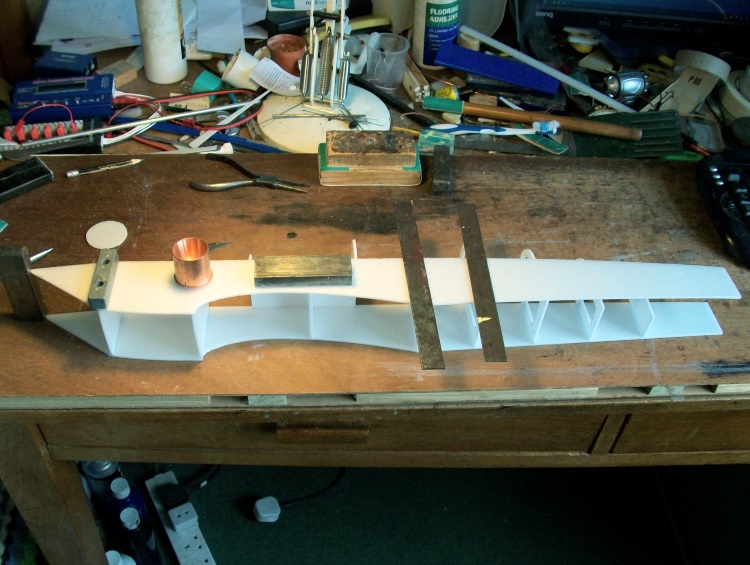
In fact it will also be a 'thin' Ballerina as it has no doublers.
The underside is also 3 mm Depron but the rear decking uses 2 mm planks.

The question is how much has to be completed before I can determine where to put the battery? I don't do ballast.
The sides are the good Depron - its strong and flat - the formers are the softer and not flat 'aero' quality.
Built up in exactly the same way as with balsa.
In fact it will also be a 'thin' Ballerina as it has no doublers.
The underside is also 3 mm Depron but the rear decking uses 2 mm planks.
The question is how much has to be completed before I can determine where to put the battery? I don't do ballast.
Thanks: Klipkopwildlife, blue123, Ex-Member, boz, Firewood
Please Log in or Create an account to join the conversation.
- Quorneng
-
Topic Author
- Offline
- Forum Master
-
Less
More
- Posts: 9436
- Thank you received: 19043
14 Sep 2016 21:04 #9
by Quorneng
Replied by Quorneng on topic Petiterina
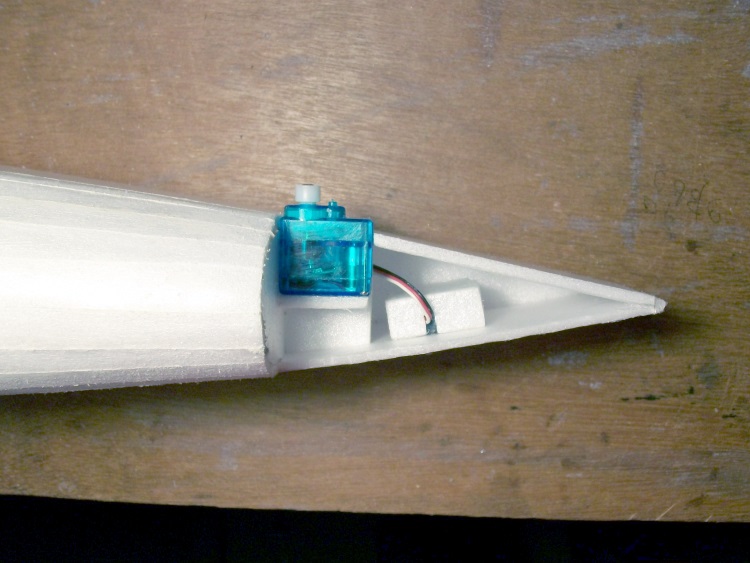
The elevator (5g) and rudder (3.7g) servo mounted right at the back so they will only need short direct links.
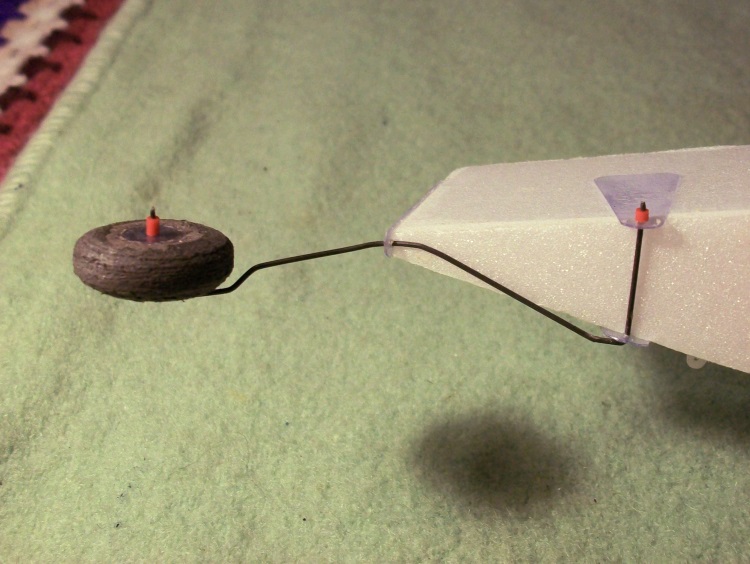
The undercarriage wire formed along with the acetate side plates.

Actually push rod wire so it gives quite a 'soft' suspension.
The tail wheel uses similar but in a triangular arrangement.
Sitting on its wheels.

Tail feathers next.
The undercarriage wire formed along with the acetate side plates.
Actually push rod wire so it gives quite a 'soft' suspension.
The tail wheel uses similar but in a triangular arrangement.
Sitting on its wheels.
Tail feathers next.
Thanks: Klipkopwildlife, blue123, Ex-Member, Ralpharr2001, boz, Firewood
Please Log in or Create an account to join the conversation.
- Quorneng
-
Topic Author
- Offline
- Forum Master
-
Less
More
- Posts: 9436
- Thank you received: 19043
19 Sep 2016 17:44 - 19 Sep 2016 17:45 #10
by Quorneng
Replied by Quorneng on topic Petiterina
Tailplane all Depron - 2 mm skins over a depron shear web.
The elevator has a glass fibre torque tube joiner that also acts as the 'pin' for the centre hinge.
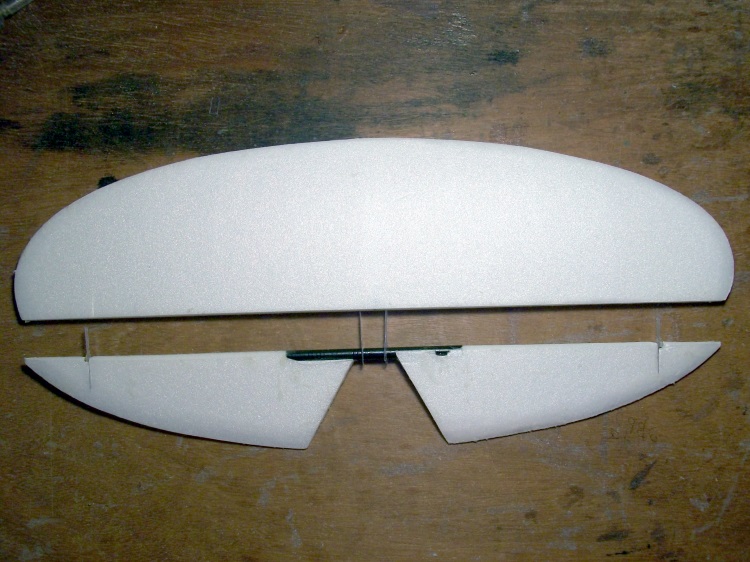
The outer hinges are home made acetate pin hinges.
The fin is built the same way with two acetate pin hinges.
With the wing joined it can all be glued together. It begins to actually look like a Ballerina.

To save weight just the control surfaces are painted
The elevator has a glass fibre torque tube joiner that also acts as the 'pin' for the centre hinge.
The outer hinges are home made acetate pin hinges.
The fin is built the same way with two acetate pin hinges.
With the wing joined it can all be glued together. It begins to actually look like a Ballerina.
To save weight just the control surfaces are painted
Last edit: 19 Sep 2016 17:45 by Quorneng.
Thanks: Eric, Klipkopwildlife, Ex-Member, Firewood
Please Log in or Create an account to join the conversation.
- Ex-Member
- User
-
Less
More
- Thank you received: 0
20 Sep 2016 00:04 #11
by Ex-Member
Replied by Ex-Member on topic Petiterina
Can you post a bit more detail on your acetate/pin hinges, please Q?
Thanks,
Andy
Thanks,
Andy
Please Log in or Create an account to join the conversation.
- Quorneng
-
Topic Author
- Offline
- Forum Master
-
Less
More
- Posts: 9436
- Thank you received: 19043
20 Sep 2016 14:39 #12
by Quorneng
Replied by Quorneng on topic Petiterina
Andy
Here you go.

I drill the holes with a sharp pointed needle file. The head end hinge flap is a close free fit. The other is a push interference fit.
Once assembled the excess pin length is cut off and the pin end secured with a dab glue. I use Gorilla glue.
One advantage is the acetate (or what ever the plastic sheet is!) can be cut a suitable shape/size to fit the wing/fuselage that it is being glued into. The one in picture was used on a sheet Depron fin/rudder.
The same principle can be used for much larger diameters. This is the acetate hinge flap on the 5 mm elevator torque tube used on the Petiterina.

Here you go.
I drill the holes with a sharp pointed needle file. The head end hinge flap is a close free fit. The other is a push interference fit.
Once assembled the excess pin length is cut off and the pin end secured with a dab glue. I use Gorilla glue.
One advantage is the acetate (or what ever the plastic sheet is!) can be cut a suitable shape/size to fit the wing/fuselage that it is being glued into. The one in picture was used on a sheet Depron fin/rudder.
The same principle can be used for much larger diameters. This is the acetate hinge flap on the 5 mm elevator torque tube used on the Petiterina.
Thanks: Klipkopwildlife, Ex-Member
Please Log in or Create an account to join the conversation.
- Quorneng
-
Topic Author
- Offline
- Forum Master
-
Less
More
- Posts: 9436
- Thank you received: 19043
20 Sep 2016 19:31 - 20 Sep 2016 19:32 #13
by Quorneng
Replied by Quorneng on topic Petiterina
Just had to make use of the current calm weather.

Just 12.8 oz all up so with its 120W measured it has 150W/lb available.
The Petiterina maiden. Hand launch as the grass is quite long and rough but it actually ROGs nicely.
It has a Lemon 7ch gyro rx in it although the gyro was not used initially.
When I did switch it on it promptly tried to loop! Fortunately my finger was near the switch so the gyro was killed before things got out of hand.
Reason? The elevator gyro action was reversed! Oops! :woohoo:
My only defence is it is easy to miss exactly which way the gyro actually moves the surface.
Once corrected the gyro now makes it fly 'on rails' and dead straight too, so a suitable setting on the fail safe is important.
And yes at full chat it can go straight up!
Last edit: 20 Sep 2016 19:32 by Quorneng.
Thanks: Klipkopwildlife, Ex-Member, boz, Firewood
Please Log in or Create an account to join the conversation.
- Ex-Member
- User
-
Less
More
- Thank you received: 0
20 Sep 2016 20:04 #14
by Ex-Member
Replied by Ex-Member on topic Petiterina
Nice one Q, well done!
Thanks also for the info on the hinges, that'll be very useful on my small scale models! As a matter of interest, how thick is the acetate you're using?
Thanks also for the info on the hinges, that'll be very useful on my small scale models!
As a matter of interest, how thick is the acetate you're using? Please Log in or Create an account to join the conversation.
- Quorneng
-
Topic Author
- Offline
- Forum Master
-
Less
More
- Posts: 9436
- Thank you received: 19043
21 Sep 2016 00:05 #15
by Quorneng
Replied by Quorneng on topic Petiterina
I only have an imperial micrometer which measures it at 0.0175" which is 0.444 mm or 444 microns.
Thanks: Ex-Member
Please Log in or Create an account to join the conversation.
Time to create page: 1.350 seconds