
- Posts: 9436
- Thank you received: 19043
A monoplane fighter ahead of its time?
- Quorneng
-
 Topic Author
- Offline
- Forum Master
-

Less
More
15 Sep 2013 20:56 - 15 Sep 2013 20:59 #1
by Quorneng
A monoplane fighter ahead of its time? was created by Quorneng
On another site a challenge was laid down to scratch build an electric foam RC plane for under $50.
I thought it would be quite tricky but all the electrics were excluded!
On this basis every single Depron plane I have built would qualify! :woohoo:
Still this is what I chose.
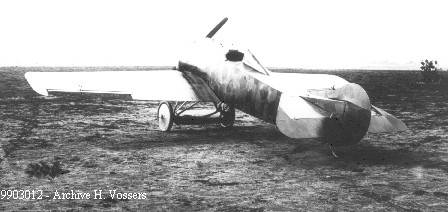
The Fokker V25.
One of a number of prototypes Anthony Fokker built for the 1918 fighter trials.
Of remarkably 'modern' appearance and construction with an all plywood covered 2 spar wing on a 'Triplane' style fabric covered steel tube fuselage with an Oberursel 110hp rotary on the front.
It was light and had remarkable speed and manouverability for its limited power but at the time downward visibility was considered absolutely essential so it was rejected out of hand.
Fokker solved the problem with the very similar DVIII with its parasol wing positioned close to the pilots eye line.

This was accepted and put into production but the struts added a bit of drag and weight. Although a true monoplane the parasol installation certainly did not look as robust as the low wing mount on the V25.
I do wonder if the V25 had been put into production rather than the DVIII whether the classic low wing monoplane fighter might have appeared a good bit earlier.
Whilst there was nothing really wrong with the DVIII it was considered a bit of an oddity by the allies and was largely ignored.
Unfortunately I could find no 3 view of the V25 so I had to 'reverse engineer' one from a DVIII.
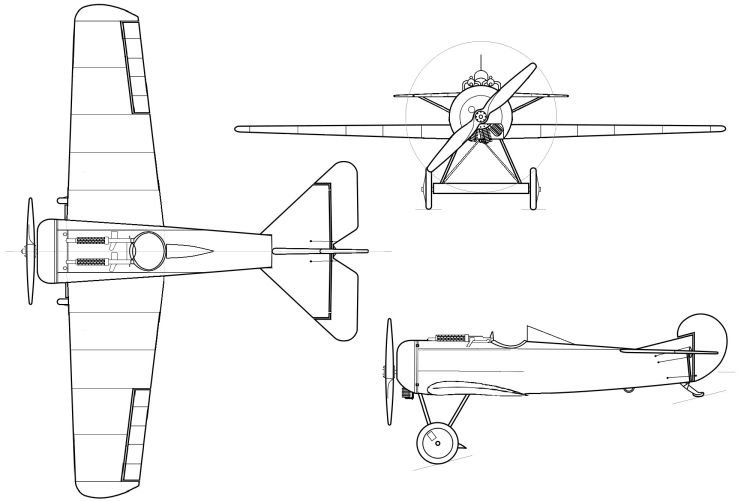
I have left the guns on the drawing although as far as I can tell the V25 was never actually armed.
So a small (and cheap!) 26" span scale 'foamie'. (I have no room for anything bigger!)
It will use the same size motor and battery as my 40" Super Cub so hopefully it will be a touch lighter but will swing a larger 8" rather than 7" prop.
I thought it would be quite tricky but all the electrics were excluded!
On this basis every single Depron plane I have built would qualify! :woohoo:
Still this is what I chose.
The Fokker V25.
One of a number of prototypes Anthony Fokker built for the 1918 fighter trials.
Of remarkably 'modern' appearance and construction with an all plywood covered 2 spar wing on a 'Triplane' style fabric covered steel tube fuselage with an Oberursel 110hp rotary on the front.
It was light and had remarkable speed and manouverability for its limited power but at the time downward visibility was considered absolutely essential so it was rejected out of hand.
Fokker solved the problem with the very similar DVIII with its parasol wing positioned close to the pilots eye line.
This was accepted and put into production but the struts added a bit of drag and weight. Although a true monoplane the parasol installation certainly did not look as robust as the low wing mount on the V25.
I do wonder if the V25 had been put into production rather than the DVIII whether the classic low wing monoplane fighter might have appeared a good bit earlier.
Whilst there was nothing really wrong with the DVIII it was considered a bit of an oddity by the allies and was largely ignored.
Unfortunately I could find no 3 view of the V25 so I had to 'reverse engineer' one from a DVIII.
I have left the guns on the drawing although as far as I can tell the V25 was never actually armed.
So a small (and cheap!) 26" span scale 'foamie'. (I have no room for anything bigger!)
It will use the same size motor and battery as my 40" Super Cub so hopefully it will be a touch lighter but will swing a larger 8" rather than 7" prop.
Last edit: 15 Sep 2013 20:59 by Quorneng.
Thanks: Klipkopwildlife, blue123, Sarah-Jane Smith, SmarTmartY
Please Log in or Create an account to join the conversation.
- Sarah-Jane Smith
-

- Offline
- Forum Veteran
-

- Gone
Less
More
- Posts: 2510
- Thank you received: 2182
15 Sep 2013 20:59 #2
by Sarah-Jane Smith
I wish I was a glow worm, a glow worm's never glum.
Cos how can you be grumpy when the sun shines out your bum?!
Replied by Sarah-Jane Smith on topic A monoplane fighter ahead of its time?
oh do you like a challenge you :lol:
Love the fokker so looking forward to this one.
Love the fokker so looking forward to this one.
I wish I was a glow worm, a glow worm's never glum.
Cos how can you be grumpy when the sun shines out your bum?!
Please Log in or Create an account to join the conversation.
- alan cantwell
-

- Offline
- Banned
-

Less
More
- Posts: 1768
- Thank you received: 1918
15 Sep 2013 21:29 #3
by alan cantwell
i have 2 sides
no you dont,
yes i do,
Replied by alan cantwell on topic A monoplane fighter ahead of its time?
incredible, look at that, and you have a ww22 fighter, if they had got away from the see the ground thing, they could have been air battle winners, i detest the D8, its orrid
i have 2 sides
no you dont,
yes i do,
Please Log in or Create an account to join the conversation.
- Sarah-Jane Smith
-
- Offline
- Forum Veteran
-
- Gone
Less
More
- Posts: 2510
- Thank you received: 2182
16 Sep 2013 07:53 #4
by Sarah-Jane Smith
PMSL how many world wars? :lol:
I wish I was a glow worm, a glow worm's never glum.
Cos how can you be grumpy when the sun shines out your bum?!
Replied by Sarah-Jane Smith on topic A monoplane fighter ahead of its time?
alan cantwell wrote: incredible, look at that, and you have a ww22 fighter, if they had got away from the see the ground thing, they could have been air battle winners, i detest the D8, its orrid
PMSL how many world wars? :lol:
I wish I was a glow worm, a glow worm's never glum.
Cos how can you be grumpy when the sun shines out your bum?!
Thanks: The Beard
Please Log in or Create an account to join the conversation.
- Quorneng
-
Topic Author
- Offline
- Forum Master
-
Less
More
- Posts: 9436
- Thank you received: 19043
16 Sep 2013 11:27 - 16 Sep 2013 11:28 #5
by Quorneng
Replied by Quorneng on topic A monoplane fighter ahead of its time?
As always start with the wings.
It has a rather unusual section, quite thick but with a bit of under camber.
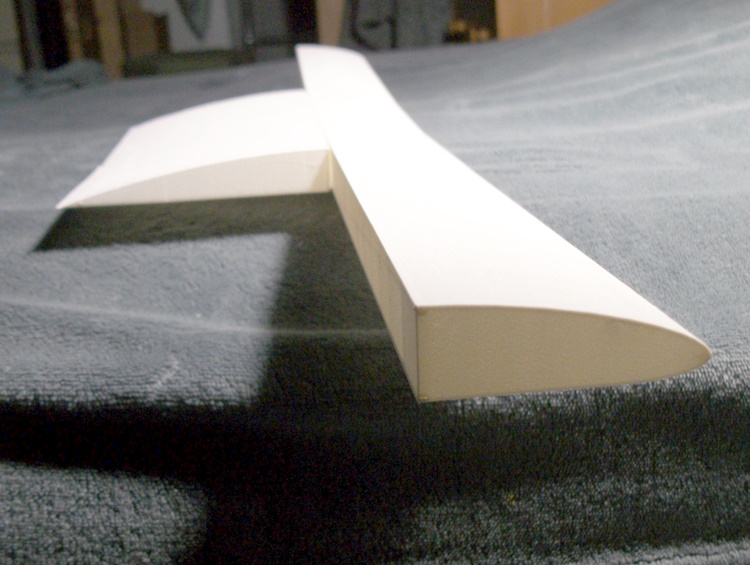
To achieve this a tapered support block is glued to the plan.
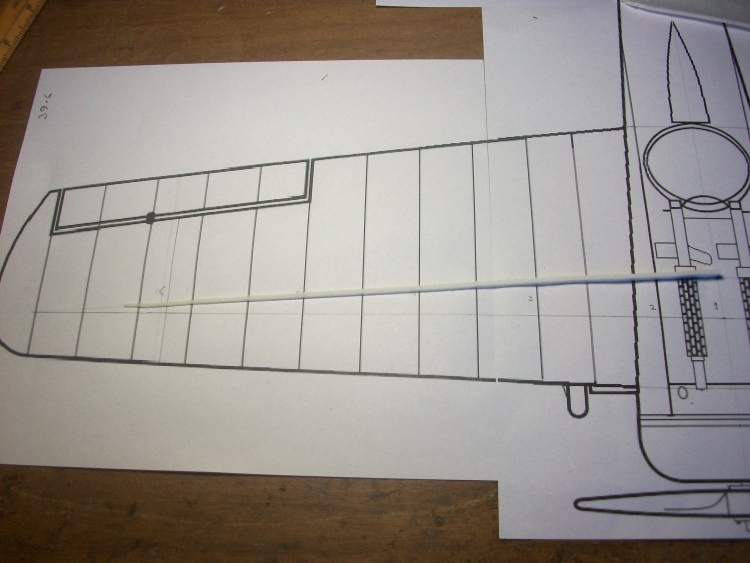
And the under surface skin 'formed' to roughly the correct profile.
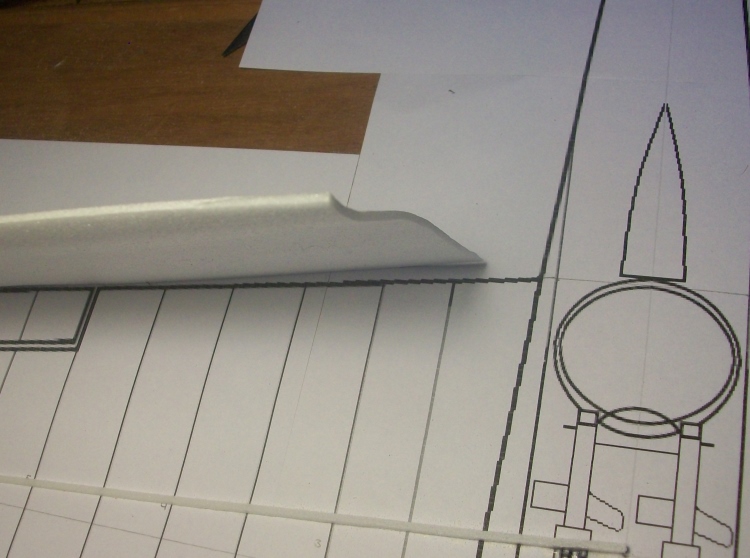
At such a small size the wing will be a monocoque with no load bearing spar.
The first rib goes on with the single shear web.
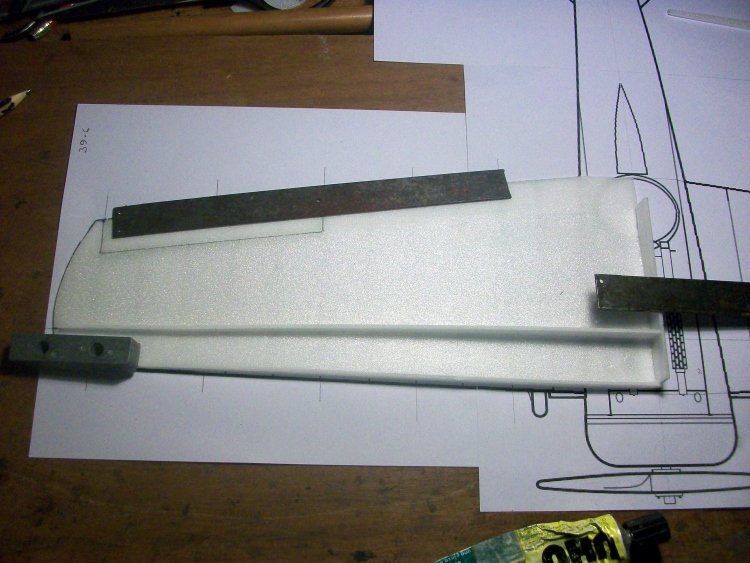
Only the underside of the rib is cut to shape but pressed down with weights it holds the lower skin to the correct profile.
Once all the ribs are on the wing can be lifted and the ribs carefully cut/sanded to the correct profile using the mk1 eyeball. At at these sizes the actual wing section is less critical than that they both be the same!
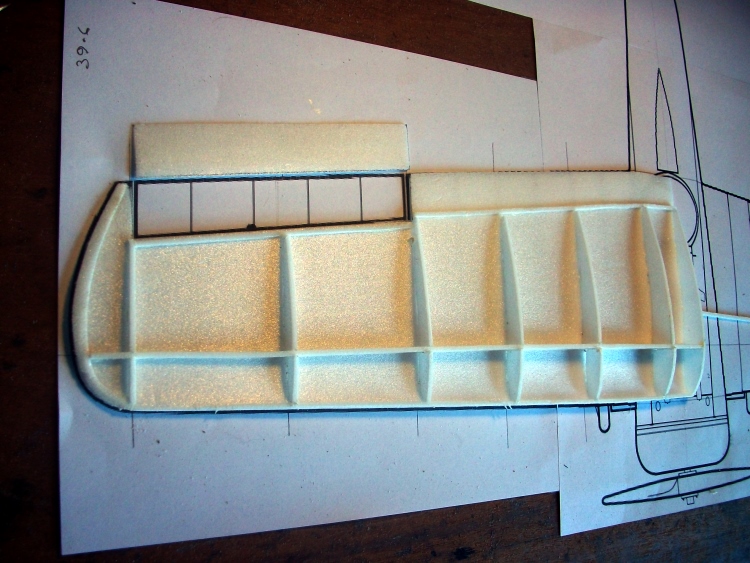
The aileron is cut out and the top skin added.
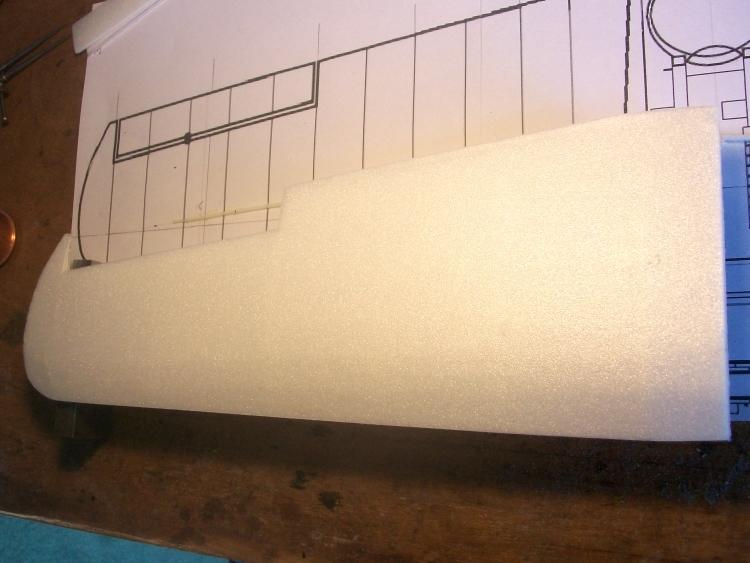
The half wing weighs less than 1/3oz.
This plane will be slightly unusual in that it will use a pull/pull control system and the aileron and rudder will be coupled.
It has a rather unusual section, quite thick but with a bit of under camber.
To achieve this a tapered support block is glued to the plan.
And the under surface skin 'formed' to roughly the correct profile.
At such a small size the wing will be a monocoque with no load bearing spar.
The first rib goes on with the single shear web.
Only the underside of the rib is cut to shape but pressed down with weights it holds the lower skin to the correct profile.
Once all the ribs are on the wing can be lifted and the ribs carefully cut/sanded to the correct profile using the mk1 eyeball.
At at these sizes the actual wing section is less critical than that they both be the same!
The aileron is cut out and the top skin added.
The half wing weighs less than 1/3oz.
This plane will be slightly unusual in that it will use a pull/pull control system and the aileron and rudder will be coupled.
Last edit: 16 Sep 2013 11:28 by Quorneng.
Thanks: Klipkopwildlife, blue123, Sarah-Jane Smith, SmarTmartY
Please Log in or Create an account to join the conversation.
- Ex-Member
- User
-

Less
More
- Thank you received: 0
16 Sep 2013 14:15 #6
by Ex-Member
Replied by Ex-Member on topic A monoplane fighter ahead of its time?
I love the choice of prototype Q and the build method description is fascinating. Have you ever thought of getting your Depron building techniques published in one of the commercial mags. The info you're putting out here is priceless.
Many thanks
Andy
Many thanks
Andy
Please Log in or Create an account to join the conversation.
- Quorneng
-
Topic Author
- Offline
- Forum Master
-
Less
More
- Posts: 9436
- Thank you received: 19043
17 Sep 2013 12:08 - 17 Sep 2013 12:13 #7
by Quorneng
Replied by Quorneng on topic A monoplane fighter ahead of its time?
The finished wing root section.
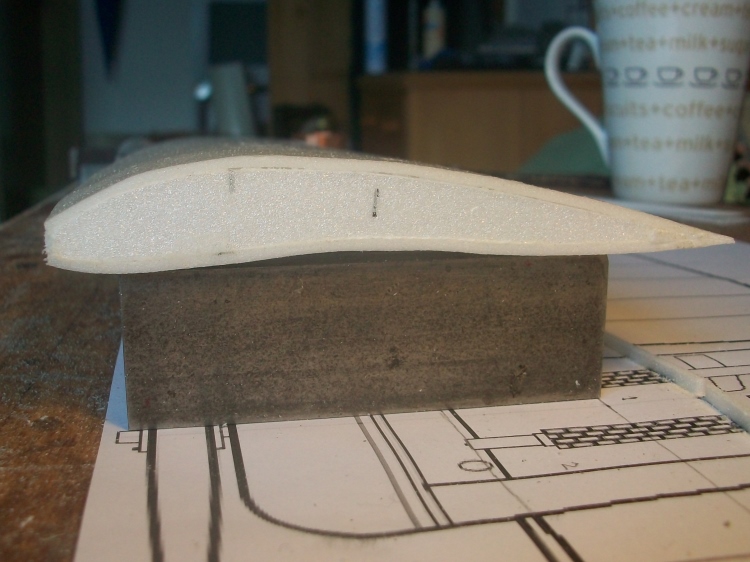
The leading edge is a strip of Depron sanded to shape. As sanding Depron gives a very open surface a coat of PVA is painted over it to fill it.
As the wing has no spar it is joined by simply glueing them together.

The joint is reinforced by a tissue bandage glued on with PVA.
The ailerons are pin hinged at each end. The horn acts as a support for the inner pin.
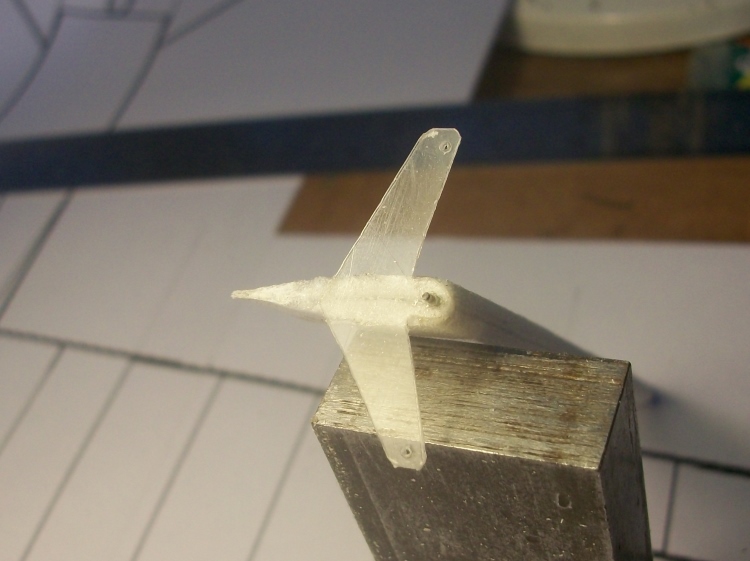
The aileron has a radius leading edge with a matching 'shroud' profile sanded into the wing.
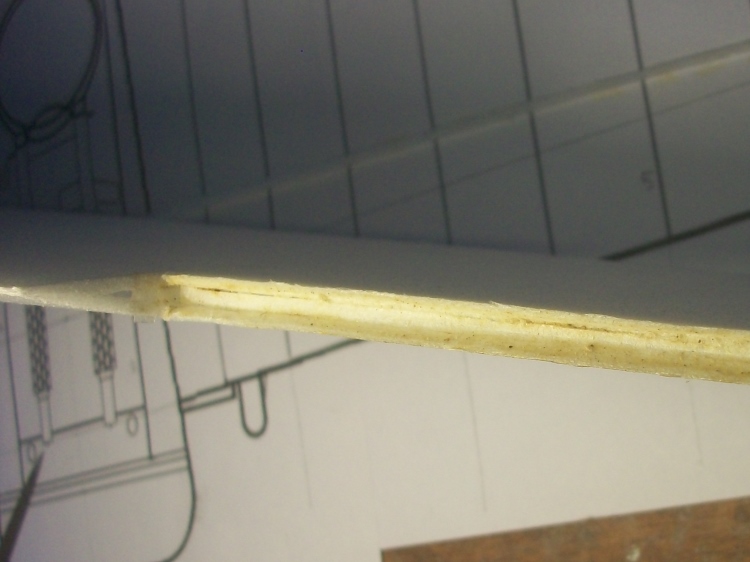
The outer hinge pin (it literally is a pin!) is driven in from the wing tip.
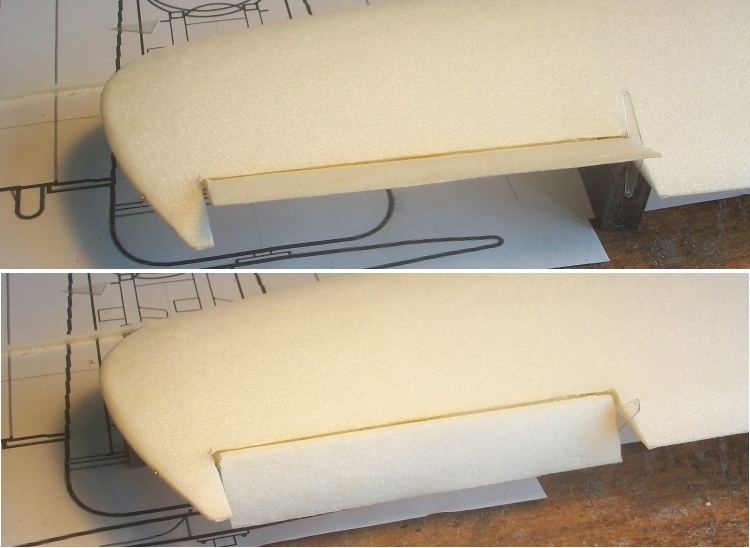
The surfaces are relatively small so have plenty of travel.
The combined aileron/rudder servo is mounted at the centre of the wing in the leading edge with the tip of the arm protruding from the underside.
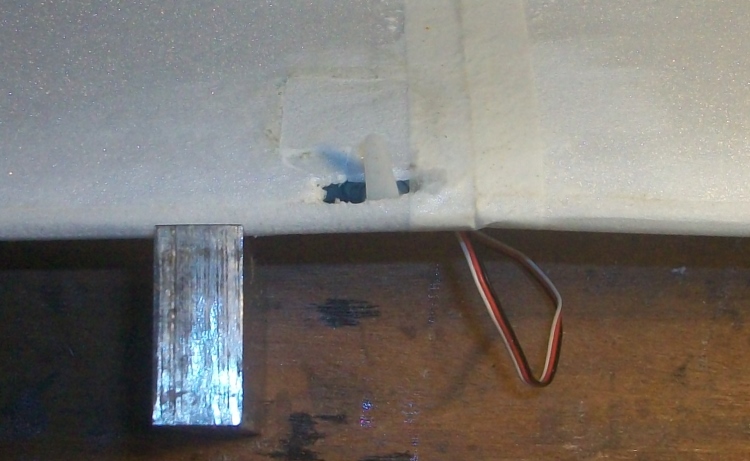
The complete wing and servo weighs 0.88oz (25g).
The rotary is a major scale feature on such a plane and fortunately at this size the out runner bell is exactly the right size for the Oberursel crankcase so....

Each paper tube cylinder is wound with cotton to simulate the fine fins and is glued directly onto the bell which was covered in paper to give good adhesion.
With all nine in place, the inlet and valve rods added (it used a single push/pull rod arrangement) along with Depron inserts on the face of the motor bell it is given a coat of paint.
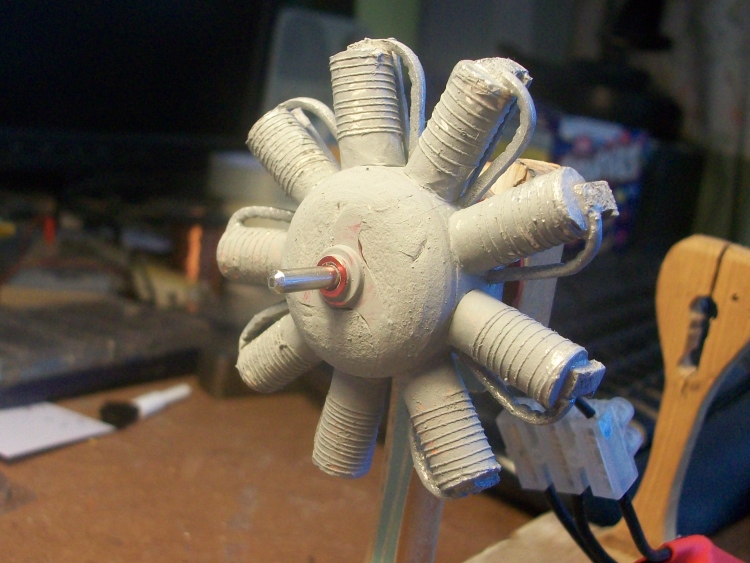
The Oberursel was a direct copy of the LeRhone 9J which had distinctive copper inlet pipes but as this was in short supply in Germany on the Oberursel they were made of aluminium.
Coupled to a scale diameter (but not shape!) 8x4.3 slow fly prop.
It draws 6 amps from a 2s and produced more thrust than the expected weight of the plane!
And this started out as a simple foamie! :woohoo:
The leading edge is a strip of Depron sanded to shape. As sanding Depron gives a very open surface a coat of PVA is painted over it to fill it.
As the wing has no spar it is joined by simply glueing them together.
The joint is reinforced by a tissue bandage glued on with PVA.
The ailerons are pin hinged at each end. The horn acts as a support for the inner pin.
The aileron has a radius leading edge with a matching 'shroud' profile sanded into the wing.
The outer hinge pin (it literally is a pin!) is driven in from the wing tip.
The surfaces are relatively small so have plenty of travel.
The combined aileron/rudder servo is mounted at the centre of the wing in the leading edge with the tip of the arm protruding from the underside.
The complete wing and servo weighs 0.88oz (25g).
The rotary is a major scale feature on such a plane and fortunately at this size the out runner bell is exactly the right size for the Oberursel crankcase so....
Each paper tube cylinder is wound with cotton to simulate the fine fins and is glued directly onto the bell which was covered in paper to give good adhesion.
With all nine in place, the inlet and valve rods added (it used a single push/pull rod arrangement) along with Depron inserts on the face of the motor bell it is given a coat of paint.
The Oberursel was a direct copy of the LeRhone 9J which had distinctive copper inlet pipes but as this was in short supply in Germany on the Oberursel they were made of aluminium.
Coupled to a scale diameter (but not shape!) 8x4.3 slow fly prop.
It draws 6 amps from a 2s and produced more thrust than the expected weight of the plane!
And this started out as a simple foamie! :woohoo:
Last edit: 17 Sep 2013 12:13 by Quorneng.
Thanks: Klipkopwildlife, blue123, Sarah-Jane Smith, SmarTmartY, old fart, Ex-Member
Please Log in or Create an account to join the conversation.
- Ex-Member
- User
-
Less
More
- Thank you received: 0
18 Sep 2013 09:23 #8
by Ex-Member
Replied by Ex-Member on topic A monoplane fighter ahead of its time?
Another good one Q, I like the motor and the test run looks good...............
.................. I hope you don't mind me stealing the idea for an indoor scale model - do you envisage any cooling probs with the dummy crankcase covering the cooling holes of the outrunner?
.................. I hope you don't mind me stealing the idea for an indoor scale model
- do you envisage any cooling probs with the dummy crankcase covering the cooling holes of the outrunner? Please Log in or Create an account to join the conversation.
- Quorneng
-
Topic Author
- Offline
- Forum Master
-
Less
More
- Posts: 9436
- Thank you received: 19043
18 Sep 2013 15:40 #9
by Quorneng
Replied by Quorneng on topic A monoplane fighter ahead of its time?
Andy
I haven't so far.
My slightly bigger and heavier (7oz) Super Cub uses the same motor and whilst not covered up in the same way is nevertheless completely buried in a close fitting Depron tube.
Actually it is quite a generous motor for the 5oz V25 and is propped for 6A (45W) at full power, which I won't need. The maximum specified is 13!
At these very low powers just the air circulation from the spinning bell seems to dissipate the heat ok.
Even on rather more powerful set-ups just the bell surface seems to provide adequate cooling provided it is in a positive airflow.
This 180W pusher installation is virtually shielded from airflow through the motor but it still only gets slightly warm after 4 or 5 minutes flat out flying.
Thanks: Klipkopwildlife, blue123, Sarah-Jane Smith, Ex-Member
Please Log in or Create an account to join the conversation.
- Ex-Member
- User
-
Less
More
- Thank you received: 0
18 Sep 2013 16:37 - 18 Sep 2013 16:37 #10
by Ex-Member
Replied by Ex-Member on topic A monoplane fighter ahead of its time?
Thanks for all that Q. I hope you didn't mind me asking the question - I'm new to outrunners.
Last edit: 18 Sep 2013 16:37 by Ex-Member. Reason: sp
Please Log in or Create an account to join the conversation.
- Quorneng
-
Topic Author
- Offline
- Forum Master
-
Less
More
- Posts: 9436
- Thank you received: 19043
19 Sep 2013 01:10 - 19 Sep 2013 01:14 #11
by Quorneng
Replied by Quorneng on topic A monoplane fighter ahead of its time?
Feel free to ask away!
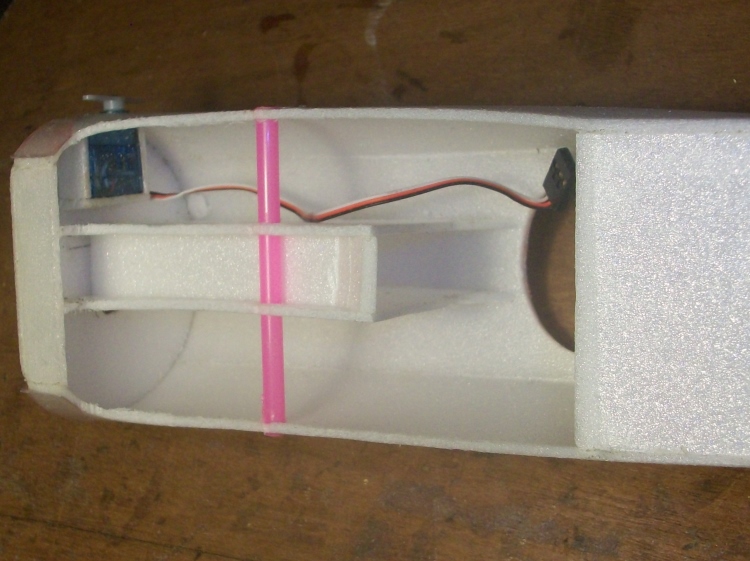
The fuselage is a completely hollow Depron monocoque with just a single former behind the cockpit. It is simply resting on the wing in this picture.
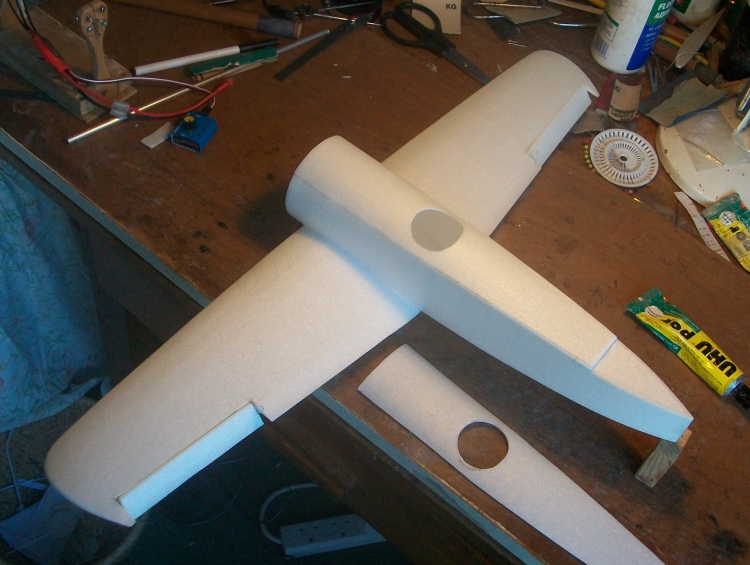
The spare top decking was scrap as I cut the cockpit in the wrong place! :oops:
The front bulkhead is actually two layers of 2mm Depon.

The 'drum' motor mounting sandwiched between them.

The elevator servo is fitted right up behind the bulkhead to keep the CofG as far forward as possible.
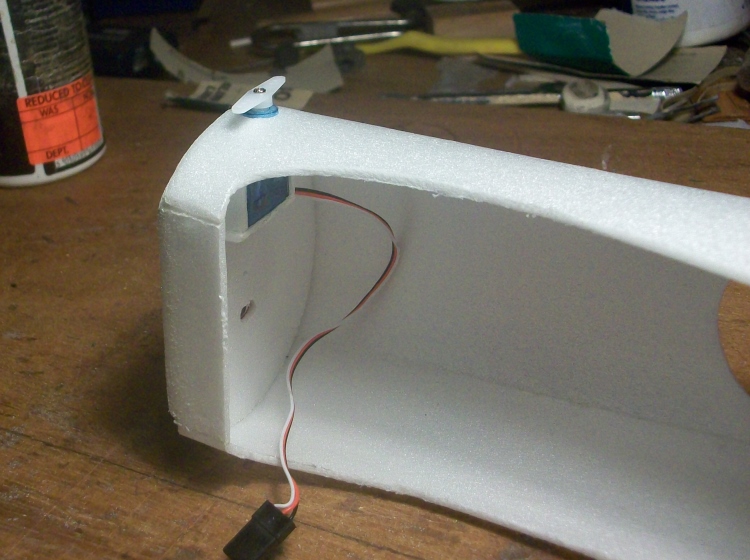
After some thought it appears possible to insert the battery through the cockpit and push it up to the bulkhead. This will completely remove the need for any hatches although the battery will probably have to be pulled out again by its leads!

The drinking straw is the cross tube for the aileron cables.
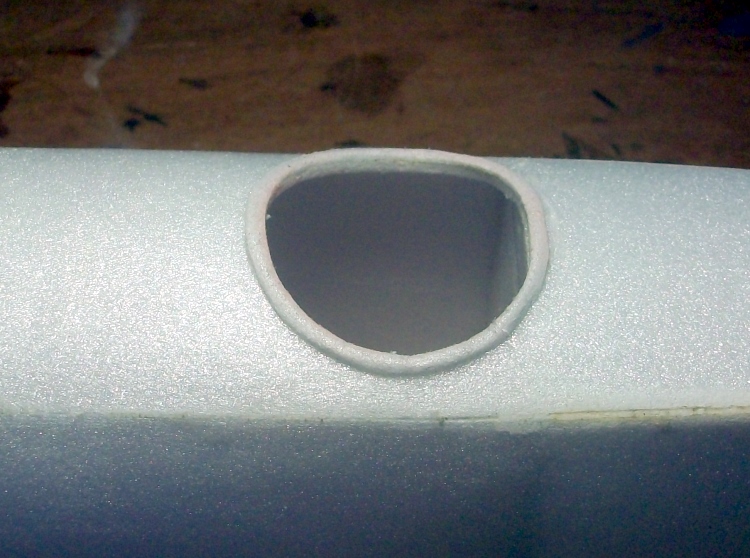
Sanded Depron makes a nice cockpit coaming.
The tail feathers are 2mm Depron..
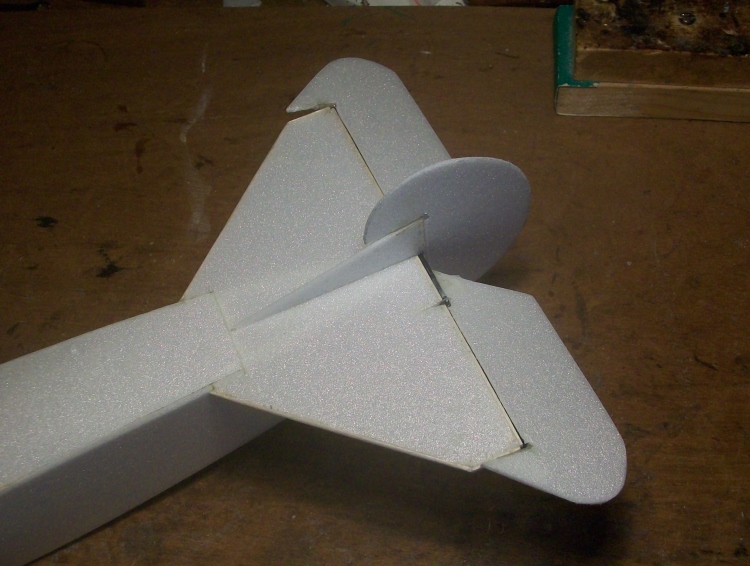
With 2x1mm birch struts.
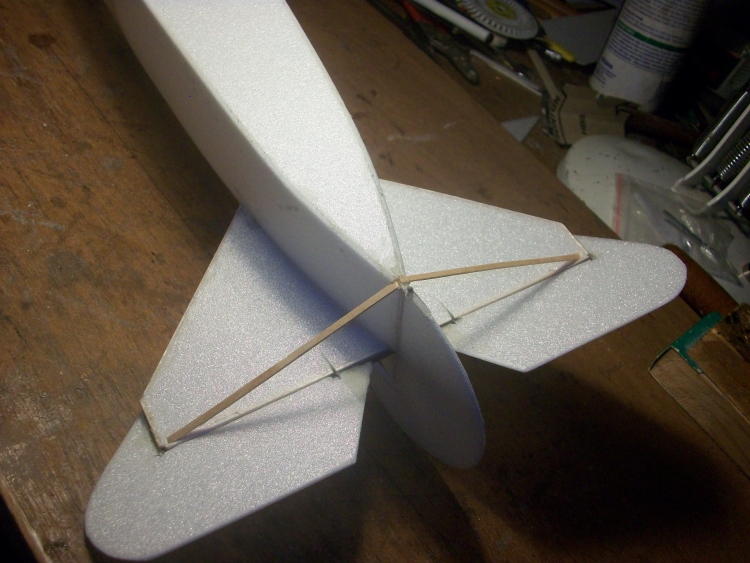
For such a tiny plane progress is horribly slow.
.
The fuselage is a completely hollow Depron monocoque with just a single former behind the cockpit. It is simply resting on the wing in this picture.
The spare top decking was scrap as I cut the cockpit in the wrong place! :oops:
The front bulkhead is actually two layers of 2mm Depon.
The 'drum' motor mounting sandwiched between them.
The elevator servo is fitted right up behind the bulkhead to keep the CofG as far forward as possible.
After some thought it appears possible to insert the battery through the cockpit and push it up to the bulkhead. This will completely remove the need for any hatches although the battery will probably have to be pulled out again by its leads!
The drinking straw is the cross tube for the aileron cables.
Sanded Depron makes a nice cockpit coaming.
The tail feathers are 2mm Depron..
With 2x1mm birch struts.
For such a tiny plane progress is horribly slow.
.
Last edit: 19 Sep 2013 01:14 by Quorneng.
Thanks: Klipkopwildlife, blue123, Sarah-Jane Smith, SmarTmartY, old fart, Ex-Member
Please Log in or Create an account to join the conversation.
- Klipkopwildlife
-

- Offline
- Administrator
-

- I'm supposed to be retired!
19 Sep 2013 10:57 #12
by Klipkopwildlife
Do it now, you may never get another chance
Replied by Klipkopwildlife on topic A monoplane fighter ahead of its time?
Love it Simon, as usual you're putting us all to shame! Andy is right, you have so much information buried in your head, I think it's worth an eBook, think about it, Eric can give you plenty of advice on it.
Do it now, you may never get another chance
Please Log in or Create an account to join the conversation.
- Quorneng
-
Topic Author
- Offline
- Forum Master
-
Less
More
- Posts: 9436
- Thank you received: 19043
19 Sep 2013 13:56 - 19 Sep 2013 14:01 #13
by Quorneng
Replied by Quorneng on topic A monoplane fighter ahead of its time?
Thanks for the kind comments but much of what I do is simply to make things ridiculously small and light which although may be of some interest not everybody actually wants to go down the same path.
As a gentleman at a club put it "If there was a competition for the most usual build technique these would come first, second and third"! I am sure it was meant as a compliment but clearly they tend to be considered a bit of an oddity.
Onward
Like the ailerons the elevator and rudder are pin hinged. Rudder top and bottom and 2 in each elevator half. The halves are joined by a short CF rod which also acts as the 'pin' for the inner hinge.
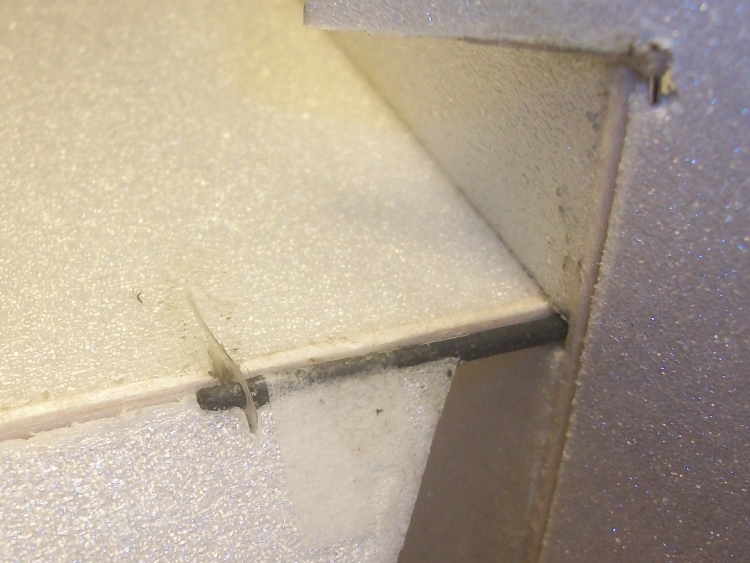
After a bit of trial and error I was happy that the battery could be inserted through the cockpit and pushed right up to the bulkhead so no hatch is required but the battery will probably have to be pulled out again by its leads! :ohmy:
The engine cowling was a problem. To keep weight down it really needed to be made of Depron but how?
I thought I would try a 'concentric rings' method.

Starting with the flat front disc the cowling is built up with a series of progressively wider and staggered rings, each made up from a simple Depron strip. The result is very economic in the use of material.

Provided it clears the rotary the inner surface can be left 'stepped'. The outer is carefully sanded to profile.
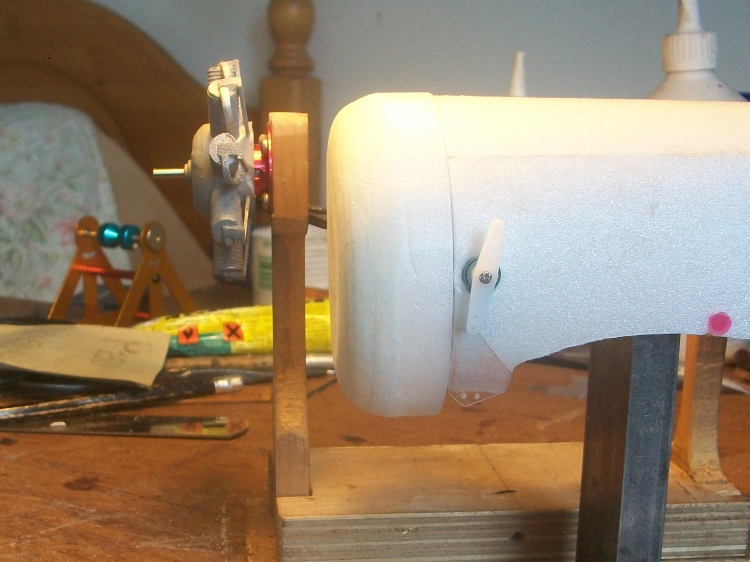
At this stage for rigidity it is still a full circle. It will be cut to the correct shape just before final installation.
My original intention was to 'build in' the rx by my last Orange one proved to be a dud so its replacement, when it arrives, will also have to be installed through the cockpit.
Using the dud as a pattern the first job was to make it smaller (and much lighter!).

The ESC lead had to be extended slightly but now all can be connected (and tested) to the Rx outside the cockpit and then it can pushed into a prepared mount on the inside wall of the cockpit.
With the motor permanently installed, connected to the ESC and tested the wing is glued on.
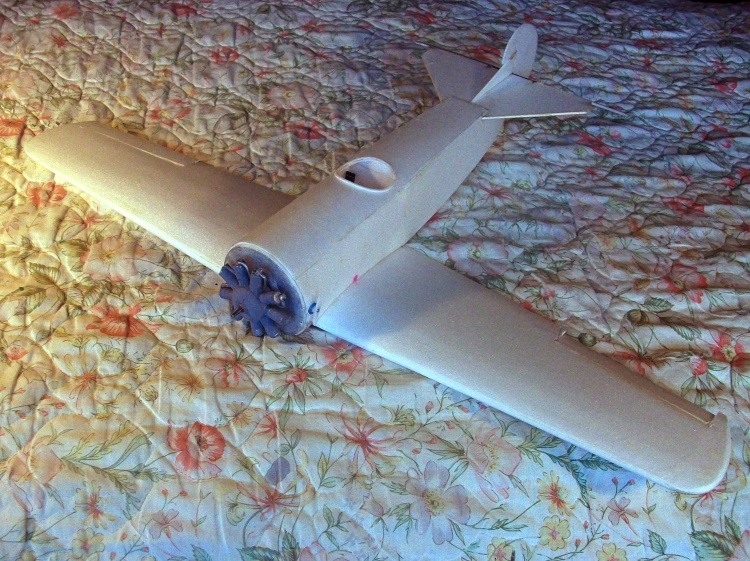
At last it is almost a plane.
Next comes the undercarriage.
The final issue is the paint finish.
It appears the original was covered with the standard German lozenge printed fabric, at least on the fuselage, not something I want to even try to paint by hand!
The RNAF (Dutch airforce) used the Fokker DVIII with a simple dark green overall finish with orange markings.
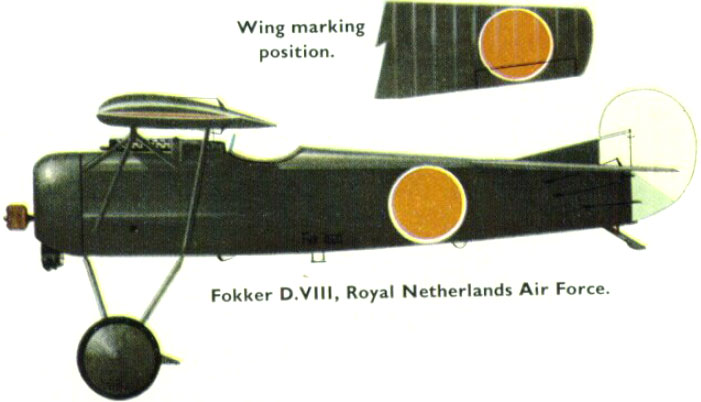
I must admit I initially thought it was Japanese!
Had the V25 gone into production I am sure Fokker would have 'spirited away' a train load for the RNAF at the end of the war just as he did with the DVII and DVIII so I feel justified in using the colour scheme on my V25!
As a gentleman at a club put it "If there was a competition for the most usual build technique these would come first, second and third"! I am sure it was meant as a compliment but clearly they tend to be considered a bit of an oddity.
Onward
Like the ailerons the elevator and rudder are pin hinged. Rudder top and bottom and 2 in each elevator half. The halves are joined by a short CF rod which also acts as the 'pin' for the inner hinge.
After a bit of trial and error I was happy that the battery could be inserted through the cockpit and pushed right up to the bulkhead so no hatch is required but the battery will probably have to be pulled out again by its leads! :ohmy:
The engine cowling was a problem. To keep weight down it really needed to be made of Depron but how?
I thought I would try a 'concentric rings' method.
Starting with the flat front disc the cowling is built up with a series of progressively wider and staggered rings, each made up from a simple Depron strip. The result is very economic in the use of material.
Provided it clears the rotary the inner surface can be left 'stepped'. The outer is carefully sanded to profile.
At this stage for rigidity it is still a full circle. It will be cut to the correct shape just before final installation.
My original intention was to 'build in' the rx by my last Orange one proved to be a dud so its replacement, when it arrives, will also have to be installed through the cockpit.
Using the dud as a pattern the first job was to make it smaller (and much lighter!).
The ESC lead had to be extended slightly but now all can be connected (and tested) to the Rx outside the cockpit and then it can pushed into a prepared mount on the inside wall of the cockpit.
With the motor permanently installed, connected to the ESC and tested the wing is glued on.
At last it is almost a plane.
Next comes the undercarriage.
The final issue is the paint finish.
It appears the original was covered with the standard German lozenge printed fabric, at least on the fuselage, not something I want to even try to paint by hand!
The RNAF (Dutch airforce) used the Fokker DVIII with a simple dark green overall finish with orange markings.
I must admit I initially thought it was Japanese!
Had the V25 gone into production I am sure Fokker would have 'spirited away' a train load for the RNAF at the end of the war just as he did with the DVII and DVIII so I feel justified in using the colour scheme on my V25!
Last edit: 19 Sep 2013 14:01 by Quorneng.
Thanks: Klipkopwildlife, blue123, Sarah-Jane Smith, old fart, Ex-Member
Please Log in or Create an account to join the conversation.
- Ex-Member
- User
-
Less
More
- Thank you received: 0
20 Sep 2013 07:15 #14
by Ex-Member
Replied by Ex-Member on topic A monoplane fighter ahead of its time?
Simon,
Your colouring plan looks goos to me, but if you'd still like a lozenge camo scheme on the model, have you considered printed tissue? There's a great article on it on Mike Stuart's website here: www.ffscale.co.uk/page4e.htm
Andy
Your colouring plan looks goos to me, but if you'd still like a lozenge camo scheme on the model, have you considered printed tissue? There's a great article on it on Mike Stuart's website here: www.ffscale.co.uk/page4e.htm
Andy
Please Log in or Create an account to join the conversation.
- Quorneng
-
Topic Author
- Offline
- Forum Master
-
Less
More
- Posts: 9436
- Thank you received: 19043
20 Sep 2013 20:02 - 20 Sep 2013 20:03 #15
by Quorneng
Replied by Quorneng on topic A monoplane fighter ahead of its time?
The undercarriage is similar that I used on the Depron Super Cub with spring wire legs retained by plates glued to the side of the fuselage.
The front mount.
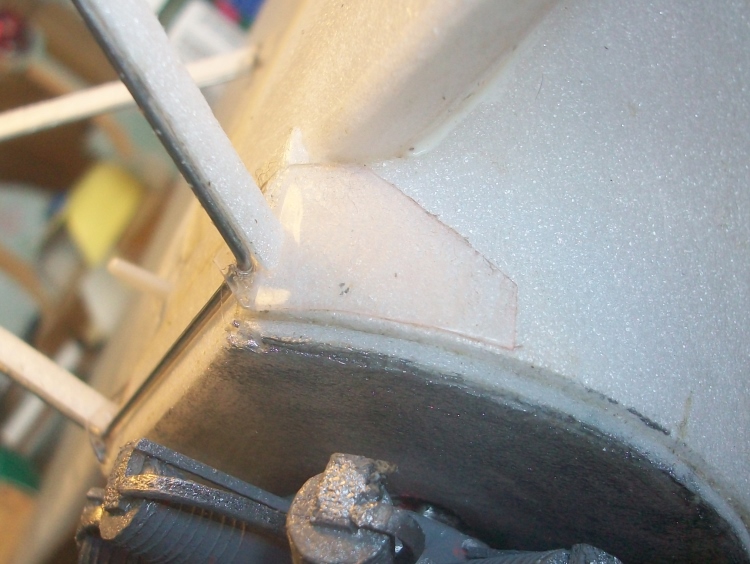
The rear mount passes into the wing and is glued to a rib.

Only the front leg provides the springing, the rear is flexibly mounted and terminates in a Z bend.
The U/C with Depron fairings added.
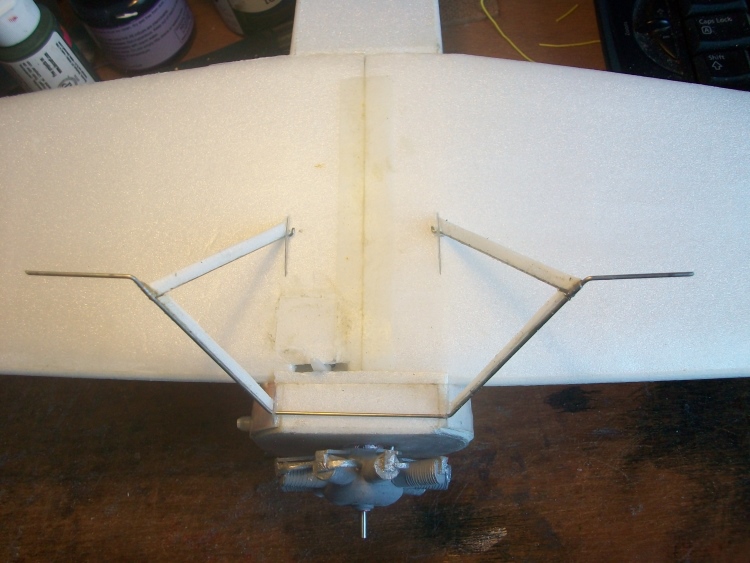
Of course the full size Fokker had a undercarriage 'wing' that covered the sprung axle. I will have to use a dummy wing that allows the legs to move appropriately.
The wheels are also Depron.
Each weighs just 1.2g.
The front mount.
The rear mount passes into the wing and is glued to a rib.
Only the front leg provides the springing, the rear is flexibly mounted and terminates in a Z bend.
The U/C with Depron fairings added.
Of course the full size Fokker had a undercarriage 'wing' that covered the sprung axle. I will have to use a dummy wing that allows the legs to move appropriately.
The wheels are also Depron.
Attachment 2.25Wheel.JPG not found
Each weighs just 1.2g.
Last edit: 20 Sep 2013 20:03 by Quorneng.
Thanks: Klipkopwildlife, blue123, Sarah-Jane Smith, old fart, Ex-Member
Please Log in or Create an account to join the conversation.
Time to create page: 1.344 seconds