
- Posts: 219
- Thank you received: 268
150 Scale VMC (Veron) rubber-powered Hurricane
- Firewood
-

- Offline
- Elite Member
-

Less
More
13 Sep 2017 21:20 - 13 Sep 2017 22:05 #91
by Firewood
I'm so clever that sometimes I don't understand a single word of what I'm saying.
Replied by Firewood on topic 150 Scale VMC (Veron) rubber-powered Hurricane
You might try gluing with Titebond or Aliphatic.
I'm so clever that sometimes I don't understand a single word of what I'm saying.
Last edit: 13 Sep 2017 22:05 by .
Thanks: boz, Crashrr
Please Log in or Create an account to join the conversation.
- User
-

Less
More
- Thank you received: 0
13 Sep 2017 22:08 #92
by
Replied by on topic 150 Scale VMC (Veron) rubber-powered Hurricane
When tissue covering, don't use cellulose, it'll melt the Depron. Tissue paste may work, or wallpaper paste. I have to say that I've tried neither on Depron, so I can't say for sure.
For construction, I have successfully used foam safe cyano, aliphatic and superphatic, all of which work well.
For construction, I have successfully used foam safe cyano, aliphatic and superphatic, all of which work well.
Please Log in or Create an account to join the conversation.
- one tenor
-

- Offline
- Forum Veteran
-

- johnpcalex@gmail.com
13 Sep 2017 22:44 #93
by one tenor
Anything will fly given enough power
Replied by one tenor on topic 150 Scale VMC (Veron) rubber-powered Hurricane
I don't know if it will work but you could try securing it using lightweight filler .If this proves too brittle add a LITTLE, DILUTE pva. As I always say EXPERIMENT. Try it on some scrap first. Very nice work so far btw [badass]
Anything will fly given enough power
Thanks: boz, Crashrr
Please Log in or Create an account to join the conversation.
- Crashrr
-
 Topic Author
- Offline
- Senior Member
-

Less
More
- Posts: 87
- Thank you received: 284
28 Sep 2017 19:38 - 28 Sep 2017 19:42 #94
by Crashrr
'What the hell' is always the right answer...
Replied by Crashrr on topic 150 Scale VMC (Veron) rubber-powered Hurricane
Covering is now complete. I used a pritt stick to glue the tissue and found it easy to control and clean. This was the first time I have used Esaki tissue and it was a revelation. I covered most of the model dry, until it came to that curvy nose, I wetted the tissue and was amazed how much it could be stretched. That's the first time I've covered 'wet'.
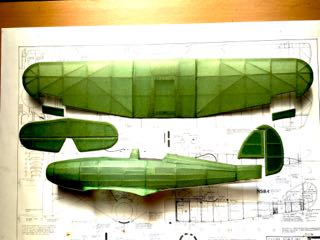
I've now painted it, too. I used Windsor and Newton watercolours. I paint one colour, let it dry, then paint the second one, overlapping by as little as possible - these watercolours set and won't intermix. It's a technique that makes sense on paper, but perhaps not always on tissue... The idea is that you shrink and paint at the same time, creating an opaque surface, and since the paint is almost just a stain, it doesn't add much weight - 3 grams on the 27" span Hurricane. However, being water-based, it won't penetrate the tissue where there's a hint of glue, which leaves an ugly patchy finish.
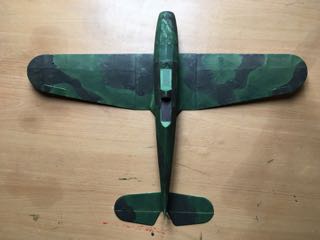
This isn't always a bad thing, it adds a random patina to the model which worked really well on my Me109 - dark grey paint on light grey tissue. Results on the Hurricane are mixed. The dark green paint on green tissue generally worked well; the dark reddy/brown paint on green tissue turned out black! I suspect that there are tissue, paint colour and light and dark combinations that will work well with this technique, and others that will be a disaster. The scheme looks a mess on the Hurricane at the moment, especially around the nose, where the glue smeared onto the planking, but I think the whole thing will improve a bit when I seal it.
Now that it's ready to dope, it's time for my next question... Can I add, say 10% shrinking dope to 90% non-shrinking dope, then thin the whole thing down 50%? The idea being to get a hint of tightening on the non-shrinking dope to prevent any sags creeping in. I will try a sample first, but just thought I'd put the question out there to garner any thoughts on this.
Many thanks,
Crashrr
I've now painted it, too. I used Windsor and Newton watercolours. I paint one colour, let it dry, then paint the second one, overlapping by as little as possible - these watercolours set and won't intermix. It's a technique that makes sense on paper, but perhaps not always on tissue... The idea is that you shrink and paint at the same time, creating an opaque surface, and since the paint is almost just a stain, it doesn't add much weight - 3 grams on the 27" span Hurricane. However, being water-based, it won't penetrate the tissue where there's a hint of glue, which leaves an ugly patchy finish.
This isn't always a bad thing, it adds a random patina to the model which worked really well on my Me109 - dark grey paint on light grey tissue. Results on the Hurricane are mixed. The dark green paint on green tissue generally worked well; the dark reddy/brown paint on green tissue turned out black! I suspect that there are tissue, paint colour and light and dark combinations that will work well with this technique, and others that will be a disaster. The scheme looks a mess on the Hurricane at the moment, especially around the nose, where the glue smeared onto the planking, but I think the whole thing will improve a bit when I seal it.
Now that it's ready to dope, it's time for my next question... Can I add, say 10% shrinking dope to 90% non-shrinking dope, then thin the whole thing down 50%? The idea being to get a hint of tightening on the non-shrinking dope to prevent any sags creeping in. I will try a sample first, but just thought I'd put the question out there to garner any thoughts on this.
Many thanks,
Crashrr
'What the hell' is always the right answer...
Last edit: 28 Sep 2017 19:42 by Crashrr.
Thanks: boz, Squirrelnet
Please Log in or Create an account to join the conversation.
- User
-
Less
More
- Thank you received: 0
28 Sep 2017 20:02 #95
by
Replied by on topic 150 Scale VMC (Veron) rubber-powered Hurricane
You've just discovered a fundamental rule of painting there Crashrr! i.e. if you mix together two complimentary colours (red and green, blue and orange, or yellow and purple), you'll get black! 
Please Log in or Create an account to join the conversation.
- one tenor
-
- Offline
- Forum Veteran
-
- johnpcalex@gmail.com
28 Sep 2017 21:07 #96
by one tenor
Anything will fly given enough power
Replied by one tenor on topic 150 Scale VMC (Veron) rubber-powered Hurricane
Very nice Crasharr . I've been advocating the use of watercolours on tissue for years.Shrinking and colouring together.
Anything will fly given enough power
Thanks: Crashrr
Please Log in or Create an account to join the conversation.
- Crashrr
-
Topic Author
- Offline
- Senior Member
-
Less
More
- Posts: 87
- Thank you received: 284
15 Oct 2017 15:45 #97
by Crashrr
'What the hell' is always the right answer...
Replied by Crashrr on topic 150 Scale VMC (Veron) rubber-powered Hurricane
The Hurricane nears completion...
I did a very short trial test glide to establish roughly how much weight I needed to add to the nose. To my horror, it needs around 24g. Darn, the whole plane only weighs 54g! To keep this weight to an absolute minimum, I decided to cast a lead noseblock, which sits right behind the spinner - as far forward as its possible to put the weight. Although it took me three attempts to get it right, the process was much easier than I imagined.
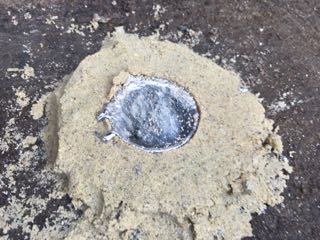

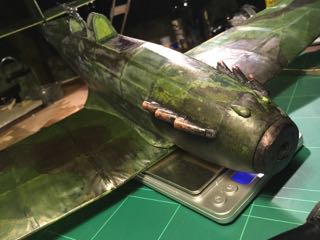
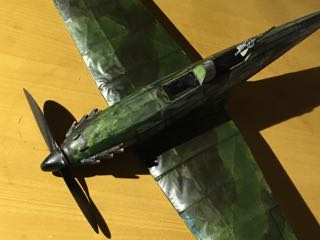
I deliberately cast it too heavy, as it will be easier to drill out some lead, than add it afterwards. Which brings me to the next problem... Rubber!
Following Andy's advice, I shortened the peg length to keep aft weight down, so the new peg to hook length is 9". I have cut a 100' strip of 3/16th rubber and intend to run two 25" loops. However, I now need to figure out how to braid it so that it hangs correctly in the fuselage and doesn't cause errant CoG problems when it unwinds. I have searched online and tried the following: tied the two ends together to make a 50" loop; put 150 forward turns on it; unhooked the winder and brought the ends together to make two 25" loops; reattached the winder and allowed the rubber to braid itself. the resultant motor was 23" long. I have tried everything from 75 forward turns to 300, but cannot get that 23" motor to shorten to 9" (which I am reliably told it will do...!) I have also been told to wind the motor a few times (outside the plane), attach the prop and let it unwind holding the noseblock 9" away from the peg. This should allow it to settle into it's proper position. No change.
So, my next question is: how do I braid the motor to get it to rest at say 10" long?
As always, many thanks, in advance.
Getting there...
Crashrr.
I did a very short trial test glide to establish roughly how much weight I needed to add to the nose. To my horror, it needs around 24g. Darn, the whole plane only weighs 54g! To keep this weight to an absolute minimum, I decided to cast a lead noseblock, which sits right behind the spinner - as far forward as its possible to put the weight. Although it took me three attempts to get it right, the process was much easier than I imagined.
I deliberately cast it too heavy, as it will be easier to drill out some lead, than add it afterwards. Which brings me to the next problem... Rubber!
Following Andy's advice, I shortened the peg length to keep aft weight down, so the new peg to hook length is 9". I have cut a 100' strip of 3/16th rubber and intend to run two 25" loops. However, I now need to figure out how to braid it so that it hangs correctly in the fuselage and doesn't cause errant CoG problems when it unwinds. I have searched online and tried the following: tied the two ends together to make a 50" loop; put 150 forward turns on it; unhooked the winder and brought the ends together to make two 25" loops; reattached the winder and allowed the rubber to braid itself. the resultant motor was 23" long. I have tried everything from 75 forward turns to 300, but cannot get that 23" motor to shorten to 9" (which I am reliably told it will do...!) I have also been told to wind the motor a few times (outside the plane), attach the prop and let it unwind holding the noseblock 9" away from the peg. This should allow it to settle into it's proper position. No change.
So, my next question is: how do I braid the motor to get it to rest at say 10" long?
As always, many thanks, in advance.
Getting there...
Crashrr.
'What the hell' is always the right answer...
Thanks: boz
Please Log in or Create an account to join the conversation.
- Crashrr
-
Topic Author
- Offline
- Senior Member
-
Less
More
- Posts: 87
- Thank you received: 284
17 Oct 2017 21:37 #98
by Crashrr
'What the hell' is always the right answer...
Replied by Crashrr on topic 150 Scale VMC (Veron) rubber-powered Hurricane
Well, I did some research on the braiding and asked a few people online and, although, it didn't quite work the way I expected, I have finally managed to braid the motor to 9". That's a major milestone for me in my quest for duration. My, somewhat measly, record is a mere 26 seconds. Not much, but probably more than all my childhood flights added together!
More rubber is going to smash that record!
More rubber is going to smash that record!
'What the hell' is always the right answer...
Thanks: boz
Please Log in or Create an account to join the conversation.
- Crashrr
-
Topic Author
- Offline
- Senior Member
-
Less
More
- Posts: 87
- Thank you received: 284
28 Oct 2017 15:46 - 28 Oct 2017 18:54 #99
by Crashrr
'What the hell' is always the right answer...
Replied by Crashrr on topic 150 Scale VMC (Veron) rubber-powered Hurricane
I think I can safely declare that the Hawker Hurricane is finished - (bar the tail wheel which is drying as I type, and a pilot and observer).
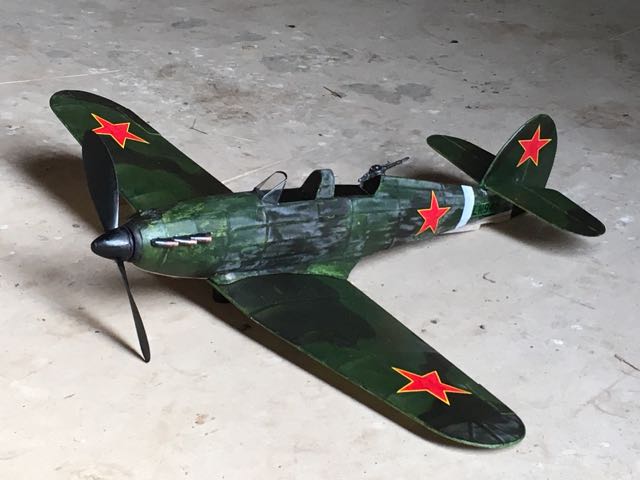
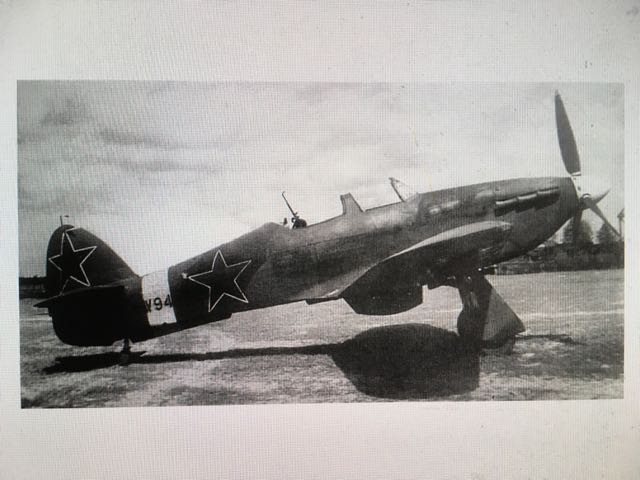
Here is the real one upon which it was based.
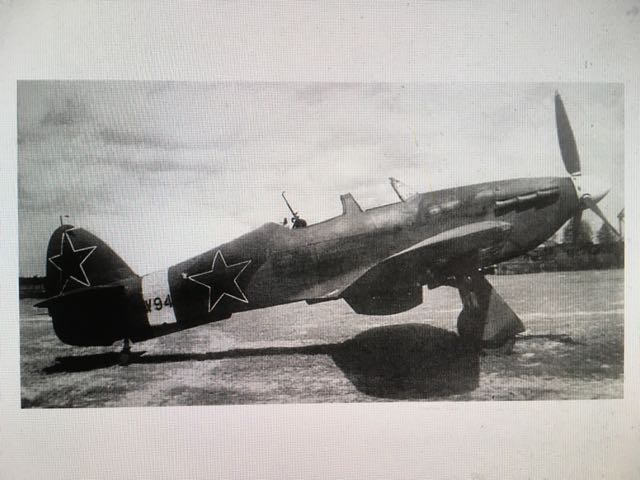
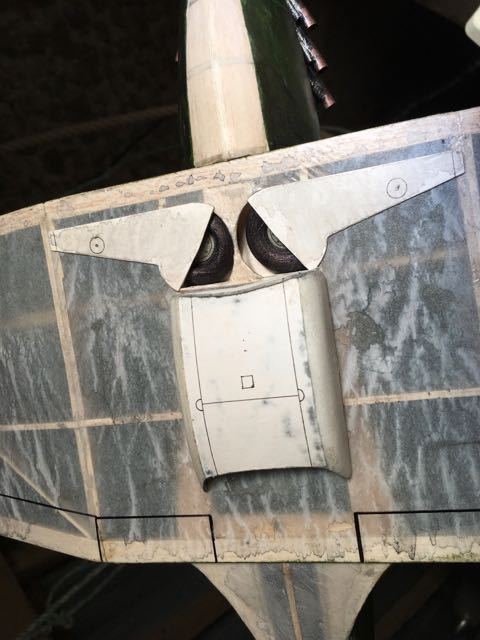
I ditched the retractable undercarriage: it was just too fiddly to get right, and it hinged right on a critical join in the wing which would have required more bracing. In its place, I opted for built in depron wheels, of which I'm very pleased. The light grey colouring of the undersides didn't take at all, but has added a sort of mottling.
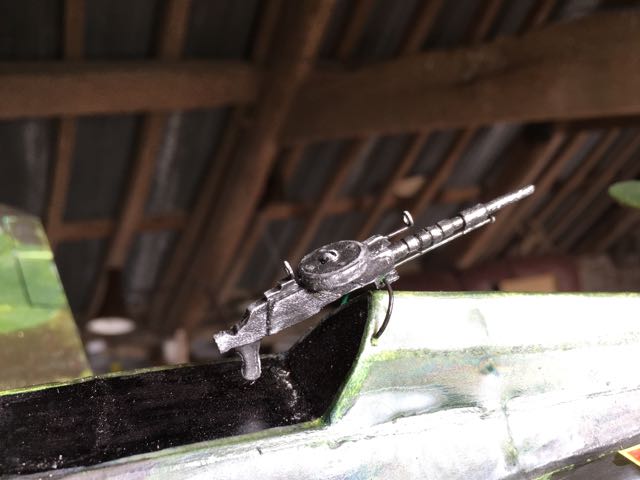
It's been an interesting project, not least for all the 'firsts' I've managed to build into it: balsa spinner, solid nose-block with adjustable thrust bearing, Depron, Esaki tissue, non-shrinking dope, colour testing, magnetic wings and, of course, my first machine-gun!
If I'm disappointed in it, it's more because it's semi-scale and, therefore, missing some of those classic Hurricane features, most notably, the thick wing, and that I got a few bits wrong - exhausts too big, etc. Also, it's heavier than I had hoped. It weighs 87g without a motor. Most of the balsa is 3/32, but I think much of that could have been replaced with 1/16. Fortunately, I ignored the kit's huge solid sheet rudder and made my own built-up version, I also cut out some ends of stringers towards the rear; all of which would have helped to reduce the 25g cast lead nose-weight necessary to get the CoG right.
Negatives aside, this plane was always supposed to be a learning mule, and for that it has been a huge success. The magnetic knock-off wings are a triumph and will, I'm sure, save me much grief in the future.
I've no idea when that future - of long grass and clement weather - will arrive, but I will report back with the results of the first test glides.
Many thanks to everyone who has chipped in and helped me on this project.
Chocks away, Biggles, I mean, Boris!
Crashrr
Here is the real one upon which it was based.
I ditched the retractable undercarriage: it was just too fiddly to get right, and it hinged right on a critical join in the wing which would have required more bracing. In its place, I opted for built in depron wheels, of which I'm very pleased. The light grey colouring of the undersides didn't take at all, but has added a sort of mottling.
It's been an interesting project, not least for all the 'firsts' I've managed to build into it: balsa spinner, solid nose-block with adjustable thrust bearing, Depron, Esaki tissue, non-shrinking dope, colour testing, magnetic wings and, of course, my first machine-gun!
If I'm disappointed in it, it's more because it's semi-scale and, therefore, missing some of those classic Hurricane features, most notably, the thick wing, and that I got a few bits wrong - exhausts too big, etc. Also, it's heavier than I had hoped. It weighs 87g without a motor. Most of the balsa is 3/32, but I think much of that could have been replaced with 1/16. Fortunately, I ignored the kit's huge solid sheet rudder and made my own built-up version, I also cut out some ends of stringers towards the rear; all of which would have helped to reduce the 25g cast lead nose-weight necessary to get the CoG right.
Negatives aside, this plane was always supposed to be a learning mule, and for that it has been a huge success. The magnetic knock-off wings are a triumph and will, I'm sure, save me much grief in the future.
I've no idea when that future - of long grass and clement weather - will arrive, but I will report back with the results of the first test glides.
Many thanks to everyone who has chipped in and helped me on this project.
Chocks away, Biggles, I mean, Boris!
Crashrr
'What the hell' is always the right answer...
Last edit: 28 Oct 2017 18:54 by .
Thanks: THE BLACKBIRD, , one tenor, boz, Squirrelnet
Please Log in or Create an account to join the conversation.
- Mike Rolls
-

- Offline
- Elite Member
-
Less
More
- Posts: 634
- Thank you received: 573
28 Oct 2017 18:15 #100
by Mike Rolls
The older I get, the better I was!
Replied by Mike Rolls on topic 150 Scale VMC (Veron) rubber-powered Hurricane
Well done!!
Mike
Mike
The older I get, the better I was!
Please Log in or Create an account to join the conversation.
- boz
-

- Offline
- Platinum Member
-

Less
More
- Posts: 1176
- Thank you received: 1420
28 Oct 2017 18:19 #101
by boz
Replied by boz on topic 150 Scale VMC (Veron) rubber-powered Hurricane
Tally ho, old bean, well done. :woohoo:
Please Log in or Create an account to join the conversation.
- Squirrelnet
- Offline
- Elite Member
-
Less
More
- Posts: 754
- Thank you received: 2067
28 Oct 2017 18:36 #102
by Squirrelnet
Replied by Squirrelnet on topic 150 Scale VMC (Veron) rubber-powered Hurricane
Nice work Crashrr, it looks great
Please Log in or Create an account to join the conversation.
- Crashrr
-
Topic Author
- Offline
- Senior Member
-
Less
More
- Posts: 87
- Thank you received: 284
30 Oct 2017 15:30 #103
by Crashrr
'What the hell' is always the right answer...
Replied by Crashrr on topic 150 Scale VMC (Veron) rubber-powered Hurricane
Three days of dry, sunny weather and I cracked... I took the Hurricane out for a few test-glides to establish its CoG. Here is one of them.
At the end of the flight you can see the knock-off wings popping off - they work a treat. The crate is a tad nose-heavy, which I expected, but before I do any more, I'm going to build a small magnet into the nose-plug to hold it it. Being solid lead, any movement will have a huge effect on the crate's flight.
I think that's it, till the grass grows and I can start winding on some power...
'What the hell' is always the right answer...
Thanks: Quorneng, , boz, Squirrelnet
Please Log in or Create an account to join the conversation.
- Quorneng
-

- Offline
- Forum Master
-

Less
More
- Posts: 9436
- Thank you received: 19043
30 Oct 2017 16:45 #104
by Quorneng
Replied by Quorneng on topic 150 Scale VMC (Veron) rubber-powered Hurricane
Not much wrong with that glide!
Thanks: Crashrr
Please Log in or Create an account to join the conversation.
- User
-
Less
More
- Thank you received: 0
30 Oct 2017 17:14 #105
by
Replied by on topic 150 Scale VMC (Veron) rubber-powered Hurricane
that was a fantastic glide.
i would leave well alone.
Tony B
i would leave well alone.
Tony B
Please Log in or Create an account to join the conversation.
Time to create page: 1.913 seconds