
- Posts: 10058
- Thank you received: 19043
A major repair but at least Depron crumples!
- Quorneng
-
 Topic Author
- Offline
- Forum Master
-

Less
More
06 Jan 2015 12:19 - 06 Jan 2015 12:31 #1
by Quorneng
A major repair but at least Depron crumples! was created by Quorneng
At the Ashbourne fly in my FD2 suffered a major crash - vertical from 50 ft! 
Still not sure why it happened half way though an otherwise normal flight in lovely calm conditions so I do wonder if it was in effect 'shot down' as a result of the DSM2 getting over loaded as there were a heck of a lot of planes there and virtually all on 2.4.
This what it looked like before.

After the crash.

The tip of the nose ended up several inches in the ground.
The interesting bit is the complete lack of damage to the rest of the structure. Obviously this type of Depron monocoque acts as an energy absorbing crumple zone.
I rather like the FD2 and with the lack of other damage I intend to build a complete new nose and graft it on so that hopefully "you wont be able to see the join".
First job is to start cutting back to find out exactly how much 'new' nose is required.
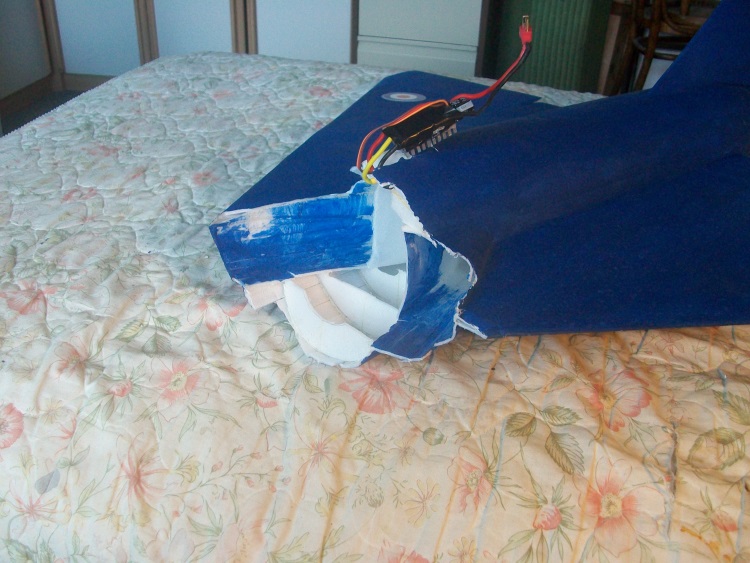
This is always a bit disheartening as you always seem to have to cut away more than you think.
The problem is the area of the bifurcated inlet was originally done a bit 'on the fly' so it will be quite hard to replicate it.
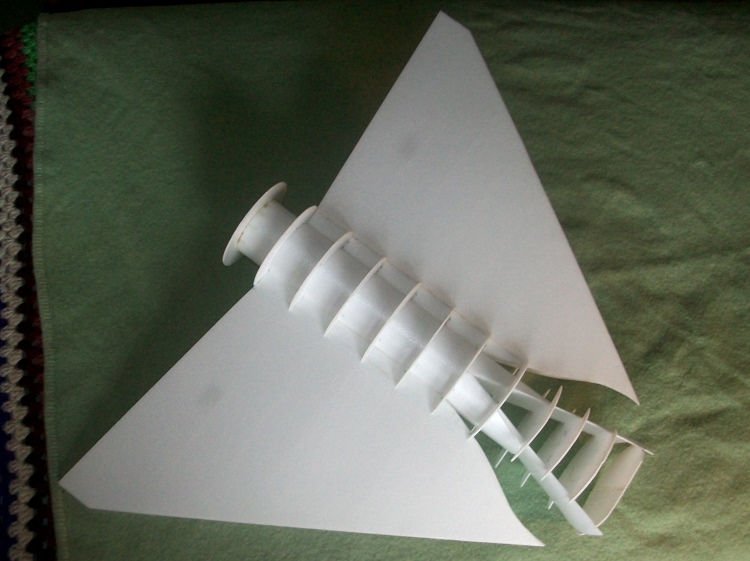
The rest of the nose was built as a complete unit so in theory should be easier.

Next job?
Cut out some formers!
.
Still not sure why it happened half way though an otherwise normal flight in lovely calm conditions so I do wonder if it was in effect 'shot down' as a result of the DSM2 getting over loaded as there were a heck of a lot of planes there and virtually all on 2.4.
This what it looked like before.
After the crash.
The tip of the nose ended up several inches in the ground.
The interesting bit is the complete lack of damage to the rest of the structure. Obviously this type of Depron monocoque acts as an energy absorbing crumple zone.
I rather like the FD2 and with the lack of other damage I intend to build a complete new nose and graft it on so that hopefully "you wont be able to see the join".
First job is to start cutting back to find out exactly how much 'new' nose is required.
This is always a bit disheartening as you always seem to have to cut away more than you think.
The problem is the area of the bifurcated inlet was originally done a bit 'on the fly' so it will be quite hard to replicate it.
The rest of the nose was built as a complete unit so in theory should be easier.
Next job?
Cut out some formers!
.
Last edit: 06 Jan 2015 12:31 by Quorneng.
Thanks: Klipkopwildlife, THE BLACKBIRD, old fart
Please Log in or Create an account to join the conversation.
- Mowerman
-

- Offline
- Elite Member
-

Less
More
- Posts: 296
- Thank you received: 139
06 Jan 2015 17:09 #2
by Mowerman
Replied by Mowerman on topic A major repair but at least Depron crumples!
That is very sad. I have seen it fly and was very impressed, I'm sure you will be able to do an invisible repair.
Please Log in or Create an account to join the conversation.
- Quorneng
-
Topic Author
- Offline
- Forum Master
-
Less
More
- Posts: 10058
- Thank you received: 19043
07 Jan 2015 01:12 - 07 Jan 2015 01:12 #3
by Quorneng
Replied by Quorneng on topic A major repair but at least Depron crumples!
It may not look like much progress but actually working out how to start the construction from a damaged area is the tricky bit.
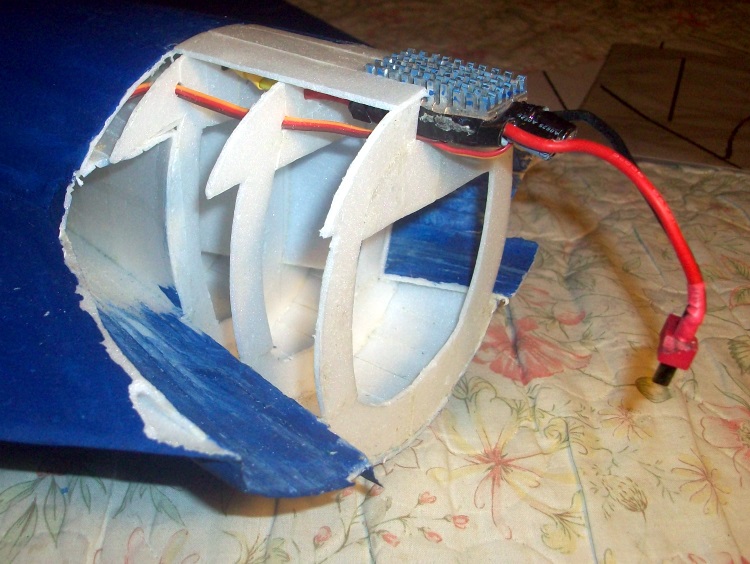
The ESC is now positioned. It will require one more former to be built on to get in front of the air intakes. The complete nose section (when its made!) will simply be fixed on at that point.
The ESC is now positioned. It will require one more former to be built on to get in front of the air intakes. The complete nose section (when its made!) will simply be fixed on at that point.
Last edit: 07 Jan 2015 01:12 by Quorneng.
Thanks: Klipkopwildlife, THE BLACKBIRD, old fart
Please Log in or Create an account to join the conversation.
- Quorneng
-
Topic Author
- Offline
- Forum Master
-
Less
More
- Posts: 10058
- Thank you received: 19043
07 Jan 2015 14:56 #4
by Quorneng
Replied by Quorneng on topic A major repair but at least Depron crumples!
As the repair progresses it get easier to work on as the structure becomes more rigid.
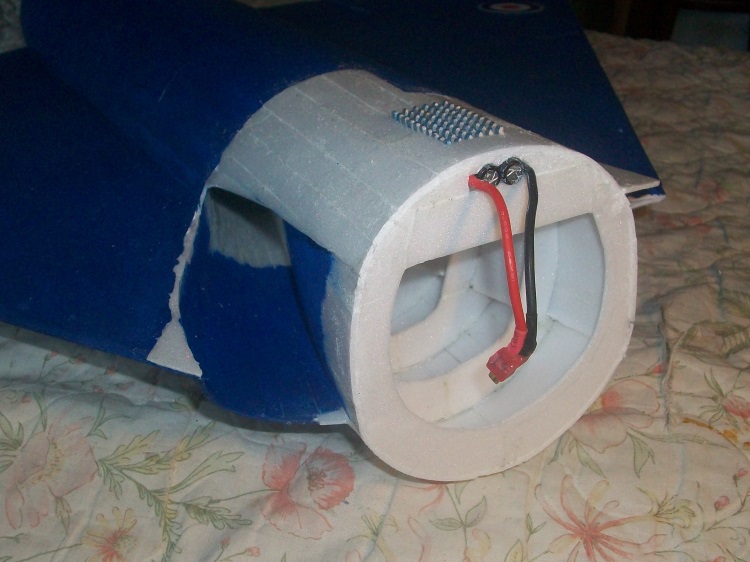
The fuselage is now built to a point just ahead of the air intakes. These are the next task.
The FD2 will then be in a state suitable for the complete nose section to be fixed on.
The only issue is I still have to build it!
The fuselage is now built to a point just ahead of the air intakes. These are the next task.
The FD2 will then be in a state suitable for the complete nose section to be fixed on.
The only issue is I still have to build it!
Thanks: Klipkopwildlife, THE BLACKBIRD, blue123, old fart
Please Log in or Create an account to join the conversation.
- Quorneng
-
Topic Author
- Offline
- Forum Master
-
Less
More
- Posts: 10058
- Thank you received: 19043
08 Jan 2015 00:37 #5
by Quorneng
Replied by Quorneng on topic A major repair but at least Depron crumples!
The air intakes complete.


Now to get on with the new nose but I expect (or rather hope!) the Canberra's replacement servo arrives before I get much further.
Now to get on with the new nose but I expect (or rather hope!) the Canberra's replacement servo arrives before I get much further.
Thanks: Klipkopwildlife, THE BLACKBIRD, blue123, old fart
Please Log in or Create an account to join the conversation.
- Quorneng
-
Topic Author
- Offline
- Forum Master
-
Less
More
- Posts: 10058
- Thank you received: 19043
09 Jan 2015 00:37 - 09 Jan 2015 00:38 #6
by Quorneng
Replied by Quorneng on topic A major repair but at least Depron crumples!
After cutting out a lot of "1/2" formers a start of the cockpit section.

The first time round I built this vertically with complete formers but this time it will be as a half shell over the plan which reduces the chances of building a banana.
The first time round I built this vertically with complete formers but this time it will be as a half shell over the plan which reduces the chances of building a banana.
Last edit: 09 Jan 2015 00:38 by Quorneng.
Thanks: Klipkopwildlife, The Beard, THE BLACKBIRD, old fart
Please Log in or Create an account to join the conversation.
- Quorneng
-
Topic Author
- Offline
- Forum Master
-
Less
More
- Posts: 10058
- Thank you received: 19043
10 Jan 2015 01:02 - 10 Jan 2015 01:05 #7
by Quorneng
Replied by Quorneng on topic A major repair but at least Depron crumples!
A start on the planking with the remaining formers neatly bagged up.
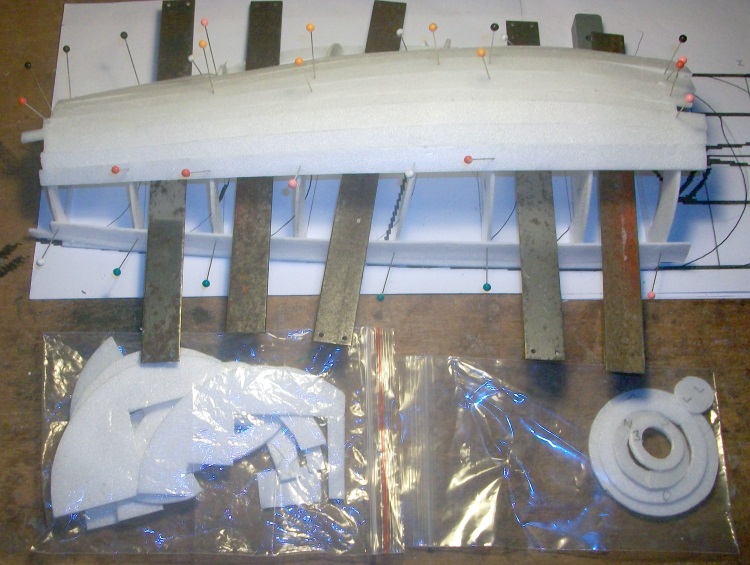
Slow going as complex double curves are involved so each plank has to guessed to be the right sort of shape.
The needle nose bit will be a easier as although it is not a constant taper at least all the formers are perfectly round.
Slow going as complex double curves are involved so each plank has to guessed to be the right sort of shape.
The needle nose bit will be a easier as although it is not a constant taper at least all the formers are perfectly round.
Last edit: 10 Jan 2015 01:05 by Quorneng.
Thanks: Klipkopwildlife, THE BLACKBIRD, old fart
Please Log in or Create an account to join the conversation.
- Quorneng
-
Topic Author
- Offline
- Forum Master
-
Less
More
- Posts: 10058
- Thank you received: 19043
12 Jan 2015 00:53 - 12 Jan 2015 00:54 #8
by Quorneng
Replied by Quorneng on topic A major repair but at least Depron crumples!
The half shell lifted from the plane and the other half formers added.

Before the planking on the LH side gets too far to limit access the battery box is installed. As the hatch will be quite large (the complete fairing behind the canopy) the battery box has to be considered as part of the monocoque skin.

The battery will sit in the 'trough' and be held down by a velcro strap.
As I do not expect the complete rebuild to be any heavier than the original the exact battery position is known but the trough will allow the battery to be moved a couple of inches - just in case!
Before the planking on the LH side gets too far to limit access the battery box is installed. As the hatch will be quite large (the complete fairing behind the canopy) the battery box has to be considered as part of the monocoque skin.
The battery will sit in the 'trough' and be held down by a velcro strap.
As I do not expect the complete rebuild to be any heavier than the original the exact battery position is known but the trough will allow the battery to be moved a couple of inches - just in case!
Last edit: 12 Jan 2015 00:54 by Quorneng.
Thanks: Klipkopwildlife, THE BLACKBIRD, blue123, old fart
Please Log in or Create an account to join the conversation.
- Quorneng
-
Topic Author
- Offline
- Forum Master
-
Less
More
- Posts: 10058
- Thank you received: 19043
14 Jan 2015 20:46 #9
by Quorneng
Replied by Quorneng on topic A major repair but at least Depron crumples!
Next to prepare the joint between the cockpit section and the rest of the fuselage.
With a stressed skin structure all that is required is that the skin is joined. There is nothing else anyway!
The dummy former removed from the new section.
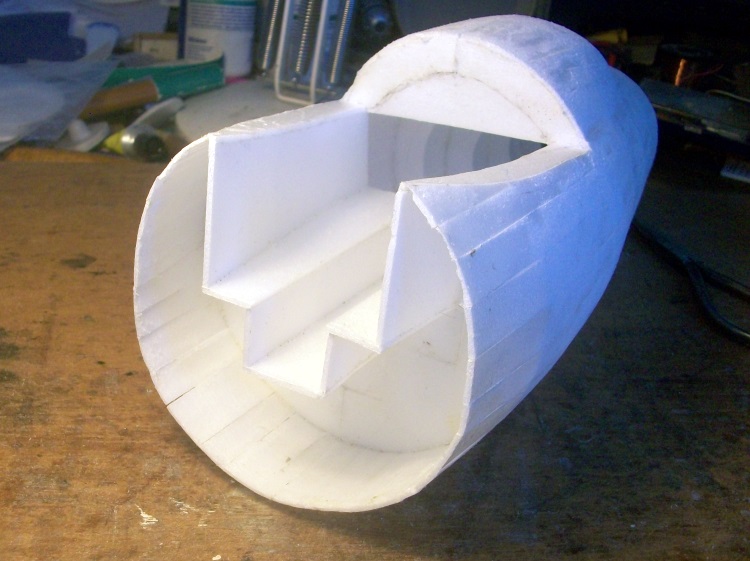
And a flange added to to the fuselage former to both locate the join and to increase the glue area.
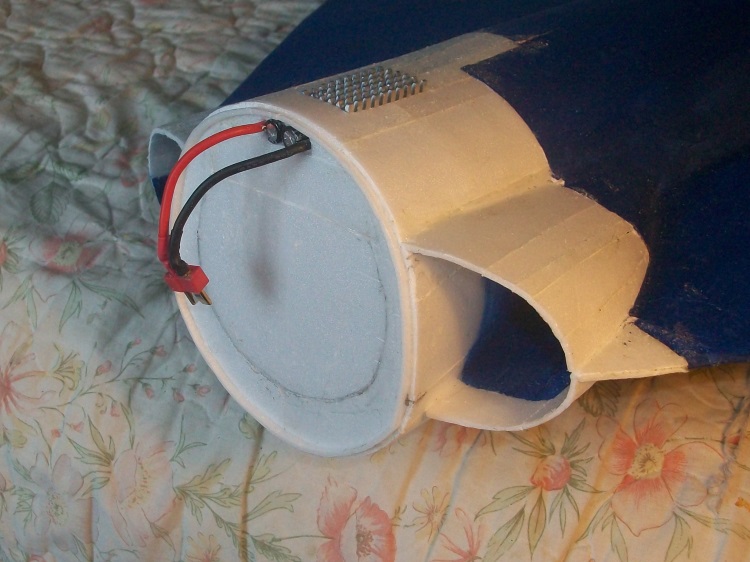
The cockpit section in place.

Made a start on the 81 /2 " nose section which will then have a further 3" of a solid Depron 'needle'!
With a stressed skin structure all that is required is that the skin is joined. There is nothing else anyway!
The dummy former removed from the new section.
And a flange added to to the fuselage former to both locate the join and to increase the glue area.
The cockpit section in place.
Made a start on the 81 /2 " nose section which will then have a further 3" of a solid Depron 'needle'!
Thanks: Klipkopwildlife, THE BLACKBIRD, old fart, alan cantwell
Please Log in or Create an account to join the conversation.
- Ex-Member
- Visitor
-

14 Jan 2015 21:07 #10
by Ex-Member
Replied by Ex-Member on topic A major repair but at least Depron crumples!
It is .fascinating watching you work sir

Please Log in or Create an account to join the conversation.
- alan cantwell
-

- Offline
- Inactivated User
-

Less
More
- Posts: 2290
- Thank you received: 1918
14 Jan 2015 21:23 #11
by alan cantwell
i have 2 sides
no you dont,
yes i do,
Replied by alan cantwell on topic A major repair but at least Depron crumples!
Totally, and absolutely fascinating
i have 2 sides
no you dont,
yes i do,
Please Log in or Create an account to join the conversation.
- Garry Pollard
- Visitor
-
14 Jan 2015 21:46 #12
by Garry Pollard
Replied by Garry Pollard on topic A major repair but at least Depron crumples!
Your skills with this material amaze me Q
Garry
Garry
Please Log in or Create an account to join the conversation.
- Quorneng
-
Topic Author
- Offline
- Forum Master
-
Less
More
- Posts: 10058
- Thank you received: 19043
15 Jan 2015 01:01 - 15 Jan 2015 01:03 #13
by Quorneng
Replied by Quorneng on topic A major repair but at least Depron crumples!
Thanks gents for the kind words but skill?
I have a confession to make.
That cockpit section in the earlier pictures before it was joined was actually the wrong shape!
Not at the actual join but too wide in the cockpit area so it looked wrong.
I don't know how it happened as I was using the same plan as the original.
Solution - cut it down the middle front to back, take out 1/8" of each half (but not at the join) and glue it back together.
A bit more complicated to keep the battery trough but it all worked and you can't even see the join!
I am afraid no pictures of it being done - far too embarrassing!
I have a confession to make.
That cockpit section in the earlier pictures before it was joined was actually the wrong shape!
Not at the actual join but too wide in the cockpit area so it looked wrong.
I don't know how it happened as I was using the same plan as the original.
Solution - cut it down the middle front to back, take out 1/8" of each half (but not at the join) and glue it back together.
A bit more complicated to keep the battery trough but it all worked and you can't even see the join!
I am afraid no pictures of it being done - far too embarrassing!
Last edit: 15 Jan 2015 01:03 by Quorneng.
Thanks: Ex-Member
Please Log in or Create an account to join the conversation.
- Ex-Member
- Visitor
-
15 Jan 2015 07:07 #14
by Ex-Member
Replied by Ex-Member on topic A major repair but at least Depron crumples!
I agree with Garry, your skills with Depron are quite remarkable Q!
Quick question. Just read back and can't find the size of Depron you are working with on this one, would you remind us please?
Thanks,
Andy
Quick question. Just read back and can't find the size of Depron you are working with on this one, would you remind us please?
Thanks,
Andy
Please Log in or Create an account to join the conversation.
- THE BLACKBIRD
-

- Offline
- Forum Master
-
Less
More
- Posts: 6781
- Thank you received: 10722
15 Jan 2015 07:58 #15
by THE BLACKBIRD
Replied by THE BLACKBIRD on topic A major repair but at least Depron crumples!
I think its 2mm, amazing work, my eyes and defo my HANDS would destroy it in the process
Thanks: Ex-Member
Please Log in or Create an account to join the conversation.
Time to create page: 0.400 seconds