
- Posts: 10058
- Thank you received: 19043
Big Dragon 3
- Quorneng
-
 Topic Author
- Offline
- Forum Master
-

Less
More
07 Mar 2024 22:53 - 07 Mar 2024 22:55 #1
by Quorneng
Big Dragon 3 was created by Quorneng
I mentioned that I was thinking of using one of Phil's bigger batteries that I an custodian off namely a 4000mAh 3s.
This is quite a bit bigger than the largest single battery that I have uses so far that being a 2800mAh 3s in the Big Dragon 2 pusher. The Big Dragon 1 is no more.
The Big dragon 2 has a "printed" pod and wing pylon. The pod ahead of the wing hold the battery and is sized to exactly hold the 2800mAh battery.
A comparison of the two batteries.

The 2800 weighs 208g the 4000 is 325g. Not that dissimilar in size but nearly 60 heavier.
As the pod is printed and I designed it so I still have the FreeCad FCSTD files. It is thus not too difficult to "enlarge" the pod so it exactly fit the 4000mAh battery. Making a structure to exactly fit a battery is normally not good practise but I do have access to three them!
The increase weight will require a stronger and slightly bigger span wing although the construction will remain the same. Printed ribs, a hard balsa spar and 3mm Depron wing skins
I might also be prudent to upgrade to 5g servos as well.
The Big Dragon 2 has a surfeit power so the same motor and prop should be able to handle the greater weight.
Enough dialogue so I started working on the Big Dragon 2 Free Cad files. There are 6 printed components that make up the complete pod, pylon and wing mount. They are simply glued together, apart from the battery hatch.

Combined as a CAD image it will look like this.

In PLA the parts will take a total of about 16 hours to print.

Today I even made a start printing the rear section of the pod. As the glass fibre tapered fishing rod "boom" has to be an exact 'friction' fit it required a bit of "trial and error" to get itright.


It took 4 hours 23 minutes to print
I ordered the blue PLA simply because it was really cheap. Apparently blue is not a popular colour.
A short video of it being printed.
At 221mm tall it is close to the 250 limit of the A8.
This is quite a bit bigger than the largest single battery that I have uses so far that being a 2800mAh 3s in the Big Dragon 2 pusher. The Big Dragon 1 is no more.
The Big dragon 2 has a "printed" pod and wing pylon. The pod ahead of the wing hold the battery and is sized to exactly hold the 2800mAh battery.
A comparison of the two batteries.
The 2800 weighs 208g the 4000 is 325g. Not that dissimilar in size but nearly 60 heavier.
As the pod is printed and I designed it so I still have the FreeCad FCSTD files. It is thus not too difficult to "enlarge" the pod so it exactly fit the 4000mAh battery. Making a structure to exactly fit a battery is normally not good practise but I do have access to three them!
The increase weight will require a stronger and slightly bigger span wing although the construction will remain the same. Printed ribs, a hard balsa spar and 3mm Depron wing skins
I might also be prudent to upgrade to 5g servos as well.
The Big Dragon 2 has a surfeit power so the same motor and prop should be able to handle the greater weight.
Enough dialogue so I started working on the Big Dragon 2 Free Cad files. There are 6 printed components that make up the complete pod, pylon and wing mount. They are simply glued together, apart from the battery hatch.
Combined as a CAD image it will look like this.
In PLA the parts will take a total of about 16 hours to print.
Today I even made a start printing the rear section of the pod. As the glass fibre tapered fishing rod "boom" has to be an exact 'friction' fit it required a bit of "trial and error" to get itright.
It took 4 hours 23 minutes to print
I ordered the blue PLA simply because it was really cheap. Apparently blue is not a popular colour.
A short video of it being printed.
At 221mm tall it is close to the 250 limit of the A8.
Attachments:
Last edit: 07 Mar 2024 22:55 by Quorneng.
Thanks: Eric, Klipkopwildlife, Flytilbroke, THE BLACKBIRD
Please Log in or Create an account to join the conversation.
- Quorneng
-
Topic Author
- Offline
- Forum Master
-
Less
More
- Posts: 10058
- Thank you received: 19043
09 Mar 2024 19:42 #2
by Quorneng
Replied by Quorneng on topic Big Dragon 3
Some more crazy printing.

242 mm tall and sitting on a 28mm diameter base.
The printer got very near to the top.

Just out of interest I used the experimental "adaptive layers" in CURA 5.4. Did'nt seem to effect the print quality but took over an hour off the print time to 3 hours 14 minutes.
 .
.
242 mm tall and sitting on a 28mm diameter base.
The printer got very near to the top.
Just out of interest I used the experimental "adaptive layers" in CURA 5.4. Did'nt seem to effect the print quality but took over an hour off the print time to 3 hours 14 minutes.
Attachments:
Thanks: Klipkopwildlife, THE BLACKBIRD
Please Log in or Create an account to join the conversation.
- Klipkopwildlife
-

- Offline
- Administrator
-

- I'm supposed to be retired!
10 Mar 2024 07:19 #3
by Klipkopwildlife
Do it now, you may never get another chance
Replied by Klipkopwildlife on topic Big Dragon 3
The Prusa is only 220mm in Z but 250mm in X and 210mm in Y.
Cura is now up to 5.6
Cura is now up to 5.6
Do it now, you may never get another chance
Thanks: THE BLACKBIRD
Please Log in or Create an account to join the conversation.
- Quorneng
-
Topic Author
- Offline
- Forum Master
-
Less
More
- Posts: 10058
- Thank you received: 19043
10 Mar 2024 11:54 #4
by Quorneng
Replied by Quorneng on topic Big Dragon 3
In fact to get the full 250 mm I would have to reset the bottom micro switch and wind the table down so it compressed the springs to almost binding!
Just as an aside Marlin always raised the bridge by a few mm when starting a print . If the last job left the bridge so near the top it stalls the Z servo motors and the result is they end up out of sync - as I found out!
It seems amazing a pair of servo motors can run for hours and hours and keep in perfect step particularly as only the left one is "reset" by the bottom micro switch.
The Anet A8 has no "top" micro switch to prevent this sort of thing happening but then it was very cheap.
Just as an aside Marlin always raised the bridge by a few mm when starting a print . If the last job left the bridge so near the top it stalls the Z servo motors and the result is they end up out of sync - as I found out!
It seems amazing a pair of servo motors can run for hours and hours and keep in perfect step particularly as only the left one is "reset" by the bottom micro switch.
The Anet A8 has no "top" micro switch to prevent this sort of thing happening but then it was very cheap.
Thanks: Klipkopwildlife
Please Log in or Create an account to join the conversation.
- Quorneng
-
Topic Author
- Offline
- Forum Master
-
Less
More
- Posts: 10058
- Thank you received: 19043
14 Mar 2024 12:43 - 14 Mar 2024 12:46 #5
by Quorneng
Replied by Quorneng on topic Big Dragon 3
Still printing parts and by doing so discovered why the blue PLA was so cheap- it is horrible! The bead looses contact with the previous layer at the drop of a hat which means a large surface is full of small discontinuities and top surface coverage is very poor. The best I have achieved is the raise the flow t0 120% on the outer walls but this of course adds quite a bit of weight.
This is progress so far.
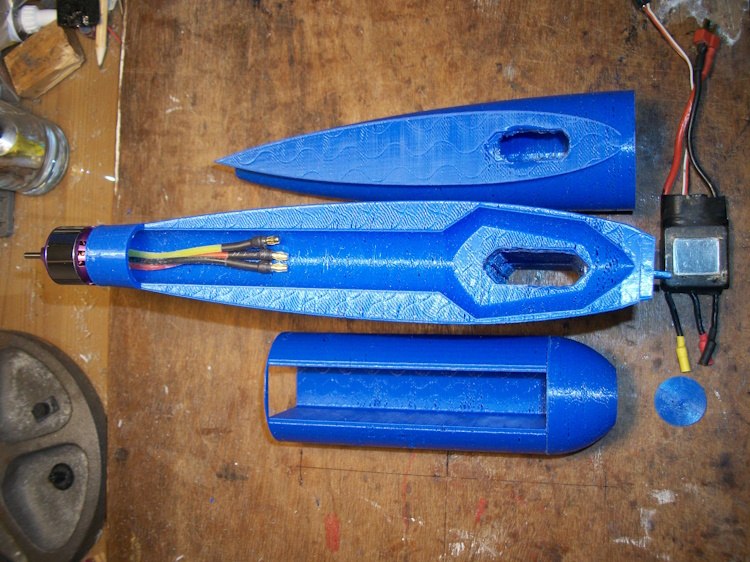
Top is the rear fuselage. It holds the long glass fibre boom.
Next is the two parts of the wing pylon and motor mount glued together with the 2830 motor in place. The 50A ESC held within the wing pylon.
The lower part is the fuselage nose. It will be glued onto the rear fuselage part when the electrics are assembled and working although in theory they can be removed when everything is complete, The nose holds the 4000mAh 3s.
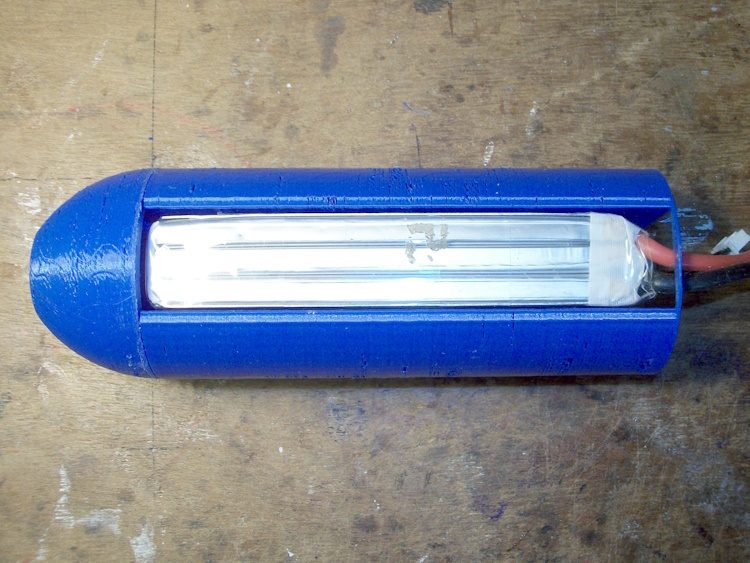
It is an 'exact' fit. It is held in place by the hatch although not yet printed. I know such a tight fit could lead to a swelling issue but even at full power the discharge will be just 5C so the battery will have an easy life.
Despite my best efforts two of the major parts had to be completely reprinted to correct "design" errors making the total print time so far well in excess of 24 hours.
It will look more like a plane when it is assembled - honest!
.
This is progress so far.
Top is the rear fuselage. It holds the long glass fibre boom.
Next is the two parts of the wing pylon and motor mount glued together with the 2830 motor in place. The 50A ESC held within the wing pylon.
The lower part is the fuselage nose. It will be glued onto the rear fuselage part when the electrics are assembled and working although in theory they can be removed when everything is complete, The nose holds the 4000mAh 3s.
It is an 'exact' fit. It is held in place by the hatch although not yet printed. I know such a tight fit could lead to a swelling issue but even at full power the discharge will be just 5C so the battery will have an easy life.
Despite my best efforts two of the major parts had to be completely reprinted to correct "design" errors making the total print time so far well in excess of 24 hours.
It will look more like a plane when it is assembled - honest!
.
Attachments:
Last edit: 14 Mar 2024 12:46 by Quorneng.
Thanks: Eric, Klipkopwildlife, Flytilbroke, THE BLACKBIRD
Please Log in or Create an account to join the conversation.
- Quorneng
-
Topic Author
- Offline
- Forum Master
-
Less
More
- Posts: 10058
- Thank you received: 19043
16 Mar 2024 22:53 - 16 Mar 2024 22:57 #6
by Quorneng
Replied by Quorneng on topic Big Dragon 3
As I hoped it does begin to look a bit more plane like when the printed parts are assembled.

Being slightly bigger than the current Big Dragon it can use a big 12x3.8 prop. (the biggest SF I have)
A short test with the slightly smaller current Big Dragon 3s battery at storage charge showed 254W at 25.3A . It blew a lot of air about the room!
All I have to do now is build all the flying surfaces.
Could be quite good tomorrow.
Being slightly bigger than the current Big Dragon it can use a big 12x3.8 prop. (the biggest SF I have)
A short test with the slightly smaller current Big Dragon 3s battery at storage charge showed 254W at 25.3A . It blew a lot of air about the room!
All I have to do now is build all the flying surfaces.
Could be quite good tomorrow.
Attachments:
Last edit: 16 Mar 2024 22:57 by Quorneng.
Thanks: Eric, Klipkopwildlife, Flytilbroke, THE BLACKBIRD
Please Log in or Create an account to join the conversation.
- Klipkopwildlife
-
- Offline
- Administrator
-
- I'm supposed to be retired!
19 Mar 2024 07:48 #7
by Klipkopwildlife
Do it now, you may never get another chance
Replied by Klipkopwildlife on topic Big Dragon 3
Simon, you may have thought of this, can I suggest you put the blue filament in the Oven for an hour or 2 at about 80degrees? It might help but it certainly won't do any harm.

Do it now, you may never get another chance
Thanks: THE BLACKBIRD
Please Log in or Create an account to join the conversation.
- Quorneng
-
Topic Author
- Offline
- Forum Master
-
Less
More
- Posts: 10058
- Thank you received: 19043
19 Mar 2024 14:29 #8
by Quorneng
Replied by Quorneng on topic Big Dragon 3
Interesting idea. I will certainly give it a try.
The Blue filament is certainly not brittle like most PLA goes when it absorbs moisture. Thinking about it at the moment it is almost a pliable as LW-PLA !
I did wonder if the blue pigment has an effect on the qualities of the PLA. Black and white certainly does, maybe because they have to use a higher pigment content to get a good colour..
I will let you know..
The Blue filament is certainly not brittle like most PLA goes when it absorbs moisture. Thinking about it at the moment it is almost a pliable as LW-PLA !
I did wonder if the blue pigment has an effect on the qualities of the PLA. Black and white certainly does, maybe because they have to use a higher pigment content to get a good colour..
I will let you know..
Thanks: Klipkopwildlife
Please Log in or Create an account to join the conversation.
- Quorneng
-
Topic Author
- Offline
- Forum Master
-
Less
More
- Posts: 10058
- Thank you received: 19043
29 Mar 2024 19:41 - 29 Mar 2024 19:43 #9
by Quorneng
Replied by Quorneng on topic Big Dragon 3
The first photo of the nearly complete Big Dragon 3

The wing is a spare I built some time ago for the Big Dragon 2. The V tail plane is new.
On the BG 2 I used a small servo for each elevator as I had intended to use them also as rudders but never did.
On the BG 3 I opted for a single bigger servo to drive both elevators. A method I used on the V tail I used on the now defunct original Wing Dragon.

Each elevator has it own link using the outer two holes of the servo arm. The elevator horn length L & R is adjusted to provides the same elevator throw.
Its "party piece" is the two section fishing rod boom is collapsible for storage.
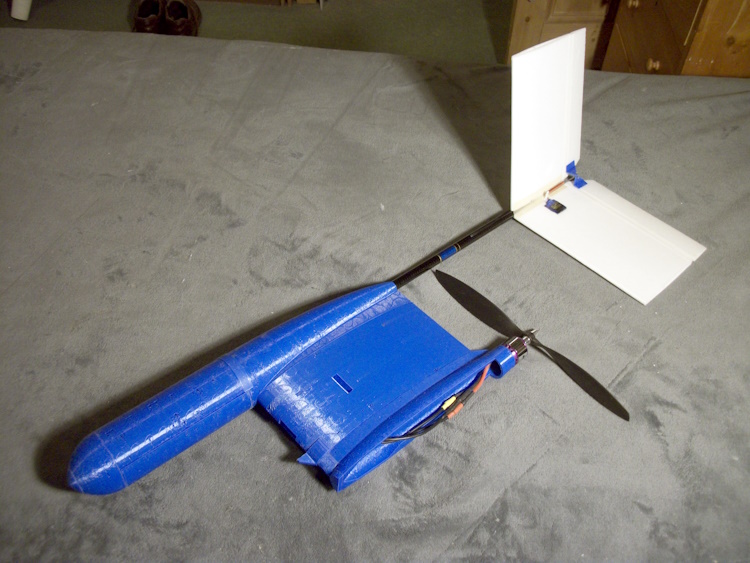
The wing is a spare I built some time ago for the Big Dragon 2. The V tail plane is new.
On the BG 2 I used a small servo for each elevator as I had intended to use them also as rudders but never did.
On the BG 3 I opted for a single bigger servo to drive both elevators. A method I used on the V tail I used on the now defunct original Wing Dragon.
Each elevator has it own link using the outer two holes of the servo arm. The elevator horn length L & R is adjusted to provides the same elevator throw.
Its "party piece" is the two section fishing rod boom is collapsible for storage.
Attachments:
Last edit: 29 Mar 2024 19:43 by Quorneng.
Thanks: Eric, Klipkopwildlife, THE BLACKBIRD
Please Log in or Create an account to join the conversation.
- Eric
-

- Offline
- Moderator
-

Less
More
- Posts: 15406
- Thank you received: 14306
30 Mar 2024 06:42 #10
by Eric
if you are calm and collected when all about you are going berserk - you've missed something important!
Replied by Eric on topic Big Dragon 3
That V-tail looks a bit small in comparison with the main wing.
Telescoping boom - I hope you have a positive lock mechanism on that - it would be 'interesting' if it decided to rotate in mid-flight!

Telescoping boom - I hope you have a positive lock mechanism on that - it would be 'interesting' if it decided to rotate in mid-flight!
if you are calm and collected when all about you are going berserk - you've missed something important!
Thanks: THE BLACKBIRD
Please Log in or Create an account to join the conversation.
- Quorneng
-
Topic Author
- Offline
- Forum Master
-
Less
More
- Posts: 10058
- Thank you received: 19043
30 Mar 2024 17:01 #11
by Quorneng
Replied by Quorneng on topic Big Dragon 3
I can assure you when pulled out tight it is a very tight fit. It has considerable length of contact (about 2") between the boom sections and the pod fuselage. The tail plane would likely break off before the boom rotated. The small size of the tail plane is made up for by the length of the boom, well over half the wing span.
The V tail has an 90 degree included angle. This is a bit "broad" for a V tail which is normally set at 80 degrees or even less to give the "V" sufficient side area. The Big Dragon 3 V tail will thus have vertical tip extensions to add side area.
I did the same thing on the Big Dragon 2. when it demonstrated a distinct lack of directional stability

It works well.
The V tail has an 90 degree included angle. This is a bit "broad" for a V tail which is normally set at 80 degrees or even less to give the "V" sufficient side area. The Big Dragon 3 V tail will thus have vertical tip extensions to add side area.
I did the same thing on the Big Dragon 2. when it demonstrated a distinct lack of directional stability
It works well.
Attachments:
Thanks: Eric, Klipkopwildlife, jon.in.swansea
Please Log in or Create an account to join the conversation.
- Quorneng
-
Topic Author
- Offline
- Forum Master
-
Less
More
- Posts: 10058
- Thank you received: 19043
08 Aug 2024 17:35 - 08 Aug 2024 18:31 #12
by Quorneng
Replied by Quorneng on topic Big Dragon 3
This has been rather a long time in coming but the Big Dragon 3 is now finally complete.
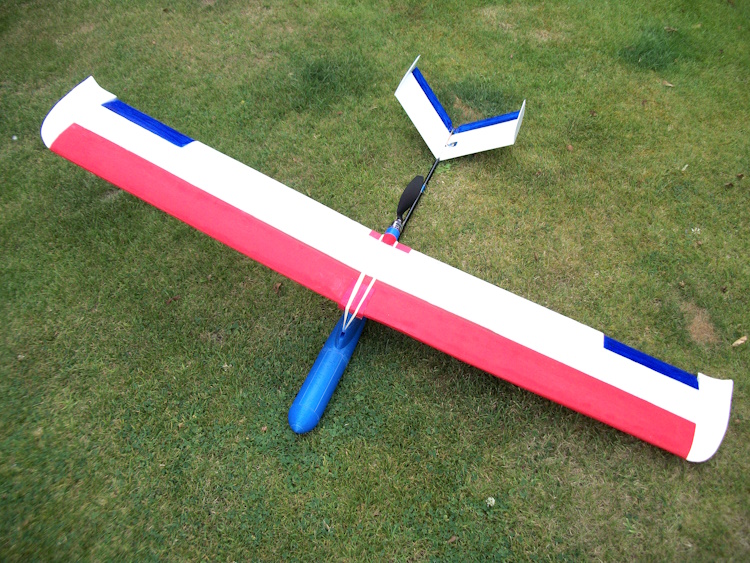
Very similar in concept to the successful current Big Dragon which is no called the Big Dragon 2! Big Dragon 1 is no more!

The 3 has a slightly bigger wing and a more powerful motor with an 11x3.8 rather than a 10x3.8. It does have a much bigger battery 4000mAh 3s compared to a 2800. As a result the 3 is a bit heavier at 853g against 743g however the extra is almost entirely due to the battery. It has a measured full power of 299W which gives a creditable 160W/lb. For a slow flyer this should give a quite adequate climb performance.
In view of the extra weight the 3 wing has a thin strip of carbon tow glued to the top and bottom wing surface directly over the wing spar out to 1/3 span. This should give a bit more stiffness but as a slow flyer it certainly won't be doing any high g aerobatics.
Just need some suitable weather for its maiden..

Very similar in concept to the successful current Big Dragon which is no called the Big Dragon 2! Big Dragon 1 is no more!
The 3 has a slightly bigger wing and a more powerful motor with an 11x3.8 rather than a 10x3.8. It does have a much bigger battery 4000mAh 3s compared to a 2800. As a result the 3 is a bit heavier at 853g against 743g however the extra is almost entirely due to the battery. It has a measured full power of 299W which gives a creditable 160W/lb. For a slow flyer this should give a quite adequate climb performance.
In view of the extra weight the 3 wing has a thin strip of carbon tow glued to the top and bottom wing surface directly over the wing spar out to 1/3 span. This should give a bit more stiffness but as a slow flyer it certainly won't be doing any high g aerobatics.
Just need some suitable weather for its maiden..
Attachments:
Last edit: 08 Aug 2024 18:31 by Klipkopwildlife.
Thanks: Eric, Klipkopwildlife, Flytilbroke, jon.in.swansea
Please Log in or Create an account to join the conversation.
- jon.in.swansea
-

- Offline
- Elite Member
-

Less
More
- Posts: 757
- Thank you received: 1164
08 Aug 2024 20:38 #13
by jon.in.swansea
Replied by jon.in.swansea on topic Big Dragon 3
Three is a brilliant looking beastie. Can't wait for stories of its future adventures.
How does the wing differ from Two?
How does the wing differ from Two?
Thanks: Klipkopwildlife
Please Log in or Create an account to join the conversation.
- Quorneng
-
Topic Author
- Offline
- Forum Master
-
Less
More
- Posts: 10058
- Thank you received: 19043
09 Aug 2024 11:35 #14
by Quorneng
Replied by Quorneng on topic Big Dragon 3
I actually built the "3" wing as a replacement for that on the "2" which had suffered a cracked spar. I later manged to repair it satisfactorily so Big Dragon 3 was built simply to make use of the new wing.
A case of a replacement part "morphing" into a complete plane.

Apart from the "3" wing having fancy curled up tips it has the same dimensions as "2" and uses the same printed wing ribs. It does have a slightly thicker wing section as the one piece Depron skins go over the spar. On "2" the skins are in two parts front and back only going up to the spar.to give the maximum possible spar depth for the wing thickness. The down side to doing this is it results in a slight interruption to the upper surface profile however I very much doubt if makes any difference.
I had originally intended the "3" printed fuselage parts to be a simple reprint of the existing stl files. However the original nose was designed to exactly match the 2800mAh battery but the 4000mAh was both longer, wider and thicker so requiring a completely redesigned nose CAD file. As "3" was going to be heavier I increased the height of the wing pylon to allow a bigger prop. As a result none of the fuselage printed parts of "3" are exactly the same as those for "2". In addition the intermediate 8 years of printer use has lowered its print quality a bit so the parts have to be a few % heavier to ensure the same structural integrity.
I do now have two near identical planes but fortunately their removeable straight wings and simple narrow fuselages mean they don't take up much storage space.
A case of a replacement part "morphing" into a complete plane.
Apart from the "3" wing having fancy curled up tips it has the same dimensions as "2" and uses the same printed wing ribs. It does have a slightly thicker wing section as the one piece Depron skins go over the spar. On "2" the skins are in two parts front and back only going up to the spar.to give the maximum possible spar depth for the wing thickness. The down side to doing this is it results in a slight interruption to the upper surface profile however I very much doubt if makes any difference.
I had originally intended the "3" printed fuselage parts to be a simple reprint of the existing stl files. However the original nose was designed to exactly match the 2800mAh battery but the 4000mAh was both longer, wider and thicker so requiring a completely redesigned nose CAD file. As "3" was going to be heavier I increased the height of the wing pylon to allow a bigger prop. As a result none of the fuselage printed parts of "3" are exactly the same as those for "2". In addition the intermediate 8 years of printer use has lowered its print quality a bit so the parts have to be a few % heavier to ensure the same structural integrity.
I do now have two near identical planes but fortunately their removeable straight wings and simple narrow fuselages mean they don't take up much storage space.
Thanks: Eric, Klipkopwildlife, Flytilbroke, jon.in.swansea
Please Log in or Create an account to join the conversation.
- Quorneng
-
Topic Author
- Offline
- Forum Master
-
Less
More
- Posts: 10058
- Thank you received: 19043
12 Aug 2024 19:02 #15
by Quorneng
Replied by Quorneng on topic Big Dragon 3
The first flight of the Dig Dragon 3 did not go well yesterday.
As ot feels heavy by my standards so gave it a firm launch and about 1/2 power to keep the motor torque down. The result it fly fairly fast towards the ground. My first reaction no unreasonably was to add more power. In fact I went to full power. Big mistake the sudden increase in motor torque caused a significant bank so a wing tip touched the ground quite firmly. As intended the bands allowed the wing to give but not as intended it caused the bands to flip off the nose hook. The wing was thus free to lift and flip over the still spinning prop. 2 big gouges in the upper surface.. The impact force did damage the prop but did cause the motor to break free from its mountings.
I am normally guilty of initially setting the initial CG too far aft but I suspect the heavy battery along with inadequate wing incidence mean a higher than expected flying speed.
Oh! well never mind it is all quite mendable.
As ot feels heavy by my standards so gave it a firm launch and about 1/2 power to keep the motor torque down. The result it fly fairly fast towards the ground. My first reaction no unreasonably was to add more power. In fact I went to full power. Big mistake the sudden increase in motor torque caused a significant bank so a wing tip touched the ground quite firmly. As intended the bands allowed the wing to give but not as intended it caused the bands to flip off the nose hook. The wing was thus free to lift and flip over the still spinning prop. 2 big gouges in the upper surface.. The impact force did damage the prop but did cause the motor to break free from its mountings.
I am normally guilty of initially setting the initial CG too far aft but I suspect the heavy battery along with inadequate wing incidence mean a higher than expected flying speed.
Oh! well never mind it is all quite mendable.
Thanks: Eric, Klipkopwildlife, Flytilbroke, jon.in.swansea
Please Log in or Create an account to join the conversation.
Time to create page: 0.257 seconds