
- Posts: 10058
- Thank you received: 19043
Printing with Light Weight PLA
- Quorneng
-
 Topic Author
- Offline
- Forum Master
-

Less
More
03 Mar 2023 13:05 #46
by Quorneng
Replied by Quorneng on topic Printing with Light Weight PLA
The reason it was positioned like that is due to the fact the bed only travels backwards and forward. Side to side movement is on the print head so provided the nozzle does not actually touch the print there is virtually no side load on it.
I did actually print the aileron but unfortunately it is far too flexible. I fear a lofted wing is out of the question unless I can find a way getting CURA to print a loft other than vertically.
The other surprise was the printer could not manage a 240 mm print height.

The carriage actually hit the top of the frame at 235 mm. There is no top limit switch. It appears I have the nozzle mounted too low and possibly the bed too high on its springs. Some resetting required if I ever really want to print at the maximum possible height.

I did actually print the aileron but unfortunately it is far too flexible. I fear a lofted wing is out of the question unless I can find a way getting CURA to print a loft other than vertically.
The other surprise was the printer could not manage a 240 mm print height.
The carriage actually hit the top of the frame at 235 mm. There is no top limit switch. It appears I have the nozzle mounted too low and possibly the bed too high on its springs. Some resetting required if I ever really want to print at the maximum possible height.
Please Log in or Create an account to join the conversation.
- jon.in.swansea
-

- Offline
- Elite Member
-

Less
More
- Posts: 757
- Thank you received: 1164
03 Mar 2023 13:13 #47
by jon.in.swansea
Replied by jon.in.swansea on topic Printing with Light Weight PLA
Re-reading the post about an estimated 40 hours of print time... I know that LW-PLA needs a slower print speed. What speed are you printing at?
I have settled on 40mm/s for all parts of the print whether or not I am doing a vase mode or a gyroid infil print. I also use a 70% flow rate to get the maximum foaming to 0.8mm. I like the stiffness although I know it is possible to use a 35% flow rate that results in a 0.5mm width or a 50% flow rate for ~0.65mm width - lighter but much less stiff.
I have settled on 40mm/s for all parts of the print whether or not I am doing a vase mode or a gyroid infil print. I also use a 70% flow rate to get the maximum foaming to 0.8mm. I like the stiffness although I know it is possible to use a 35% flow rate that results in a 0.5mm width or a 50% flow rate for ~0.65mm width - lighter but much less stiff.
Please Log in or Create an account to join the conversation.
- Klipkopwildlife
-

- Offline
- Administrator
-

- I'm supposed to be retired!
03 Mar 2023 16:48 #48
by Klipkopwildlife
Do it now, you may never get another chance
Replied by Klipkopwildlife on topic Printing with Light Weight PLA
Jon, I'd be tempted to move away from bending foam over ribs and go for the complete LW-PLA solution.
Do it now, you may never get another chance
Thanks: jon.in.swansea
Please Log in or Create an account to join the conversation.
- Quorneng
-
Topic Author
- Offline
- Forum Master
-
Less
More
- Posts: 10058
- Thank you received: 19043
03 Mar 2023 17:43 #49
by Quorneng
Replied by Quorneng on topic Printing with Light Weight PLA
jon
The foaming is more dependent on the nozzle temperature than the flow. Higher the temperature the less flow for the same final thickness.
I am printing at 230 degrees which is a hot as I dare go without installing the special high temperature hot end. 250 degrees is supposed to give the maximum foam.
I am using a flow rate of 46%. A line width of 0.4 with a 0.2 layer height. A print speed of 50 mm/s. With these settings I end up with a single wall of 0.8 (ish) mm (measured).
The retract distance is 0.8 mm, same as for PLA. I have not tried increasing it to reduce the 'tails' on nozzle position change with LW-PLA.
I note some on forums claim to have used a 15 mm retract!.
Similarly someone was complaining of a low quality print using 280 degrees and a 22% flow.
I guess like a lot of the printing parameters, if it works for you stick with it.
ps
I never liked bending any foam around the rib leading edge so I don't, even when using the thinnest sheet foams.
I use a small leading edge foam spar to fix the separate top and bottom skins to and finish off the wing with a solid 'added on' foam leading edge sanded to shape.
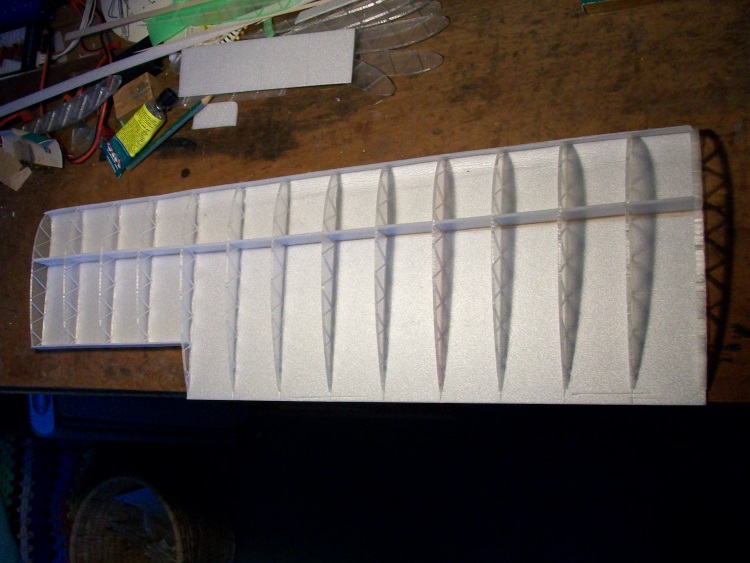
Works for me.
The foaming is more dependent on the nozzle temperature than the flow. Higher the temperature the less flow for the same final thickness.
I am printing at 230 degrees which is a hot as I dare go without installing the special high temperature hot end. 250 degrees is supposed to give the maximum foam.
I am using a flow rate of 46%. A line width of 0.4 with a 0.2 layer height. A print speed of 50 mm/s. With these settings I end up with a single wall of 0.8 (ish) mm (measured).
The retract distance is 0.8 mm, same as for PLA. I have not tried increasing it to reduce the 'tails' on nozzle position change with LW-PLA.
I note some on forums claim to have used a 15 mm retract!.
Similarly someone was complaining of a low quality print using 280 degrees and a 22% flow.
I guess like a lot of the printing parameters, if it works for you stick with it.
ps
I never liked bending any foam around the rib leading edge so I don't, even when using the thinnest sheet foams.
I use a small leading edge foam spar to fix the separate top and bottom skins to and finish off the wing with a solid 'added on' foam leading edge sanded to shape.
Works for me.
Attachments:
Thanks: Klipkopwildlife, jon.in.swansea
Please Log in or Create an account to join the conversation.
- Klipkopwildlife
-
- Offline
- Administrator
-
- I'm supposed to be retired!
04 Mar 2023 07:28 - 04 Mar 2023 07:32 #50
by Klipkopwildlife
Do it now, you may never get another chance
Replied by Klipkopwildlife on topic Printing with Light Weight PLA
With the Colorfab I found 240o and 250o both gave the maximum foaming by wall thickness measurement but at 250o heat discolouration was evident so I used 240o. I found it was better to use the basic settings provided by Cura for the Anet A6 but reducing the feed rate to 40mm, giving better corners, and I got my best results by reducing the extrusion feed rate at run time on the printer. somewhere around 60% as I recall.
The stuff that I bought from DaVinci labs in Cape Town prints perfectly at 180o with no foaming but I can't get it to print nicely with any other settings.
The stuff that I bought from DaVinci labs in Cape Town prints perfectly at 180o with no foaming but I can't get it to print nicely with any other settings.
Do it now, you may never get another chance
Last edit: 04 Mar 2023 07:32 by Klipkopwildlife.
Thanks: Quorneng
Please Log in or Create an account to join the conversation.
- jon.in.swansea
-
- Offline
- Elite Member
-
Less
More
- Posts: 757
- Thank you received: 1164
05 Mar 2023 12:55 #51
by jon.in.swansea
Replied by jon.in.swansea on topic Printing with Light Weight PLA
An earlier comment about using a gyroid fill was that there were few options for adjusting it within a hollow body. I just found that the Prusa slicer has a layer modification option. One an STL is sliced you can right click on the right side STL file name and there is an option to set ONE exception within a limited layer range.
Some folk us it for setting two primeters for the first couple of layers of a print (which is what several of the LW-PLA mfg suggest).
But it can also be used for other purposes - you can alter the infil % ! So in one my leading edge sections printed horizontally I print the main part of the hollow with 3% and the upper 6mm of the print with a 4% infil. That might be a useful find for all kinds of printed entities....
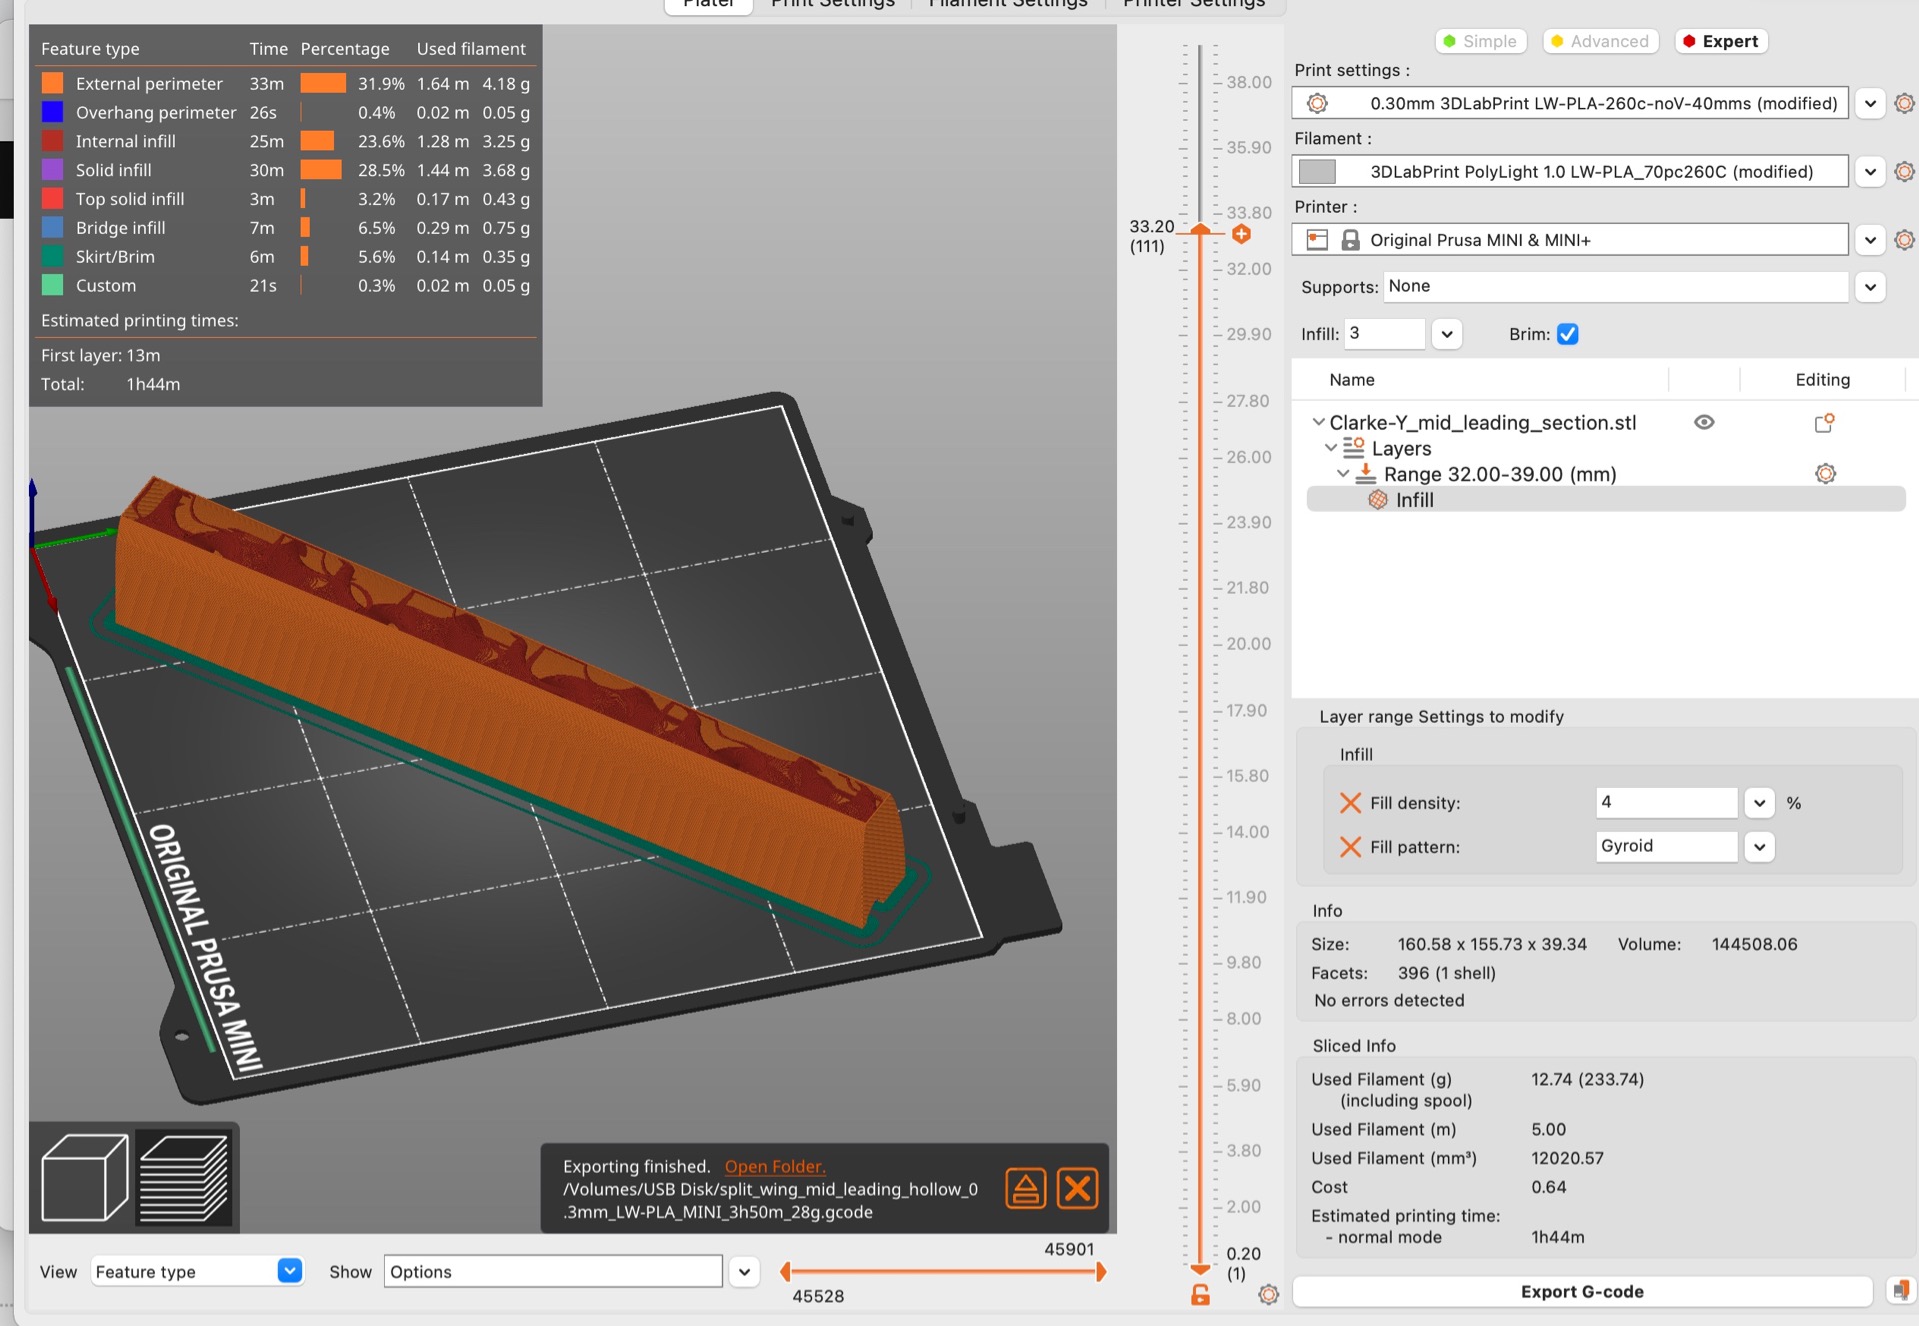
Some folk us it for setting two primeters for the first couple of layers of a print (which is what several of the LW-PLA mfg suggest).
But it can also be used for other purposes - you can alter the infil % ! So in one my leading edge sections printed horizontally I print the main part of the hollow with 3% and the upper 6mm of the print with a 4% infil. That might be a useful find for all kinds of printed entities....
Attachments:
Thanks: Klipkopwildlife, Quorneng
Please Log in or Create an account to join the conversation.
- jon.in.swansea
-
- Offline
- Elite Member
-
Less
More
- Posts: 757
- Thank you received: 1164
05 Mar 2023 13:00 #52
by jon.in.swansea
Replied by jon.in.swansea on topic Printing with Light Weight PLA
I remembered another difference I use with LW-PLA printing - the PolyLight (3DLabPrint) recommend using 0.3mm layer height and that is always what I use. It certainly speeds up the printing (as it chunters along at 40mm/s). For RC parts 0.3mm is plenty of resolution. It could be that at a 0.2mm layer height it might squish wider than I get with 0.3mm....
Thanks: Klipkopwildlife
Please Log in or Create an account to join the conversation.
- Quorneng
-
Topic Author
- Offline
- Forum Master
-
Less
More
- Posts: 10058
- Thank you received: 19043
05 Mar 2023 23:54 #53
by Quorneng
Replied by Quorneng on topic Printing with Light Weight PLA
jon
Interesting about the 0.3 mm layer height and 40 mm/sec print speed. I shall have to try it to compare with the 0.2 layer and 50 mm/sec that I use at the moment.
In theory your parameters should give a 20% quicker print time.
Interesting about the 0.3 mm layer height and 40 mm/sec print speed. I shall have to try it to compare with the 0.2 layer and 50 mm/sec that I use at the moment.
In theory your parameters should give a 20% quicker print time.
Thanks: Klipkopwildlife
Please Log in or Create an account to join the conversation.
- Klipkopwildlife
-
- Offline
- Administrator
-
- I'm supposed to be retired!
06 Mar 2023 13:26 #54
by Klipkopwildlife
Do it now, you may never get another chance
Replied by Klipkopwildlife on topic Printing with Light Weight PLA
PlanePrint recommend 0.27 layer.
Do it now, you may never get another chance
Thanks: Quorneng
Please Log in or Create an account to join the conversation.
- jon.in.swansea
-
- Offline
- Elite Member
-
Less
More
- Posts: 757
- Thank you received: 1164
07 Mar 2023 18:32 #55
by jon.in.swansea
Replied by jon.in.swansea on topic Printing with Light Weight PLA
Here is a set of LW-PLA ribs. Average <1g each. I will keep around for building up another hybrid wing or to help me remember how I sized the beasties.


Reminder to self to blunt the leading edge of the rib to try out a 'sanded foam' leading edge vs heat-formed leading edge....
Reminder to self to blunt the leading edge of the rib to try out a 'sanded foam' leading edge vs heat-formed leading edge....
Attachments:
Thanks: Klipkopwildlife
Please Log in or Create an account to join the conversation.
- jon.in.swansea
-
- Offline
- Elite Member
-
Less
More
- Posts: 757
- Thank you received: 1164
07 Mar 2023 18:33 #56
by jon.in.swansea
Replied by jon.in.swansea on topic Printing with Light Weight PLA
Oh, if anyone wants the freeCAD or STL files of these LW-PLA ribs let me know..... -Jon
Thanks: Klipkopwildlife
Please Log in or Create an account to join the conversation.
- Quorneng
-
Topic Author
- Offline
- Forum Master
-
Less
More
- Posts: 10058
- Thank you received: 19043
07 Mar 2023 19:38 - 07 Mar 2023 19:39 #57
by Quorneng
Replied by Quorneng on topic Printing with Light Weight PLA
jon
Those ribs look very neat.
I am still plugging away with my Clark Y unreinforced wing.
The latest component is a dihedral centre section.
Just the bit ahead of the spar line so far.
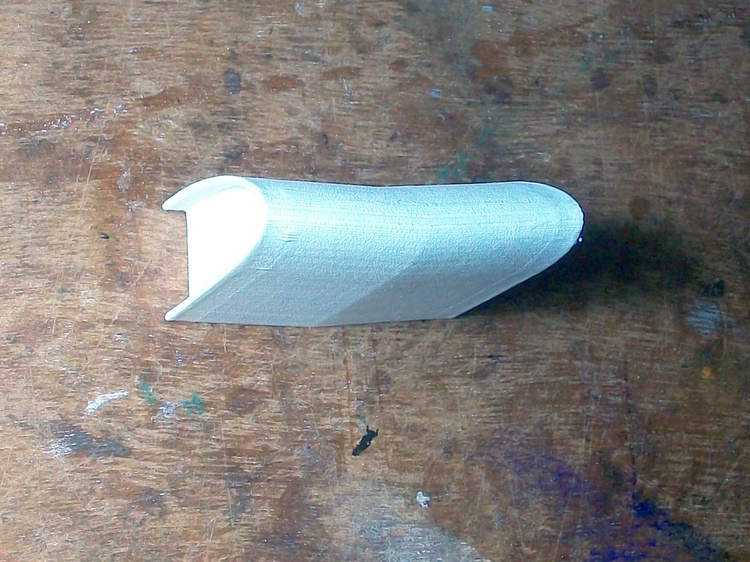
It is a bit bigger than the rest of the wing so the adjacent wing panels 'plug in' to it so the glue join is in shear. It gives a dihedral of 6 degrees.
It also has a more dense fill and a double wall as at the root it has the greatest load.
It took a while before I achieved a good plug in fit!

Just for info it was been printed with a 0.3 layer height and at 50 mm/s with no problem. It makes a significant reduction to my previous print times.
Those ribs look very neat.
I am still plugging away with my Clark Y unreinforced wing.
The latest component is a dihedral centre section.
Just the bit ahead of the spar line so far.
It is a bit bigger than the rest of the wing so the adjacent wing panels 'plug in' to it so the glue join is in shear. It gives a dihedral of 6 degrees.
It also has a more dense fill and a double wall as at the root it has the greatest load.
It took a while before I achieved a good plug in fit!
Just for info it was been printed with a 0.3 layer height and at 50 mm/s with no problem. It makes a significant reduction to my previous print times.
Attachments:
Last edit: 07 Mar 2023 19:39 by Quorneng.
Thanks: Klipkopwildlife, jon.in.swansea
Please Log in or Create an account to join the conversation.
- jon.in.swansea
-
- Offline
- Elite Member
-
Less
More
- Posts: 757
- Thank you received: 1164
08 Mar 2023 07:55 #58
by jon.in.swansea
Replied by jon.in.swansea on topic Printing with Light Weight PLA
Initial slot together of the printed wing. Mixed feelings about this - the air foil is rather an improvement although I got a couple of the joins off a bit.
In comparison with my prior large hybrid wing it is a draw in terms of weight. The 1m printed wing with wiring is 227g and the 920mm hybrid wing with wiring is 226g.


Some of the weight is in-and-around the spar supports which shows up when printing horizontally. And even at 3% infil there is still a fair bit of weight even though it is very nicely stiff.
I did have a 2nd look at a vase-mode design printed vertically which uses more spars. Not quite the stiffness of gyroid but saves 10g for a typical section.
I also got some ideas about lofting and how to loft more of the wing in one go and then use the slicer to trim the sections to be printed. Will have a go at that later....
In comparison with my prior large hybrid wing it is a draw in terms of weight. The 1m printed wing with wiring is 227g and the 920mm hybrid wing with wiring is 226g.
Some of the weight is in-and-around the spar supports which shows up when printing horizontally. And even at 3% infil there is still a fair bit of weight even though it is very nicely stiff.
I did have a 2nd look at a vase-mode design printed vertically which uses more spars. Not quite the stiffness of gyroid but saves 10g for a typical section.
I also got some ideas about lofting and how to loft more of the wing in one go and then use the slicer to trim the sections to be printed. Will have a go at that later....
Attachments:
Thanks: Klipkopwildlife, Quorneng
Please Log in or Create an account to join the conversation.
- Quorneng
-
Topic Author
- Offline
- Forum Master
-
Less
More
- Posts: 10058
- Thank you received: 19043
10 Mar 2023 17:05 - 10 Mar 2023 17:06 #59
by Quorneng
Replied by Quorneng on topic Printing with Light Weight PLA
After a good few hours of printing my 1000 mm wing is complete and glued together.

The front part of each wing is a 4% gyroid fill. the rear part 3%. The ailerons are 4%. The 50 mm centre section is 5% fill and it has a double wall.
If you add 4x240 + 50 the wing is actually 1110 mm span!
Without servos or wire it weighs 133.4g.
I can't test it in any way until the glue is fully hard, at least 2 days, but it will be test flown using the Blue Dragon fuselage once I have worked out how to fit the aileron servos.
In order to not weaken the stressed skin I may just glue them onto the wing underside!
Whilst printing the bits I came up with a neat way of actually printing a proper 'spar' within the front part of the wing for just a 3g per panel weight penalty. I couldn't be bothered to start printing all over again so it will have to used on the mk2 version when the first one fails!
The front part of each wing is a 4% gyroid fill. the rear part 3%. The ailerons are 4%. The 50 mm centre section is 5% fill and it has a double wall.
If you add 4x240 + 50 the wing is actually 1110 mm span!
Without servos or wire it weighs 133.4g.
I can't test it in any way until the glue is fully hard, at least 2 days, but it will be test flown using the Blue Dragon fuselage once I have worked out how to fit the aileron servos.
In order to not weaken the stressed skin I may just glue them onto the wing underside!
Whilst printing the bits I came up with a neat way of actually printing a proper 'spar' within the front part of the wing for just a 3g per panel weight penalty. I couldn't be bothered to start printing all over again so it will have to used on the mk2 version when the first one fails!
Attachments:
Last edit: 10 Mar 2023 17:06 by Quorneng.
Thanks: Klipkopwildlife, jon.in.swansea
Please Log in or Create an account to join the conversation.
- Klipkopwildlife
-
- Offline
- Administrator
-
- I'm supposed to be retired!
11 Mar 2023 07:09 #60
by Klipkopwildlife
Do it now, you may never get another chance
Replied by Klipkopwildlife on topic Printing with Light Weight PLA
The way you guys have pushed the envelope is absolutely awesome and makes me feel really dumb!
Do it now, you may never get another chance
Thanks: Quorneng
Please Log in or Create an account to join the conversation.
Time to create page: 0.562 seconds