
- Forum
- Forum Categories
- Reviews - Model Flying Shops, Products, Kits
- Kit Review, Max Thrust Ruckus (Another Poly Project)
Kit Review, Max Thrust Ruckus (Another Poly Project)
- Phil Wood
-
 Topic Author
- Offline
- Inactivated User
-

When I got home the postman had been with the BMFA magazine and Ann (my missus) had been reading through it. As soon as I sat down she pushed the mag' in front of my face and said, "I want that one" ...... Yes it was a picture of the Ruckus!
For the past few weeks I've had to endure her asking "Where's my model" ?????
Well here it is, you get to peek at the box for now, I'm getting tired, but now that I've started the thread I'll have to finish it.
![[badass]](/media/kunena/emoticons/bad_boys_20.gif "[badass]")

I just own the forum .... you guys make it great thanks.
Please Log in or Create an account to join the conversation.
- Phil Wood
-
Topic Author
- Offline
- Inactivated User
-

First impression is great, one thing I hate about some foam models is when they just super press the foam very thin to act as hinges on the control surfaces, I was pleased to see this wasn't the case here, they've fitted good real hinges and the control surfaces are really easy to move ..... These servo's will have an easy life.
Looks like all the bits are there, shouldn't take long to put this together.

When I lifted the fuz out of the box I noticed the nose was heavier than I expected, .... probably due to this nice meaty looking motor.

Inspected for any damage and all I could find is a 1 inch circular blemish on the underside of an aileron, it's generally put together nicely so I'm pleased up to now.

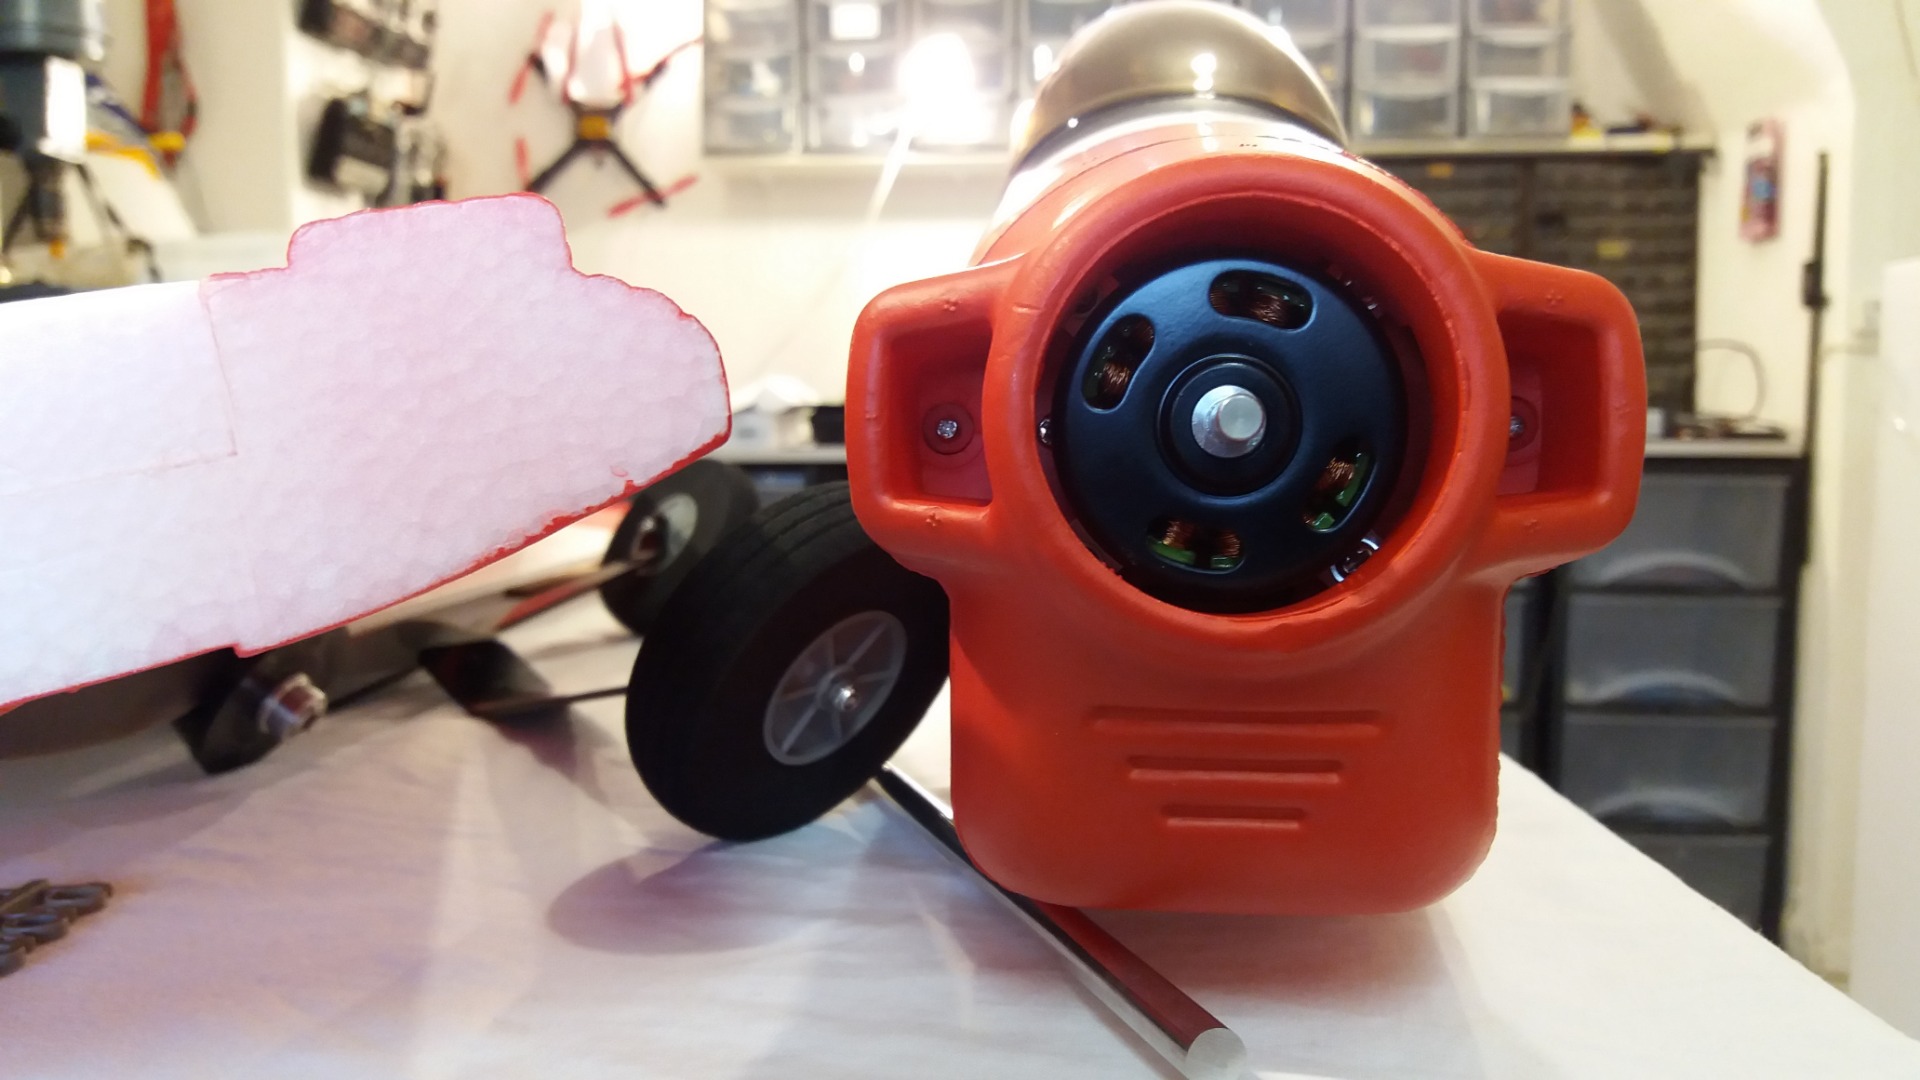
I've been up all night so I don't think I'll finish assembling this today. ...... Pol.
I just own the forum .... you guys make it great thanks.
Please Log in or Create an account to join the conversation.
- Klipkopwildlife
-

- Offline
- Administrator
-

- I'm supposed to be retired!
Do it now, you may never get another chance
Please Log in or Create an account to join the conversation.
- jeffwill6
-

- Offline
- Junior Member
-

- Posts: 27
- Thank you received: 31
Jeff
Please Log in or Create an account to join the conversation.
- Eric
-

- Offline
- Moderator
-

- Posts: 15406
- Thank you received: 14305
An old straight-blade screwie heated with a flame makes a slot in the stub, so you can unscrew it.
if you are calm and collected when all about you are going berserk - you've missed something important!
Please Log in or Create an account to join the conversation.
- jeffwill6
-
- Offline
- Junior Member
-
- Posts: 27
- Thank you received: 31
Jeff
Please Log in or Create an account to join the conversation.
- Phil Wood
-
Topic Author
- Offline
- Inactivated User
-
There's a hell of a weight in it as well Klip', they say it's aluminium but when I picked it up I thought it was steel.Klipkopwildlife wrote: That wing joiner looks pretty meaty too. Good to see you back in the saddle Phil.

It would have saved a few grams if they'd used a carbon fibre tube or rod, but the model is light enough anyway and I don't think it would make much difference to its performance.
Well apart from that what can I say? ...... I was almost hoping to do a kit review with a bit of content, one where I could pick a load of faults and suggest alternatives, but this thing deserves some praise.

It went together in less than an hour, and I was supping coffee and smoking myself silly while I was doing it, it was 9 screws, 2 Y leads and fit the prop ...... Oh, and a bit of double sided sticky stuff to hold the Rx in place (which I haven't done yet)

I am a bit concerned about the U/C as it's only held in place by 4 small self tappers, but I suppose in the event of a heavy landing it's best for these to pull out rather than rip out half of the fuselage.
It may seem just a little expensive at £150 but it is really well moulded and it's even got lights on the wing tips.
.... these LED's must be bloody expensive! 
The motor turns by hand without heavy "klicking" as I call it, it feels really smooth so it's probably one with loads of magnets...... or they forgot to fit any magnets at all
 ...... we'll find out when I power it up.
I did remember to balance the prop, but it was already perfect.


I've still got to fit a lipo and check the COG, but here's my one bad criticism. Firstly, if they had just rearranged the inside a little and moved the straps further back, the lipo could have sat over the COG point so you'd be able to use batteries of different weights.
But also, .... look at those wing mounting bolts!!!! ..... something has got to be done here or there's a danger of one of those cutting into the lipo and cremating the 'plane. I'll probably fit a block of EPP onto the base of the fuz and sit the battery on that.
In the instructions it shows the battery pushed right forward into the noze, it may need this to get the correct COG but even then it'll be over the 4 bolt heads that you can just see on the left under the motor wires, it definitely just needs a bit of protection here.

But all in all I'm very happy with Ann's model, I'd better get out and maiden it.
Pol.
I just own the forum .... you guys make it great thanks.
Please Log in or Create an account to join the conversation.
- crash happy
-

- Offline
- Platinum Member
-

- Oops. did I say that out loud!
- Posts: 1250
- Thank you received: 1203
I bought a pack self adhesive Velcro. One piece in the battery compartment & one on all my batteries.
Gives me some leeway in getting the CG right with different sizes. It might cover your bolt heads ?
Please Log in or Create an account to join the conversation.
- THE BLACKBIRD
-

- Offline
- Forum Master
-

- Posts: 6781
- Thank you received: 10722
I thought you had given it up
BAD BOY
Please Log in or Create an account to join the conversation.
- Flytilbroke
-

- Offline
- Platinum Member
-
- Not Tired, long retired "Bob"
- Posts: 1981
- Thank you received: 1978
Have a nice Day, unless I don't like you.
Please Log in or Create an account to join the conversation.
- Klipkopwildlife
-
- Offline
- Administrator
-
- I'm supposed to be retired!
I would recommend doing what you've said but then seating the Lipo on a piece of packaging foam.
Do it now, you may never get another chance
Please Log in or Create an account to join the conversation.
- Phil Wood
-
Topic Author
- Offline
- Inactivated User
-
That thought did cross my mind but then I thought of the possibility of a wing bolt vibrating loose. If it was only screwed in a couple of turns it could fall out before I could land the thing.Flytilbroke wrote: You can always trim off the excess protrusion of the wing bolts and round the ends a little.
I couldn't lock them in place because I will have to remove the wings for transport ..... I've got a much smaller car now.

Pol.
I just own the forum .... you guys make it great thanks.
Please Log in or Create an account to join the conversation.
- Eric
-
- Offline
- Moderator
-
- Posts: 15406
- Thank you received: 14305
So it will still be 'all the way in', but with nothing poking through into the battery compartment.
Don't forget to allow airflow over the battery, if you are using a lot of power for aero's, the pack can get quite warm - even hot - if you are pushing it towards it's max 'burst' power current drain.
if you are calm and collected when all about you are going berserk - you've missed something important!
Please Log in or Create an account to join the conversation.
- Flytilbroke
-
- Offline
- Platinum Member
-
- Not Tired, long retired "Bob"
- Posts: 1981
- Thank you received: 1978
I see Eric also answered

Have a nice Day, unless I don't like you.
Please Log in or Create an account to join the conversation.
- Phil Wood
-
Topic Author
- Offline
- Inactivated User
-
I was bit annoyed to find out that the manufacturers had issued a report that they'd received a few complaints.
1)The canopy had a tendency to blow off mid flight due to a build up of air pressure inside the cabin.
2) when used with a 4S lipo the ESC got very hot.
Their solution to the cabin pressure was to simply drill a couple of 15mm holes on the underside of the model to release some air pressure.
The ESC problem was a bit different. The model was portrayed in some reviews as being good on a 3S
.... but a rocket on a 4S Their solution to the ESC overheating problem was that the holes on the understand of the fuz would allow better air flow & cooling.
Also they reduced the prop from a 12 x 6 to an 11 x 5.5
 .... This would just mean less power!!!!! .... so in other words crap on a 3S and OK on a 4S .... not the rocket I paid for.
Well a lot of chopping was needed but out came the 40A stock ESC and in went a 70A opto one with a bloody big heat sink. (I just happened to have one in stock).
I had to carve a hole through from underneath the motor to make a space for this heat sink, and to allow decent air flow. All the wiring had to be re-done as well.

Yes I can see the bare wire, don't worry, I cut all this to length, heat shrink it, and fasten it all down neatly.
The ESC fits great and gets a howling gale over it.

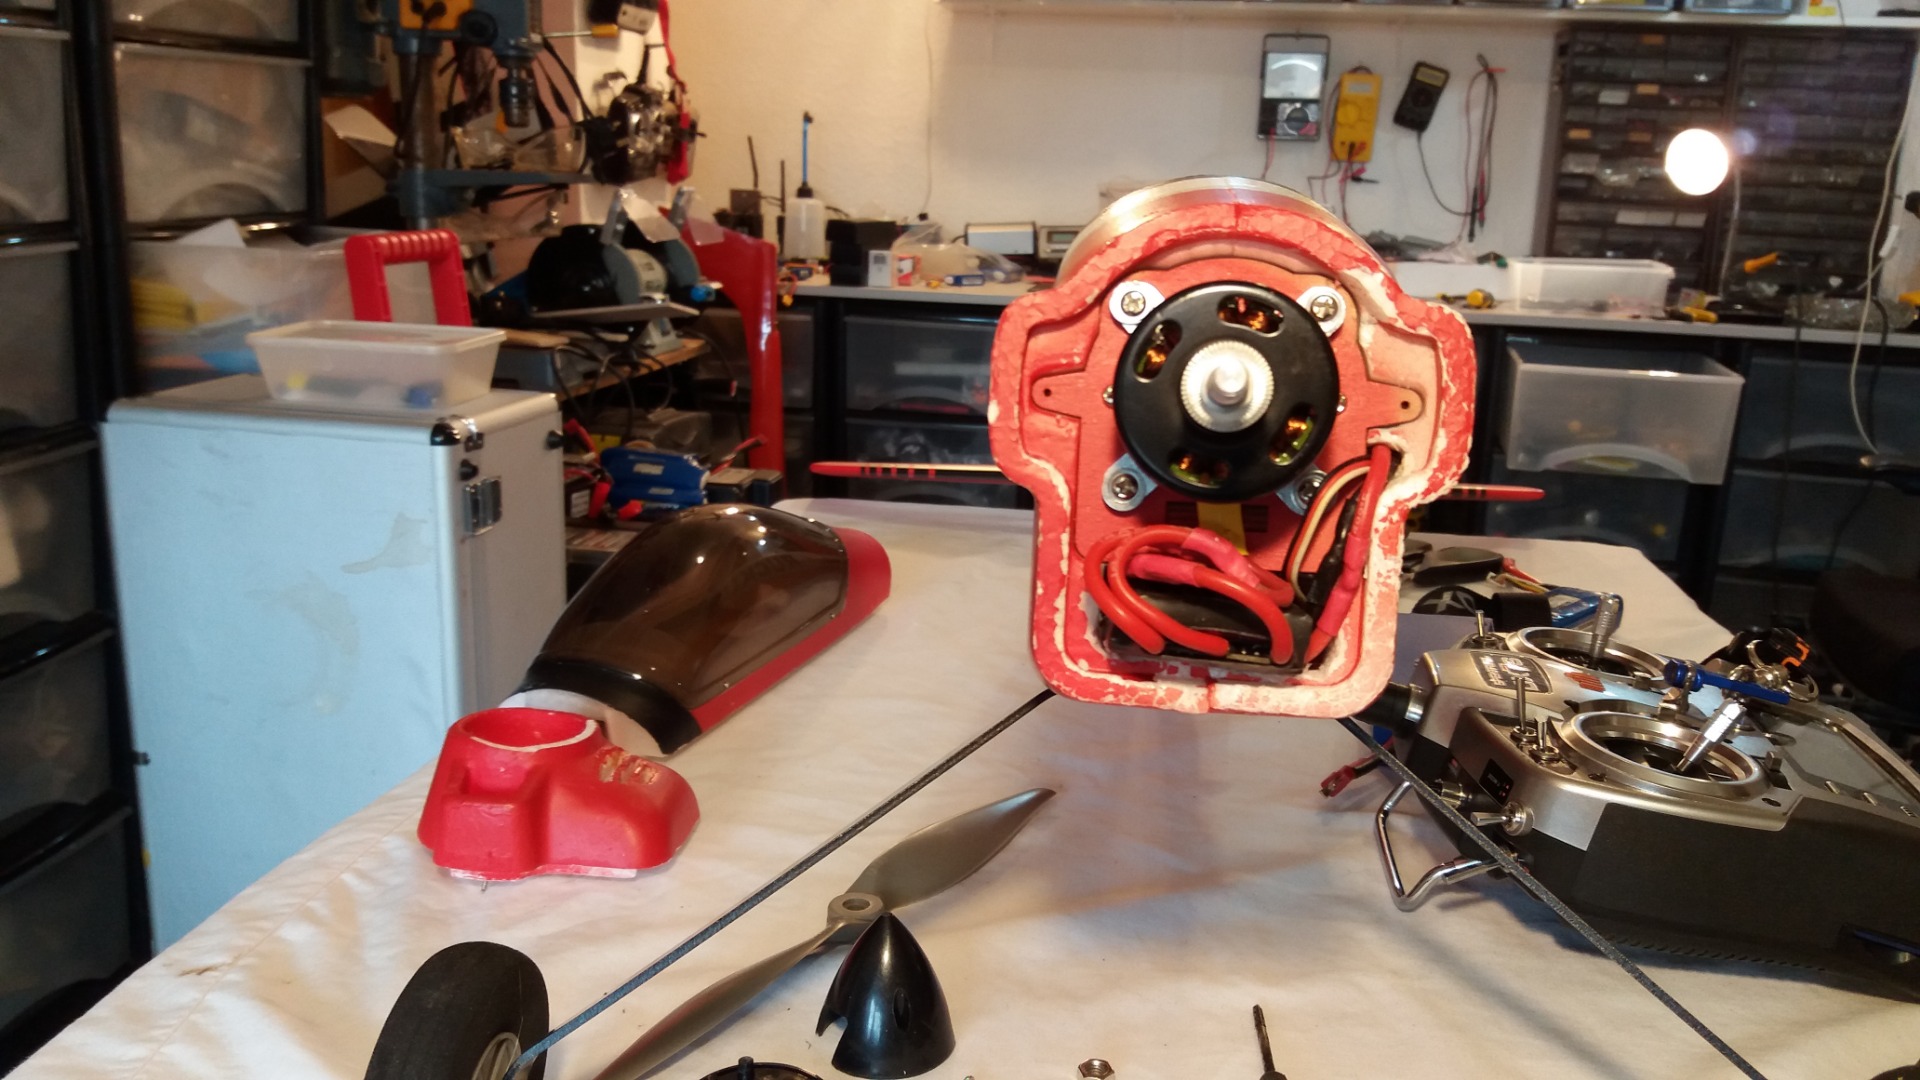
More to come. .... Pol.
I just own the forum .... you guys make it great thanks.
Please Log in or Create an account to join the conversation.
- Forum
- Forum Categories
- Reviews - Model Flying Shops, Products, Kits
- Kit Review, Max Thrust Ruckus (Another Poly Project)