
- Thank you received: 0
Fairey Gannet AEW3
- Ex-Member
- User
-

Less
More
13 Sep 2015 17:16 #61
by Ex-Member
Replied by Ex-Member on topic Fairey Gannet AEW3
"wow" that is very impressive and also very complicated. 
will that rudder work ok, or will the rod twist a bit under load?
will that rudder work ok, or will the rod twist a bit under load?
Please Log in or Create an account to join the conversation.
- Ralpharr2001
-
 Topic Author
- Offline
- Elite Member
-

Less
More
- Posts: 496
- Thank you received: 1484
13 Sep 2015 19:26 - 13 Sep 2015 19:27 #62
by Ralpharr2001
I'm currently unsupervised. I know it freaks me out as well, but the possibilities are endless!!
Replied by Ralpharr2001 on topic Fairey Gannet AEW3
Hi Tony,
Good point. I did check the twist with various loads on the cranked end (35deg crank not 90deg) and the rod deflection was just a few mm with a 1kg load. A majority of the twist came from the wire bowing so I will have 3 "PTFE in brass" bushes to support the shaft. Remember I am extremely weight conscious on this build so everything is at the light end of the envelope but within safety limits.
Good point. I did check the twist with various loads on the cranked end (35deg crank not 90deg) and the rod deflection was just a few mm with a 1kg load. A majority of the twist came from the wire bowing so I will have 3 "PTFE in brass" bushes to support the shaft. Remember I am extremely weight conscious on this build so everything is at the light end of the envelope but within safety limits.
I'm currently unsupervised. I know it freaks me out as well, but the possibilities are endless!!
Last edit: 13 Sep 2015 19:27 by Ralpharr2001.
Thanks: Ex-Member, blue123, Fly-Navy, boz
Please Log in or Create an account to join the conversation.
- Fly-Navy
-

- Offline
- Elite Member
-
Less
More
- Posts: 259
- Thank you received: 295
27 Sep 2015 23:03 #63
by Fly-Navy
Now that I am older it seemed nice I have more patience.
Turns out "I don't give a s**t "
Replied by Fly-Navy on topic Fairey Gannet AEW3
Loving it Ralph, having been on 849 B flight on the Vic in the sixties and watching them wobbling all over the place on finals [badass] Mk1 (Cod) Gannet was the ships favourite, used to collect the mail for us, bit of a bugger when you strapped the jockey in and he had his toothbrush in his pencil pocket, you knew he was having an overnighter :woohoo: :woohoo:
Appreciate a bit of dialogue re your Firefly please Ralph when you have time, is it the Vance Mosher one? Would love to have a go at one, one day.
John
Now back on topic gents, sorry
Appreciate a bit of dialogue re your Firefly please Ralph when you have time, is it the Vance Mosher one? Would love to have a go at one, one day.
John
Now back on topic gents, sorry
Now that I am older it seemed nice I have more patience.
Turns out "I don't give a s**t "
Thanks: Ralpharr2001
Please Log in or Create an account to join the conversation.
- Eric
-

- Offline
- Moderator
-

Less
More
- Posts: 13726
- Thank you received: 14467
28 Sep 2015 11:39 #64
by Eric
if you are calm and collected when all about you are going berserk - you've missed something important!
Replied by Eric on topic Fairey Gannet AEW3
On the Hermes, we always knew when the COD was going to break down, while ashore, because the crew took their golf clubs!
if you are calm and collected when all about you are going berserk - you've missed something important!
Thanks: Ralpharr2001, boz
Please Log in or Create an account to join the conversation.
- Ralpharr2001
-
Topic Author
- Offline
- Elite Member
-
Less
More
- Posts: 496
- Thank you received: 1484
08 Nov 2015 13:43 #65
by Ralpharr2001
I'm currently unsupervised. I know it freaks me out as well, but the possibilities are endless!!
Replied by Ralpharr2001 on topic Fairey Gannet AEW3
Managed to get yesterday and this morning on the Gannet build. I have set up the wing incidence and alignment then glued in the wing joiners and fuselage tubes for the joiners to fit into.
If you remember, (it was a while ago!! ) I had trouble finding suitable wing joining tubes and was considering, as Tony suggested, a tongue joiner. Well I wasn't really happy with that because of weight so I have been looking for carbon tubes. Couldn't find anything suitable anywhere, not that were a sliding fit into one another, but low and behold Hobbyking had some carbon tube in their global warehouse. I bought a couple to try and they are perfect. So they are now epoxyed in to the wing and fuselage. Sorry no photo's as I was busy jigging, adjusting, rejigging, adjusting then finally epoxying!! I'll try and post a photo later in the week.
If you remember, (it was a while ago!!
) I had trouble finding suitable wing joining tubes and was considering, as Tony suggested, a tongue joiner. Well I wasn't really happy with that because of weight so I have been looking for carbon tubes. Couldn't find anything suitable anywhere, not that were a sliding fit into one another, but low and behold Hobbyking had some carbon tube in their global warehouse. I bought a couple to try and they are perfect. So they are now epoxyed in to the wing and fuselage. Sorry no photo's as I was busy jigging, adjusting, rejigging, adjusting then finally epoxying!! I'll try and post a photo later in the week. I'm currently unsupervised. I know it freaks me out as well, but the possibilities are endless!!
Thanks: Ex-Member, boz
Please Log in or Create an account to join the conversation.
- Ex-Member
- User
-
Less
More
- Thank you received: 0
08 Nov 2015 17:13 #66
by Ex-Member
Replied by Ex-Member on topic Fairey Gannet AEW3
nice to see you back on the Gannet sir.
can't wait to see some more pictures of this fantastic build.
can't wait to see some more pictures of this fantastic build.
Please Log in or Create an account to join the conversation.
- THE BLACKBIRD
-

- Offline
- Forum Master
-

Less
More
- Posts: 6368
- Thank you received: 10842
08 Nov 2015 17:23 #67
by THE BLACKBIRD
Replied by THE BLACKBIRD on topic Fairey Gannet AEW3
Second that Tony
Please Log in or Create an account to join the conversation.
- Ralpharr2001
-
Topic Author
- Offline
- Elite Member
-
Less
More
- Posts: 496
- Thank you received: 1484
08 Nov 2015 18:07 - 08 Nov 2015 18:08 #68
by Ralpharr2001
I'm currently unsupervised. I know it freaks me out as well, but the possibilities are endless!!
Replied by Ralpharr2001 on topic Fairey Gannet AEW3
Thanks for the encouragement guys. It does help knowing that others are following the build and gives me a bit of drive to keep going.
Here are some pictures. You can see how I have moved the rear wing joining tube into the rear spar. I had to do this to give clearance for the main u/carriage wheels. You can see how much I have had to move it. This rear spar will be sheeted around this tube for strength. The second photo shows the carbon tubes the wing tubes slide into on the fuselage. I have yet to make the balsa/ply rings to go around the tubes to spread the load into each rib and fill in the old tube position holes. Ignore the glue deposits, I have yet to clean up the work. Not very flattering photo's of my workmanship!! :blush: :blush:
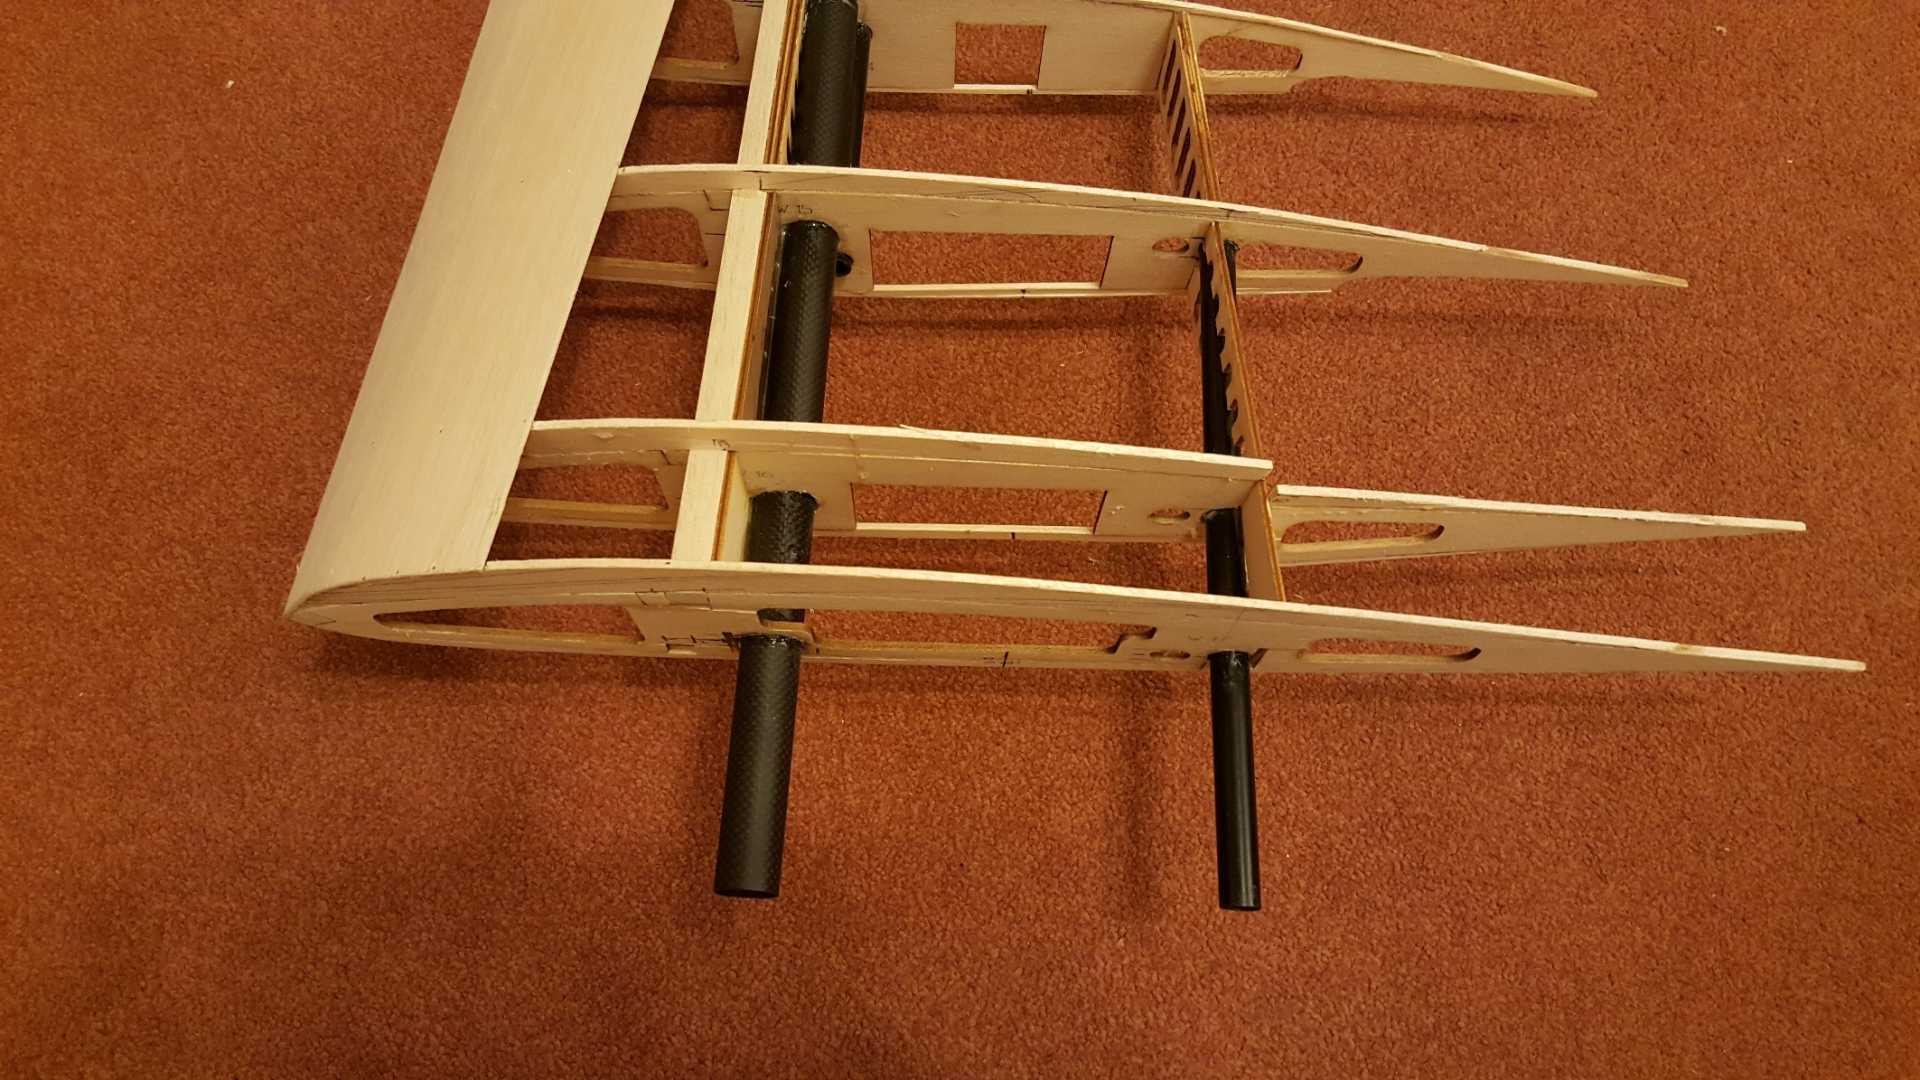
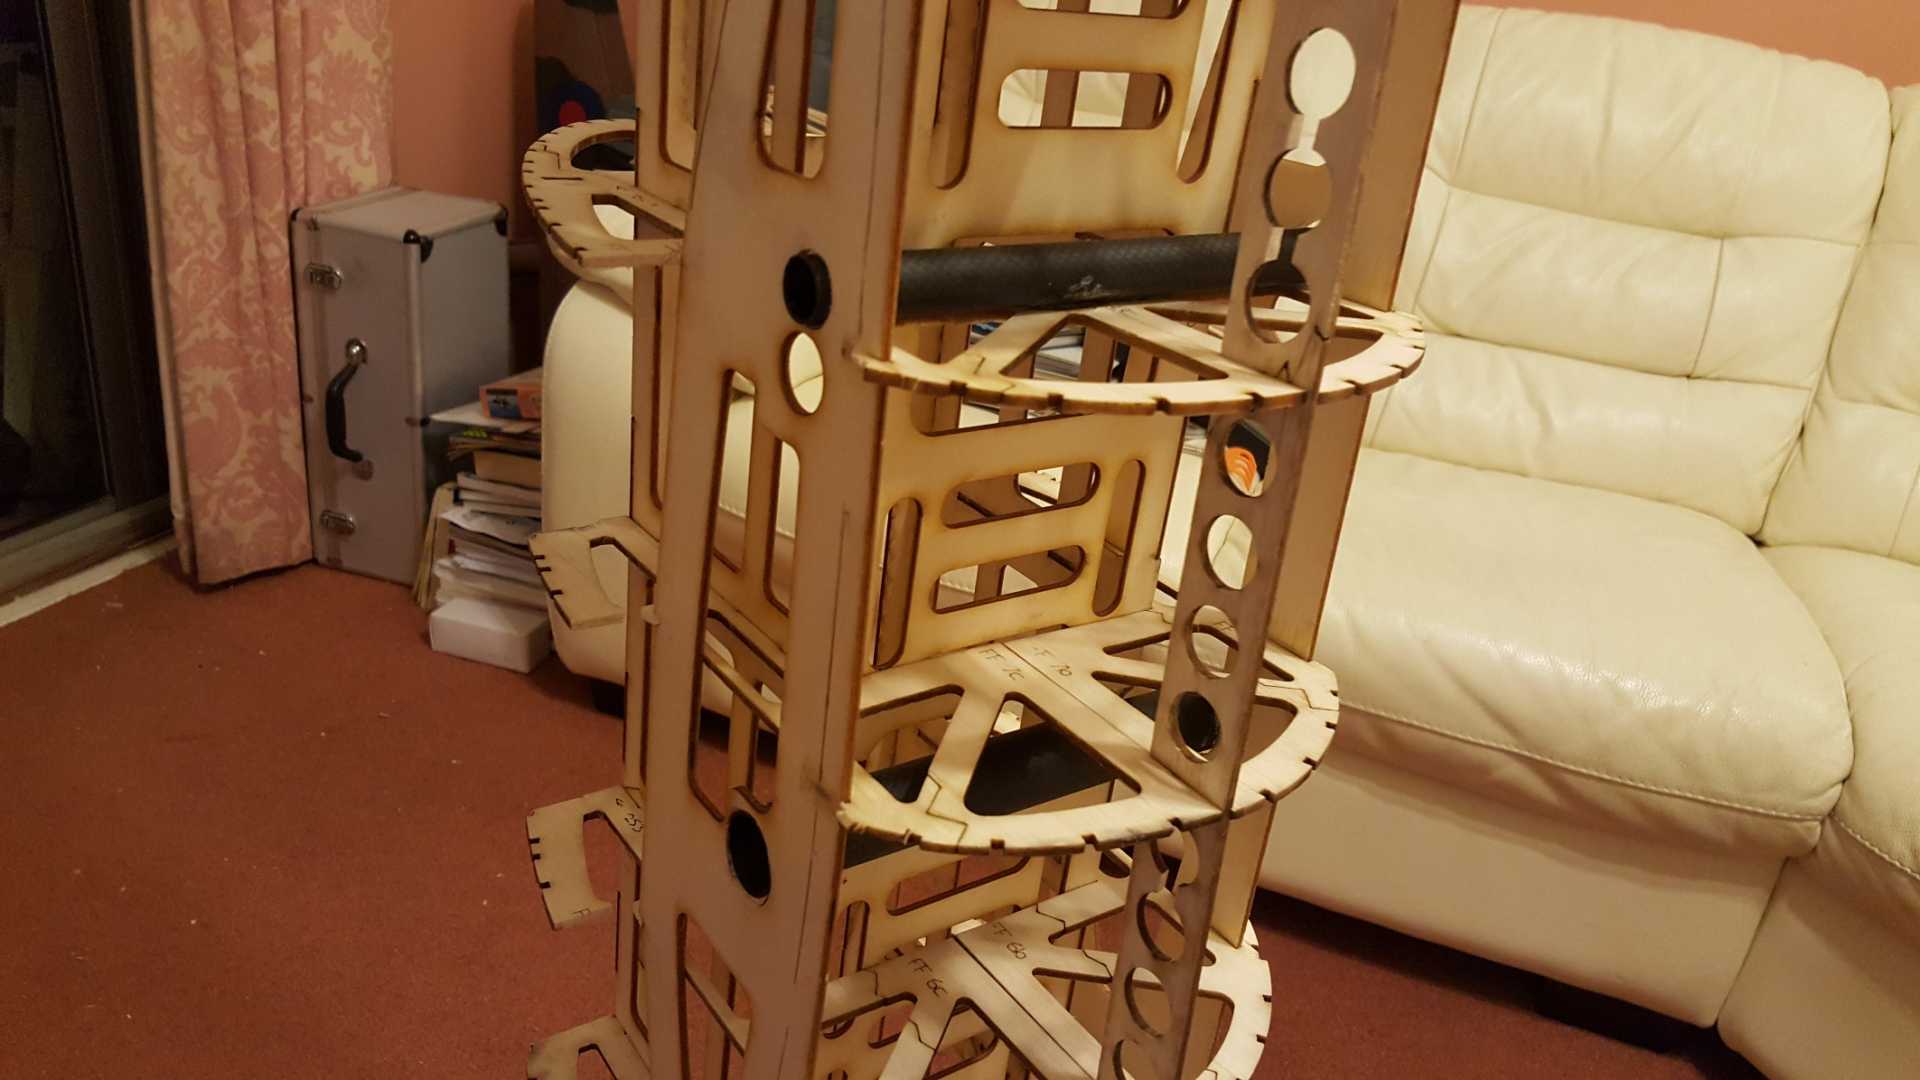
Here are some pictures. You can see how I have moved the rear wing joining tube into the rear spar. I had to do this to give clearance for the main u/carriage wheels. You can see how much I have had to move it. This rear spar will be sheeted around this tube for strength. The second photo shows the carbon tubes the wing tubes slide into on the fuselage. I have yet to make the balsa/ply rings to go around the tubes to spread the load into each rib and fill in the old tube position holes. Ignore the glue deposits, I have yet to clean up the work. Not very flattering photo's of my workmanship!! :blush: :blush:
I'm currently unsupervised. I know it freaks me out as well, but the possibilities are endless!!
Last edit: 08 Nov 2015 18:08 by Ralpharr2001.
Thanks: Eric, Klipkopwildlife, Ex-Member, THE BLACKBIRD, old fart, Fly-Navy, boz
Please Log in or Create an account to join the conversation.
- Ex-Member
- User
-
Less
More
- Thank you received: 0
08 Nov 2015 18:27 #69
by Ex-Member
Replied by Ex-Member on topic Fairey Gannet AEW3
Looks like a bloody neat and tidy job to me.
you should see the state of my builds inside the skin.
you should see the state of my builds inside the skin.
Please Log in or Create an account to join the conversation.
- Eric
-
- Offline
- Moderator
-
Less
More
- Posts: 13726
- Thank you received: 14467
08 Nov 2015 19:19 - 08 Nov 2015 19:23 #70
by Eric
if you are calm and collected when all about you are going berserk - you've missed something important!
Replied by Eric on topic Fairey Gannet AEW3
The increased spacing between joiners improves the 'rattle factor'. Less chance of micro-flutter in flight! :S
How is the main joiner connected to the spar? It's hard to see in the pics.
How is the load from the joiner carried into the spar?
How is the main joiner connected to the spar? It's hard to see in the pics.
How is the load from the joiner carried into the spar?
if you are calm and collected when all about you are going berserk - you've missed something important!
Last edit: 08 Nov 2015 19:23 by Eric. Reason: added a comment
Thanks: boz
Please Log in or Create an account to join the conversation.
- Ralpharr2001
-
Topic Author
- Offline
- Elite Member
-
Less
More
- Posts: 496
- Thank you received: 1484
08 Nov 2015 19:45 #71
by Ralpharr2001
I'm currently unsupervised. I know it freaks me out as well, but the possibilities are endless!!
Replied by Ralpharr2001 on topic Fairey Gannet AEW3
Very good point Eric. Shame I didn't think of that, i was thinking more about getting the main wheels in!! :ohmy:
I'm currently unsupervised. I know it freaks me out as well, but the possibilities are endless!!
Thanks: Ex-Member, boz
Please Log in or Create an account to join the conversation.
- one tenor
-

- Offline
- Forum Veteran
-

- johnpcalex@gmail.com
30 Nov 2015 12:55 #72
by one tenor
Anything will fly given enough power
Replied by one tenor on topic Fairey Gannet AEW3
HI I only just found this thread so it is probably too late .First off is the second rib not glued yet //////? secondly we used linen tape soaked in glue ( epoxy ) or dope to bind tubes to spars etc. Also u/c wires to fuse etc .Very strong. Lovely looking work sir. Precut woods or all your own work?
Anything will fly given enough power
Thanks: boz
Please Log in or Create an account to join the conversation.
- Ralpharr2001
-
Topic Author
- Offline
- Elite Member
-
Less
More
- Posts: 496
- Thank you received: 1484
30 Nov 2015 21:20 #73
by Ralpharr2001
I'm currently unsupervised. I know it freaks me out as well, but the possibilities are endless!!
Replied by Ralpharr2001 on topic Fairey Gannet AEW3
Great idea about the linen and epoxy. I will probably glass the tubes in rather than box them in with ply. Easier and lighter.
The first 3 ribs have been modified to change the section. These will be replaced when i'm not working!! Been working 7 days a week for the last few weeks. But got this weekend off so hoping to get some work done on her. I will make them from a 1/64 ply, 1/8 balsa, 1/64 ply sandwich. Light but very strong.
A friend laser cut the wood for me. I don't do patience so I would never have cut them out myself!! :evil:
I'm currently unsupervised. I know it freaks me out as well, but the possibilities are endless!!
Thanks: Ex-Member, Quorneng, THE BLACKBIRD, boz
Please Log in or Create an account to join the conversation.
- Ralpharr2001
-
Topic Author
- Offline
- Elite Member
-
Less
More
- Posts: 496
- Thank you received: 1484
05 Dec 2015 16:19 - 05 Dec 2015 16:23 #74
by Ralpharr2001
I'm currently unsupervised. I know it freaks me out as well, but the possibilities are endless!!
Replied by Ralpharr2001 on topic Fairey Gannet AEW3
Had a great day working on the Gannet.
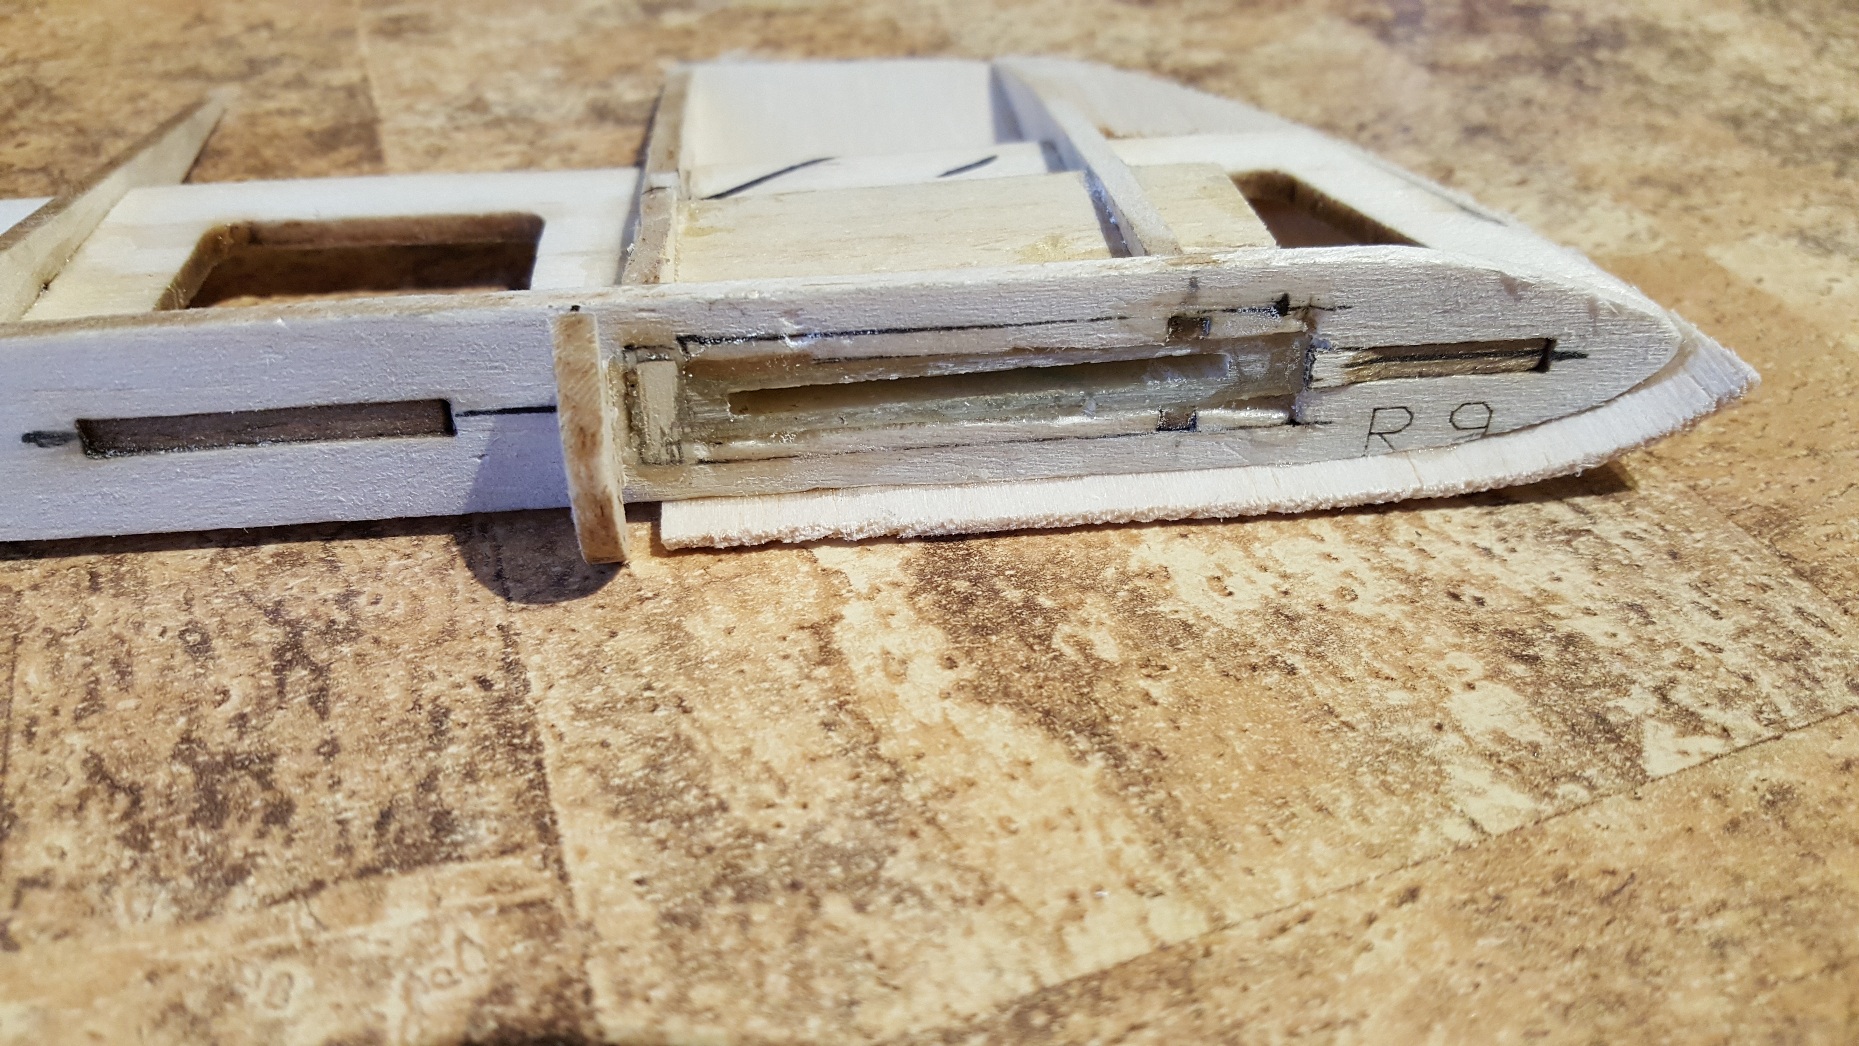
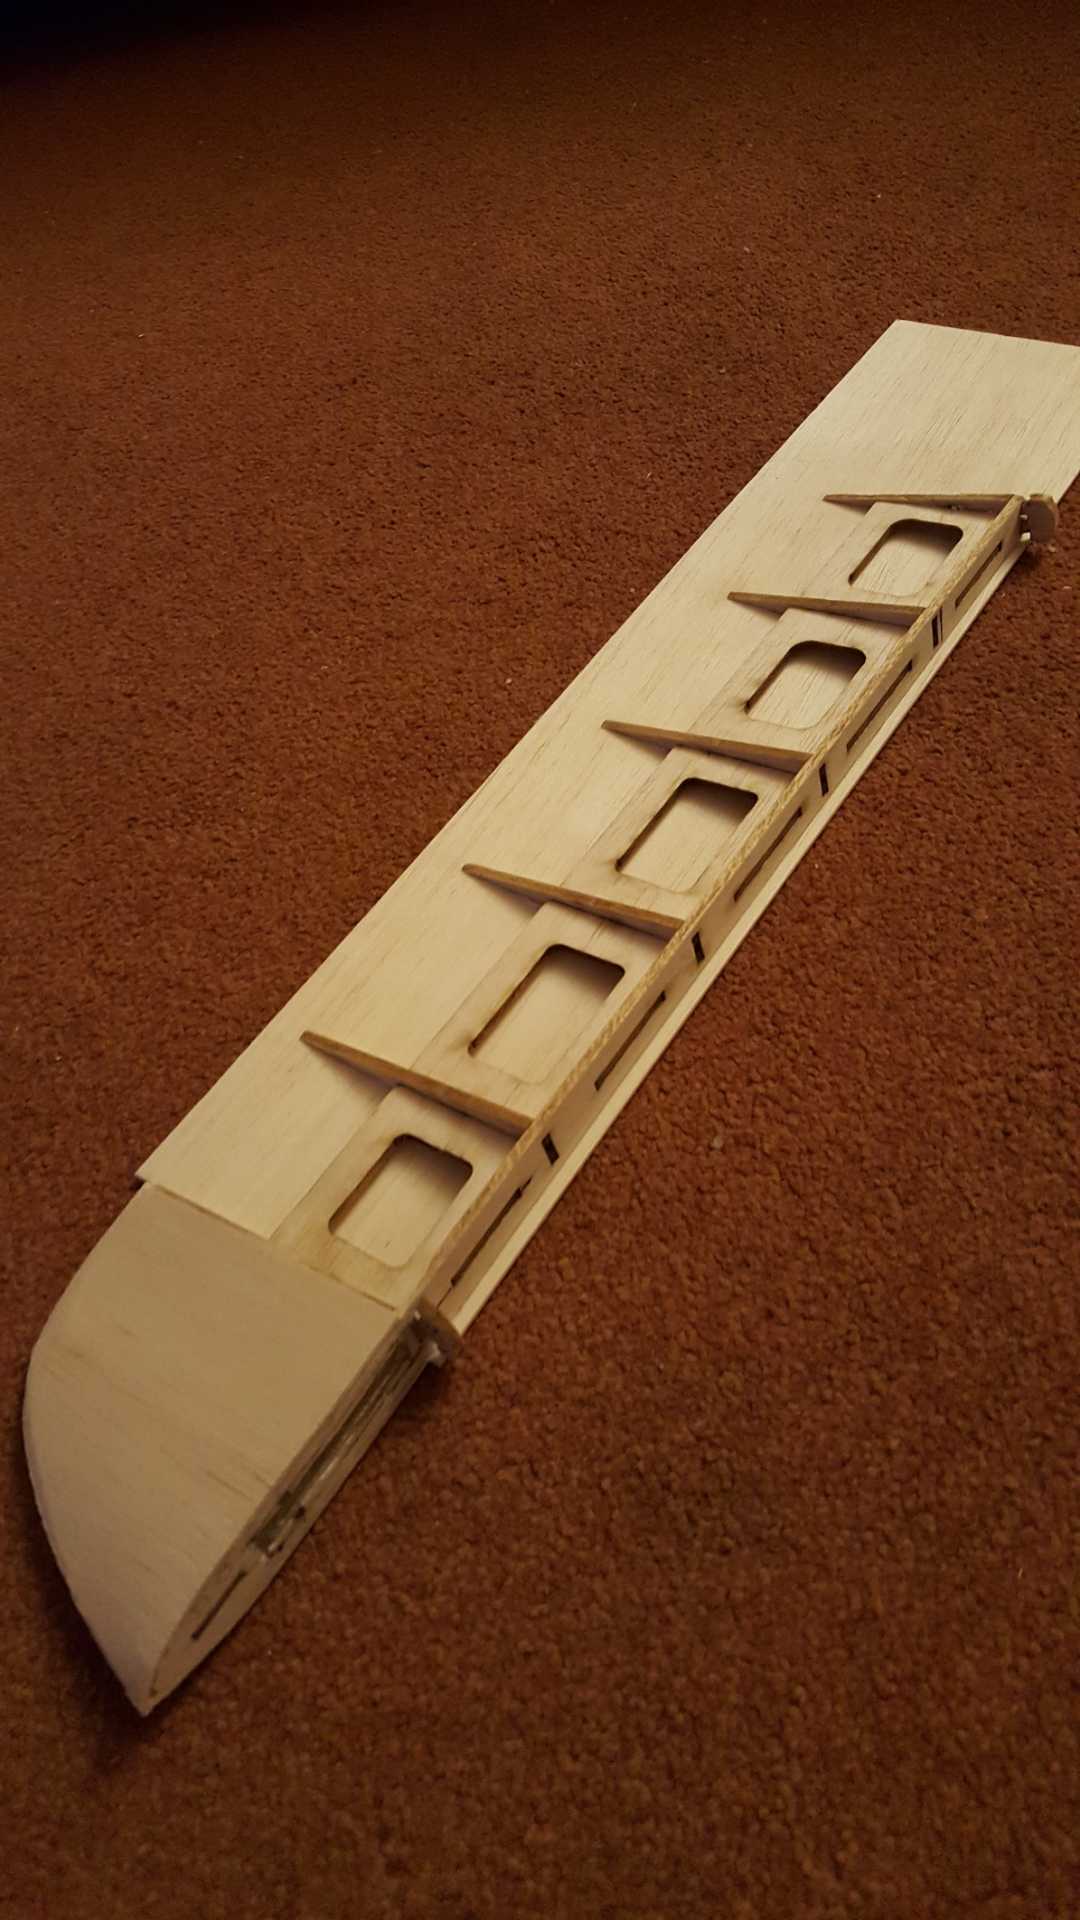
Finished the RDS wiper box and fitted it into the rudder. The box is made of 2mm thick fiberglass separated by thin strips of fiberglass, then filed down so that the piano wiper is a snug fit in the gap. The picture shows the box fitted into the rudder hinge post. Not yet cleaned up so looks a bit rough. The second picture shows with the skin (horizontal grain to stop warping)

Then skinned one side of the rudder to keep it stiff so I can cut in the hinges. The hinges will be 2mm fiberglass plates shaped as per the full size. I was thinking of using pin hinges but they don't look scale enough.
Then started skinning the cockpit area. This is the top hatch for access to install batteries.

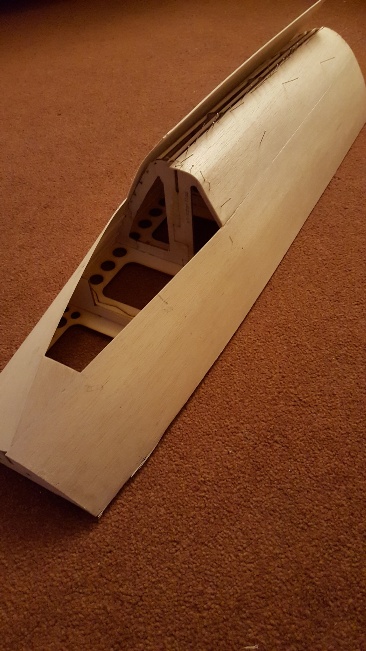
Finished the RDS wiper box and fitted it into the rudder. The box is made of 2mm thick fiberglass separated by thin strips of fiberglass, then filed down so that the piano wiper is a snug fit in the gap. The picture shows the box fitted into the rudder hinge post. Not yet cleaned up so looks a bit rough. The second picture shows with the skin (horizontal grain to stop warping)
Then skinned one side of the rudder to keep it stiff so I can cut in the hinges. The hinges will be 2mm fiberglass plates shaped as per the full size. I was thinking of using pin hinges but they don't look scale enough.
Then started skinning the cockpit area. This is the top hatch for access to install batteries.
I'm currently unsupervised. I know it freaks me out as well, but the possibilities are endless!!
Last edit: 05 Dec 2015 16:23 by Ralpharr2001.
Thanks: Klipkopwildlife, Quorneng, THE BLACKBIRD, old fart, boz
Please Log in or Create an account to join the conversation.
- Ex-Member
- User
-
Less
More
- Thank you received: 0
05 Dec 2015 16:27 #75
by Ex-Member
Replied by Ex-Member on topic Fairey Gannet AEW3
Beautiful build sir.
will be a smasher when it's done.
i like the wiper control design, looks to be a good way to hide all the servos inside the air frame.
will be a smasher when it's done.
i like the wiper control design, looks to be a good way to hide all the servos inside the air frame.
Please Log in or Create an account to join the conversation.
Time to create page: 1.588 seconds