
- Posts: 9436
- Thank you received: 19043
A printed plane or not as the case may be!
- Quorneng
-
 Topic Author
- Offline
- Forum Master
-

Less
More
18 May 2020 17:37 - 18 May 2020 17:51 #1
by Quorneng
Replied by Quorneng on topic A printed plane or not as the case may be!
On the RCME site there has been some discussion on converting a Ballerina (A low wing 52" span Peter Miller design) to a biplane and to keep the right 'feel' convert it with a dummy radial engine.
When the Ballerina was the subject of a 'Mass build' I built both a 3/4 and full size one out of Depron. Of course they came out ridiculously light but actually flew very nicely but slow and docile.
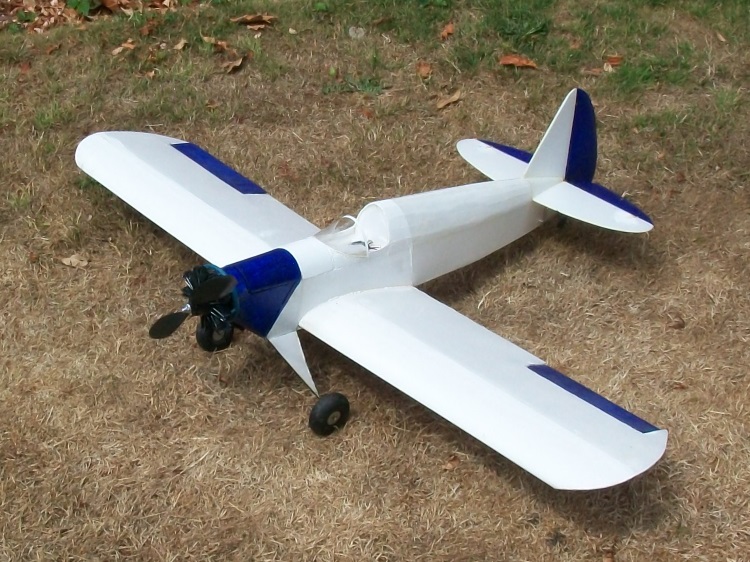
Of course adding a second wing on my Depron versions whilst not a structural problem it would halve their already 'light glider' wing loading to indoor plane levels but perhaps more significantly would use up quite a bit of my precious Depron.
Out of curiosity I roughly calculated the bi plane wing size needed maintain the same area as my 3/4 size 40" span Ballerina. It came to 24" span with a 6" chord.
With such a modest wing span and a desire to save Depron I wondered if the wing could instead be printed. It would of course be heavier than using Depron but the 3/4 Ballerina has such a reserve of performance it should be able to handle some extra weight satisfactorily.
What I wanted to explore is whether I could design a set of printed biplane wings that would only be 'heavy' by my lightweight standards.
My 3/4 size Ballerina weighs 13 oz ready to go so I set a target maximum of 20 oz and just to save even more Depron print the fuselage as well.:woohoo:
To be practical I will allow myself the luxury of Depron tail feathers to keep the tail weight down.
It is one thing to design a printed structure but there are many more printing issues as you reduce the material thickness to reduce weight.
3D printing filament is heavy when compared to normal wing building materials and its like lead when compared to foam. :ohmy:
To make best structural use of the material my first constraint was to print with the laid down material along the line of wing span so it would be in the direction of the stress. Printed material is 2 or 3 times stronger along the print than across it. Doing it this way does make accurately printing the shape of a wing section more difficult particularly when using a very thin skin.
Print bed limitations mean the wing would have to made up of several pieces, say each 6" long, and then glued together with maybe a tape reinforcement.
The next decision was to print front and rear parts either side of the point of maximum thickness. This had the advantage of automatically providing a shear web at the correct point for a stressed skin structure.
The two parts.
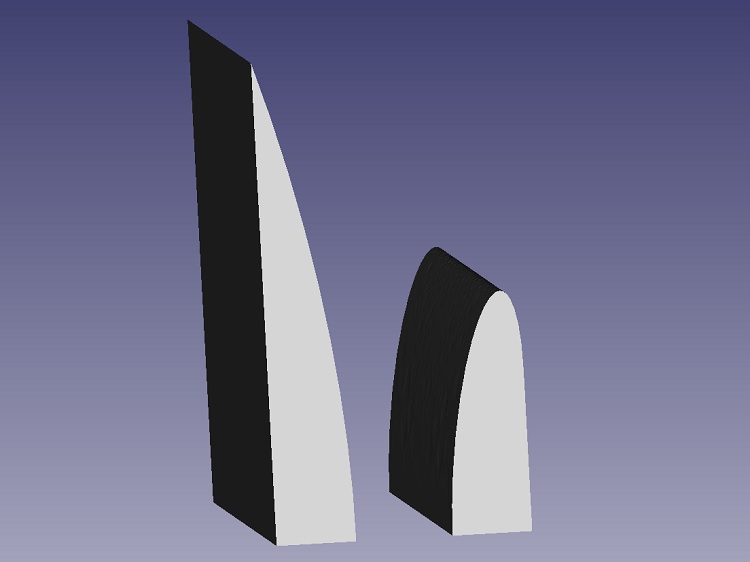
They would each be printed in this orientation and once released from the bed glued together to form a 6" section of wing with a 6" chord.
The front wing panel printed.
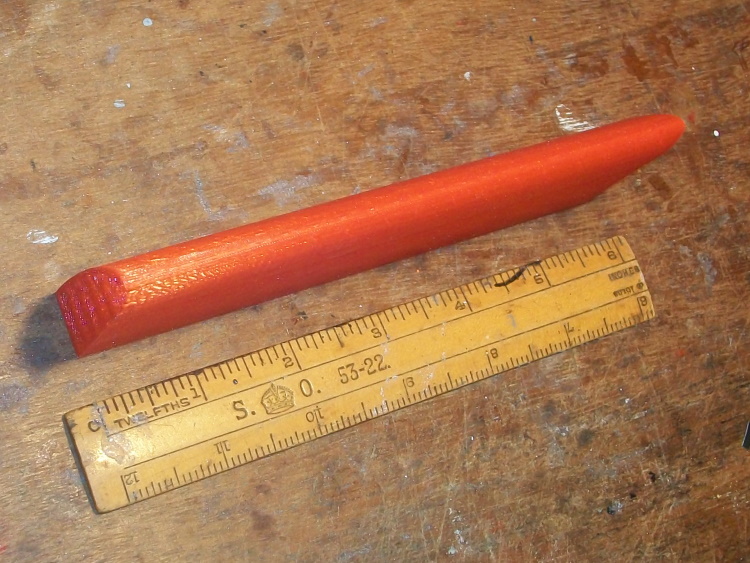
The actual printing identified some problems.
First it took nearly 2 hours to do so even at this size any 'trial and error' development was going to take a long time.
Although nothing wrong with the shape or its strength it was as expected very heavy.
The 16 pieces required to make up a pair of 24" wings (4 front & 4 rear for each wing) would weigh more than the complete 40" Depron Ballerina ready to go!:woohoo:
"I think I will have to think it out again!" sort of moment. :ohmy:
However before giving up completely I decided to print a complete 6" section of wing with an aileron and a mount for a micro servo.
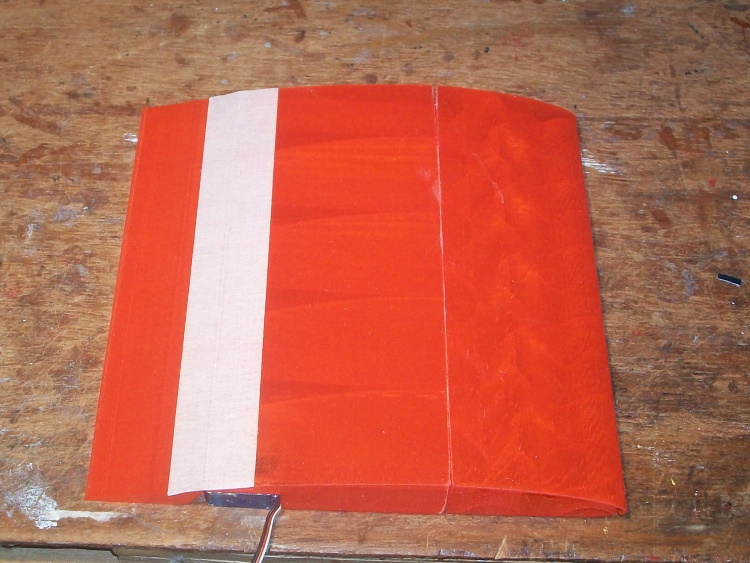
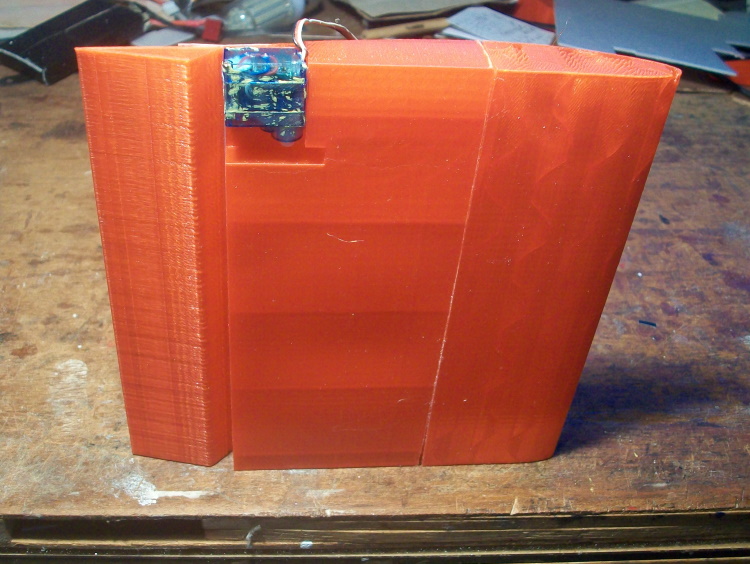
No problem with the quality of the result although it does represent over 6 hours printing but for a light weight it needs to be... er....lighter, a lot lighter!
Enough of this nonsense. I need to get out more.. Oh! I can't.. so on we go.
When the Ballerina was the subject of a 'Mass build' I built both a 3/4 and full size one out of Depron. Of course they came out ridiculously light but actually flew very nicely but slow and docile.
Of course adding a second wing on my Depron versions whilst not a structural problem it would halve their already 'light glider' wing loading to indoor plane levels but perhaps more significantly would use up quite a bit of my precious Depron.
Out of curiosity I roughly calculated the bi plane wing size needed maintain the same area as my 3/4 size 40" span Ballerina. It came to 24" span with a 6" chord.
With such a modest wing span and a desire to save Depron I wondered if the wing could instead be printed. It would of course be heavier than using Depron but the 3/4 Ballerina has such a reserve of performance it should be able to handle some extra weight satisfactorily.
What I wanted to explore is whether I could design a set of printed biplane wings that would only be 'heavy' by my lightweight standards.
My 3/4 size Ballerina weighs 13 oz ready to go so I set a target maximum of 20 oz and just to save even more Depron print the fuselage as well.:woohoo:
To be practical I will allow myself the luxury of Depron tail feathers to keep the tail weight down.
It is one thing to design a printed structure but there are many more printing issues as you reduce the material thickness to reduce weight.
3D printing filament is heavy when compared to normal wing building materials and its like lead when compared to foam. :ohmy:
To make best structural use of the material my first constraint was to print with the laid down material along the line of wing span so it would be in the direction of the stress. Printed material is 2 or 3 times stronger along the print than across it. Doing it this way does make accurately printing the shape of a wing section more difficult particularly when using a very thin skin.
Print bed limitations mean the wing would have to made up of several pieces, say each 6" long, and then glued together with maybe a tape reinforcement.
The next decision was to print front and rear parts either side of the point of maximum thickness. This had the advantage of automatically providing a shear web at the correct point for a stressed skin structure.
The two parts.
They would each be printed in this orientation and once released from the bed glued together to form a 6" section of wing with a 6" chord.
The front wing panel printed.
The actual printing identified some problems.
First it took nearly 2 hours to do so even at this size any 'trial and error' development was going to take a long time.
Although nothing wrong with the shape or its strength it was as expected very heavy.
The 16 pieces required to make up a pair of 24" wings (4 front & 4 rear for each wing) would weigh more than the complete 40" Depron Ballerina ready to go!:woohoo:
"I think I will have to think it out again!" sort of moment. :ohmy:
However before giving up completely I decided to print a complete 6" section of wing with an aileron and a mount for a micro servo.
No problem with the quality of the result although it does represent over 6 hours printing but for a light weight it needs to be... er....lighter, a lot lighter!
Enough of this nonsense. I need to get out more.. Oh! I can't.. so on we go.
Last edit: 18 May 2020 17:51 by Quorneng.
Thanks: Klipkopwildlife, crash happy
Please Log in or Create an account to join the conversation.
- paul d
-
- Offline
- Forum Veteran
-

Less
More
- Posts: 2074
- Thank you received: 2292
18 May 2020 17:59 #2
by paul d
balsa is best.
Replied by paul d on topic A printed plane or not as the case may be!
Not sure what size depron your short of Simon but my local model shop have stacks of 3mm and 6mm...hth
balsa is best.
Please Log in or Create an account to join the conversation.
- Eric
-

- Offline
- Moderator
-

Less
More
- Posts: 13726
- Thank you received: 14467
18 May 2020 18:13 #3
by Eric
if you are calm and collected when all about you are going berserk - you've missed something important!
Replied by Eric on topic A printed plane or not as the case may be!
Rather than print it 'solid', print it as an open frame structure, and skin it with tish, like the old-timers were.
if you are calm and collected when all about you are going berserk - you've missed something important!
Please Log in or Create an account to join the conversation.
- paul d
-
- Offline
- Forum Veteran
-
Less
More
- Posts: 2074
- Thank you received: 2292
18 May 2020 18:31 #4
by paul d
balsa is best.
Replied by paul d on topic A printed plane or not as the case may be!
or polyester silk, much more puncture resistant..Eric wrote: Rather than print it 'solid', print it as an open frame structure, and skin it with tish, like the old-timers were.
balsa is best.
Please Log in or Create an account to join the conversation.
- Quorneng
-
Topic Author
- Offline
- Forum Master
-
Less
More
- Posts: 9436
- Thank you received: 19043
18 May 2020 19:41 - 18 May 2020 19:43 #5
by Quorneng
Replied by Quorneng on topic A printed plane or not as the case may be!
Unfortunately even a printed open structure is heavy when compared to using balsa as it simply cannot compete with balsa's cellular structure.
By the time you have arranged for anything like the same rigidity of say a balsa rib the weight is doubled.
You may have noticed one of the 'test' wings I consigned to the attic used 3d printed ribs with a doped tissue covering.
From my perspective the only advantage of 3D printing is its ability to create highly complex shapes very accurately but to so it has to use a solid plastic.
There is talk of a micro balloon print filament that can create structures of only half the density. A sort of foam printing which if it also allowed a variable density to be created at the same time would really advance printed plane structures.
In the mean time its just down to "how thin can you go"?
Paul
It is strange but for some reason actual 3 & 6 mm Depron is not imported into the UK although it is apparently still in production in Latvia of all places. In the UK the only option now is the very soft 5 mm insulation board.
In fact the 'all yellow' test wing was made of it.
Last edit: 18 May 2020 19:43 by Quorneng.
Thanks: Klipkopwildlife
Please Log in or Create an account to join the conversation.
- paul d
-
- Offline
- Forum Veteran
-
Less
More
- Posts: 2074
- Thank you received: 2292
18 May 2020 19:51 #6
by paul d
balsa is best.
Replied by paul d on topic A printed plane or not as the case may be!
well all I know is that my local have loads of it and have no trouble getting more..
balsa is best.
Please Log in or Create an account to join the conversation.
- Quorneng
-
Topic Author
- Offline
- Forum Master
-
Less
More
- Posts: 9436
- Thank you received: 19043
19 May 2020 23:39 - 19 May 2020 23:40 #7
by Quorneng
Replied by Quorneng on topic A printed plane or not as the case may be!
Thinking about it the concept of printing more conventional parts and then gluing them together and covering with tissue did look attractive.
I am happy that the front section is plenty strong enough to act as a leading edge box spar so no addition support is need from the rear part.
In addition the printed bed is big enough to make the wing in 3 x 200 mm sections and it was possible to add printed dihedral to the centre section.
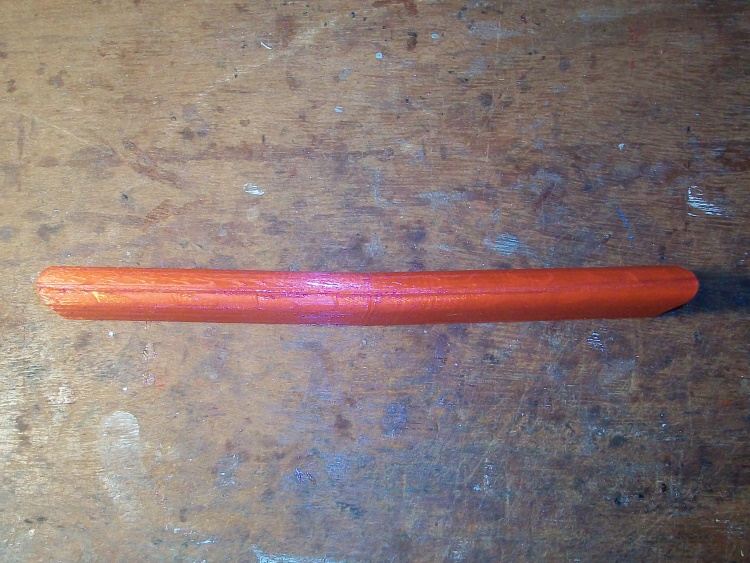
Printed ribs would then be glued to the rear of the box spar.

Even the trailing edge could be printed in such a way that the ribs can be glued into it.
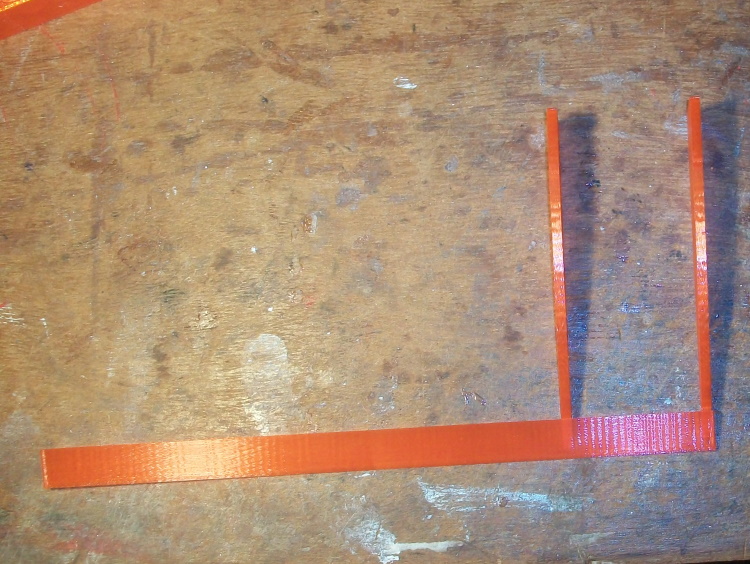
Done like this I stand a chance of getting each wing down to 2.1 oz (60 g) which makes my all up target of 20 oz (566 g) look possible.
The down side, apart from a substantial printing time of about 12 hours per wing, there is also a conventional construction time or put another way it is a technique that results in the worst of both worlds!:ohmy:
I am happy that the front section is plenty strong enough to act as a leading edge box spar so no addition support is need from the rear part.
In addition the printed bed is big enough to make the wing in 3 x 200 mm sections and it was possible to add printed dihedral to the centre section.
Printed ribs would then be glued to the rear of the box spar.
Even the trailing edge could be printed in such a way that the ribs can be glued into it.
Done like this I stand a chance of getting each wing down to 2.1 oz (60 g) which makes my all up target of 20 oz (566 g) look possible.
The down side, apart from a substantial printing time of about 12 hours per wing, there is also a conventional construction time or put another way it is a technique that results in the worst of both worlds!:ohmy:
Last edit: 19 May 2020 23:40 by Quorneng.
Thanks: Eric, Klipkopwildlife, crash happy
Please Log in or Create an account to join the conversation.
- crash happy
-

- Offline
- Platinum Member
-

- Oops. did I say that out loud!
Less
More
- Posts: 1250
- Thank you received: 1203
20 May 2020 07:03 #8
by crash happy
Replied by crash happy on topic A printed plane or not as the case may be!
Interesting concept. I do like a bit of experimentation !
Thanks: paul d
Please Log in or Create an account to join the conversation.
- Quorneng
-
Topic Author
- Offline
- Forum Master
-
Less
More
- Posts: 9436
- Thank you received: 19043
21 May 2020 22:14 #9
by Quorneng
Replied by Quorneng on topic A printed plane or not as the case may be!
Slowly working along the wing, rather making it up as I go along.
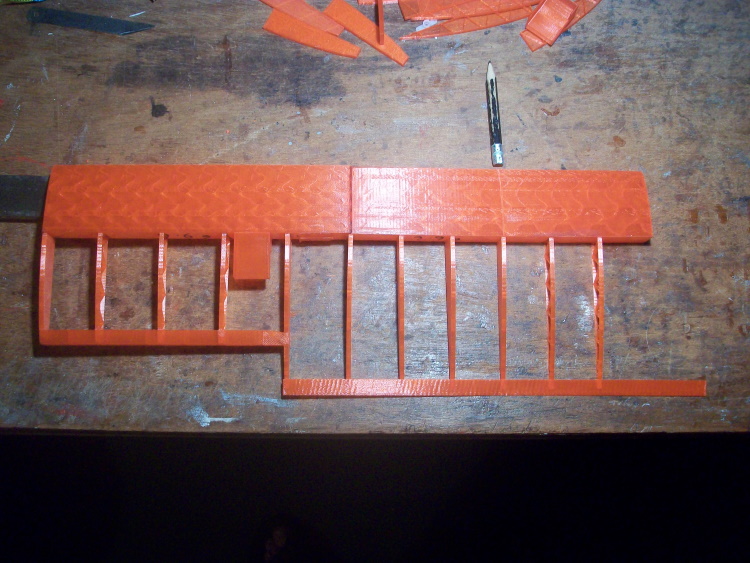
The pencil marks the the wing centre line. The square box is the mount for the aileron servo
Whats in the picture (just over half) weighs 29 g.
The next problem is to print a light and stiff aileron.
I am now regretting choosing a biplane as I will have to print it all out again, about 15 hours worth, and the CURA setup is different for each part.
Thanks: Klipkopwildlife, crash happy
Please Log in or Create an account to join the conversation.
- Quorneng
-
Topic Author
- Offline
- Forum Master
-
Less
More
- Posts: 9436
- Thank you received: 19043
22 May 2020 16:38 - 22 May 2020 16:41 #10
by Quorneng
Replied by Quorneng on topic A printed plane or not as the case may be!
The complete wing all 200 mm of it.
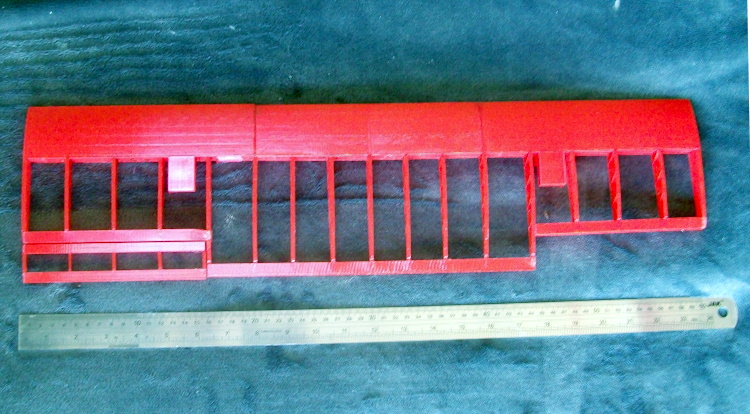
Apart for the leading edge 'D' box spar everything else is fabricated.
The component list:-
Centre D box with dihedral
Inner rib (9 off RH)
Inner TE with dihedral
Outer D box (2 off)
Outer rib (8 off)
Outer TE (2 off)
Aileron D box (2 off)
Aileron rib (10 off)
Aileron TE (2 off)
37 parts in total
Without the tissue and dope covering it weighs 47.9 g. My target of 60 g complete should be achievable however the finished article is far from perfect. The printing is just to thin to be consistent so at this point I think I will evoke the "or not" bit and call it a day on this build.
I will tissue and dope it to test its ability to resist the shrinking and then add it to my collection of 'test' wings.
The principle of 'building' a wing out of just printed parts is quite interesting and probably worthy of taking a bit further maybe to create a bigger? wing that can be used on an existing plane.
Last edit: 22 May 2020 16:41 by Quorneng.
Thanks: Eric, Klipkopwildlife, paul d, crash happy
Please Log in or Create an account to join the conversation.
- Quorneng
-
Topic Author
- Offline
- Forum Master
-
Less
More
- Posts: 9436
- Thank you received: 19043
23 May 2020 19:53 #11
by Quorneng
Replied by Quorneng on topic A printed plane or not as the case may be!
My evolving Plan B is to make the wing of the small Ballerina removable and be retained by nylon bolts.
This would allow other 'test' wings to be used to give a direct comparison.
The wing specification thus changes to match the small Ballerina wing 1000 mm x 200 mm (40" x 8").
The small Ballerina used a 12.5% t/c ratio giving a maximum thickness of 25 mm.
At that depth I am pretty sure a generous printed spar would be plenty strong enough at the root but the printer bed size limitations would mean it would have to made in 5 x 200 mm sections. How to retain the full strength at the join. At least with 5 sections there would be no join at the centre, the point of maximum stress.
On a 'plank' wing the spar does not have to be the same section tip to tip indeed the bending load at the tip is zero.
It then occurred to me that a tube achieve a full strength join with a simple over lap so all that was needed would be for each section to fit inside each other with thickest at the root.
So I spent most of today printing 3 short sections of box spar that fitted exactly inside each other.
The fact the spar would be smaller towards the tip also meant that the outer ribs could be printed in one piece and simply passed over the spar as in full size.

The sections slide in side each other.
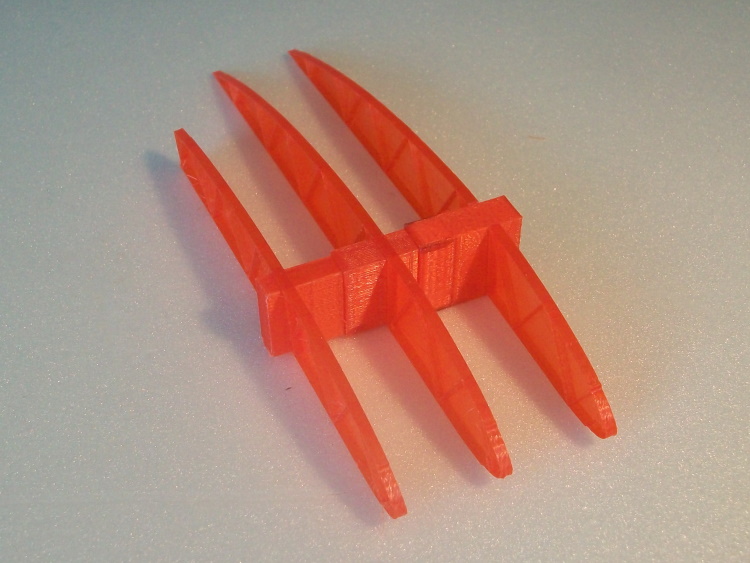
Each joint has a 10 mm overlap which when super glued will should a full strength joint, hopefully.
Each 200 mm spar section will not only be deeper toward the wing root but will have an different internal structure to reflect the increasing bending forces in has to bear.
Apart from having just a single spar instead of a leading edge D box the rest will follow the same sort of 'fabricated' printed structure I used on the 'test' 600 mm wing.
The aileron of the 600 mm wing duly tissue covered, water shrunk and doped.
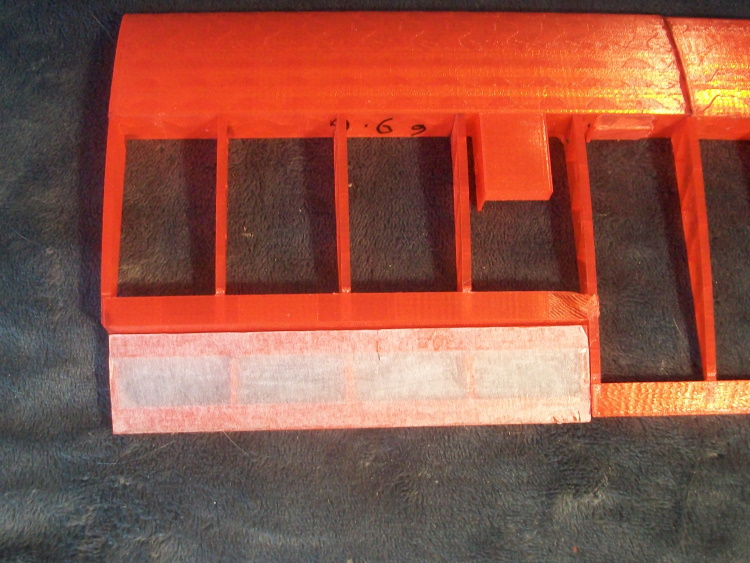
The rest to follow in due course.
This would allow other 'test' wings to be used to give a direct comparison.
The wing specification thus changes to match the small Ballerina wing 1000 mm x 200 mm (40" x 8").
The small Ballerina used a 12.5% t/c ratio giving a maximum thickness of 25 mm.
At that depth I am pretty sure a generous printed spar would be plenty strong enough at the root but the printer bed size limitations would mean it would have to made in 5 x 200 mm sections. How to retain the full strength at the join. At least with 5 sections there would be no join at the centre, the point of maximum stress.
On a 'plank' wing the spar does not have to be the same section tip to tip indeed the bending load at the tip is zero.
It then occurred to me that a tube achieve a full strength join with a simple over lap so all that was needed would be for each section to fit inside each other with thickest at the root.
So I spent most of today printing 3 short sections of box spar that fitted exactly inside each other.
The fact the spar would be smaller towards the tip also meant that the outer ribs could be printed in one piece and simply passed over the spar as in full size.
The sections slide in side each other.
Each joint has a 10 mm overlap which when super glued will should a full strength joint, hopefully.
Each 200 mm spar section will not only be deeper toward the wing root but will have an different internal structure to reflect the increasing bending forces in has to bear.
Apart from having just a single spar instead of a leading edge D box the rest will follow the same sort of 'fabricated' printed structure I used on the 'test' 600 mm wing.
The aileron of the 600 mm wing duly tissue covered, water shrunk and doped.
The rest to follow in due course.
Thanks: Klipkopwildlife, crash happy
Please Log in or Create an account to join the conversation.
- Eric
-
- Offline
- Moderator
-
Less
More
- Posts: 13726
- Thank you received: 14467
24 May 2020 08:12 #12
by Eric
if you are calm and collected when all about you are going berserk - you've missed something important!
Replied by Eric on topic A printed plane or not as the case may be!
Vaguely similar to what Reggie Mitchell did with the Spitfire spar, then - he made it like a giant leaf spring, with each leaf shorter than the preceding one.
if you are calm and collected when all about you are going berserk - you've missed something important!
Please Log in or Create an account to join the conversation.
- Quorneng
-
Topic Author
- Offline
- Forum Master
-
Less
More
- Posts: 9436
- Thank you received: 19043
24 May 2020 14:15 #13
by Quorneng
Replied by Quorneng on topic A printed plane or not as the case may be!
Eric
indeed it was the description of the Spitfire wing that gave me the basic idea although Mitchell went a lot further as each spar boom was itself mode up a several layers of concentric extruded square tube so each was virtually a solid block at the root.
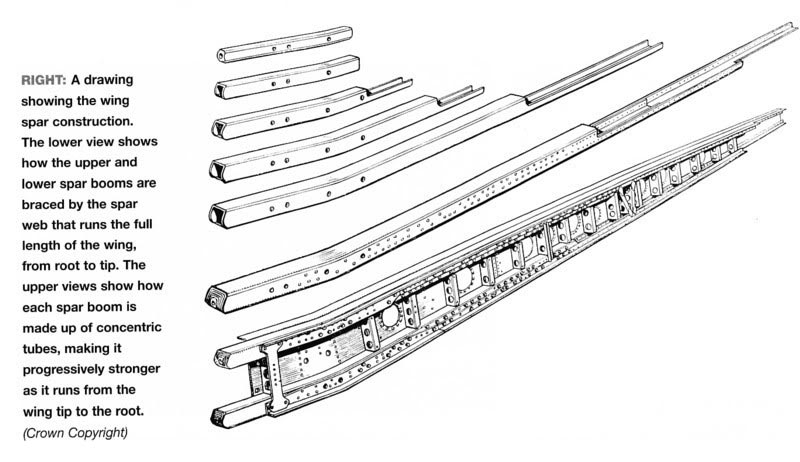
Seems a very complex way of doing it but it probably made sense with the production facilities available at the time.
The first 'dry fit' of the components that make up the outer wing panel.

It all ooks to go togther well enough but I am reluctant to start gluing anything until I have printed out all the bits for one half of the wing. Only then will I start to 'build' and from the root out. As the build progresses only then will the parts for the other side will be printed. This will mean that one part has to scrapped because it does not fit
Its not the cost of scrapping any parts, each only used a few pennies of the plastic filament, but the printing time of the replacement.
I estimate it will require at least 25 hours of printing time to create the 56 parts for the complete wing.
For comparison the same part of the earlier wing placed on top.

The 33% bigger wing panel is actually slightly lighter!
indeed it was the description of the Spitfire wing that gave me the basic idea although Mitchell went a lot further as each spar boom was itself mode up a several layers of concentric extruded square tube so each was virtually a solid block at the root.
Seems a very complex way of doing it but it probably made sense with the production facilities available at the time.
The first 'dry fit' of the components that make up the outer wing panel.
It all ooks to go togther well enough but I am reluctant to start gluing anything until I have printed out all the bits for one half of the wing. Only then will I start to 'build' and from the root out. As the build progresses only then will the parts for the other side will be printed. This will mean that one part has to scrapped because it does not fit
Its not the cost of scrapping any parts, each only used a few pennies of the plastic filament, but the printing time of the replacement.
I estimate it will require at least 25 hours of printing time to create the 56 parts for the complete wing.
For comparison the same part of the earlier wing placed on top.
The 33% bigger wing panel is actually slightly lighter!
Thanks: Klipkopwildlife, crash happy
Please Log in or Create an account to join the conversation.
- crash happy
-
- Offline
- Platinum Member
-
- Oops. did I say that out loud!
Less
More
- Posts: 1250
- Thank you received: 1203
25 May 2020 13:02 #14
by crash happy
Replied by crash happy on topic A printed plane or not as the case may be!
I know it defeats the object a bit, but wouldn't it save on printing time if you just made the ribs with a round hole where the printed spar would be & used a carbon fibre tube ?
Please Log in or Create an account to join the conversation.
- paul d
-
- Offline
- Forum Veteran
-
Less
More
- Posts: 2074
- Thank you received: 2292
25 May 2020 13:12 #15
by paul d
balsa is best.
Replied by paul d on topic A printed plane or not as the case may be!
Or use Balsa...crash happy wrote: I know it defeats the object a bit, but wouldn't it save on printing time if you just made the ribs with a round hole where the printed spar would be & used a carbon fibre tube ?
balsa is best.
Please Log in or Create an account to join the conversation.
Time to create page: 0.944 seconds