
- Posts: 9436
- Thank you received: 19043
P1081 The 'straight through' swept wing Sea Hawk
- Quorneng
-
 Topic Author
- Offline
- Forum Master
-

Less
More
12 Aug 2021 18:44 - 12 Aug 2021 18:45 #16
by Quorneng
Replied by Quorneng on topic P1081 The 'straight through' swept wing Sea Hawk
The tail plane goes on.
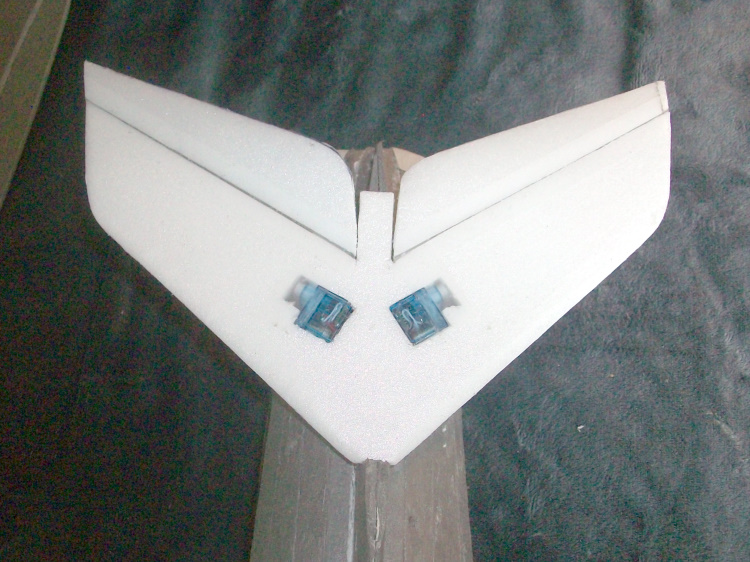
Structurally the servos had to be as close in as possible so there was no option but to mount them symmetrically opposite which of course meant a servo reverser was required.
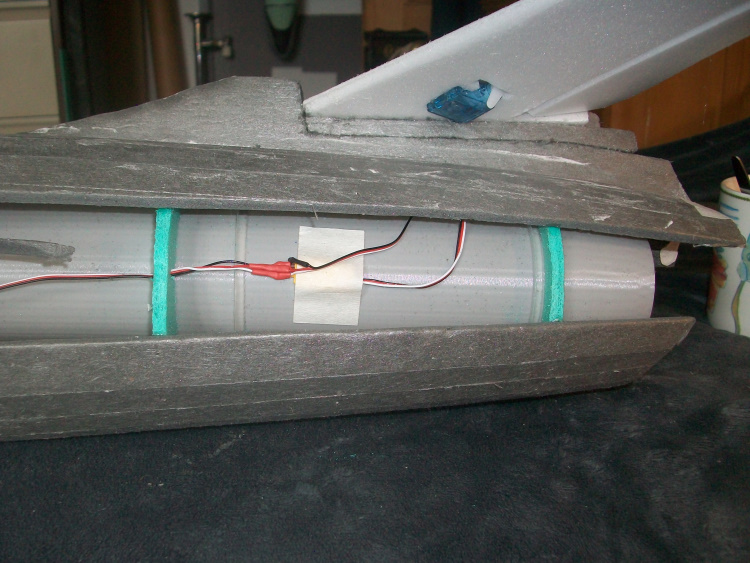
With a long servo lead taken forward through the formers to my great relief it works!
I suppose it is the wings next so the aileron servos can be run then I can finish planking the fuselage.
Structurally the servos had to be as close in as possible so there was no option but to mount them symmetrically opposite which of course meant a servo reverser was required.
With a long servo lead taken forward through the formers to my great relief it works!
I suppose it is the wings next so the aileron servos can be run then I can finish planking the fuselage.
Last edit: 12 Aug 2021 18:45 by Quorneng.
Thanks: Klipkopwildlife, THE BLACKBIRD, Ralpharr2001
Please Log in or Create an account to join the conversation.
- Klipkopwildlife
-

- Offline
- Administrator
-

- I'm supposed to be retired!
13 Aug 2021 07:34 #17
by Klipkopwildlife
Do it now, you may never get another chance
Replied by Klipkopwildlife on topic P1081 The 'straight through' swept wing Sea Hawk
You didn't think about reversing the servo itself to save the tail end weight?
Do it now, you may never get another chance
Thanks: paul d
Please Log in or Create an account to join the conversation.
- Quorneng
-
Topic Author
- Offline
- Forum Master
-
Less
More
- Posts: 9436
- Thank you received: 19043
13 Aug 2021 10:10 #18
by Quorneng
Replied by Quorneng on topic P1081 The 'straight through' swept wing Sea Hawk
Ha!
I can assure you I was not about to attempt to 'reverse' a tiny 3.7 g servo. I have found that just taking them apart can cause problems particularly with the gears. Anyway I already had a 2 gm servo reverser sitting in the draw and I did remove all the plugs and soldered everything directly to save weight
I can assure you I was not about to attempt to 'reverse' a tiny 3.7 g servo. I have found that just taking them apart can cause problems particularly with the gears. Anyway I already had a 2 gm servo reverser sitting in the draw and I did remove all the plugs and soldered everything directly to save weight
Thanks: Eric, Klipkopwildlife
Please Log in or Create an account to join the conversation.
- paul d
-
- Offline
- Forum Veteran
-

Less
More
- Posts: 2074
- Thank you received: 2292
13 Aug 2021 10:31 #19
by paul d
balsa is best.
Replied by paul d on topic P1081 The 'straight through' swept wing Sea Hawk
Nice job as normal!!
balsa is best.
Thanks: Klipkopwildlife
Please Log in or Create an account to join the conversation.
- Klipkopwildlife
-
- Offline
- Administrator
-
- I'm supposed to be retired!
13 Aug 2021 17:19 #20
by Klipkopwildlife
Do it now, you may never get another chance
Replied by Klipkopwildlife on topic P1081 The 'straight through' swept wing Sea Hawk
Ah, sorry Simon, 'foot n mouth' disease, the 9gm servo I did was quite small enough thankyou!
Do it now, you may never get another chance
Thanks: Eric
Please Log in or Create an account to join the conversation.
- Quorneng
-
Topic Author
- Offline
- Forum Master
-
Less
More
- Posts: 9436
- Thank you received: 19043
16 Aug 2021 21:57 - 16 Aug 2021 22:00 #21
by Quorneng
Replied by Quorneng on topic P1081 The 'straight through' swept wing Sea Hawk
The wings in progress.

A major issue bending the thick foam skin is it relies entirely on the glue to hold the skins in place. The trailing edge is easy enough apart from all the sanding required to achieve a fine edge. :ohmy: Just a few weights suffice but it has to be left for 24 hours to harden before the leading edge can be drawn over. This requires some serious clamping with metal strips top and bottom to prevent the clamps from crushing the foam and another 24 hrs and I only have tyhe strips and clamps to them one leading edge at a time.
Then the ailerons have to be cut out and their servos added so the extended wires can be run through the wing. Only then can the wing be glued to the fuselage with another 24 hours for each side. Those extremely simple wings, each only has 4 parts, but they take a ridiculously long time to assemble.
Last edit: 16 Aug 2021 22:00 by Quorneng.
Thanks: Klipkopwildlife, THE BLACKBIRD
Please Log in or Create an account to join the conversation.
- paul d
-
- Offline
- Forum Veteran
-
Less
More
- Posts: 2074
- Thank you received: 2292
17 Aug 2021 07:32 #22
by paul d
balsa is best.
Replied by paul d on topic P1081 The 'straight through' swept wing Sea Hawk
..it'll be worth the wait! what glue are you using?
balsa is best.
Thanks: Klipkopwildlife
Please Log in or Create an account to join the conversation.
- Quorneng
-
Topic Author
- Offline
- Forum Master
-
Less
More
- Posts: 9436
- Thank you received: 19043
17 Aug 2021 12:57 - 17 Aug 2021 12:57 #23
by Quorneng
Replied by Quorneng on topic P1081 The 'straight through' swept wing Sea Hawk
Paul
I am actually using Technicqll Polyvinyl Adhesive made in Poland that is normally used to stick foam to head linings in cars!
Foam safe (obviously) and slightly cheaper the UHU POR but more important it sets rock hard in 24 hours. Rather important in this particular wing build.
POR on the other hand quickly sets 'rubbery' so perfectly adequate to hold soft and flexible foam parts securely in place but it can take weeks before it can resist a continuous pull.
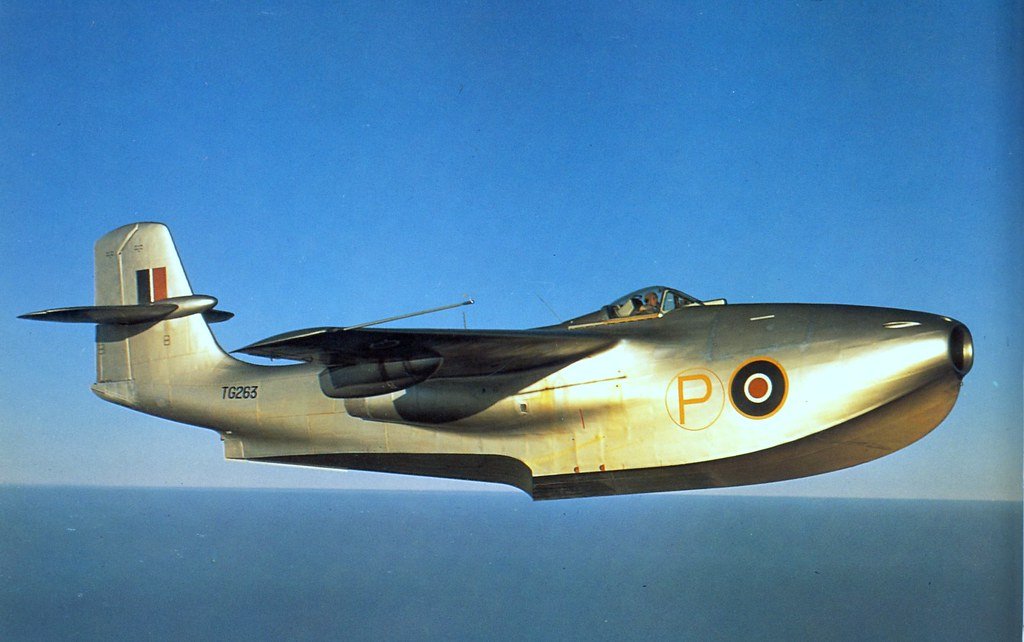
I have run up the EDF and it fairly shoots the fuselage along bed so hopefully a slide take off will be a possibility which raises an interesting thought, a Saunders Roe SR-A1.
:woohoo:
I am actually using Technicqll Polyvinyl Adhesive made in Poland that is normally used to stick foam to head linings in cars!
Foam safe (obviously) and slightly cheaper the UHU POR but more important it sets rock hard in 24 hours. Rather important in this particular wing build.
POR on the other hand quickly sets 'rubbery' so perfectly adequate to hold soft and flexible foam parts securely in place but it can take weeks before it can resist a continuous pull.
I have run up the EDF and it fairly shoots the fuselage along bed so hopefully a slide take off will be a possibility which raises an interesting thought, a Saunders Roe SR-A1.
:woohoo:
Last edit: 17 Aug 2021 12:57 by Quorneng.
Thanks: Klipkopwildlife, THE BLACKBIRD, paul d
Please Log in or Create an account to join the conversation.
- Klipkopwildlife
-
- Offline
- Administrator
-
- I'm supposed to be retired!
17 Aug 2021 17:45 #24
by Klipkopwildlife
Do it now, you may never get another chance
Replied by Klipkopwildlife on topic P1081 The 'straight through' swept wing Sea Hawk
Now that's a pretty airplane.
Do it now, you may never get another chance
Please Log in or Create an account to join the conversation.
- Quorneng
-
Topic Author
- Offline
- Forum Master
-
Less
More
- Posts: 9436
- Thank you received: 19043
17 Aug 2021 18:40 #25
by Quorneng
Replied by Quorneng on topic P1081 The 'straight through' swept wing Sea Hawk
I know Eric 'Winkle' Brown was impressed by it but then just what didn't he fly!
Maybe not straight away as I would like to complete the 'development set' first and build a Hawker Hunter.
Maybe not straight away as I would like to complete the 'development set' first and build a Hawker Hunter.
Thanks: Klipkopwildlife
Please Log in or Create an account to join the conversation.
- Quorneng
-
Topic Author
- Offline
- Forum Master
-
Less
More
- Posts: 9436
- Thank you received: 19043
18 Aug 2021 18:27 - 18 Aug 2021 18:28 #26
by Quorneng
Replied by Quorneng on topic P1081 The 'straight through' swept wing Sea Hawk
Having grumbled at how long the wings are taking at last some progress.
The first wing is on.
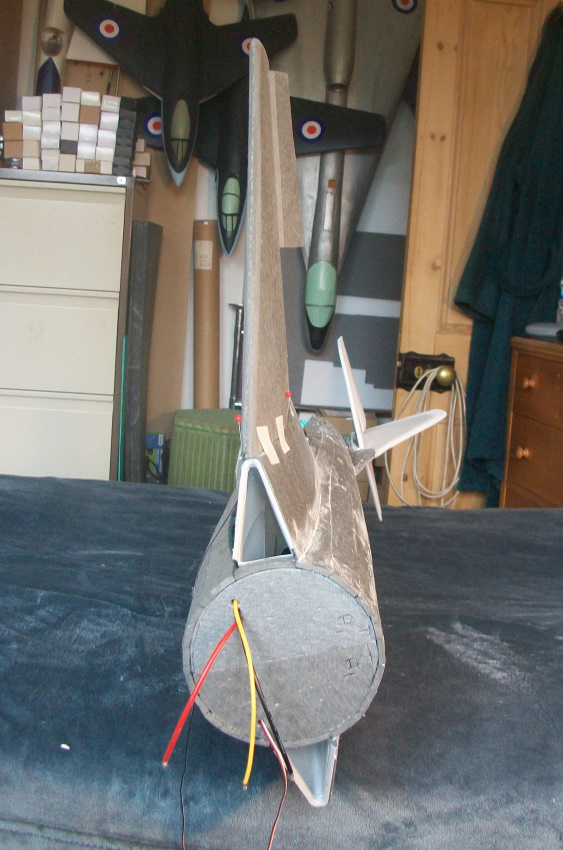
But it will have to stay 'vertical' like that till tomorrow although the other wing is now ready to glue on.
I suppose its time to start the nose section.
The first wing is on.
But it will have to stay 'vertical' like that till tomorrow although the other wing is now ready to glue on.
I suppose its time to start the nose section.
Last edit: 18 Aug 2021 18:28 by Quorneng.
Thanks: Klipkopwildlife, THE BLACKBIRD, paul d
Please Log in or Create an account to join the conversation.
- Quorneng
-
Topic Author
- Offline
- Forum Master
-
Less
More
- Posts: 9436
- Thank you received: 19043
19 Aug 2021 18:35 #27
by Quorneng
Replied by Quorneng on topic P1081 The 'straight through' swept wing Sea Hawk
At last some measurable progress.
The tail end more or less complete.

Both wings are on with all the wires run forward to the cockpit area.
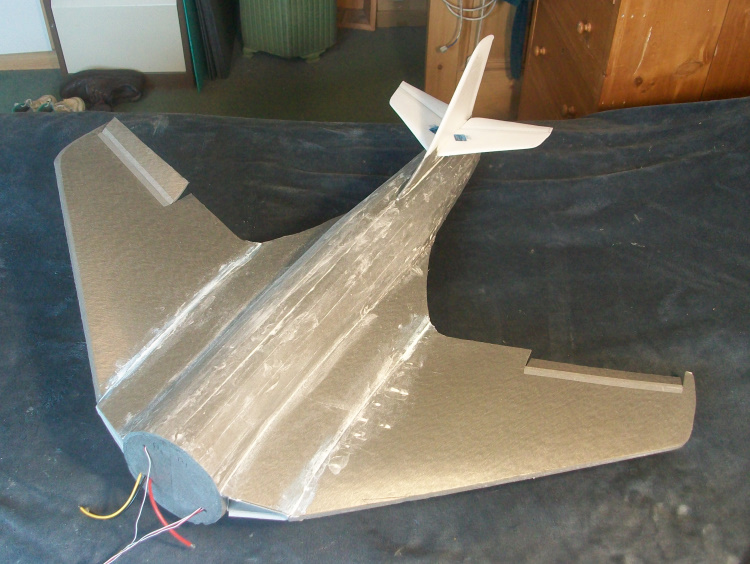
And a start has been made on the nose section.
The tail end more or less complete.
Both wings are on with all the wires run forward to the cockpit area.
And a start has been made on the nose section.
Thanks: Klipkopwildlife, THE BLACKBIRD
Please Log in or Create an account to join the conversation.
- Quorneng
-
Topic Author
- Offline
- Forum Master
-
Less
More
- Posts: 9436
- Thank you received: 19043
21 Aug 2021 22:13 #28
by Quorneng
Replied by Quorneng on topic P1081 The 'straight through' swept wing Sea Hawk
After many hours the end is in sight. Its almost complete!
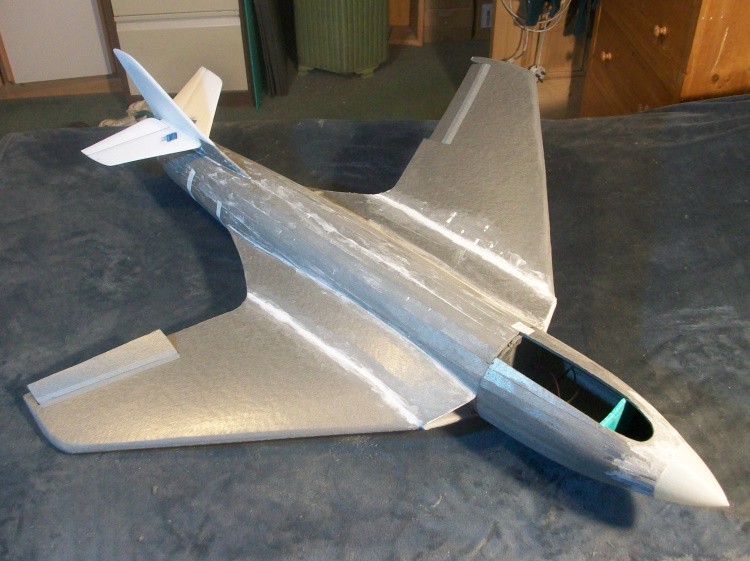
Actually many pins and masking tape are holding it together whilst the glue dries!
Just the canopy/battery hatch to do along with quite a bit of filling and sanding.
Actually many pins and masking tape are holding it together whilst the glue dries!
Just the canopy/battery hatch to do along with quite a bit of filling and sanding.
Thanks: Klipkopwildlife, THE BLACKBIRD
Please Log in or Create an account to join the conversation.
- Quorneng
-
Topic Author
- Offline
- Forum Master
-
Less
More
- Posts: 9436
- Thank you received: 19043
23 Aug 2021 23:12 - 23 Aug 2021 23:14 #29
by Quorneng
Replied by Quorneng on topic P1081 The 'straight through' swept wing Sea Hawk
As it will be painted a pale blue/green overall it has been given a white under coat to start to cover the grey of the foam.
 .
The cockpit/battery hatch in nearly complete.
It appears the original was never painted ,or at least ever pictured, in RAF or RN colours. It kept the yellow P on the fuselage.
Not surprisingly with the bigger rear fuselage and longer jet pipe it looks like the battery will have to go a bit further forward in the cockpit than for either the Sea Hawk or the P1052.
Last edit: 23 Aug 2021 23:14 by Quorneng.
Thanks: Klipkopwildlife, THE BLACKBIRD, paul d
Please Log in or Create an account to join the conversation.
- Quorneng
-
Topic Author
- Offline
- Forum Master
-
Less
More
- Posts: 9436
- Thank you received: 19043
25 Aug 2021 23:50 - 25 Aug 2021 23:53 #30
by Quorneng
Replied by Quorneng on topic P1081 The 'straight through' swept wing Sea Hawk
Now with it final coat of a very pale green/blue overall.

The small blemish on the rear fuselage just aft of the wing is a moth!
Under artifial light it looks rather whiter than it is.
I understand this was something like its original colour but there are no colour photos.The roundels and other markings should help to break up its distinct 'blandness'.
Still got to fit the ESC, gyro rx and battery box.
Last edit: 25 Aug 2021 23:53 by Quorneng.
Thanks: Klipkopwildlife
Please Log in or Create an account to join the conversation.
Time to create page: 0.783 seconds