
- Posts: 9436
- Thank you received: 19043
A bigger Skyray
- Quorneng
-
 Topic Author
- Offline
- Forum Master
-

Less
More
24 Apr 2023 19:04 #1
by Quorneng
A bigger Skyray was created by Quorneng
If you go down the recent posts list about halfway down there is the build blog of what I called an XPS (5 mm foam) Douglas Skyray. After a whole series of crashes and rebuilds it does now fly passably well but not surprisingly is rather full of dings, dents and repair marks. The XPS Skyray has a modest 26" span making very twitchy in roll compared to response in pitch..
Along time ago (2011!) I build a bigger 36" span Depron Skyray that used a 5x4 prop within the fuselage as an EDP. It flew very well indeed but because of the prop diameter both the inlets and jet pipe was significantly over scale.

It eventually crashed into a big bramble thicket outside my field and was never found..
As I literally have no room for yet another plane my cunning plan is build another 36" Skyray out of true 3mm Depron. If I use the drone motor and 3x4 three blade out of the now 'tired' XPS Skyray it should allow true scale inlets and jet pipe, provided I can build the airframe light enough.

I will be able to print the duct in LW-PLA which should be a bit lighter than the fully fabricated and bigger diameter Depron duct of the first 36" Skyray.
Anyway that's the plan.
Along time ago (2011!) I build a bigger 36" span Depron Skyray that used a 5x4 prop within the fuselage as an EDP. It flew very well indeed but because of the prop diameter both the inlets and jet pipe was significantly over scale.
It eventually crashed into a big bramble thicket outside my field and was never found..
As I literally have no room for yet another plane my cunning plan is build another 36" Skyray out of true 3mm Depron. If I use the drone motor and 3x4 three blade out of the now 'tired' XPS Skyray it should allow true scale inlets and jet pipe, provided I can build the airframe light enough.
I will be able to print the duct in LW-PLA which should be a bit lighter than the fully fabricated and bigger diameter Depron duct of the first 36" Skyray.
Anyway that's the plan.
Thanks: Klipkopwildlife, Flytilbroke
Please Log in or Create an account to join the conversation.
- Quorneng
-
Topic Author
- Offline
- Forum Master
-
Less
More
- Posts: 9436
- Thank you received: 19043
25 Apr 2023 09:24 - 25 Apr 2023 09:27 #2
by Quorneng
Replied by Quorneng on topic A bigger Skyray
It always surprises me how a relatively modest increase in overall size, in this case from 26" to 36" span, gives an increase in wing area of 92%.
I have printed out the side and plan views for the 36" version along side the actual 26" span Skyray for comparison.
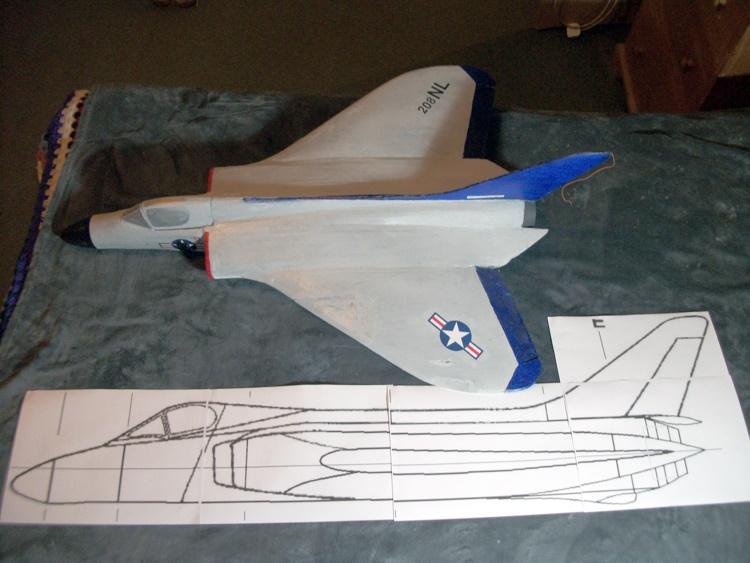

Given that the bigger one will be made out of 3mm rather than 5mm sheet there is a good possibility the increase in the airframe weight will be relatively modest despite using nearly twice the area of foam. All the hardware will be a direct transfer so no weight penalty there and although the actual duct will be longer hopefully when printed in LW-PLA it will weigh little more.
So nearly double the wing area but with only a 15%? increase in weight is good!

Furthermore the motor and prop can use a 4s LIpo if more thrust proves to be necessary.
My apologies for droning on about weight so much but I do find this sort of project very satisfying to do, particularly if I get close to achieving my initial predictions.
I have printed out the side and plan views for the 36" version along side the actual 26" span Skyray for comparison.
Given that the bigger one will be made out of 3mm rather than 5mm sheet there is a good possibility the increase in the airframe weight will be relatively modest despite using nearly twice the area of foam. All the hardware will be a direct transfer so no weight penalty there and although the actual duct will be longer hopefully when printed in LW-PLA it will weigh little more.
So nearly double the wing area but with only a 15%? increase in weight is good!
Furthermore the motor and prop can use a 4s LIpo if more thrust proves to be necessary.
My apologies for droning on about weight so much but I do find this sort of project very satisfying to do, particularly if I get close to achieving my initial predictions.
Last edit: 25 Apr 2023 09:27 by Quorneng.
Thanks: Eric, Klipkopwildlife, Flytilbroke, THE BLACKBIRD, jon.in.swansea
Please Log in or Create an account to join the conversation.
- Quorneng
-
Topic Author
- Offline
- Forum Master
-
Less
More
- Posts: 9436
- Thank you received: 19043
05 May 2023 15:51 - 05 May 2023 15:51 #3
by Quorneng
Replied by Quorneng on topic A bigger Skyray
Made a start on printing the duct for the bigger Skyray.
The lofted off set RH inlet duct vase printed in LW-PLA.
With the EDF right at the back the inlet duct will be 723 mm long!

The lofted off set RH inlet duct vase printed in LW-PLA.
With the EDF right at the back the inlet duct will be 723 mm long!
Last edit: 05 May 2023 15:51 by Quorneng.
Thanks: Eric, Klipkopwildlife, THE BLACKBIRD
Please Log in or Create an account to join the conversation.
- Klipkopwildlife
-

- Offline
- Administrator
-

- I'm supposed to be retired!
05 May 2023 17:27 #4
by Klipkopwildlife
Do it now, you may never get another chance
Replied by Klipkopwildlife on topic A bigger Skyray
No apologies necessary Simon, we all learn something form your posts
Do it now, you may never get another chance
Thanks: Flytilbroke, jon.in.swansea
Please Log in or Create an account to join the conversation.
- Quorneng
-
Topic Author
- Offline
- Forum Master
-
Less
More
- Posts: 9436
- Thank you received: 19043
06 May 2023 17:20 - 06 May 2023 17:22 #5
by Quorneng
Replied by Quorneng on topic A bigger Skyray
The complete duct for the bigger Skyray. The EDF from the smaller one will go on the end.

All printed in LW-PLA using CURA 4.13.1 as this old version 'vase' prints correctly where as the later 5.1.0 does not!
All the sections were printed at 60 mm/s. The lofted inlets used a 45% flow. The six simpler tube sections used a 35% flow. Just over 6 hours total printing!
The duct weighs 36.6g.
It is pretty flexible so will rely heavily on the fuselage formers to resist collapsing when under suction.
Last edit: 06 May 2023 17:22 by Quorneng.
Thanks: Klipkopwildlife, Flytilbroke
Please Log in or Create an account to join the conversation.
- Klipkopwildlife
-
- Offline
- Administrator
-
- I'm supposed to be retired!
08 May 2023 08:35 #6
by Klipkopwildlife
Do it now, you may never get another chance
Replied by Klipkopwildlife on topic A bigger Skyray
Interesting point about Cura. The guys at Planeprint maintain you can only use Cura 5+
Do it now, you may never get another chance
Please Log in or Create an account to join the conversation.
- Quorneng
-
Topic Author
- Offline
- Forum Master
-
Less
More
- Posts: 9436
- Thank you received: 19043
08 May 2023 09:21 - 08 May 2023 09:31 #7
by Quorneng
Replied by Quorneng on topic A bigger Skyray
I suspect the Plane Print stl files do not use the CURA 'vase' print feature directly as the files are likely programmed from scratch.
CURA 5.1.0 really does this on a simple cylinder with the 'vase' print option selected. In doing so it also makes quite a mess of the print.

CURA 4.13.1 prints the same stl file correctly, although it does take a couple of minutes longer to do it even using exactly the same print parameters!

No problem as I have short cuts to both versions on my Desk Top!
Having printed and assembled the duct the next step is to cut out the fuselage formers in 3mm Depron that will directly support it.
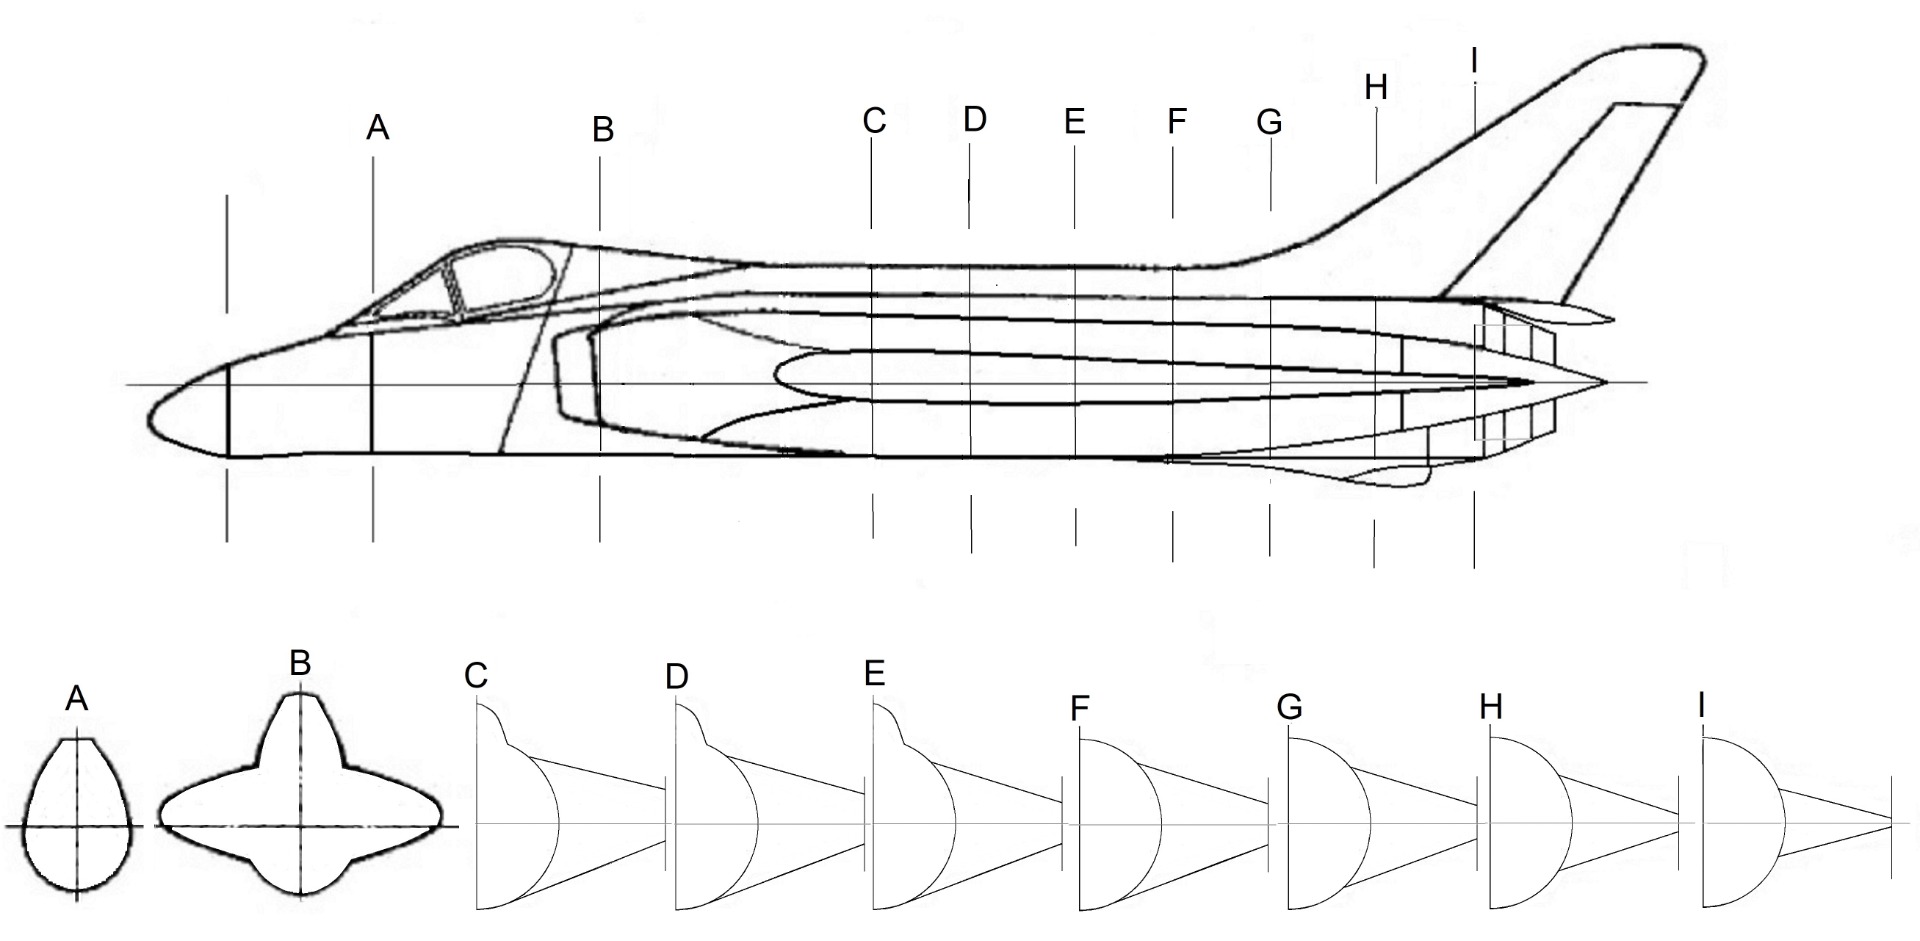
Its is all rather delicate until some of the fuselage skin is in place..
ps
The formers are drawn to the outer profile of the fuselage so they will have to be actually cut out 3mm smaller to allow for the Depron skin thickness.
.
CURA 5.1.0 really does this on a simple cylinder with the 'vase' print option selected. In doing so it also makes quite a mess of the print.
CURA 4.13.1 prints the same stl file correctly, although it does take a couple of minutes longer to do it even using exactly the same print parameters!
No problem as I have short cuts to both versions on my Desk Top!
Having printed and assembled the duct the next step is to cut out the fuselage formers in 3mm Depron that will directly support it.
Its is all rather delicate until some of the fuselage skin is in place..
ps
The formers are drawn to the outer profile of the fuselage so they will have to be actually cut out 3mm smaller to allow for the Depron skin thickness.
Last edit: 08 May 2023 09:31 by Quorneng.
Thanks: Klipkopwildlife
Please Log in or Create an account to join the conversation.
- Quorneng
-
Topic Author
- Offline
- Forum Master
-
Less
More
- Posts: 9436
- Thank you received: 19043
08 May 2023 20:23 - 08 May 2023 20:24 #8
by Quorneng
Replied by Quorneng on topic A bigger Skyray
As Eric pointed out it was a bit wet today so I pressed on adding the fuselage formers to the duct.

Fiddly and time consuming to do as each half former has to be accurately 'fitted' to the duct to get a good glue contact but not to distort it.
I will be a bit happier when the duct inlet is supported and some of the skin goes on.
With the Skyray is its all about the fuselage. The wings, nose and fin are just stuck on.
Last edit: 08 May 2023 20:24 by Quorneng.
Thanks: Klipkopwildlife, THE BLACKBIRD, jon.in.swansea
Please Log in or Create an account to join the conversation.
- Quorneng
-
Topic Author
- Offline
- Forum Master
-
Less
More
- Posts: 9436
- Thank you received: 19043
10 May 2023 19:57 #9
by Quorneng
Replied by Quorneng on topic A bigger Skyray
Well I managed to fall foul of the 3 view. The plan did not match the side view and by quite a long way at that. The side view had the wing about 1 inche further back at the scale I was working at!
So some quick "re alignment" before the glue set rock hard.
I have a 1/72 Skyray plastic kit and the position of the wing agrees pretty closely with the plan 3 view so I am basing everything on that.
The 'fuselage' now looks like this. Front and rear view.


The next target is to Depron skin as much of it as possible for rigidity but limited by the need to be able to run the motor and servo wires through to the cockpit area.
So some quick "re alignment" before the glue set rock hard.
I have a 1/72 Skyray plastic kit and the position of the wing agrees pretty closely with the plan 3 view so I am basing everything on that.
The 'fuselage' now looks like this. Front and rear view.
The next target is to Depron skin as much of it as possible for rigidity but limited by the need to be able to run the motor and servo wires through to the cockpit area.
Thanks: Klipkopwildlife, Flytilbroke
Please Log in or Create an account to join the conversation.
- Quorneng
-
Topic Author
- Offline
- Forum Master
-
Less
More
- Posts: 9436
- Thank you received: 19043
11 May 2023 21:37 #10
by Quorneng
Replied by Quorneng on topic A bigger Skyray
Made a start skinning the underside.
Loads of pins!

That is about the largest panel I was happy with and even then it required quite a bit of 'forming' to be a reasonable fit onto the formers.
Loads of pins!
That is about the largest panel I was happy with and even then it required quite a bit of 'forming' to be a reasonable fit onto the formers.
Thanks: Klipkopwildlife, THE BLACKBIRD, jon.in.swansea
Please Log in or Create an account to join the conversation.
- Quorneng
-
Topic Author
- Offline
- Forum Master
-
Less
More
- Posts: 9436
- Thank you received: 19043
12 May 2023 17:45 #11
by Quorneng
Replied by Quorneng on topic A bigger Skyray
More pins!
Slowly completing the under side skin.
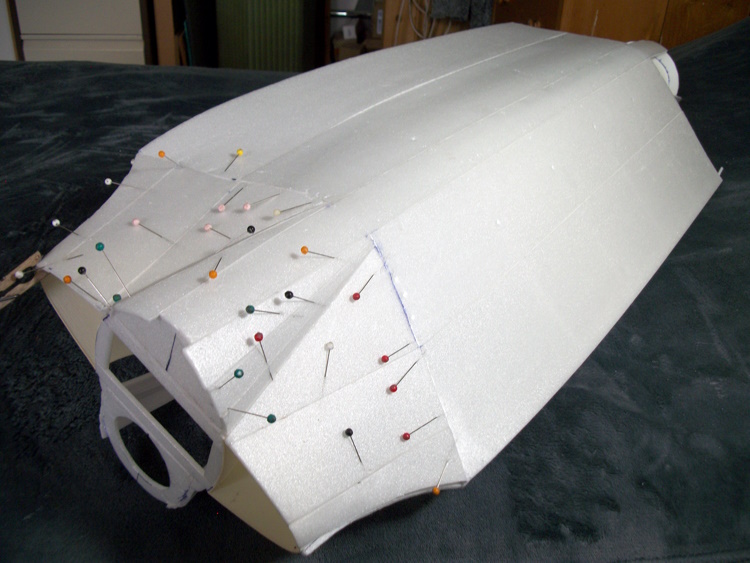
Those pins are holding 11 planks in place each cut and sanded to be an exact fit. It gets rather tedious.

Slowly completing the under side skin.
Those pins are holding 11 planks in place each cut and sanded to be an exact fit. It gets rather tedious.
Thanks: Klipkopwildlife, Flytilbroke
Please Log in or Create an account to join the conversation.
- Quorneng
-
Topic Author
- Offline
- Forum Master
-
Less
More
- Posts: 9436
- Thank you received: 19043
14 May 2023 20:44 #12
by Quorneng
Replied by Quorneng on topic A bigger Skyray
With the fuselage substantially skinned top and bottom it was time to extract the 3D printed motor mount, motor with its 3x4.5 prop from the small Skyray..

Clean up and installed in the Big Skyray fuselage.
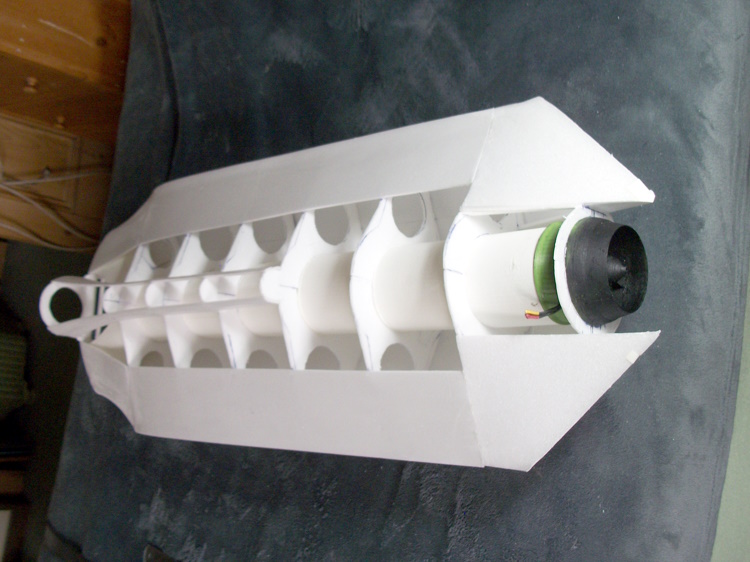
It will easily push the fuselage along the bedspread but it is only taking 7.5A (90W) on a 3s so I might have to go to 4s..
Clean up and installed in the Big Skyray fuselage.
It will easily push the fuselage along the bedspread but it is only taking 7.5A (90W) on a 3s so I might have to go to 4s..
Thanks: Klipkopwildlife, Flytilbroke, THE BLACKBIRD
Please Log in or Create an account to join the conversation.
- Quorneng
-
Topic Author
- Offline
- Forum Master
-
Less
More
- Posts: 9436
- Thank you received: 19043
17 May 2023 21:59 #13
by Quorneng
Replied by Quorneng on topic A bigger Skyray
Next is the nose section. This will give me an idea of far forward the battery will have to go;
My usual formers and a planked half shell built over the plan.

It is completely empty inside.

With a printed nose cone the full nose is glued on..

Next run the 'magnet' motor wires along the fuselage 'spine' to the ESC which will be just in front of the left air intake. Then build and install the fin.
It all feels very light.
My usual formers and a planked half shell built over the plan.
It is completely empty inside.
With a printed nose cone the full nose is glued on..
Next run the 'magnet' motor wires along the fuselage 'spine' to the ESC which will be just in front of the left air intake. Then build and install the fin.
It all feels very light.
Thanks: Eric, Klipkopwildlife, THE BLACKBIRD, jon.in.swansea
Please Log in or Create an account to join the conversation.
- Quorneng
-
Topic Author
- Offline
- Forum Master
-
Less
More
- Posts: 9436
- Thank you received: 19043
18 May 2023 21:32 - 18 May 2023 21:33 #14
by Quorneng
Replied by Quorneng on topic A bigger Skyray
The printed cockpit frames.

3mm "U" channel PLA. Tedious to get exactly right but light and strong.
With a bit of luck it looks like placing the battery under the removeable canopy will get the CofG about right.
3mm "U" channel PLA. Tedious to get exactly right but light and strong.
With a bit of luck it looks like placing the battery under the removeable canopy will get the CofG about right.
Last edit: 18 May 2023 21:33 by Quorneng.
Thanks: Eric, Klipkopwildlife
Please Log in or Create an account to join the conversation.
- Quorneng
-
Topic Author
- Offline
- Forum Master
-
Less
More
- Posts: 9436
- Thank you received: 19043
19 May 2023 18:21 #15
by Quorneng
Replied by Quorneng on topic A bigger Skyray
A video showing the ESC which had been extracted from the small Skyray and the 'magnet wires' to the motor run through each former.
Solid 'varnish' insulated wire is only about half the weight of multi strand silicone insulated wire. An important feature with three 30" (760 mm) long wires!
Solid 'varnish' insulated wire is only about half the weight of multi strand silicone insulated wire. An important feature with three 30" (760 mm) long wires!
Thanks: Klipkopwildlife, Flytilbroke, jon.in.swansea
Please Log in or Create an account to join the conversation.
Time to create page: 0.564 seconds