
- Thank you received: 0
Ian Middlemiss's Ferry 500 - Small-Field EFF Model
- Ex-Member
- Topic Author
- User
-

Less
More
14 Mar 2018 13:04 #1
by Ex-Member
Ian Middlemiss's Ferry 500 - Small-Fieid EFF Model was created by Ex-Member
One of the Peterborough Model Flying Club's more active FF members, Ian Middlemiss, sadly passed away last year, so the Club is celebrating his contribution by having a one-model FF contest this year for his Ferry 500 Electric FF Model. Ian was a master in the art of producing small electrical devices, not least of which is the FET Timer used for this small model.
The formula is a 500mm maximum length and span (or 20" if you prefer) and an engine run of 8". The Club flies from Peterborough's Ferry Meadows, hence the Ferry 500 title. Club members have produced a power pack with two LiPos, a FET timer, motor and several props and a set of laser cut ribs and TEs. So, with such support, the project was too good to miss!
For more details, including the model plan, see: www.peterboroughmfc.org/technical-articl...8/E20Competition.htm
Here's the ribs, set in a block to check size and part sand away the laser burns:
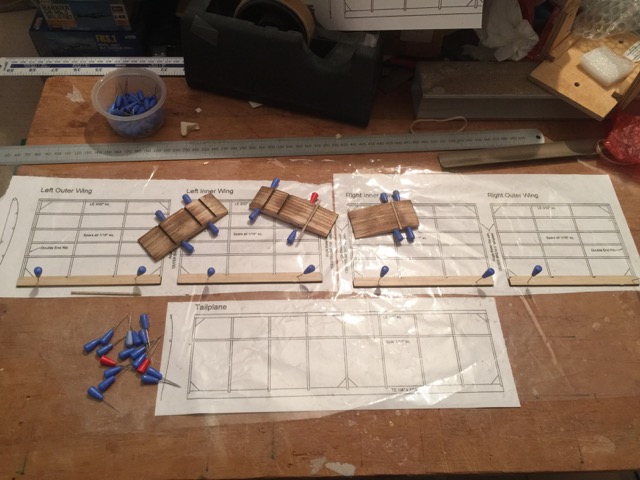
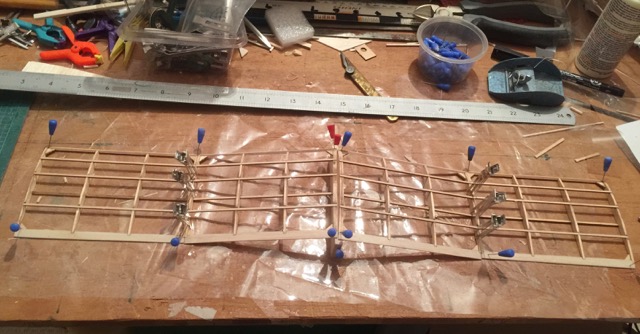
The wings and tailplane were then laid down over the plan:

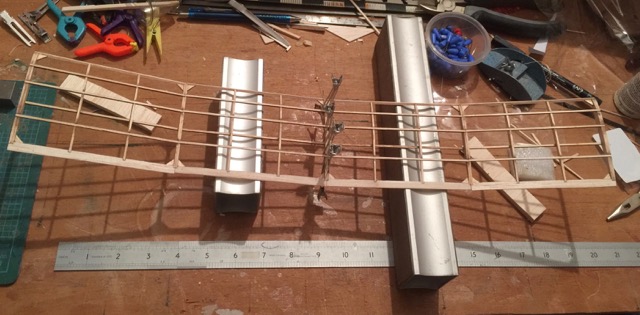
and after drying, removed, tidied and mocked up to check that the span was less than the maximum of 500mm! The two possible fuselage booms are also pictured, one being a 3mm carbon tube and the other a tapered fibreglass chuck glider boom.
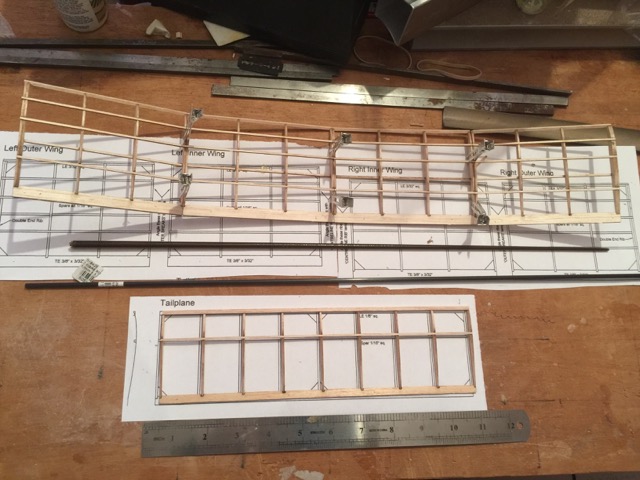
General consensus is that the models need a DT, even with the space we have at Farry and the limited power run, so I'm experimenting with Radio DT for the first time. I'll report back on that when I have the system working...
The formula is a 500mm maximum length and span (or 20" if you prefer) and an engine run of 8". The Club flies from Peterborough's Ferry Meadows, hence the Ferry 500 title. Club members have produced a power pack with two LiPos, a FET timer, motor and several props and a set of laser cut ribs and TEs. So, with such support, the project was too good to miss!
For more details, including the model plan, see: www.peterboroughmfc.org/technical-articl...8/E20Competition.htm
Here's the ribs, set in a block to check size and part sand away the laser burns:
The wings and tailplane were then laid down over the plan:
and after drying, removed, tidied and mocked up to check that the span was less than the maximum of 500mm! The two possible fuselage booms are also pictured, one being a 3mm carbon tube and the other a tapered fibreglass chuck glider boom.
General consensus is that the models need a DT, even with the space we have at Farry and the limited power run, so I'm experimenting with Radio DT for the first time. I'll report back on that when I have the system working...
Please Log in or Create an account to join the conversation.
- one tenor
-

- Offline
- Forum Veteran
-

- johnpcalex@gmail.com
14 Mar 2018 13:26 #2
by one tenor
Anything will fly given enough power
Replied by one tenor on topic Ian Middlemiss's Ferry 500 - Small-Fieid EFF Model
I've seen a radio D/T done with a small servo pulling a pin from a pop up T/P or parachute release..Both on same plane at different times. Would something like that suit Andy. P.S. Are you building 3?
Anything will fly given enough power
Please Log in or Create an account to join the conversation.
- Squirrelnet
- Offline
- Elite Member
-

Less
More
- Posts: 754
- Thank you received: 2067
14 Mar 2018 22:19 #3
by Squirrelnet
Replied by Squirrelnet on topic Ian Middlemiss's Ferry 500 - Small-Fieid EFF Model
The cost of a separate rdt system with dedicated push button tx in addition to my normal rc gear has put me off rdt so I will be very interested to see which system you have gone for. Unfortunately my Multiplex gear is great for gliders but not very good at being versatile 
Please Log in or Create an account to join the conversation.
- Eric
-

- Offline
- Moderator
-

Less
More
- Posts: 13726
- Thank you received: 14467
14 Mar 2018 22:49 #4
by Eric
if you are calm and collected when all about you are going berserk - you've missed something important!
Replied by Eric on topic Ian Middlemiss's Ferry 500 - Small-Fieid EFF Model
Why buy a new radio set? Just use a mini receiver on one channel, controlled by a switch.
(Or would that be too heavy?)
(Or would that be too heavy?)
if you are calm and collected when all about you are going berserk - you've missed something important!
Please Log in or Create an account to join the conversation.
- one tenor
-
- Offline
- Forum Veteran
-
- johnpcalex@gmail.com
14 Mar 2018 23:49 - 15 Mar 2018 00:03 #5
by one tenor
Anything will fly given enough power
Replied by one tenor on topic Ian Middlemiss's Ferry 500 - Small-Fieid EFF Model
If I ever get mobile again I have a new old stock Futaba 3 Ch Rx /Tx kit which would do very nicely with a mini relay
Anything will fly given enough power
Last edit: 15 Mar 2018 00:03 by one tenor. Reason: correction
Please Log in or Create an account to join the conversation.
- Ex-Member
- Topic Author
- User
-
Less
More
- Thank you received: 0
15 Mar 2018 06:13 #6
by Ex-Member
Replied by Ex-Member on topic Ian Middlemiss's Ferry 500 - Small-Fieid EFF Model
Not much to show for the few minutes in the model room yesterday, just 24 gussets!

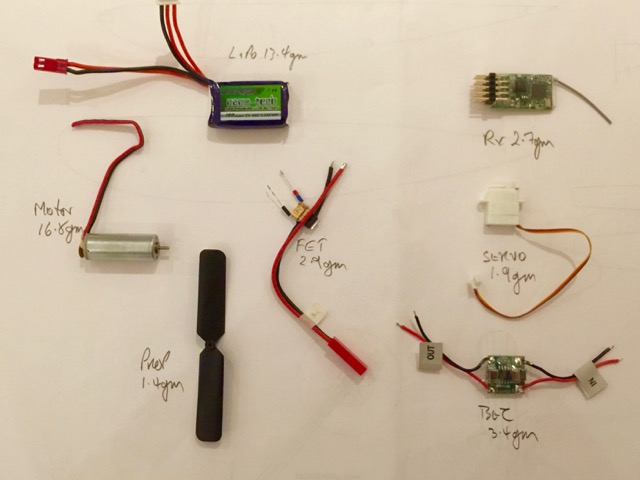
RDT - my main concern was one of weight rather than cost, but the system I'm trying out turned out to be quite reasonably priced:
HobbyKing Micro-Bec: £3.24 (3.4gm)
HK-5320 servo from HobbyKing: £2.92 (1.9gm)
Redcon CM421 4CH Rx from bangGood: £3.49 (2.7gm)
The weights are as measured rather than as advertised. That all adds up to 8.0gm. I could probably save a gram or so by stripping off the connectors I don't need and hard wiring the system, but we'll see as the project progresses.
The power system consists of a 2C LiPo, FET, Motor and Prop, all procured and supplied as a pack by a PMFC member, the whole weighing in at 34.5gm. This means that the model will be carrying a payload of at least 42.5gm, which is rather high for only 20" span, but we shall see!
Here's a pic of the electronic bits, with weights:
RDT - my main concern was one of weight rather than cost, but the system I'm trying out turned out to be quite reasonably priced:
HobbyKing Micro-Bec: £3.24 (3.4gm)
HK-5320 servo from HobbyKing: £2.92 (1.9gm)
Redcon CM421 4CH Rx from bangGood: £3.49 (2.7gm)
The weights are as measured rather than as advertised. That all adds up to 8.0gm. I could probably save a gram or so by stripping off the connectors I don't need and hard wiring the system, but we'll see as the project progresses.
The power system consists of a 2C LiPo, FET, Motor and Prop, all procured and supplied as a pack by a PMFC member, the whole weighing in at 34.5gm. This means that the model will be carrying a payload of at least 42.5gm, which is rather high for only 20" span, but we shall see!
Here's a pic of the electronic bits, with weights:
Please Log in or Create an account to join the conversation.
- Squirrelnet
- Offline
- Elite Member
-
Less
More
- Posts: 754
- Thank you received: 2067
15 Mar 2018 07:10 #7
by Squirrelnet
My Multiplex gear only works with Multiplex Rx's and the smallest is too big ...and £35.
I should look at getting a Spectrum TX or similar so I can use the cheaper rx's
Andy - 42g does sound a lot on a small model, and a lot more than a viscous Tomy Timer.
Replied by Squirrelnet on topic Ian Middlemiss's Ferry 500 - Small-Fieid EFF Model
Why buy a new radio set?
My Multiplex gear only works with Multiplex Rx's and the smallest is too big ...and £35.
I should look at getting a Spectrum TX or similar so I can use the cheaper rx's
Andy - 42g does sound a lot on a small model, and a lot more than a viscous Tomy Timer.
Please Log in or Create an account to join the conversation.
- THE BLACKBIRD
-

- Offline
- Forum Master
-

Less
More
- Posts: 6368
- Thank you received: 10842
15 Mar 2018 07:36 #8
by THE BLACKBIRD
Replied by THE BLACKBIRD on topic Ian Middlemiss's Ferry 500 - Small-Fieid EFF Model
Haaa do you think we will get the boss hooked on radio control :evil:
Interesting project
Interesting project
Please Log in or Create an account to join the conversation.
- Ex-Member
- Topic Author
- User
-
Less
More
- Thank you received: 0
15 Mar 2018 07:59 #9
by Ex-Member
Ha ha....morning BB! You're too late on that one, I've been flying radio since around 1969....but I don't talk about it too much. . I did give it up from 1985 to 2005, but as I was living on Old Warden airfield during the noughties, I decided to get back into it. I got my BMFA 'B' certificate a year or so later and the rest, as they say, is history!
In a spare moment last night I drafted the pylon structure, fin, and prop protector:
Replied by Ex-Member on topic Ian Middlemiss's Ferry 500 - Small-Fieid EFF Model
THE BLACKBIRD wrote: Haaa do you think we will get the boss hooked on radio control :evil:
Interesting project
Ha ha....morning BB! You're too late on that one, I've been flying radio since around 1969....but I don't talk about it too much.
. I did give it up from 1985 to 2005, but as I was living on Old Warden airfield during the noughties, I decided to get back into it. I got my BMFA 'B' certificate a year or so later and the rest, as they say, is history!In a spare moment last night I drafted the pylon structure, fin, and prop protector:
This attachment is hidden for guests.
Please log in or register to see it.
Please log in or register to see it.
Please Log in or Create an account to join the conversation.
- Ex-Member
- Topic Author
- User
-
Less
More
- Thank you received: 0
16 Mar 2018 15:18 #10
by Ex-Member
Replied by Ex-Member on topic Ian Middlemiss's Ferry 500 - Small-Fieid EFF Model
I re-drew the pylon plan as there were a few errors compared to the original model. Half a pylon is currently drying on the work bench:

Please Log in or Create an account to join the conversation.
- Ex-Member
- Topic Author
- User
-
Less
More
- Thank you received: 0
17 Mar 2018 16:11 - 17 Mar 2018 16:11 #11
by Ex-Member
Replied by Ex-Member on topic Ian Middlemiss's Ferry 500 - Small-Fieid EFF Model
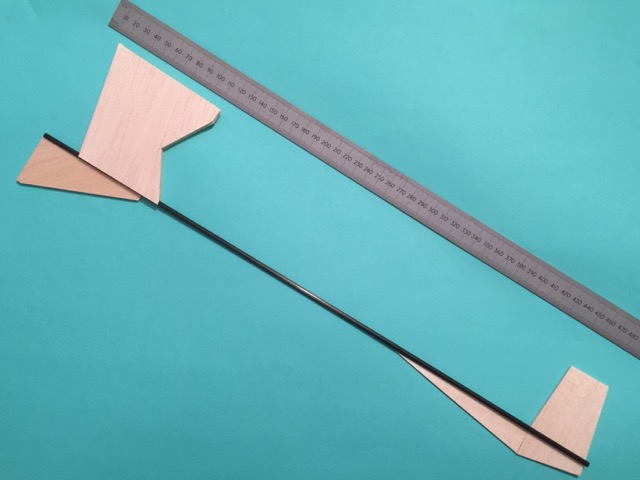
The pylon is now complete with 1.5mm balsa both sides. I also cut some 3mm carbon tube to length for the fuselage, cut the fins from some 1.5mm 'C' grain balsa and cut the prop-protector from 3mm balsa:
Last edit: 17 Mar 2018 16:11 by Ex-Member.
Please Log in or Create an account to join the conversation.
- Ex-Member
- Topic Author
- User
-
Less
More
- Thank you received: 0
18 Mar 2018 06:30 - 18 Mar 2018 06:31 #12
by Ex-Member
Replied by Ex-Member on topic Ian Middlemiss's Ferry 500 - Small-Fieid EFF Model
This one is progressing nicely between other projects. I shaped the LE and TE last night and joined the outer wing panels:
Then this morning, joined the wing on the centre-line:
Then this morning, joined the wing on the centre-line:
Last edit: 18 Mar 2018 06:31 by Ex-Member.
Please Log in or Create an account to join the conversation.
- Ex-Member
- Topic Author
- User
-
Less
More
- Thank you received: 0
19 Mar 2018 17:53 #13
by Ex-Member
Replied by Ex-Member on topic Ian Middlemiss's Ferry 500 - Small-Fieid EFF Model
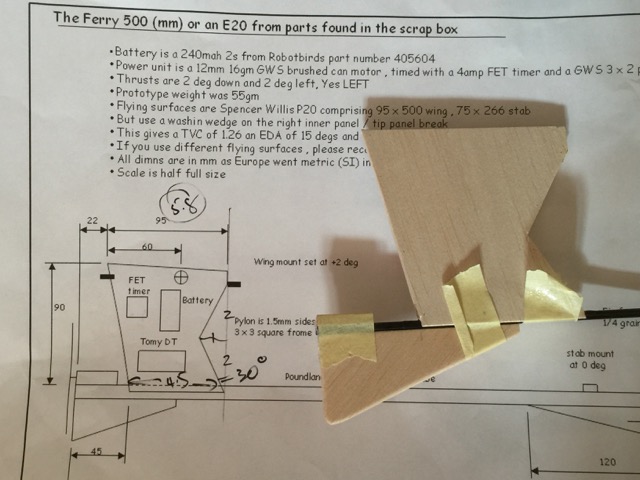
The pylon, prop-protector and motor mount have now been epoxied to the fuselage and the fin to the underfin:

Please Log in or Create an account to join the conversation.
- Ex-Member
- Topic Author
- User
-
Less
More
- Thank you received: 0
23 Mar 2018 18:03 #14
by Ex-Member
Replied by Ex-Member on topic Ian Middlemiss's Ferry 500 - Small-Fieid EFF Model
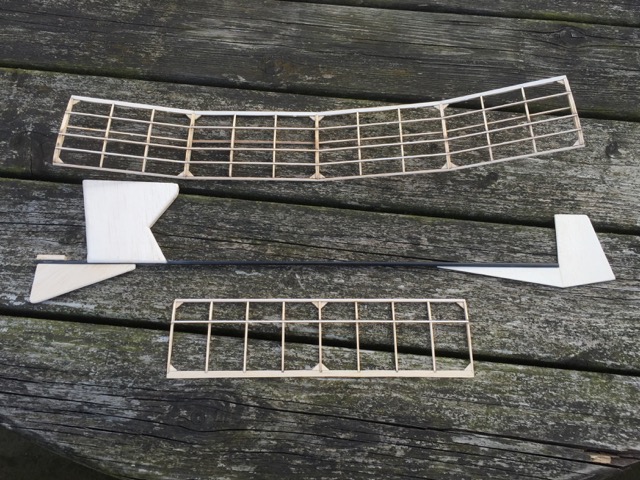
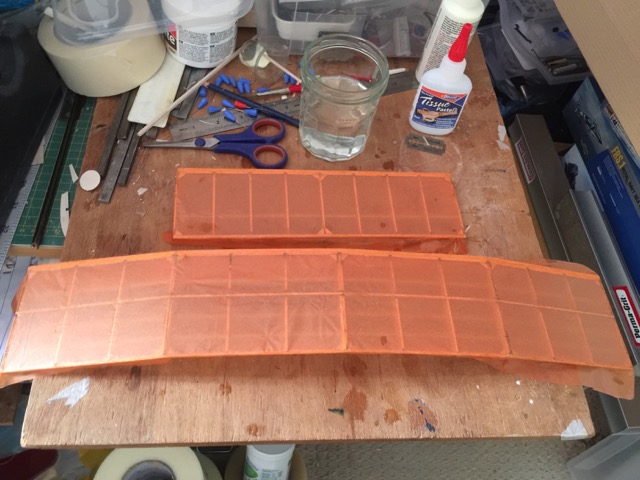
The model was sanded this afternoon and covering commenced:
Please Log in or Create an account to join the conversation.
- Ex-Member
- Topic Author
- User
-
Less
More
- Thank you received: 0
25 Mar 2018 18:10 - 25 Mar 2018 18:12 #15
by Ex-Member
Replied by Ex-Member on topic Ian Middlemiss's Ferry 500 - Small-Fieid EFF Model
The wings and tailplane are now covered. I managed to cover the underside of the flat bottommed wing with one sheet of tissue, but the upper surface required four separate pieces owing to the double-curvature of the wing section and dihedral breaks.
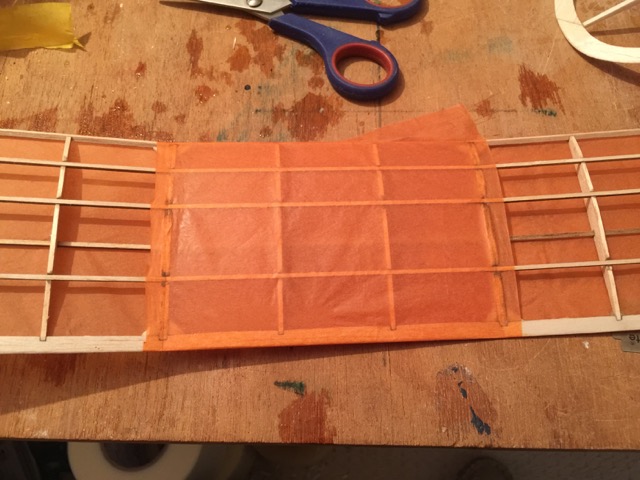

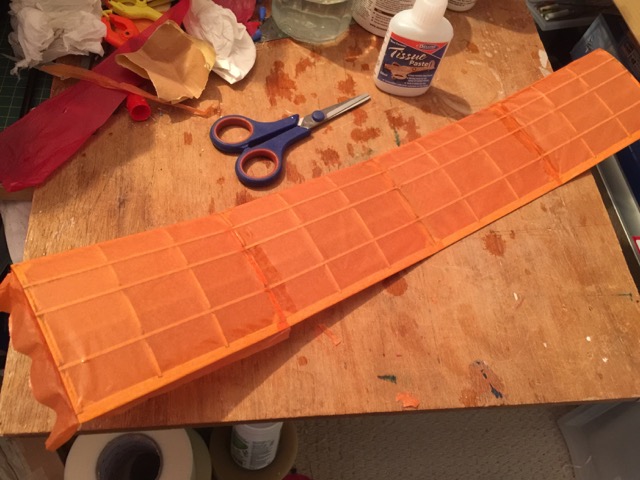
I'm using Esaki tissue from SAMS Models with Deluxe Materials tissue paste as an adhesive. After laying the tissue over the pasted airframe, I rub the edge with my fingers dipped in tap water to seal them...the edges that is, not me fingers! When dry, I lightly run some fine sandpaper over the LE and TE to edge the tissue. I cut it with a razor blade at the dihedral breaks to get a hard edge.
I'm using Esaki tissue from SAMS Models with Deluxe Materials tissue paste as an adhesive. After laying the tissue over the pasted airframe, I rub the edge with my fingers dipped in tap water to seal them...the edges that is, not me fingers!
When dry, I lightly run some fine sandpaper over the LE and TE to edge the tissue. I cut it with a razor blade at the dihedral breaks to get a hard edge.
Last edit: 25 Mar 2018 18:12 by Ex-Member.
Please Log in or Create an account to join the conversation.
Time to create page: 1.512 seconds