
- Posts: 1250
- Thank you received: 1203
Antonov AN 124 Rusian
- crash happy
-

- Offline
- Platinum Member
-

- Oops. did I say that out loud!
Less
More
20 Jan 2020 12:29 #256
by crash happy
Replied by crash happy on topic Antonov AN 124 Rusian
"I suppose with the calm weather really I should actually try and fly the thing. Call me a wimp but I just did not fancy the attempt on a cold, very muddy and wet grass field. If it is to get wrecked it might as well be in the relative warm and dry. "
I can empathise with that ! stunning job.
I can empathise with that ! stunning job.
Thanks: Quorneng
Please Log in or Create an account to join the conversation.
- paul d
-
- Offline
- Forum Veteran
-

Less
More
- Posts: 2074
- Thank you received: 2292
20 Jan 2020 15:38 #257
by paul d
balsa is best.
Replied by paul d on topic Antonov AN 124 Rusian
looks lovely Q, one for a calm day I think.
balsa is best.
Thanks: Quorneng
Please Log in or Create an account to join the conversation.
- Klipkopwildlife
-

- Offline
- Administrator
-

- I'm supposed to be retired!
20 Jan 2020 17:33 #258
by Klipkopwildlife
Do it now, you may never get another chance
Replied by Klipkopwildlife on topic Antonov AN 124 Rusian
I think you'll be pleasantly surprised.
Do it now, you may never get another chance
Please Log in or Create an account to join the conversation.
- Quorneng
-
 Topic Author
- Offline
- Forum Master
-

Less
More
- Posts: 9436
- Thank you received: 19043
21 Sep 2020 23:10 #259
by Quorneng
Replied by Quorneng on topic Antonov AN 124 Rusian
Just for the record the video of it flying.
And for completeness the result of its 3rd flight.:woohoo:
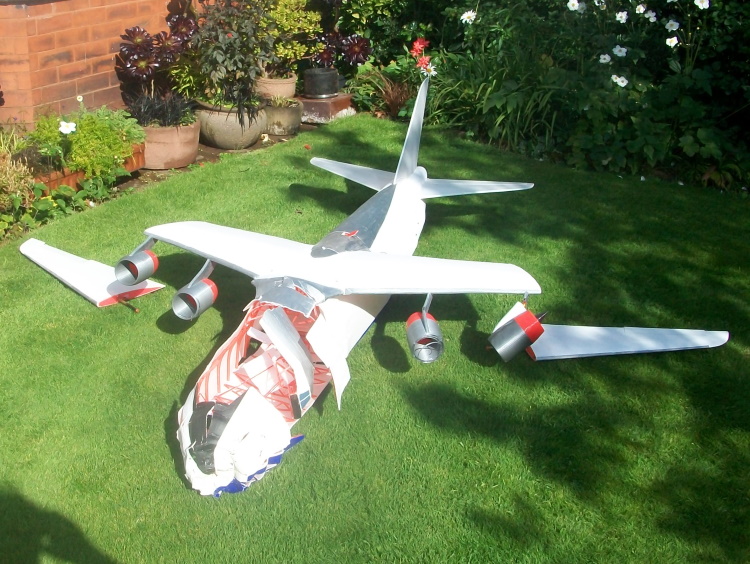
My proposal is not to repair it immediately but to structurally 'tidy up' the bits so they can be stored safely without risking any further damage.
I have made a start on the fuselage.

As all the engine nacelles are seriously damaged there will have to be many hours of printing.
And for completeness the result of its 3rd flight.:woohoo:
My proposal is not to repair it immediately but to structurally 'tidy up' the bits so they can be stored safely without risking any further damage.
I have made a start on the fuselage.
As all the engine nacelles are seriously damaged there will have to be many hours of printing.
Thanks: Klipkopwildlife, THE BLACKBIRD, crash happy
Please Log in or Create an account to join the conversation.
- Quorneng
-
Topic Author
- Offline
- Forum Master
-
Less
More
- Posts: 9436
- Thank you received: 19043
22 Sep 2020 18:30 #260
by Quorneng
Replied by Quorneng on topic Antonov AN 124 Rusian
Slowly working through the 'tidy up'.
The fuselage repaired up to the wing leading edge.

Two new formers had to be printed and some skin replaced but at least the relationship between the wing and tail has been retained.
I hate to think how much printing and build time will be required to make the complete nose section.
The engine nacelles needed some thought as three of the pylons are broken and they have the motor wires running up inside them. :woohoo:
No1 nacelle has been repaired with a printed thin (0.5 mm) plate 'patch' glued either side of the pylon over the break.

No2 nacelle has by far the worst damage.

In fact as well as the pylon break the actual motor mount is broken in several places.

Still thinking about how to fix that.
No3 nacelle pylon has been repaired in the same way as No1.

In addition the damaged first 17 mm on the nacelle inlet has been cut away and a replacement printed (45 minutes!) and glued on.
No4 nacelle is undamaged.
Apart from everything else I really want to increase the size of the ailerons and to add a working rudder but the CofG cannot go any further aft. I don't do ballast.
.
The fuselage repaired up to the wing leading edge.
Two new formers had to be printed and some skin replaced but at least the relationship between the wing and tail has been retained.
I hate to think how much printing and build time will be required to make the complete nose section.
The engine nacelles needed some thought as three of the pylons are broken and they have the motor wires running up inside them. :woohoo:
No1 nacelle has been repaired with a printed thin (0.5 mm) plate 'patch' glued either side of the pylon over the break.
No2 nacelle has by far the worst damage.
In fact as well as the pylon break the actual motor mount is broken in several places.
Still thinking about how to fix that.
No3 nacelle pylon has been repaired in the same way as No1.
In addition the damaged first 17 mm on the nacelle inlet has been cut away and a replacement printed (45 minutes!) and glued on.
No4 nacelle is undamaged.
Apart from everything else I really want to increase the size of the ailerons and to add a working rudder but the CofG cannot go any further aft. I don't do ballast.
.
Thanks: Klipkopwildlife, Flytilbroke, THE BLACKBIRD, crash happy
Please Log in or Create an account to join the conversation.
- THE BLACKBIRD
-

- Offline
- Forum Master
-
Less
More
- Posts: 6368
- Thank you received: 10844
23 Sep 2020 11:20 #261
by THE BLACKBIRD
Replied by THE BLACKBIRD on topic Antonov AN 124 Rusian
Thats a real shame, what caused the crash, lack of power ? when you had power on then turned it off i could not see the difference in speed, must be my eye sight,
Thanks: Klipkopwildlife
Please Log in or Create an account to join the conversation.
- Quorneng
-
Topic Author
- Offline
- Forum Master
-
Less
More
- Posts: 9436
- Thank you received: 19043
23 Sep 2020 12:44 #262
by Quorneng
Replied by Quorneng on topic Antonov AN 124 Rusian
BB
Not lack of power (which is surprisingly quite adequate) but a structural failure. :woohoo: The right hand outer wing panel pulled out just far enough to release it from its locating pins!
The wing panel join tube is a 'friction' tight fit but the wing also carries the ailerons so it probably gets 'wiggled' a bit which which may have caused it to work out.
Lesson learned. If and when it gets rebuilt those wing panels will have retaining cross pins as well.
In the video I was flying pretty gently so when the power was off it did not alter the flying speed by much, it just went from slow to slightly slower.
Thanks: Klipkopwildlife, THE BLACKBIRD
Please Log in or Create an account to join the conversation.
- Klipkopwildlife
-
- Offline
- Administrator
-
- I'm supposed to be retired!
23 Sep 2020 13:20 #263
by Klipkopwildlife
Do it now, you may never get another chance
Replied by Klipkopwildlife on topic Antonov AN 124 Rusian
Point to all, "friction fits" have no place in RC! Thanks for being honest Simon, in a parallel world it might have hit someone!
Do it now, you may never get another chance
Thanks: Mowerman, crash happy
Please Log in or Create an account to join the conversation.
- Quorneng
-
Topic Author
- Offline
- Forum Master
-
Less
More
- Posts: 9436
- Thank you received: 19043
24 Sep 2020 12:25 - 24 Sep 2020 12:27 #264
by Quorneng
Replied by Quorneng on topic Antonov AN 124 Rusian
Klippy
I am not sure about friction fit having no place in RC. Surely it is not uncommon for the wings on many planes to be retained by just a joining tube relying just on friction to stop it working out. My ST330 (a Radian clone) certainly does although in that case the aligning pins (actually more like lugs) are quite big and long.
Anyway I have made some progress on restoring the Antonov.
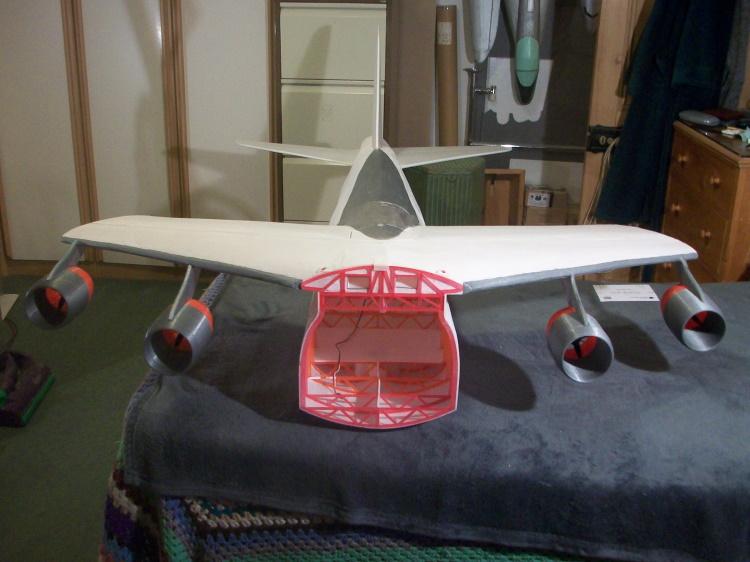
The wing centre section is restored and the nacelles are all repaired and tested.
As hoped the wing and tail plane are still in line!
I have also arranged for the batteries in the wing to be able to slide further forward actually into the forward fuselage to adjust the CofG both because it flew a bit tail heavy and to be able to compensate for the weight associated by adding a working rudder.
Obviously the next big task is rebuilding the nose. Apart from the physical building time each fuselage former takes up to an hour to print and there are a total of 15 them!
I am not sure about friction fit having no place in RC. Surely it is not uncommon for the wings on many planes to be retained by just a joining tube relying just on friction to stop it working out. My ST330 (a Radian clone) certainly does although in that case the aligning pins (actually more like lugs) are quite big and long.
Anyway I have made some progress on restoring the Antonov.
The wing centre section is restored and the nacelles are all repaired and tested.
As hoped the wing and tail plane are still in line!
I have also arranged for the batteries in the wing to be able to slide further forward actually into the forward fuselage to adjust the CofG both because it flew a bit tail heavy and to be able to compensate for the weight associated by adding a working rudder.
Obviously the next big task is rebuilding the nose. Apart from the physical building time each fuselage former takes up to an hour to print and there are a total of 15 them!
Last edit: 24 Sep 2020 12:27 by Quorneng.
Thanks: Eric, Klipkopwildlife, THE BLACKBIRD
Please Log in or Create an account to join the conversation.
- Klipkopwildlife
-
- Offline
- Administrator
-
- I'm supposed to be retired!
24 Sep 2020 13:40 #265
by Klipkopwildlife
Do it now, you may never get another chance
Replied by Klipkopwildlife on topic Antonov AN 124 Rusian
To be honest Simon, it was a bit of a "throw away line" for which I apologise, I'm afraid my Shingles were biting particularly badly yesterday. You're quite correct about friction fits, the wings on my Tiger Moth are attached in the same fashion, but when I get back to it I will make sure there's no possibility of the wings working outwards, the friction can only get less with time. My first thought was a screw through the wing into the CF spar, duh!
Do it now, you may never get another chance
Please Log in or Create an account to join the conversation.
- Ralpharr2001
-

- Offline
- Elite Member
-

Less
More
- Posts: 496
- Thank you received: 1484
24 Sep 2020 13:47 #266
by Ralpharr2001
I'm currently unsupervised. I know it freaks me out as well, but the possibilities are endless!!
Replied by Ralpharr2001 on topic Antonov AN 124 Rusian
Q, have your seen these wing connector clips from Multiplex? I'm sure you could design and 3D print something similar.


I'm currently unsupervised. I know it freaks me out as well, but the possibilities are endless!!
Thanks: Klipkopwildlife
Please Log in or Create an account to join the conversation.
- Klipkopwildlife
-
- Offline
- Administrator
-
- I'm supposed to be retired!
24 Sep 2020 13:57 #267
by Klipkopwildlife
Do it now, you may never get another chance
Replied by Klipkopwildlife on topic Antonov AN 124 Rusian
Looks good Ralph, I take it the red wedge is for disassembling the wings.
Do it now, you may never get another chance
Please Log in or Create an account to join the conversation.
- paul d
-
- Offline
- Forum Veteran
-
Less
More
- Posts: 2074
- Thank you received: 2292
24 Sep 2020 14:21 #268
by paul d
balsa is best.
Replied by paul d on topic Antonov AN 124 Rusian
Blimey Simon I didn't know the wings "just" plugged in!! rebuild is looking good though, really enjoyed the flying video.
balsa is best.
Please Log in or Create an account to join the conversation.
- Quorneng
-
Topic Author
- Offline
- Forum Master
-
Less
More
- Posts: 9436
- Thank you received: 19043
24 Sep 2020 16:41 - 24 Sep 2020 16:42 #269
by Quorneng
Replied by Quorneng on topic Antonov AN 124 Rusian
Ralph
Yes that sort of thing is a possibility but still with a clear mental image of the Antonov spiralling in I favour putting a pin vertically through the spar flanges and through end of the joiner tube. As long as that pin is in place the wing panel might snap off but it simply will not come out.
The outer wing panel joining tubes are quite long so I did not expect any unwanted movement but on the principle of belts and braces the rear locating pins have also been revised so they are both stronger and longer so even if the wing moves out a little bit they will not 'let go'.

Slowly started printing the new fuselage formers.
1 hour 4 minutes to do that lot.
Yes that sort of thing is a possibility but still with a clear mental image of the Antonov spiralling in I favour putting a pin vertically through the spar flanges and through end of the joiner tube. As long as that pin is in place the wing panel might snap off but it simply will not come out.
The outer wing panel joining tubes are quite long so I did not expect any unwanted movement but on the principle of belts and braces the rear locating pins have also been revised so they are both stronger and longer so even if the wing moves out a little bit they will not 'let go'.
Slowly started printing the new fuselage formers.
1 hour 4 minutes to do that lot.
Last edit: 24 Sep 2020 16:42 by Quorneng.
Thanks: Klipkopwildlife, THE BLACKBIRD
Please Log in or Create an account to join the conversation.
- Eric
-

- Offline
- Moderator
-

Less
More
- Posts: 13729
- Thank you received: 14473
24 Sep 2020 18:11 #270
by Eric
if you are calm and collected when all about you are going berserk - you've missed something important!
Replied by Eric on topic Antonov AN 124 Rusian
The outer panels on my 12' Aether are only friction fit, as are the wings of my Excalibur v-tail missile, although they DO have a little 'servo -screw' into a plastic block to stop them creeping out. The plastic block is only tacked on with UHU!
-
No, Klippy, drilling a hole in a carbon spar for a locking screw is not a good idea! :woohoo: Instant stress point! But I think you had already realized that!
-
No, Klippy, drilling a hole in a carbon spar for a locking screw is not a good idea! :woohoo: Instant stress point! But I think you had already realized that!
if you are calm and collected when all about you are going berserk - you've missed something important!
Thanks: Klipkopwildlife
Please Log in or Create an account to join the conversation.
Time to create page: 1.217 seconds