
- Thank you received: 0
Blackburn 1912 Monoplane - 48" (1220mm) PAW Diesel
- Ex-Member
- Topic Author
- User
-

Less
More
01 Feb 2015 10:56 - 01 Feb 2015 10:58 #1
by Ex-Member
Blackburn 1912 Monoplane - 48" (1220mm) PAW Diesel was created by Ex-Member
This is the last new build start in the current series and it 'should' take priority as I'll need it for the AeroModeller/Model Aircraft Scale Plans event at the BMFA FF Nationals at the end of May.
I started the APS (AeroModeller Plans Service) ANEC IV with a view to getting it ready in time, but I've hit a snag with the construction that may take a long time to research/fix, so I needed something quick to build that I knew will fly............and having built one some 50 years ago with the 50 year old plan still in my plans chest, it was another that was too good to miss.
Mods to the plan are acceptable, so I'm reducing the size of the tailplane wood to 3/16" sq:

Here's a few I built earlier....a lot earlier in the first case......... 1965 in fact!
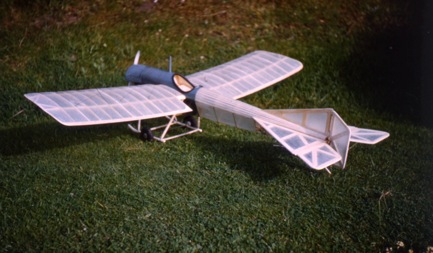
Another, smaller version, came along in 1982. It's being held here by my good friend, modeller, historic aircraft pilot and CBSFM DJ Dan Taylor. I'm holding his Pistachio version and the photo was taken in the Cottage I rented on Old Warden airfield circa 2006

This one was an all-sheet version of the Blackburn School Monoplane designed and built for a BMFA competition circa 1990. The photo was taken at an event I ran in RAFMAA circa 1989.

A copy of the plan I'm using can be downloaded here: www.outerzone.co.uk/plan_details.asp?ID=4772
I started the APS (AeroModeller Plans Service) ANEC IV with a view to getting it ready in time, but I've hit a snag with the construction that may take a long time to research/fix, so I needed something quick to build that I knew will fly............and having built one some 50 years ago with the 50 year old plan still in my plans chest, it was another that was too good to miss.
Mods to the plan are acceptable, so I'm reducing the size of the tailplane wood to 3/16" sq:
Here's a few I built earlier....a lot earlier in the first case......... 1965 in fact!
Another, smaller version, came along in 1982. It's being held here by my good friend, modeller, historic aircraft pilot and CBSFM DJ Dan Taylor. I'm holding his Pistachio version and the photo was taken in the Cottage I rented on Old Warden airfield circa 2006
This one was an all-sheet version of the Blackburn School Monoplane designed and built for a BMFA competition circa 1990. The photo was taken at an event I ran in RAFMAA circa 1989.
A copy of the plan I'm using can be downloaded here: www.outerzone.co.uk/plan_details.asp?ID=4772
Last edit: 01 Feb 2015 10:58 by Ex-Member. Reason: magazine title wrong - model Aircraft, not Model Maker
Please Log in or Create an account to join the conversation.
- Ex-Member
- Topic Author
- User
-
Less
More
- Thank you received: 0
03 Feb 2015 10:02 - 03 Feb 2015 10:04 #2
by Ex-Member
Replied by Ex-Member on topic Blackburn 1912 Monoplane - 48" (1220mm) PAW Diesel
Made a start this morning, but half the time was spent looking out my 'large model' tools. The saw was modified in the early sixties to allow it to cut down to the board, but the mitre block is relatively new being only about 10 yrs old.
I managed to lay down most of the fin before visitors intervened! The blocks are left over from the Mini-Caprice fuselage build, the wood used is hard 3/16" sq (4.5mm) and the adhesive is Aliphatic resin - a white glue that sands well when dry.

I managed to lay down most of the fin before visitors intervened! The blocks are left over from the Mini-Caprice fuselage build, the wood used is hard 3/16" sq (4.5mm) and the adhesive is Aliphatic resin - a white glue that sands well when dry.
Last edit: 03 Feb 2015 10:04 by Ex-Member. Reason: sp more detail
Please Log in or Create an account to join the conversation.
- Ex-Member
- Topic Author
- User
-
Less
More
- Thank you received: 0
03 Feb 2015 20:36 #3
by Ex-Member
Replied by Ex-Member on topic Blackburn 1912 Monoplane - 48" (1220mm) PAW Diesel
Former cutting this evening:

Please Log in or Create an account to join the conversation.
- martynk
-
- Offline
- Premium Member
-

04 Feb 2015 15:30 #4
by martynk
--
Martyn
mad-aeromodeller.blogspot.co.uk/
Replied by martynk on topic Blackburn 1912 Monoplane - 48" (1220mm) PAW Diesel
Looking forward to this Andy.. Are you keeping the same dihedral? - it looks like it would be OK with a little less
Martyn
Martyn
--
Martyn
mad-aeromodeller.blogspot.co.uk/
Please Log in or Create an account to join the conversation.
- Ex-Member
- Topic Author
- User
-
Less
More
- Thank you received: 0
04 Feb 2015 21:22 #5
by Ex-Member
Replied by Ex-Member on topic Blackburn 1912 Monoplane - 48" (1220mm) PAW Diesel
Still cutting out bits!

Thanks Martyn. My small Blackburn flew quite nicely with scale dihedral, so I see no reason why this one shouldn't.
Thanks Martyn. My small Blackburn flew quite nicely with scale dihedral, so I see no reason why this one shouldn't.
Please Log in or Create an account to join the conversation.
- martynk
-
- Offline
- Premium Member
-
05 Feb 2015 11:01 #6
by martynk
--
Martyn
mad-aeromodeller.blogspot.co.uk/
Replied by martynk on topic Blackburn 1912 Monoplane - 48" (1220mm) PAW Diesel
Hi Andy
What engine are you using for this - I assume its the PAW 1.5 - is that correct?
Martyn
What engine are you using for this - I assume its the PAW 1.5 - is that correct?
Martyn
--
Martyn
mad-aeromodeller.blogspot.co.uk/
Please Log in or Create an account to join the conversation.
- Ex-Member
- Topic Author
- User
-
Less
More
- Thank you received: 0
05 Feb 2015 11:43 #7
by Ex-Member
Replied by Ex-Member on topic Blackburn 1912 Monoplane - 48" (1220mm) PAW Diesel
Work today has included stripping spars from 1metre lengths of balsa:

And making up the tailplane:

Not sure yet on the engine Martyn. The plan shows a Mills 0.75, which I used in my original model. I also used a Frog 80 and both provided adequate power but the Mills stuck out of the top of the cowl. I'm planning on the PAW 06 (~1.0cc), but if it isn't powerful enough, then I'll use the PAW 09 (~1.5cc)
And making up the tailplane:
Not sure yet on the engine Martyn. The plan shows a Mills 0.75, which I used in my original model. I also used a Frog 80 and both provided adequate power but the Mills stuck out of the top of the cowl. I'm planning on the PAW 06 (~1.0cc), but if it isn't powerful enough, then I'll use the PAW 09 (~1.5cc)
Please Log in or Create an account to join the conversation.
- Ex-Member
- Topic Author
- User
-
Less
More
- Thank you received: 0
06 Feb 2015 12:24 #8
by Ex-Member
Replied by Ex-Member on topic Blackburn 1912 Monoplane - 48" (1220mm) PAW Diesel
Had a productive morning this morning.
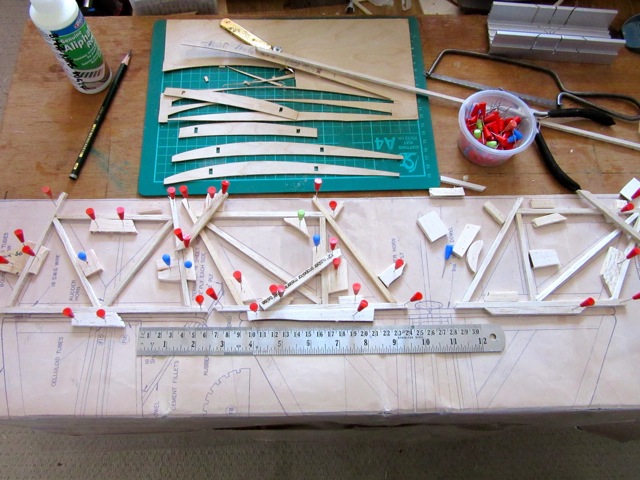
Elevators and rudder have been assembled and the plywood ribs cut:
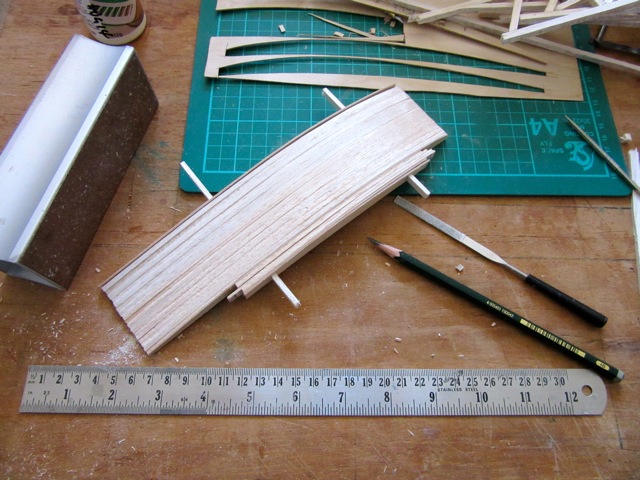
All wing ribs have been slotted onto stub spars and sanded:
Port wing construction commenced - ribs slotted onto spars and left and right TE's pinned together so that rib slots can be filed in same position and to same depth:
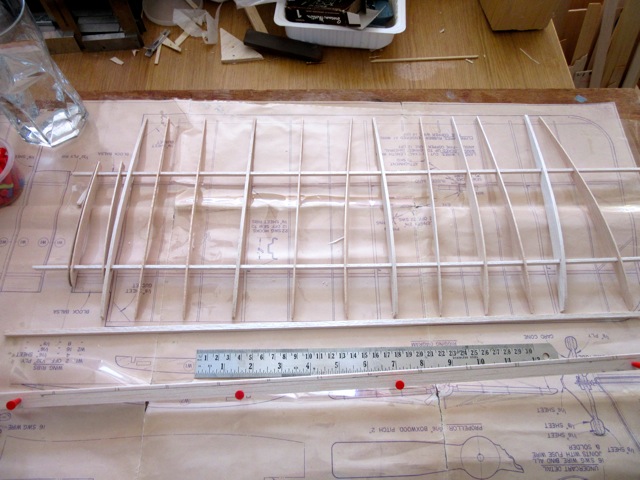
Port wing dry assembled. One or two of the ribs are over length and at least one is too short. Once I've sorted that, I'll jig the ribs upright, then drop Superphatic ( a dilute aliphatic resin) on all the joints to fix 'em.
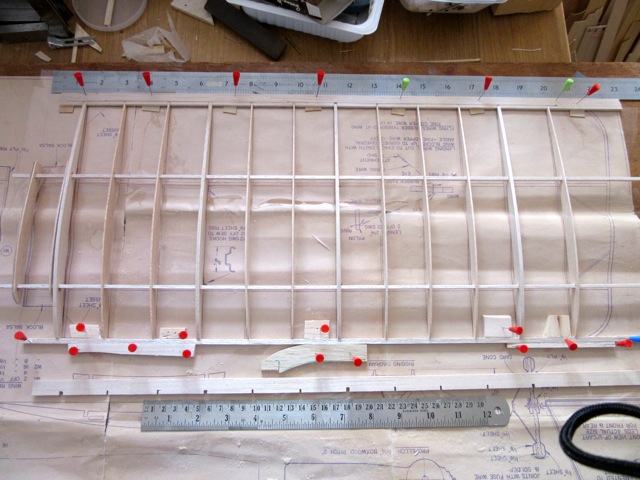

Elevators and rudder have been assembled and the plywood ribs cut:
All wing ribs have been slotted onto stub spars and sanded:
Port wing construction commenced - ribs slotted onto spars and left and right TE's pinned together so that rib slots can be filed in same position and to same depth:
Port wing dry assembled. One or two of the ribs are over length and at least one is too short. Once I've sorted that, I'll jig the ribs upright, then drop Superphatic ( a dilute aliphatic resin) on all the joints to fix 'em.
Please Log in or Create an account to join the conversation.
- martynk
-
- Offline
- Premium Member
-
06 Feb 2015 16:50 - 06 Feb 2015 16:50 #9
by martynk
--
Martyn
mad-aeromodeller.blogspot.co.uk/
Replied by martynk on topic Blackburn 1912 Monoplane - 48" (1220mm) PAW Diesel
That looks good. How do you cut the holes for the spars so accurately? I guess a derivative of the sandwich technique. I always struggle cutting holes in balsa - I find the wood tears too easily.
--
Martyn
mad-aeromodeller.blogspot.co.uk/
Last edit: 06 Feb 2015 16:50 by martynk.
Please Log in or Create an account to join the conversation.
- Ex-Member
- Topic Author
- User
-
Less
More
- Thank you received: 0
06 Feb 2015 19:37 #10
by Ex-Member
It's a combination of good quality balsa, a sharp blade and technique.
Balsa - I needed some 1/64" ply this morning so I went searching on the net and found some at The Balsa Cabin. On looking closer, they do wood in four grades: Contest, soft, medium and hard and in C grain too. The contest stuff and C grain is sold at a premium price, but it looks like good value to me. I've ordered a selection and will report back when it arrives.
Sharp blade - the latest Swan Morton blades don't appear to hold an edge as well as the old ones - it just aint like it used to be, is it! Either way, I keep a good eye on how the cutting is going and re-hone the blade on an oil stone as required. The small one I use is top right in the first picture in post no 7 - I acquired it in the 60s from my uncle Geoff when he was working as a rep for Norton Abrasives. The blade I use has a fine point and is sold under the description of: Swan Morton No 1. There are two brass handled Swan Morton knives with No 1 blades in the second pic of post no 7.
Technique: I cut all the ribs using a template with the spar holes slightly undersize. When all have been cut, I thread them onto undersize spars and pin them in place. The undersize spars are removed one at a time and the holes filed to size using a flat and/or square file. I then thread in the correct size spars and finally clean up the outside edge of the ribs.
Final work today included gluing up the port wing - no photo as it looks just the same as in the previous post....
Replied by Ex-Member on topic Blackburn 1912 Monoplane - 48" (1220mm) PAW Diesel
martynk wrote: That looks good. How do you cut the holes for the spars so accurately? ...........
It's a combination of good quality balsa, a sharp blade and technique.
Balsa - I needed some 1/64" ply this morning so I went searching on the net and found some at The Balsa Cabin. On looking closer, they do wood in four grades: Contest, soft, medium and hard and in C grain too. The contest stuff and C grain is sold at a premium price, but it looks like good value to me. I've ordered a selection and will report back when it arrives.
Sharp blade - the latest Swan Morton blades don't appear to hold an edge as well as the old ones - it just aint like it used to be, is it! Either way, I keep a good eye on how the cutting is going and re-hone the blade on an oil stone as required. The small one I use is top right in the first picture in post no 7 - I acquired it in the 60s from my uncle Geoff when he was working as a rep for Norton Abrasives. The blade I use has a fine point and is sold under the description of: Swan Morton No 1. There are two brass handled Swan Morton knives with No 1 blades in the second pic of post no 7.
Technique: I cut all the ribs using a template with the spar holes slightly undersize. When all have been cut, I thread them onto undersize spars and pin them in place. The undersize spars are removed one at a time and the holes filed to size using a flat and/or square file. I then thread in the correct size spars and finally clean up the outside edge of the ribs.
Final work today included gluing up the port wing - no photo as it looks just the same as in the previous post....
Please Log in or Create an account to join the conversation.
- Ex-Member
- Topic Author
- User
-
Less
More
- Thank you received: 0
07 Feb 2015 06:53 #11
by Ex-Member
Replied by Ex-Member on topic Blackburn 1912 Monoplane - 48" (1220mm) PAW Diesel
The stbd wing has been laid down and is currently drying and the port wing root ribs have been laminated. I used the port wing plan to build the stbd to ensure that both wings are the same size.

Please Log in or Create an account to join the conversation.
- Ex-Member
- User
-
Less
More
- Thank you received: 0
07 Feb 2015 08:09 #12
by Ex-Member
Replied by Ex-Member on topic Blackburn 1912 Monoplane - 48" (1220mm) PAW Diesel
lovely looking work yet again from the young master.
going to be a beautiful model when finished.
going to be a beautiful model when finished.
Please Log in or Create an account to join the conversation.
- Ex-Member
- Topic Author
- User
-
Less
More
- Thank you received: 0
07 Feb 2015 17:18 - 07 Feb 2015 17:20 #13
by Ex-Member
Replied by Ex-Member on topic Blackburn 1912 Monoplane - 48" (1220mm) PAW Diesel
Thanks Tony.
Today saw the removal of the stbd wing off the board, the cutting of ply parts for the fus and the laying down of the fuselage crutch:
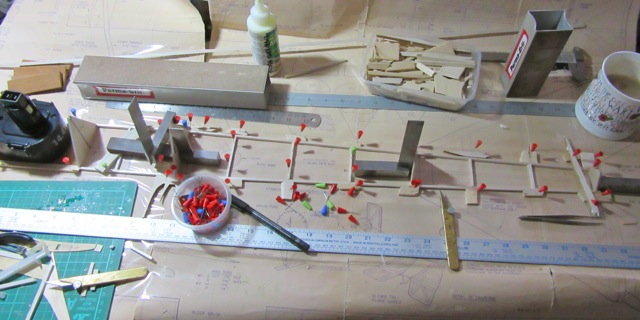
when dry, lower formers were added:

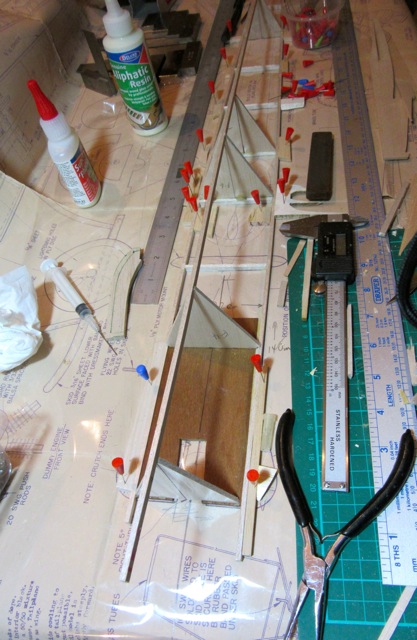
and when that was dry, the lower spine was fitted to the apex of the formers:

Work on the stbd wing continued with the root ribs being laminated and gussets were added to both wing roots and the outer edge of the elevators.
I'm not used to working this big, and looking back, it's the biggest model I've built in the last 30 odd years! :lol: :lol:
Today saw the removal of the stbd wing off the board, the cutting of ply parts for the fus and the laying down of the fuselage crutch:
when dry, lower formers were added:
and when that was dry, the lower spine was fitted to the apex of the formers:
Work on the stbd wing continued with the root ribs being laminated and gussets were added to both wing roots and the outer edge of the elevators.
I'm not used to working this big, and looking back, it's the biggest model I've built in the last 30 odd years! :lol: :lol:
Last edit: 07 Feb 2015 17:20 by Ex-Member. Reason: Sp and more detail
Please Log in or Create an account to join the conversation.
- Ex-Member
- Topic Author
- User
-
Less
More
- Thank you received: 0
08 Feb 2015 12:22 #14
by Ex-Member
Replied by Ex-Member on topic Blackburn 1912 Monoplane - 48" (1220mm) PAW Diesel
Spent a morning doing fiddley bits today - you know, those that take a long time, but there's little to show for it visually.
Fuselage uprights have been sized and fitted where appropriate. Front former has also been moved to correct position.......
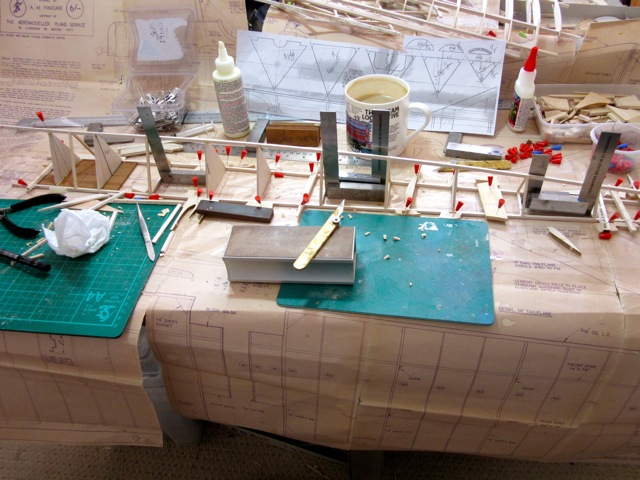
...and while that was drying I started cutting cores for the wing tips and tidying the wing roots:

Fuselage uprights have been sized and fitted where appropriate. Front former has also been moved to correct position.......
...and while that was drying I started cutting cores for the wing tips and tidying the wing roots:
Please Log in or Create an account to join the conversation.
- Ex-Member
- User
-
Less
More
- Thank you received: 0
08 Feb 2015 12:28 #15
by Ex-Member
Replied by Ex-Member on topic Blackburn 1912 Monoplane - 48" (1220mm) PAW Diesel
Lovely work as usual sir.
going to be a big un then.
going to be a big un then.
Please Log in or Create an account to join the conversation.
Time to create page: 1.354 seconds