
- Thank you received: 0
Blackburn 1912 Monoplane - 48" (1220mm) PAW Diesel
- Ex-Member
- User
-

Less
More
15 Feb 2015 17:29 #31
by Ex-Member
Replied by Ex-Member on topic Blackburn 1912 Monoplane - 48" (1220mm) PAW Diesel
"WOW" that is some delicate work there Andy.
Please Log in or Create an account to join the conversation.
- Ex-Member
- Topic Author
- User
-
Less
More
- Thank you received: 0
15 Feb 2015 17:44 #32
by Ex-Member
Replied by Ex-Member on topic Blackburn 1912 Monoplane - 48" (1220mm) PAW Diesel
The UC tubes are now in place:

Not sure what to work on next: wing rigging posts, fuselage sheeting, UC, Pylon, engine installation, empennage finishing and hinging.......I'll see where the whim takes me next time I'm in the model room.
Not sure what to work on next: wing rigging posts, fuselage sheeting, UC, Pylon, engine installation, empennage finishing and hinging.......I'll see where the whim takes me next time I'm in the model room.
Please Log in or Create an account to join the conversation.
- Ex-Member
- Topic Author
- User
-
Less
More
- Thank you received: 0
16 Feb 2015 20:21 #33
by Ex-Member
Replied by Ex-Member on topic Blackburn 1912 Monoplane - 48" (1220mm) PAW Diesel
Back to the drawing board again today.
The model plan shows the rigging attached to the wing by hooks:

Whereas on the full size, it's attached by a bolt through two plates either side of the wing spar:

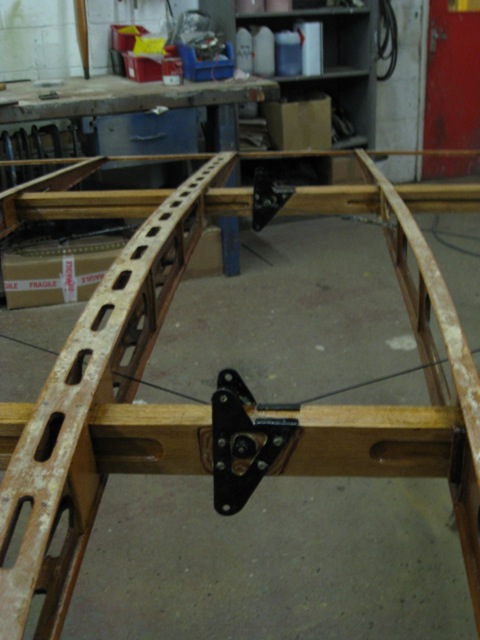
As well as being more 'scale' the latter will make the model easier to rig - from experience, getting the loops over a hook can be quite frustrating.
Scale plates are only 3.5mm proud of the wing surface and 4mm wide. I've sketched out a few shapes and twice size appears to be workable from a practical point of view and shouldn't be too excessive for scale. I'll start cutting wood tomorrow.
The model plan shows the rigging attached to the wing by hooks:
Whereas on the full size, it's attached by a bolt through two plates either side of the wing spar:
As well as being more 'scale' the latter will make the model easier to rig - from experience, getting the loops over a hook can be quite frustrating.
Scale plates are only 3.5mm proud of the wing surface and 4mm wide. I've sketched out a few shapes and twice size appears to be workable from a practical point of view and shouldn't be too excessive for scale. I'll start cutting wood tomorrow.
Please Log in or Create an account to join the conversation.
- Quorneng
-

- Offline
- Forum Master
-

Less
More
- Posts: 9436
- Thank you received: 19043
16 Feb 2015 22:40 #34
by Quorneng
Replied by Quorneng on topic Blackburn 1912 Monoplane - 48" (1220mm) PAW Diesel
Are you making the 'plates' of wood (ply) rather than metal?
Please Log in or Create an account to join the conversation.
- Ex-Member
- Topic Author
- User
-
Less
More
- Thank you received: 0
18 Feb 2015 08:02 #35
by Ex-Member
Replied by Ex-Member on topic Blackburn 1912 Monoplane - 48" (1220mm) PAW Diesel
Not sure yet Q, but the short answer is probably.
I want to make the rigging points frangible as I'd rather replace a rigging point than a main spar following a hard arrival. This means they have to be easily replaceable. If I can do that, then they'll be 1/32" ply, if not it'll be whatever thin dural I have in stock.
Yesterday's work included building up the wing spars at the rigging points and taking a belt and braces approach to the wing tubes with binding (which is not yet finished):
Please Log in or Create an account to join the conversation.
- Quorneng
-
- Offline
- Forum Master
-
Less
More
- Posts: 9436
- Thank you received: 19043
18 Feb 2015 16:44 - 18 Feb 2015 20:35 #36
by Quorneng
Replied by Quorneng on topic Blackburn 1912 Monoplane - 48" (1220mm) PAW Diesel
Andy
I have used acetate sheet as a substitute for small scale metal fittings. It is thin enough to look like metal but strong enough to take a 'bolt' type fixing and if the surface is roughened up it can be simply glued in place. In most cases the glue simply fails before the thing it is glued to actually breaks.
I have used acetate sheet as a substitute for small scale metal fittings. It is thin enough to look like metal but strong enough to take a 'bolt' type fixing and if the surface is roughened up it can be simply glued in place. In most cases the glue simply fails before the thing it is glued to actually breaks.
Last edit: 18 Feb 2015 20:35 by .
Please Log in or Create an account to join the conversation.
- Ex-Member
- Topic Author
- User
-
Less
More
- Thank you received: 0
19 Feb 2015 09:19 #37
by Ex-Member
Replied by Ex-Member on topic Blackburn 1912 Monoplane - 48" (1220mm) PAW Diesel
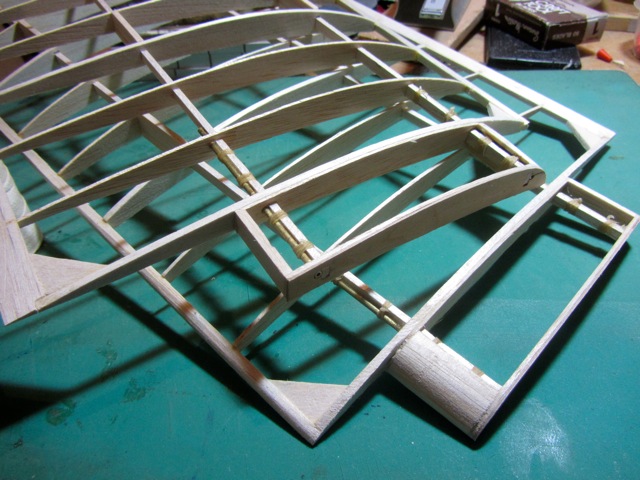
Yesterday's work included finishing off the wing and fuselage tube binding, removing a former on the fuselage and adding one, building up the wing-root LE and TE fairings and making a start on shaping the wing LE and TE:

Please Log in or Create an account to join the conversation.
- Ex-Member
- Topic Author
- User
-
Less
More
- Thank you received: 0
20 Feb 2015 12:55 #38
by Ex-Member
Replied by Ex-Member on topic Blackburn 1912 Monoplane - 48" (1220mm) PAW Diesel
Another former has been added and some gussets put in place.......slow but sure!

Please Log in or Create an account to join the conversation.
- Phil Wood
-

- Offline
- Banned
-

20 Feb 2015 20:01 #39
by Phil Wood
I just own the forum .... you guys make it great thanks.
Replied by Phil Wood on topic Blackburn 1912 Monoplane - 48" (1220mm) PAW Diesel
Here's an idea you might want to try for the plates at either side of the wing spars.
A while back I was messing about with helicopter fittings and I found a good way of making the connecting rods between ball links & such like.
I made a mold out of car body filler (You could experiment with materials) I heated some polypropylene to melting point and pressed it into the mold. (Correx is polypropylene)
When this cooled it was still extremely strong, easy to sand, easy to drill & quite light.
I had my doubts about its strength but it withstood the hammering that rotor head links have to take.
If you only need a couple of pieces then even a balsa mold should last long enough. I used the body filler because I wanted loads of identical parts so it had to stand up to a lot of heating & cooling.
Pol.
I just own the forum .... you guys make it great thanks.
Thanks: Ex-Member
Please Log in or Create an account to join the conversation.
- Ex-Member
- Topic Author
- User
-
Less
More
- Thank you received: 0
21 Feb 2015 11:20 #40
by Ex-Member
Thanks for that Pol, sounds useful and I'll certainly consider it.
Any chance of repeating or moving it to the new 'Hints and Tips' thread as it'd be nice to store good ideas such as this one there.
Thanks,
Andy
Replied by Ex-Member on topic Blackburn 1912 Monoplane - 48" (1220mm) PAW Diesel
Polyphilla wrote: Here's an idea you might want to try for the plates at either side of the wing spars.
A while back I was messing about with helicopter fittings and I found a good way of making the connecting rods between ball links & such like.
I made a mold out of car body filler (You could experiment with materials) I heated some polypropylene to melting point and pressed it into the mold. (Correx is polypropylene)
When this cooled it was still extremely strong, easy to sand, easy to drill & quite light.
I had my doubts about its strength but it withstood the hammering that rotor head links have to take.
If you only need a couple of pieces then even a balsa mold should last long enough. I used the body filler because I wanted loads of identical parts so it had to stand up to a lot of heating & cooling.
Pol.
Thanks for that Pol, sounds useful and I'll certainly consider it.
Any chance of repeating or moving it to the new 'Hints and Tips' thread as it'd be nice to store good ideas such as this one there.
Thanks,
Andy
Please Log in or Create an account to join the conversation.
- Ex-Member
- Topic Author
- User
-
Less
More
- Thank you received: 0
22 Feb 2015 14:09 - 22 Feb 2015 14:16 #41
by Ex-Member
Replied by Ex-Member on topic Blackburn 1912 Monoplane - 48" (1220mm) PAW Diesel
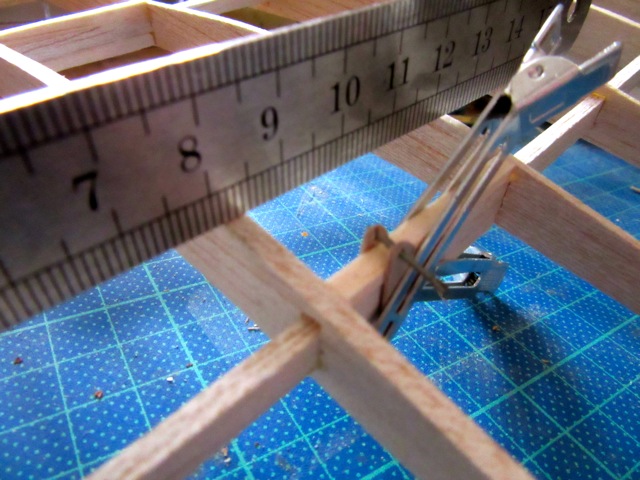
Made up a trial wing plate from 1/64" ply to check the size to make sure I had enough clearance from the wing surface to get the split pin into the holes. The split pin will hold the rigging. I'll use the ply plate as a pattern for the ones I'll eventually use.
Then made a test installation of the engine (PAW 06 RC), tank, throttle linkage, throttle servo and profiler. Using the three potentiometers on the profiler allows pre-programming of the power setting from idle to full power, the length of the power run from about 5" to 30" and the length of the run down from about 5" to 2 mins.
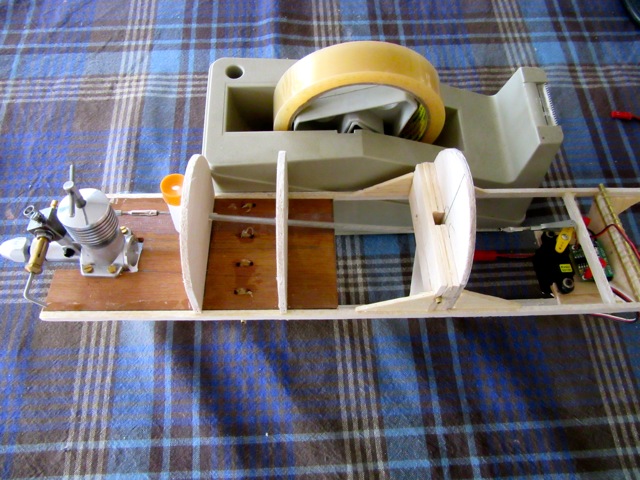

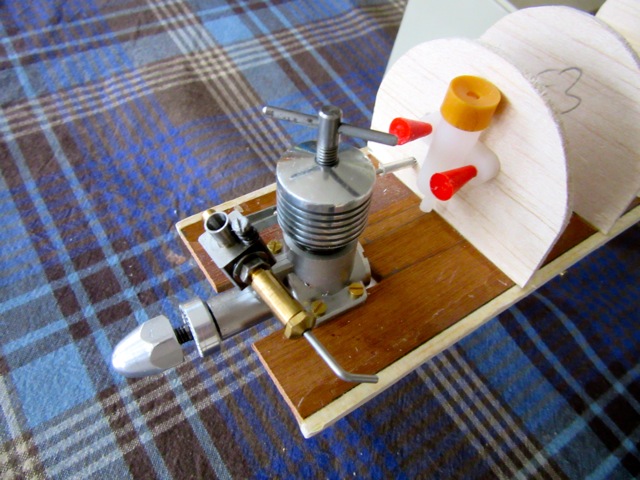
When fitted, the pilot should hide the servo, profiler and it's switch and LiPo
Then made a test installation of the engine (PAW 06 RC), tank, throttle linkage, throttle servo and profiler. Using the three potentiometers on the profiler allows pre-programming of the power setting from idle to full power, the length of the power run from about 5" to 30" and the length of the run down from about 5" to 2 mins.
When fitted, the pilot should hide the servo, profiler and it's switch and LiPo
Last edit: 22 Feb 2015 14:16 by Ex-Member.
Please Log in or Create an account to join the conversation.
- Klipkopwildlife
-

- Offline
- Administrator
-

- I'm supposed to be retired!
23 Feb 2015 13:00 #42
by Klipkopwildlife
Do it now, you may never get another chance
Replied by Klipkopwildlife on topic Blackburn 1912 Monoplane - 48" (1220mm) PAW Diesel
Details of the profiler please Andy. Where, how much?
Do it now, you may never get another chance
Please Log in or Create an account to join the conversation.
- Ex-Member
- Topic Author
- User
-
Less
More
- Thank you received: 0
23 Feb 2015 13:57 #43
by Ex-Member
Replied by Ex-Member on topic Blackburn 1912 Monoplane - 48" (1220mm) PAW Diesel
There are several profilers on the market, but I get mine from Derek Knight - he call's it a 'Time and Speed Controller". There are several types that are designed for sports use and for competition in the E30 and E36 classes - electric duration models.
You can see them here and there is a sample instruction sheet for download: www.kpaero.com/ProductReport.aspx?Category1=electric
The cost is either £17.95 or £21.95 depending on the application.
They all work in a similar way. There are three potentiometers that control engine speed, engine running time and engine rundown time. If I set all the potentiometers to the mid position on the standard model, about 10 secs after switching on the motor runs up to about 50% power, holds it for about 15 secs, then runs down to zero over about a minute.
No time at the mo, but I'll post pictures and weights later.
Please Log in or Create an account to join the conversation.
- Ex-Member
- Topic Author
- User
-
Less
More
- Thank you received: 0
26 Feb 2015 06:03 #44
by Ex-Member
Replied by Ex-Member on topic Blackburn 1912 Monoplane - 48" (1220mm) PAW Diesel
Work has been a bit slow over the past few days, but the current status is that the wing rigging posts have been constructed and the engine, profiler and servo have been removed from the fuselage:

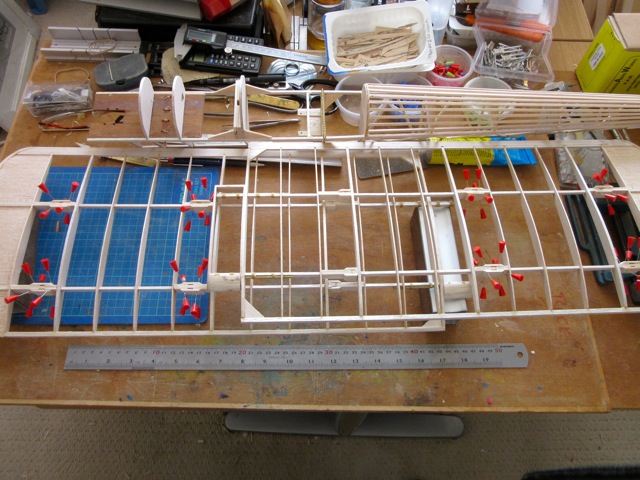
I'm now waiting for a relatively warm good weather day so I can go outside and do some serious sanding. In the meantime, I'll work on the UC.
I'm now waiting for a relatively warm good weather day so I can go outside and do some serious sanding. In the meantime, I'll work on the UC.
Please Log in or Create an account to join the conversation.
- Ex-Member
- Topic Author
- User
-
Less
More
- Thank you received: 0
04 Mar 2015 17:25 #45
by Ex-Member
Replied by Ex-Member on topic Blackburn 1912 Monoplane - 48" (1220mm) PAW Diesel
It's about time I got back to work on this one, so I spent an enjoyable hour cutting and bending wire for the UC.
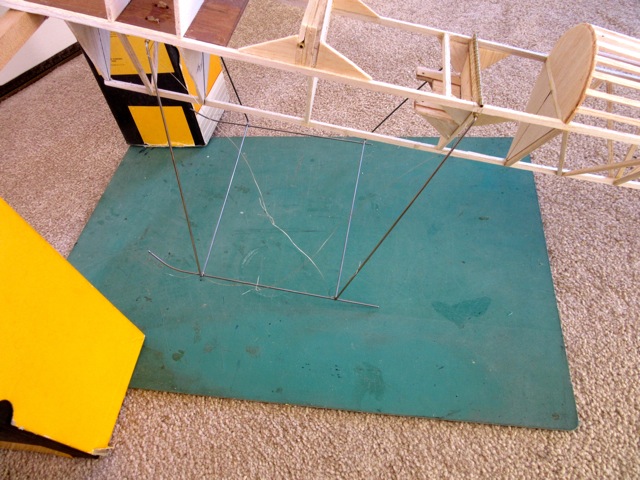
Please Log in or Create an account to join the conversation.
Time to create page: 1.189 seconds