
- Posts: 9436
- Thank you received: 19043
A Depron Airbus A350 - 1000 for 76 mm EDFs
- Quorneng
-
 Topic Author
- Offline
- Forum Master
-

Less
More
20 May 2019 14:20 #121
by Quorneng
Replied by Quorneng on topic A Depron Airbus A350 - 1000 for 76 mm EDFs
With the RC Marauder flying and undamaged  effort swings back onto the A350.
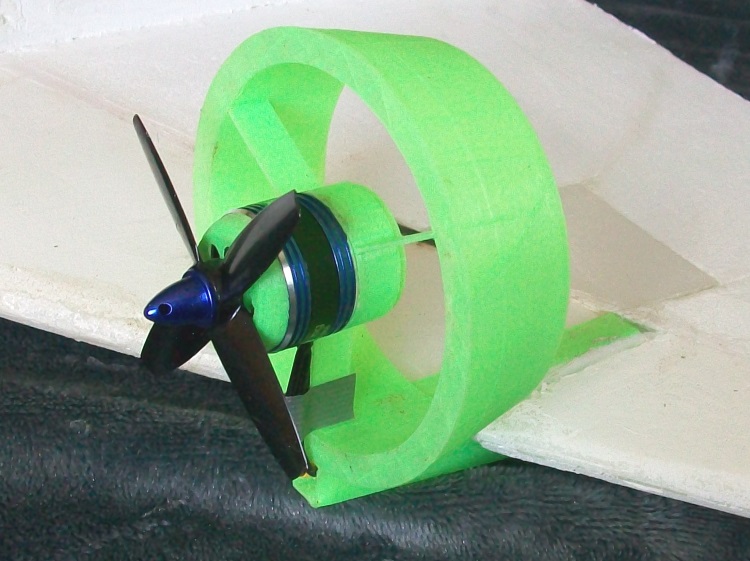
The motor and mount fixed back into the wing and tested.
The replacement nacelle body is slowly being 'planked' in 2 mm Depron.
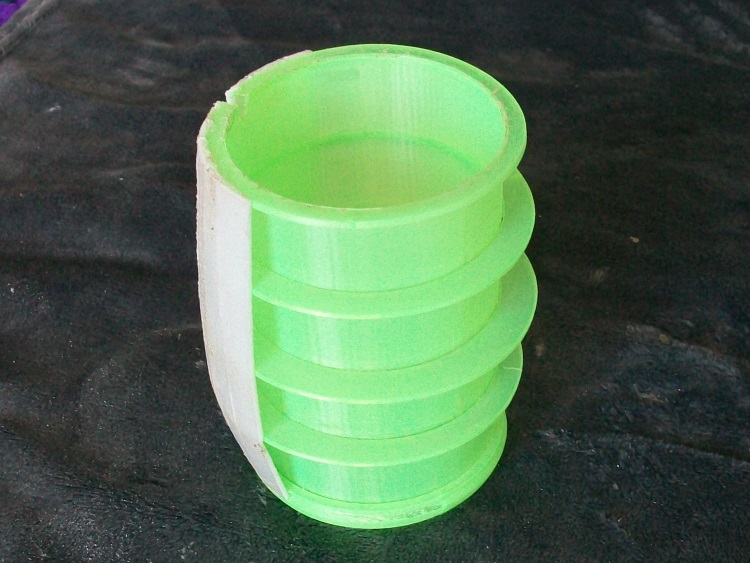
Slow going. About 34 planks each individually shaped to fit.
The next big problem will be fitting the nacelle body over the prop. There is only 0.5 mm tip clearance.
effort swings back onto the A350.The motor and mount fixed back into the wing and tested.
The replacement nacelle body is slowly being 'planked' in 2 mm Depron.
Slow going. About 34 planks each individually shaped to fit.
The next big problem will be fitting the nacelle body over the prop. There is only 0.5 mm tip clearance.
Thanks: Klipkopwildlife, THE BLACKBIRD
Please Log in or Create an account to join the conversation.
- paul d
-
- Offline
- Forum Veteran
-

Less
More
- Posts: 2074
- Thank you received: 2292
21 May 2019 08:33 #122
by paul d
balsa is best.
Replied by paul d on topic A Depron Airbus A350 - 1000 for 76 mm EDFs
Looking good Q, I know nothing about depron or printed parts, what glue do you use?
Wouldn't it be easier to plank the parallel parts of the body the other way round?
Wouldn't it be easier to plank the parallel parts of the body the other way round?
balsa is best.
Thanks: Klipkopwildlife
Please Log in or Create an account to join the conversation.
- Quorneng
-
Topic Author
- Offline
- Forum Master
-
Less
More
- Posts: 9436
- Thank you received: 19043
21 May 2019 11:47 #123
by Quorneng
Replied by Quorneng on topic A Depron Airbus A350 - 1000 for 76 mm EDFs
Paul
A straight tube whether parallel or tapered and if of sufficient diameter can indeed be rolled from a single piece Depron.
It is quite common in Depron construction to create gentle compound curved structures by using wide but short skin pieces however this does require a reasonably rigid substructure to fix them on to and can only create a true smooth outline if there is sufficient material thickness to be sanded down.
Depron however is not a homogeneous material. It has a surface 'skin' which reveals a coarser internal structure if sanded away. This then has to be filled to give a uniform surface finish.
In my quest for absolute minimum weight I try to retain Depron's original surface if at all possible both for strength (Depron sheet is really a sandwich) and to minimise any surface filling. IMO longitudinal planking is the best way to achieve this.
As a further advantage in a stressed skin structure if the planks are laid in the direction of the major forces it keeps the number of joints in tension to a minimum.
For example the 1.1 m long completely hollow all Depron Bombardier Q400 fuselage centre section has full length planks, the plane was actually scaled to match the size of the Depron sheet, so there are no potential weak joints.

The shorter nose and tail sections were built in a similar way meaning there were only two places that required some extra Depron to achieve a full strength fuselage joint.
The A350 was a later project and with ducted fans had to use 2mm Depron rather than 3 to save still further weight.
The new nacelle fully planked with a first coat of paint.

Ready to be fitted over the prop.
A straight tube whether parallel or tapered and if of sufficient diameter can indeed be rolled from a single piece Depron.
It is quite common in Depron construction to create gentle compound curved structures by using wide but short skin pieces however this does require a reasonably rigid substructure to fix them on to and can only create a true smooth outline if there is sufficient material thickness to be sanded down.
Depron however is not a homogeneous material. It has a surface 'skin' which reveals a coarser internal structure if sanded away. This then has to be filled to give a uniform surface finish.
In my quest for absolute minimum weight I try to retain Depron's original surface if at all possible both for strength (Depron sheet is really a sandwich) and to minimise any surface filling. IMO longitudinal planking is the best way to achieve this.
As a further advantage in a stressed skin structure if the planks are laid in the direction of the major forces it keeps the number of joints in tension to a minimum.
For example the 1.1 m long completely hollow all Depron Bombardier Q400 fuselage centre section has full length planks, the plane was actually scaled to match the size of the Depron sheet, so there are no potential weak joints.
The shorter nose and tail sections were built in a similar way meaning there were only two places that required some extra Depron to achieve a full strength fuselage joint.
The A350 was a later project and with ducted fans had to use 2mm Depron rather than 3 to save still further weight.
The new nacelle fully planked with a first coat of paint.
Ready to be fitted over the prop.
Thanks: Klipkopwildlife, THE BLACKBIRD
Please Log in or Create an account to join the conversation.
- Quorneng
-
Topic Author
- Offline
- Forum Master
-
Less
More
- Posts: 9436
- Thank you received: 19043
16 Jan 2022 22:11 - 16 Jan 2022 22:12 #124
by Quorneng
Replied by Quorneng on topic A Depron Airbus A350 - 1000 for 76 mm EDFs
The result of the 15 Jan 22 "nacelle rip off" landing.
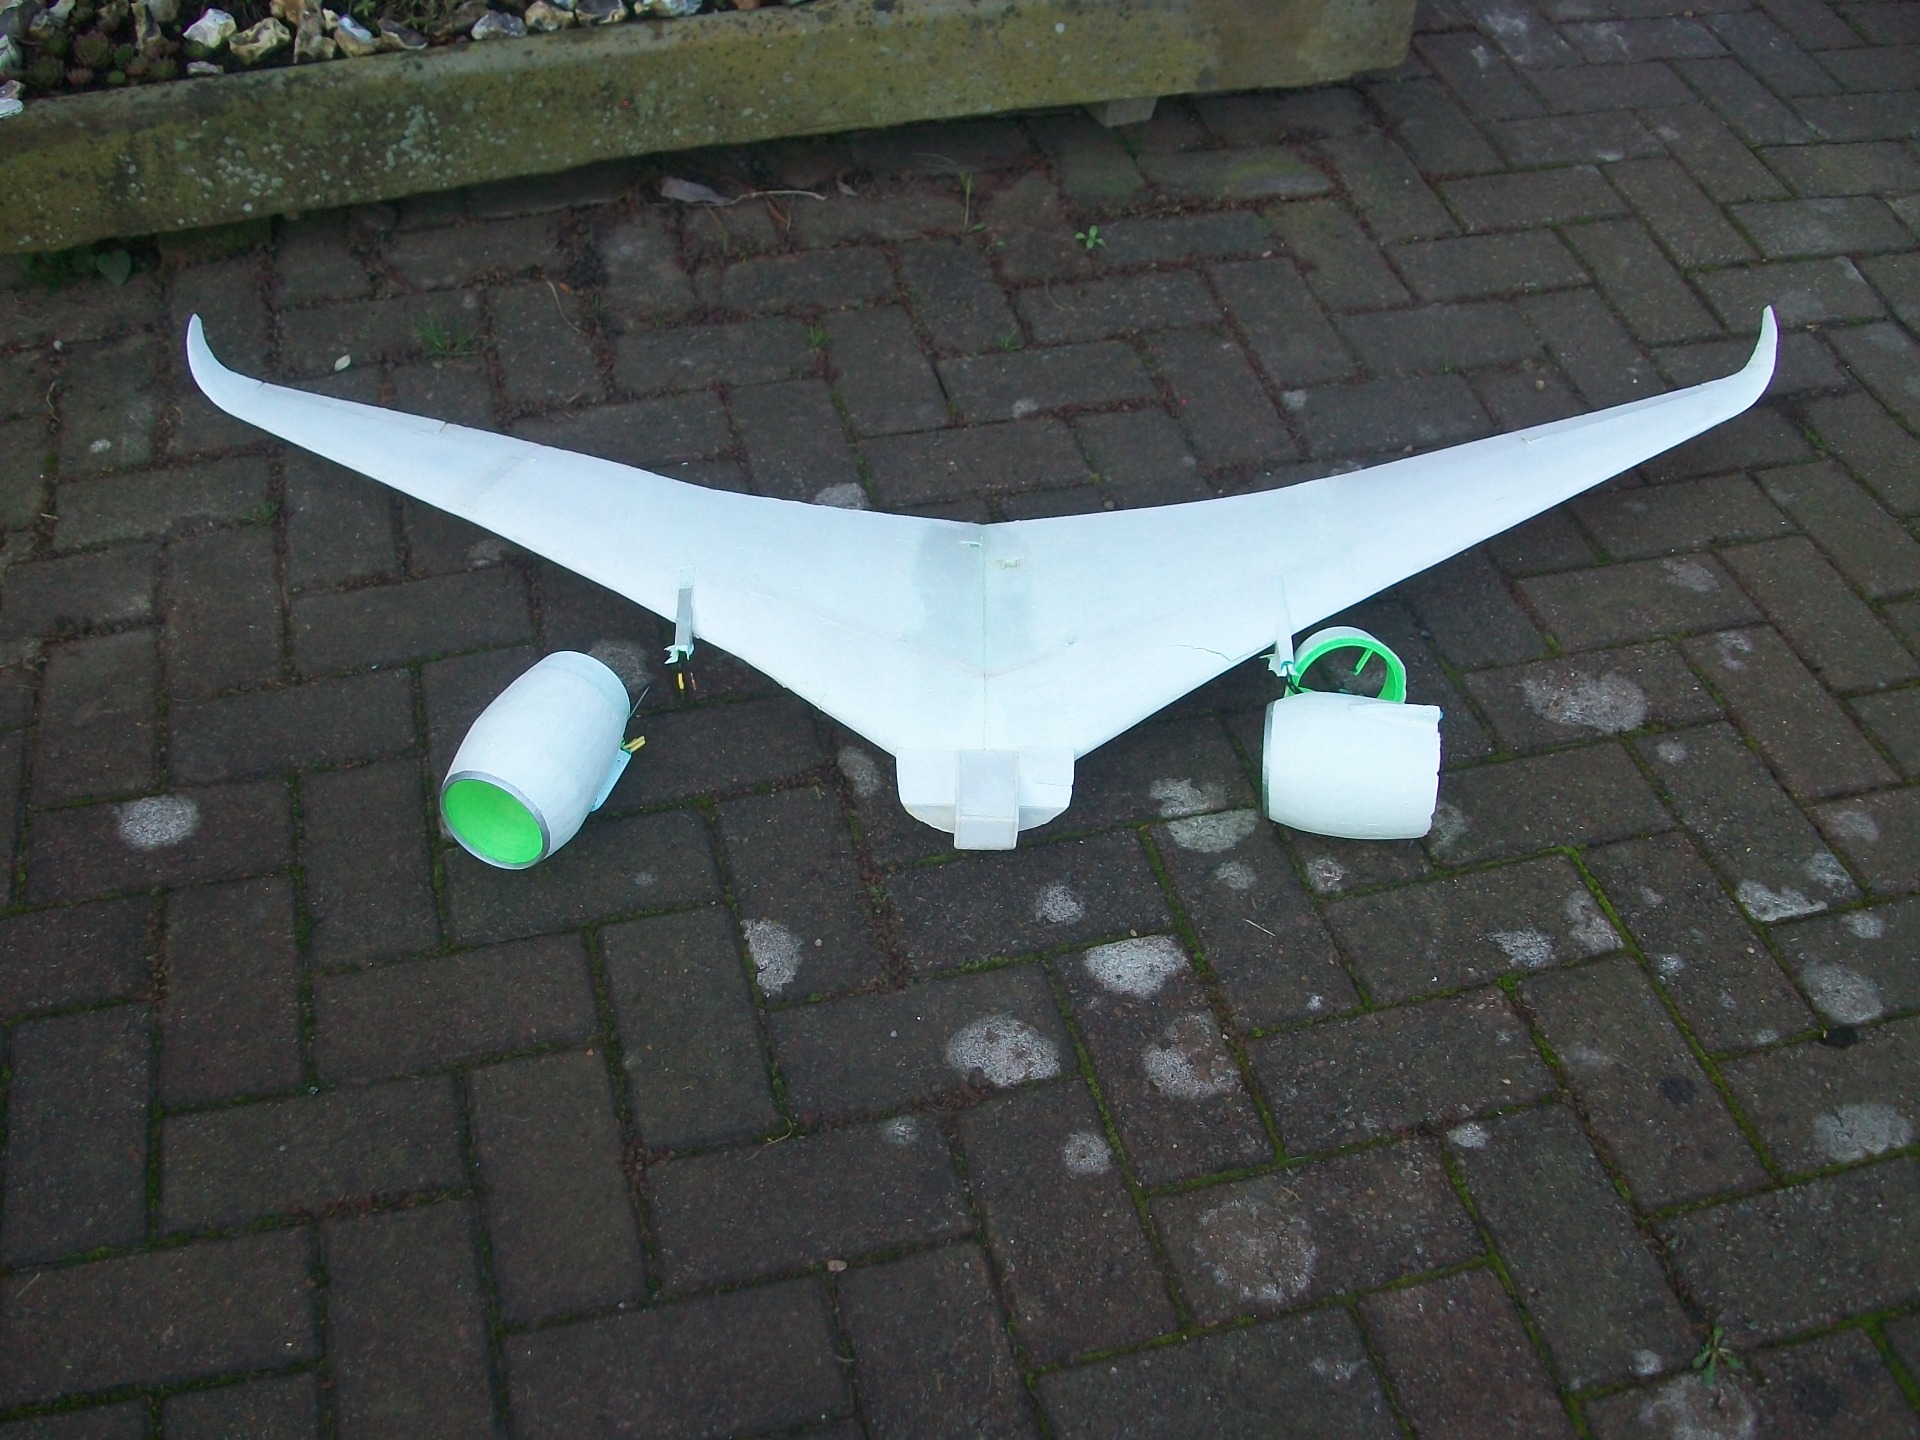
The damage to the to the motor mounts is quite severe.

To make maters worth the old motor mounts are completely built in with the nacelles and a printed integral with the wing pylon pylons so they had to be cut off.
I intend to reuse at least part of the wing pylon structure not least because it was built in to the wing so the motor mount CAD file had to be modified with a cut off pylon.
The new printed motor mounts (2.5 hours to print each) sitting on the repaired nacelles.

One of 2204 2399kV racing drone motor with its 3x3.5 four bladed prop. The other is still attached to its wiring in the wing.
How to proceed from this point is a question as it was originally all put together and wired up to the wing before it was completely covered and of course to save weight all the wiring is exactly the minimum length so there is absolutely no 'spare' to pull out to easily re attach the motor wires.
This could take some time.
Memo to self, only fly low wing belly landing airliners on 'bowling green' quality grass!
The damage to the to the motor mounts is quite severe.
To make maters worth the old motor mounts are completely built in with the nacelles and a printed integral with the wing pylon pylons so they had to be cut off.
I intend to reuse at least part of the wing pylon structure not least because it was built in to the wing so the motor mount CAD file had to be modified with a cut off pylon.
The new printed motor mounts (2.5 hours to print each) sitting on the repaired nacelles.
One of 2204 2399kV racing drone motor with its 3x3.5 four bladed prop. The other is still attached to its wiring in the wing.
How to proceed from this point is a question as it was originally all put together and wired up to the wing before it was completely covered and of course to save weight all the wiring is exactly the minimum length so there is absolutely no 'spare' to pull out to easily re attach the motor wires.
This could take some time.
Memo to self, only fly low wing belly landing airliners on 'bowling green' quality grass!
Last edit: 16 Jan 2022 22:12 by Quorneng.
Thanks: Klipkopwildlife
Please Log in or Create an account to join the conversation.
- Quorneng
-
Topic Author
- Offline
- Forum Master
-
Less
More
- Posts: 9436
- Thank you received: 19043
19 Jan 2022 17:10 #125
by Quorneng
Replied by Quorneng on topic A Depron Airbus A350 - 1000 for 76 mm EDFs
The first motor replacement motor mount goes on.
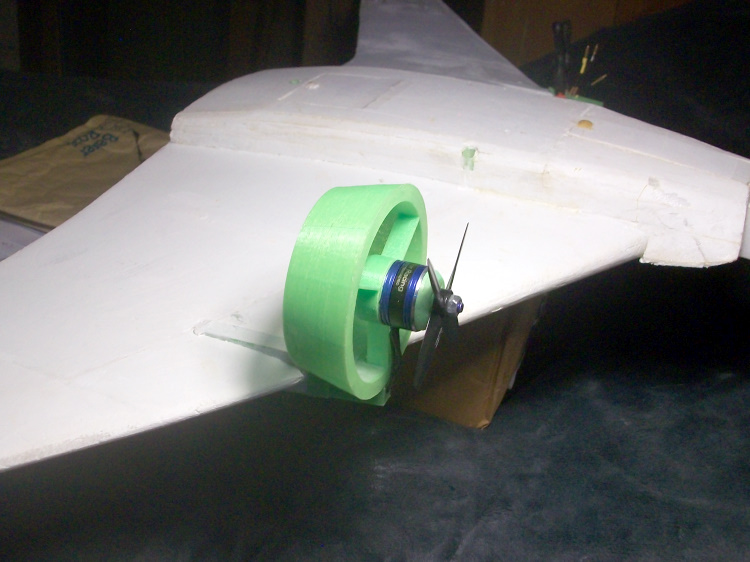
To mate up securely to the remains of the pylon and allow the motor wires to be installed without disconnecting anything required a rather complex 'bridging piece' to be printed.
I have checked that the motor still runs.
The other side will be a bit more difficult as it the motor has 2 mm bullet connectors and they will get in the way as space inside the pylon is very limited.
The other element was the wing did suffer quite a bit of hidden structural damage as the nacelles were ripped off.
Its all good fun.
Thanks: Klipkopwildlife
Please Log in or Create an account to join the conversation.
- Eric
-

- Offline
- Moderator
-

Less
More
- Posts: 13726
- Thank you received: 14470
19 Jan 2022 17:19 #126
by Eric
if you are calm and collected when all about you are going berserk - you've missed something important!
Replied by Eric on topic A Depron Airbus A350 - 1000 for 76 mm EDFs
only fly low wing belly landing airliners on 'bowling green' quality grass!
Or - land inverted! [badass]
Or - land inverted! [badass]
if you are calm and collected when all about you are going berserk - you've missed something important!
Thanks: Klipkopwildlife
Please Log in or Create an account to join the conversation.
- paul d
-
- Offline
- Forum Veteran
-
Less
More
- Posts: 2074
- Thank you received: 2292
19 Jan 2022 18:09 #127
by paul d
balsa is best.
Replied by paul d on topic A Depron Airbus A350 - 1000 for 76 mm EDFs
Shame it happened but nice work on the repairs Simon.
balsa is best.
Thanks: Klipkopwildlife
Please Log in or Create an account to join the conversation.
- Quorneng
-
Topic Author
- Offline
- Forum Master
-
Less
More
- Posts: 9436
- Thank you received: 19043
21 Jan 2022 14:34 #128
by Quorneng
Replied by Quorneng on topic A Depron Airbus A350 - 1000 for 76 mm EDFs
The nacelles and motors are in!


and they work too!
There was really no reason to rush as it won't be flown again at my field until the grass has been cut properly short, which tends to be June!
and they work too!
There was really no reason to rush as it won't be flown again at my field until the grass has been cut properly short, which tends to be June!
Thanks: Klipkopwildlife
Please Log in or Create an account to join the conversation.
- Eric
-
- Offline
- Moderator
-
Less
More
- Posts: 13726
- Thank you received: 14470
21 Jan 2022 14:38 #129
by Eric
if you are calm and collected when all about you are going berserk - you've missed something important!
Replied by Eric on topic A Depron Airbus A350 - 1000 for 76 mm EDFs
If they can start the mower!! :woohoo: :evil: [badass]
if you are calm and collected when all about you are going berserk - you've missed something important!
Thanks: Klipkopwildlife
Please Log in or Create an account to join the conversation.
- Quorneng
-
Topic Author
- Offline
- Forum Master
-
Less
More
- Posts: 9436
- Thank you received: 19043
23 Jan 2022 10:59 #130
by Quorneng
Replied by Quorneng on topic A Depron Airbus A350 - 1000 for 76 mm EDFs
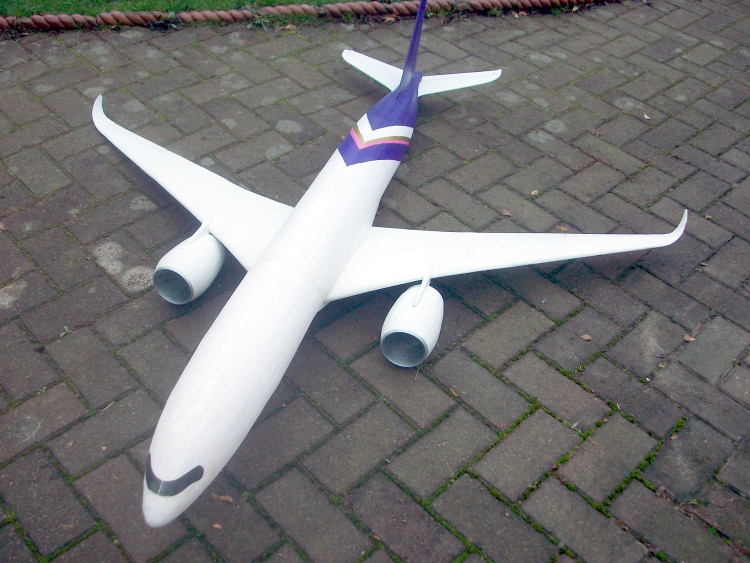
All back together prior to dismantling & storage until the field is smoother and the grass has been cut at least a couple of times.
Thanks: Klipkopwildlife, THE BLACKBIRD
Please Log in or Create an account to join the conversation.
- paul d
-
- Offline
- Forum Veteran
-
Less
More
- Posts: 2074
- Thank you received: 2292
23 Jan 2022 12:29 #131
by paul d
balsa is best.
Replied by paul d on topic A Depron Airbus A350 - 1000 for 76 mm EDFs
That's bloody lovely Simon!
balsa is best.
Thanks: Klipkopwildlife
Please Log in or Create an account to join the conversation.
- Quorneng
-
Topic Author
- Offline
- Forum Master
-
Less
More
- Posts: 9436
- Thank you received: 19043
01 May 2022 23:43 #132
by Quorneng
Replied by Quorneng on topic A Depron Airbus A350 - 1000 for 76 mm EDFs
After the crash on the 23 Mar this year the A350 has been hanging on the wall with its crusshed nose so I thought it was about time I set about repairing it.
First job reprint the 3 damaged nose formers then cut back to a structurally sound point.

The remains of the nose are along side. :woohoo:
The original former at this point has been removed and replaced with a wider 4mm version rather than 2mm to give a 'surface' to attach the new skin planks.
To be honest it was only when I cut open the nose I realised just how 'light weight' the A350 is with 'skinny' printed formers and just a 2mm Depron skin.
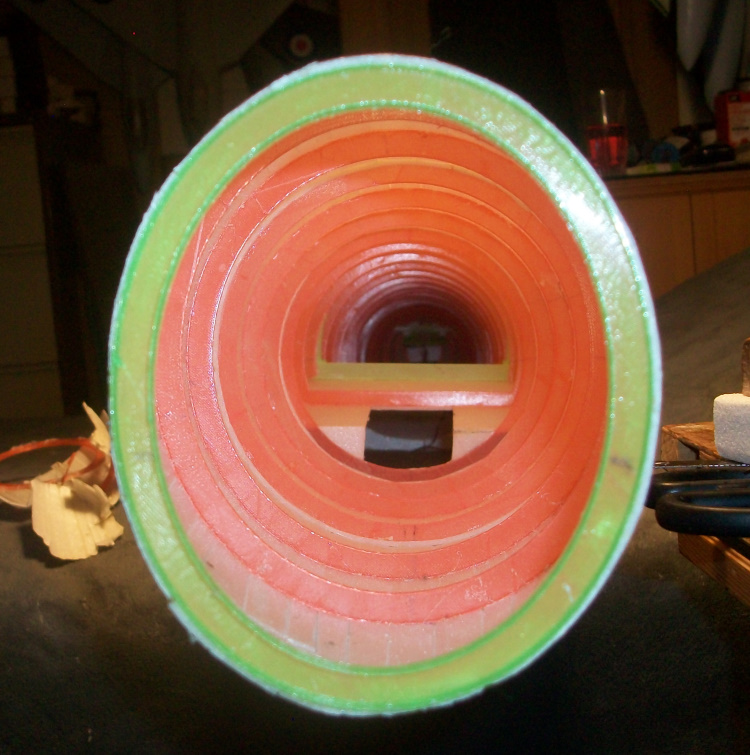
Apart from the wing mounting the inside is empty!
.
Once the nose is reapired I will investigate what might be wrong with the RH motor and/or ESC that apparently caused the crash.
First job reprint the 3 damaged nose formers then cut back to a structurally sound point.
The remains of the nose are along side. :woohoo:
The original former at this point has been removed and replaced with a wider 4mm version rather than 2mm to give a 'surface' to attach the new skin planks.
To be honest it was only when I cut open the nose I realised just how 'light weight' the A350 is with 'skinny' printed formers and just a 2mm Depron skin.
Apart from the wing mounting the inside is empty!
.
Once the nose is reapired I will investigate what might be wrong with the RH motor and/or ESC that apparently caused the crash.
Thanks: Klipkopwildlife
Please Log in or Create an account to join the conversation.
- Quorneng
-
Topic Author
- Offline
- Forum Master
-
Less
More
- Posts: 9436
- Thank you received: 19043
03 May 2022 22:56 - 03 May 2022 22:58 #133
by Quorneng
Replied by Quorneng on topic A Depron Airbus A350 - 1000 for 76 mm EDFs
The nose is now largely rebuilt so before spending too much time on the finishing & decorating it I thought I had better examine what was wrong with the RH motor that caused the crash.
Fist I openned up the fuselage underside to get at the ESCs. From this I was able to determine that th eproblem was indeed the motor as it would not run any better using another ESC.
To extract the motor the whole nacelle and pylon has to be cut away and then the front part of the nacelle cut off to be reused.

The pylon & motor mount have to be broken up to disconnect the wires and to get at the motor bolts.
At least this picture clearly shows what was wrong with it.

Definitely a "cooked" winding. :woohoo:
To make things worse it appears this particular LDPOWER 2204 2300kV motor is a 'discontinued product' as far as HK is concerned but then I did buy the original CW/CCW pair in 2010! :woohoo:
I do have a spare 2205 2300kV CW motor that is actually 2 g lighter. The moutings are identical so the printer is currently printing a new intergrated motor mount and pylon.
It had better fly after all this!
Fist I openned up the fuselage underside to get at the ESCs. From this I was able to determine that th eproblem was indeed the motor as it would not run any better using another ESC.
To extract the motor the whole nacelle and pylon has to be cut away and then the front part of the nacelle cut off to be reused.
The pylon & motor mount have to be broken up to disconnect the wires and to get at the motor bolts.
At least this picture clearly shows what was wrong with it.
Definitely a "cooked" winding. :woohoo:
To make things worse it appears this particular LDPOWER 2204 2300kV motor is a 'discontinued product' as far as HK is concerned but then I did buy the original CW/CCW pair in 2010! :woohoo:
I do have a spare 2205 2300kV CW motor that is actually 2 g lighter. The moutings are identical so the printer is currently printing a new intergrated motor mount and pylon.
It had better fly after all this!
Last edit: 03 May 2022 22:58 by Quorneng.
Thanks: Klipkopwildlife, THE BLACKBIRD
Please Log in or Create an account to join the conversation.
- Quorneng
-
Topic Author
- Offline
- Forum Master
-
Less
More
- Posts: 9436
- Thank you received: 19043
04 May 2022 22:57 #134
by Quorneng
Replied by Quorneng on topic A Depron Airbus A350 - 1000 for 76 mm EDFs
The reprinted motor mount and untegrated nacelle pylon with the new 2205 2399kV installed

The reprinted and painted 'afterbody' that resticts the exhaust nozzle to 95% of the FSA.
Just as well I kept all the files both FreeCad and Stl.
It all works when connected to its ESC in the wing.
The motor mount is almost ready to be glued into the wing.
Shoukd not take too much longer to finish.
The reprinted and painted 'afterbody' that resticts the exhaust nozzle to 95% of the FSA.
Just as well I kept all the files both FreeCad and Stl.
It all works when connected to its ESC in the wing.
The motor mount is almost ready to be glued into the wing.
Shoukd not take too much longer to finish.
Thanks: Eric, Klipkopwildlife, THE BLACKBIRD
Please Log in or Create an account to join the conversation.
- Quorneng
-
Topic Author
- Offline
- Forum Master
-
Less
More
- Posts: 9436
- Thank you received: 19043
06 May 2022 14:56 - 06 May 2022 14:57 #135
by Quorneng
Replied by Quorneng on topic A Depron Airbus A350 - 1000 for 76 mm EDFs
Almost there!
The rebuilt nose.

The new RH motor installed in the nacelle and remounted on the wing.
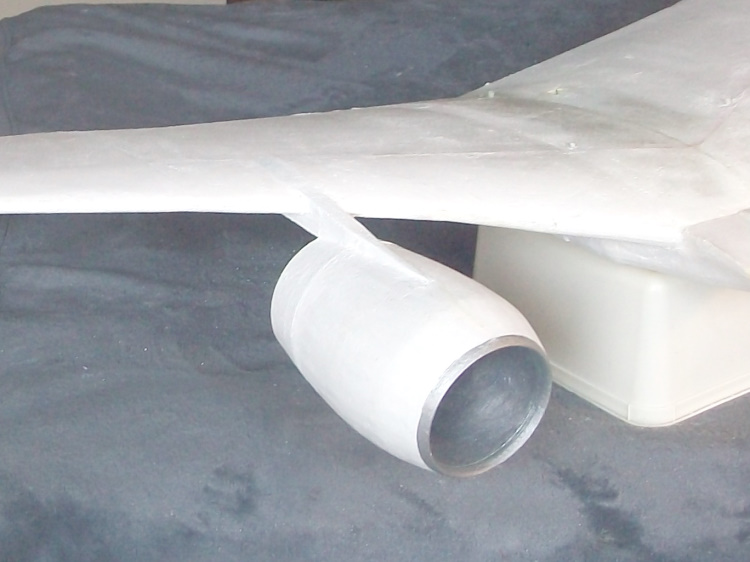
Still some comstic bits, like clear lacuer on the repainted bits and as this picture shows some medial work to replace the tips of those dreaded curly wing tips.
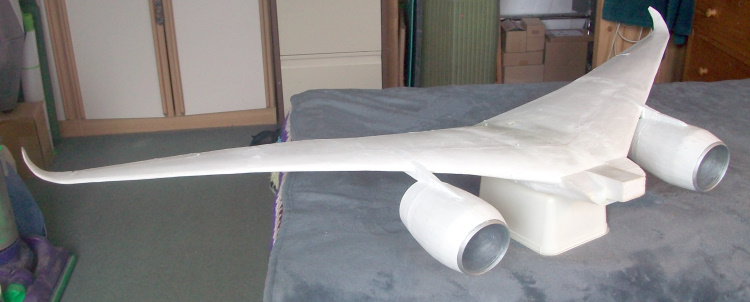
Increadibly delicate but not the result of flight damge, they just simply carch on everything! :woohoo:
Once done I can return to getting the HE162 to fly, maybe!
The rebuilt nose.
The new RH motor installed in the nacelle and remounted on the wing.
Still some comstic bits, like clear lacuer on the repainted bits and as this picture shows some medial work to replace the tips of those dreaded curly wing tips.
Increadibly delicate but not the result of flight damge, they just simply carch on everything! :woohoo:
Once done I can return to getting the HE162 to fly, maybe!
Last edit: 06 May 2022 14:57 by Quorneng.
Thanks: Eric, Klipkopwildlife, THE BLACKBIRD
Please Log in or Create an account to join the conversation.
Time to create page: 1.466 seconds