
- Posts: 50
- Thank you received: 28
Antonov AN2
- Reach
-

- Offline
- Senior Member
-

Less
More
17 Dec 2018 01:41 #31
by Reach
Replied by Reach on topic Tupolev AN 2
As always, I am simply blown away by what you do. Darned witchcraft and voodoo!
Please Log in or Create an account to join the conversation.
- Klipkopwildlife
-

- Offline
- Administrator
-

- I'm supposed to be retired!
17 Dec 2018 09:02 #32
by Klipkopwildlife
Do it now, you may never get another chance
Replied by Klipkopwildlife on topic Tupolev AN 2
To right, I've been trying to get into it myself and learning just how dumb I really am!
Do it now, you may never get another chance
Please Log in or Create an account to join the conversation.
- Quorneng
-
 Topic Author
- Offline
- Forum Master
-

Less
More
- Posts: 9436
- Thank you received: 19043
17 Dec 2018 15:36 - 17 Dec 2018 15:38 #33
by Quorneng
Replied by Quorneng on topic Tupolev AN 2
Thanks for the kind words.
The fuselage has a flat area from behind the cowling to the tail so with these cut out it should be possible to assemble the fuselage in a very conventional way - starting with the biggest formers and working towards each end.
No Depron cut yet but I have started to print the fuselage formers.
This is the biggest

Using a Warren brace and thin (0.2 mm) web on one side.
The clever bit I only discovered yesterday was that you only have to CAD design one half of the former as there is a mirror button!
The top wing sits virtually on top of the fuselage, the bottom one is attached to the side of the fuselage.
The final issue I only discovered when I started to tile print the drawings was that not all the views were to the same scale. The plan was only 85% the size of the elevation! :woohoo:
The fuselage has a flat area from behind the cowling to the tail so with these cut out it should be possible to assemble the fuselage in a very conventional way - starting with the biggest formers and working towards each end.
No Depron cut yet but I have started to print the fuselage formers.
This is the biggest
Using a Warren brace and thin (0.2 mm) web on one side.
The clever bit I only discovered yesterday was that you only have to CAD design one half of the former as there is a mirror button!
The top wing sits virtually on top of the fuselage, the bottom one is attached to the side of the fuselage.
The final issue I only discovered when I started to tile print the drawings was that not all the views were to the same scale. The plan was only 85% the size of the elevation! :woohoo:
Last edit: 17 Dec 2018 15:38 by Quorneng.
Thanks: Phil Wood, Eric, Klipkopwildlife, THE BLACKBIRD
Please Log in or Create an account to join the conversation.
- Quorneng
-
Topic Author
- Offline
- Forum Master
-
Less
More
- Posts: 9436
- Thank you received: 19043
19 Dec 2018 00:14 - 19 Dec 2018 00:15 #34
by Quorneng
Replied by Quorneng on topic Tupolev AN 2
The 'stack' of 10 printed formers for the fuselage.

The only problem doing it like this is there is no adjustment. Unlike say a Depron or balsa former there is no tweeking possible to make it fit. The only option is to workout what dimensions need adjusting in the CAD file and reprint it, hoping that you did do the sums right and it now fits! :woohoo:
These are 6 'scrappers' that have been generated along the way representing nearly 3 hours printing time in the bin!

Fortunately as a by product of them being so light mistakes don't actually waste that much filament.
The only problem doing it like this is there is no adjustment. Unlike say a Depron or balsa former there is no tweeking possible to make it fit. The only option is to workout what dimensions need adjusting in the CAD file and reprint it, hoping that you did do the sums right and it now fits! :woohoo:
These are 6 'scrappers' that have been generated along the way representing nearly 3 hours printing time in the bin!
Fortunately as a by product of them being so light mistakes don't actually waste that much filament.
Last edit: 19 Dec 2018 00:15 by Quorneng.
Thanks: Phil Wood, Klipkopwildlife, THE BLACKBIRD
Please Log in or Create an account to join the conversation.
- Quorneng
-
Topic Author
- Offline
- Forum Master
-
Less
More
- Posts: 9436
- Thank you received: 19043
19 Dec 2018 17:20 #35
by Quorneng
Replied by Quorneng on topic Tupolev AN 2
Actually started to build!
The first 3 formers.
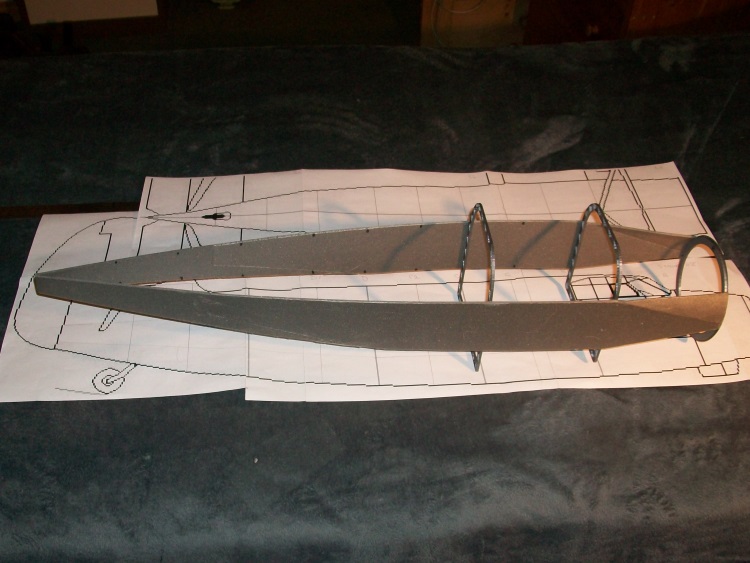
I wonder if I dare leave the fuselage completely hollow nose to tail!
The first 3 formers.
I wonder if I dare leave the fuselage completely hollow nose to tail!
Thanks: Phil Wood, Eric, Klipkopwildlife, THE BLACKBIRD
Please Log in or Create an account to join the conversation.
- THE BLACKBIRD
-

- Offline
- Forum Master
-
Less
More
- Posts: 6368
- Thank you received: 10844
20 Dec 2018 06:08 #36
by THE BLACKBIRD
Replied by THE BLACKBIRD on topic Tupolev AN 2
Are they balsa sides Simon ?
Please Log in or Create an account to join the conversation.
- Quorneng
-
Topic Author
- Offline
- Forum Master
-
Less
More
- Posts: 9436
- Thank you received: 19043
20 Dec 2018 10:54 #37
by Quorneng
Replied by Quorneng on topic Tupolev AN 2
BB
No it will all be 3mm Depron.
The full set of formers.

Still a bit 'wobbly' but it will stiffen up as the skin is added.
The cockpit canopy will be removable to insert the battery so that area will have additional internal reinforcing to maintain rigidity.
The ESC will be mounted with its external fins more or less where the oil cooler is.
The undercarriage or rather the spring unit top mounting which is actually positioned on the leading edge of the wing rather than the fuselage although it looks like it is not part of the wing structure itself!
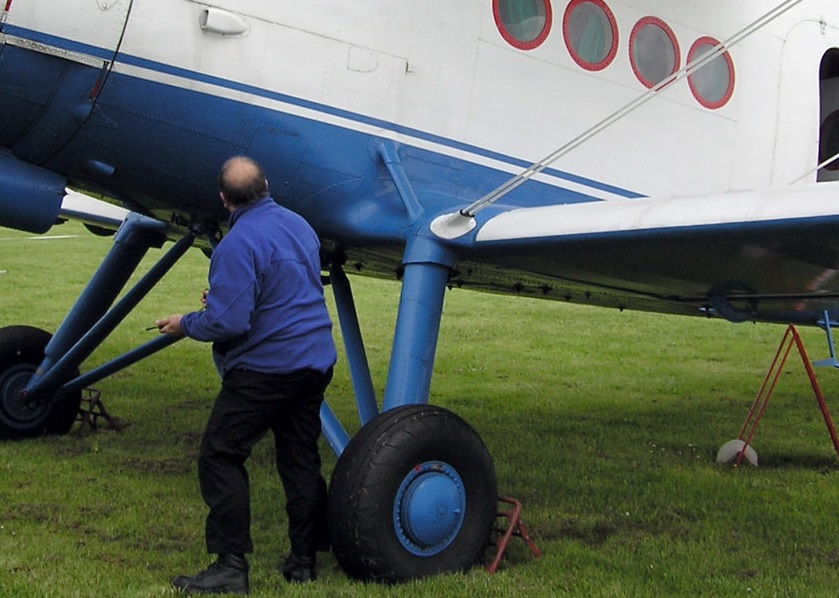
It may be necessary to include the UC mounting as part of the fuselage former. At least it will not suffer any fore and aft loads.
No it will all be 3mm Depron.
The full set of formers.
Still a bit 'wobbly' but it will stiffen up as the skin is added.
The cockpit canopy will be removable to insert the battery so that area will have additional internal reinforcing to maintain rigidity.
The ESC will be mounted with its external fins more or less where the oil cooler is.
The undercarriage or rather the spring unit top mounting which is actually positioned on the leading edge of the wing rather than the fuselage although it looks like it is not part of the wing structure itself!
It may be necessary to include the UC mounting as part of the fuselage former. At least it will not suffer any fore and aft loads.
Thanks: Phil Wood, Klipkopwildlife, THE BLACKBIRD
Please Log in or Create an account to join the conversation.
- Quorneng
-
Topic Author
- Offline
- Forum Master
-
Less
More
- Posts: 9436
- Thank you received: 19043
21 Dec 2018 23:18 - 21 Dec 2018 23:19 #38
by Quorneng
Replied by Quorneng on topic Tupolev AN 2
Just a bit more fuselage skin added so not much to show.

The biggest change has been to completely replace one former so it now includes external mounting points for the UC spring units.

This is one advantage of UHU POR a joint can be separated if it is not more than 3 days old!
The biggest change has been to completely replace one former so it now includes external mounting points for the UC spring units.
This is one advantage of UHU POR a joint can be separated if it is not more than 3 days old!
Last edit: 21 Dec 2018 23:19 by Quorneng.
Thanks: Phil Wood, Eric, Klipkopwildlife
Please Log in or Create an account to join the conversation.
- Quorneng
-
Topic Author
- Offline
- Forum Master
-
Less
More
- Posts: 9436
- Thank you received: 19043
22 Dec 2018 21:43 #39
by Quorneng
Replied by Quorneng on topic Tupolev AN 2
Only to find I made a mistake so all of yesterday work had to be scrapped.:woohoo:
A new former had to be printed.

The front mounting for the U/C A frame is now included with an internal 'beam' to take the loads.

The rear UC mounting will be part of the removable lower wing. On the full size the lower wing is in two parts so the entire undercarriage is mounted on the fuselage.
Slow but its getting there!
A new former had to be printed.
The front mounting for the U/C A frame is now included with an internal 'beam' to take the loads.
The rear UC mounting will be part of the removable lower wing. On the full size the lower wing is in two parts so the entire undercarriage is mounted on the fuselage.
Slow but its getting there!
Thanks: Phil Wood, Klipkopwildlife
Please Log in or Create an account to join the conversation.
- Quorneng
-
Topic Author
- Offline
- Forum Master
-
Less
More
- Posts: 9436
- Thank you received: 19043
23 Dec 2018 17:08 - 29 Dec 2018 22:38 #40
by Quorneng
Replied by Quorneng on topic Tupolev AN 2
It may be the Scrooge in me but Christmas (and birthdays) get in the way of aero modelling!
For his 7 th birthday train mad grandson was given a Flying Scotsman to build in an ersatz form of Meccano.
Probably cost quite a bit and a horrible thing to build, quite beyond his capabilities (and his parents!) but to the great fascination of his 2 year old brother (all those tiny shiny screws) so guess who was deputised to build it.
Took quite a few hours to do and the result doesn't 'do' anything - even the wheels are fixed!
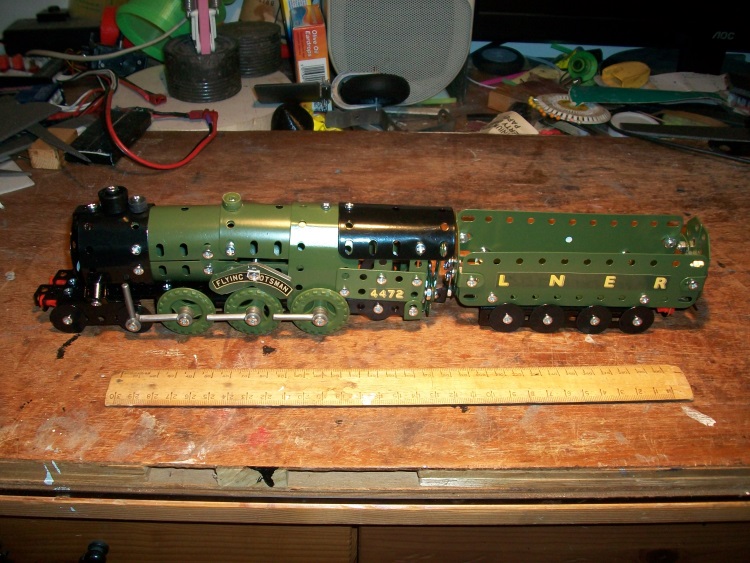
Still he likes it.
With only very limited time left I temporarily mounted the ASh-62 on the fuselage and supported it at about the right angle to check the prop clearance.

It certainly has a 'presence'.
Next job is to draw out and make a pattern for each wing centre section to ensure the last bits of fuselage skin can be set to give a good wing fit.
For his 7 th birthday train mad grandson was given a Flying Scotsman to build in an ersatz form of Meccano.
Probably cost quite a bit and a horrible thing to build, quite beyond his capabilities (and his parents!) but to the great fascination of his 2 year old brother (all those tiny shiny screws) so guess who was deputised to build it.
Took quite a few hours to do and the result doesn't 'do' anything - even the wheels are fixed!
Still he likes it.
With only very limited time left I temporarily mounted the ASh-62 on the fuselage and supported it at about the right angle to check the prop clearance.
It certainly has a 'presence'.
Next job is to draw out and make a pattern for each wing centre section to ensure the last bits of fuselage skin can be set to give a good wing fit.
Last edit: 29 Dec 2018 22:38 by Phil Wood.
Thanks: Phil Wood
Please Log in or Create an account to join the conversation.
- Eric
-

- Offline
- Moderator
-

Less
More
- Posts: 13729
- Thank you received: 14473
23 Dec 2018 17:19 #41
by Eric
if you are calm and collected when all about you are going berserk - you've missed something important!
Replied by Eric on topic Tupolev AN 2
So there's no need to guess who will be 'taken' by the wallet, to the local Hornby shop, before too long! Don't know about Lymm proper, but there are three in Warrington, if you want their addresses.
if you are calm and collected when all about you are going berserk - you've missed something important!
Please Log in or Create an account to join the conversation.
- Quorneng
-
Topic Author
- Offline
- Forum Master
-
Less
More
- Posts: 9436
- Thank you received: 19043
26 Dec 2018 22:56 #42
by Quorneng
Replied by Quorneng on topic Tupolev AN 2
Cannot avoid the family over the Christmas break so little more done.
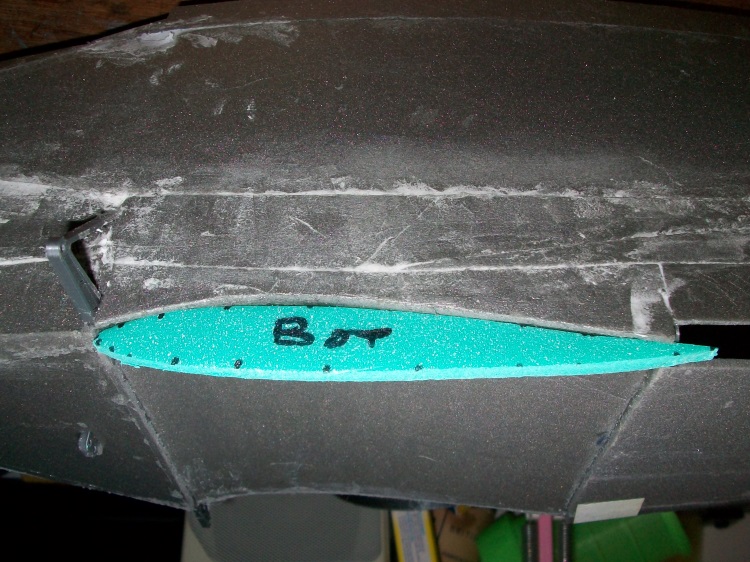
I did cut out Depron wing section for both wings so I could make sure the fuselage skin where the wings will sit was a good fit and at the right angle of incidence.

The next issue is whether to use an individual servo for each flap or put another way that would mean as many flap servos as for all the other control surfaces! :ohmy:
I did cut out Depron wing section for both wings so I could make sure the fuselage skin where the wings will sit was a good fit and at the right angle of incidence.
The next issue is whether to use an individual servo for each flap or put another way that would mean as many flap servos as for all the other control surfaces! :ohmy:
Thanks: Phil Wood, Klipkopwildlife, THE BLACKBIRD
Please Log in or Create an account to join the conversation.
- Quorneng
-
Topic Author
- Offline
- Forum Master
-
Less
More
- Posts: 9436
- Thank you received: 19043
29 Dec 2018 00:04 - 29 Dec 2018 00:07 #43
by Quorneng
Replied by Quorneng on topic Tupolev AN 2
At last I have finished the fuselage planking. I was getting rather bored with it but having a serious cough doesn't help!
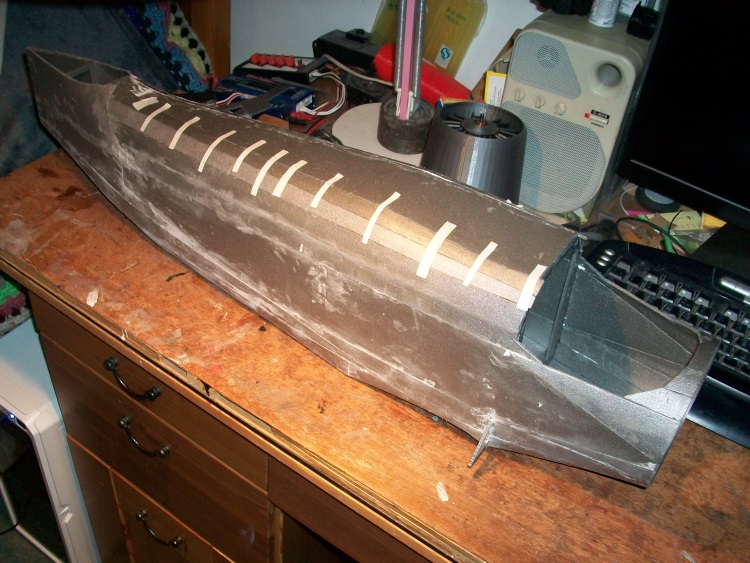
Note the masking tape strips used to hold each plank in place until the glue dries.
Still needs some filling and sanding.
The cockpit area will have a complete inner skin to maintain adequate torsional stiffness.
An interesting view down the inside of the fuselage.

Seriously empty! Note the area that will be cut out where the ESC cooling fins will protrude through the bottom of the fuselage.
In fact there will not be much more even when it is complete just two servo (rudder & elevator) right at the tail and 3 more servo leads (flaps and ailerons).
Made a start on the lower wing
Note the masking tape strips used to hold each plank in place until the glue dries.
Still needs some filling and sanding.
The cockpit area will have a complete inner skin to maintain adequate torsional stiffness.
An interesting view down the inside of the fuselage.
Seriously empty! Note the area that will be cut out where the ESC cooling fins will protrude through the bottom of the fuselage.
In fact there will not be much more even when it is complete just two servo (rudder & elevator) right at the tail and 3 more servo leads (flaps and ailerons).
Made a start on the lower wing
Last edit: 29 Dec 2018 00:07 by Quorneng.
Thanks: Phil Wood, Klipkopwildlife, THE BLACKBIRD, Ralpharr2001
Please Log in or Create an account to join the conversation.
- Phil Wood
-

- Offline
- Banned
-

29 Dec 2018 22:55 #44
by Phil Wood

Great build up to now, I'll be following closely from here on. ....... Many thanks.
Pol.
I just own the forum .... you guys make it great thanks.
Replied by Phil Wood on topic Tupolev AN 2
I've had the same problem myself with a few health issues thrown in for good measure, consequently I've only just got around to playing on the forum and catching up on the threads. Straight away I come across the Lancaster build by Ralpharr2001 and now I find this thread, I'm over the moon to say the least, I can't wait to see what I find next.Quorneng wrote: It may be the Scrooge in me but Christmas (and birthdays) get in the way of aero modelling!
Great build up to now, I'll be following closely from here on. ....... Many thanks.
Pol.
I just own the forum .... you guys make it great thanks.
Please Log in or Create an account to join the conversation.
- Quorneng
-
Topic Author
- Offline
- Forum Master
-
Less
More
- Posts: 9436
- Thank you received: 19043
29 Dec 2018 23:45 #45
by Quorneng
Replied by Quorneng on topic Tupolev AN 2
Thanks Phil but I sure my ailment is nothing compared to what you have to suffer from.
The construction of that big Lancaster does look impressive.
The wings of my AN2 will follow my usual extreme light weight construction of 2mm Depron skins over 'printed' ribs.
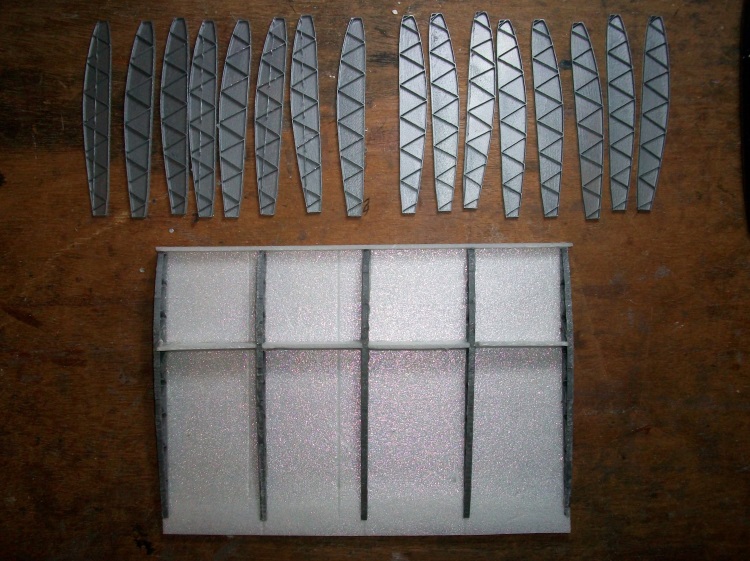
The lower wing centre section under construction with the rest of the 'short' ribs (the missing bit is flap) ready to go.
On refection I have decided to permanently fix the wings in position as I think I can live with its 48" span. Then I decided that each wing panel will be strong and stiff enough to not need spars at all and rely almost entirely on the flying wires. As a result the three parts of each wing need only be butt joint glued together (no dihedral brace) thus emulating the 'pin' joints of the full size. :woohoo:
Of course I could be wrong.
The construction of that big Lancaster does look impressive.
The wings of my AN2 will follow my usual extreme light weight construction of 2mm Depron skins over 'printed' ribs.
The lower wing centre section under construction with the rest of the 'short' ribs (the missing bit is flap) ready to go.
On refection I have decided to permanently fix the wings in position as I think I can live with its 48" span. Then I decided that each wing panel will be strong and stiff enough to not need spars at all and rely almost entirely on the flying wires. As a result the three parts of each wing need only be butt joint glued together (no dihedral brace) thus emulating the 'pin' joints of the full size. :woohoo:
Of course I could be wrong.
Thanks: Phil Wood, Klipkopwildlife, Flytilbroke
Please Log in or Create an account to join the conversation.
Time to create page: 1.807 seconds