
- Posts: 9436
- Thank you received: 19043
Antonov AN2
- Quorneng
-
 Topic Author
- Offline
- Forum Master
-

Less
More
05 Feb 2019 13:46 #76
by Quorneng
Replied by Quorneng on topic Tupolev AN 2
At last its virtually complete and taken outside for the first time.
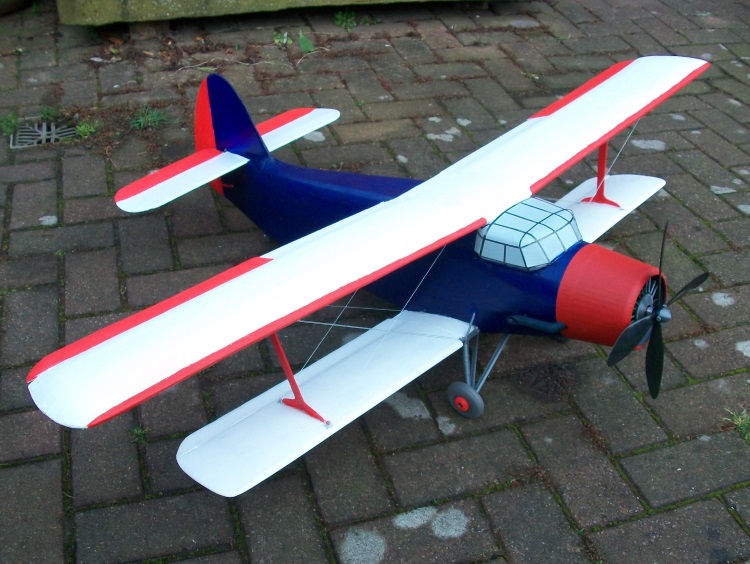
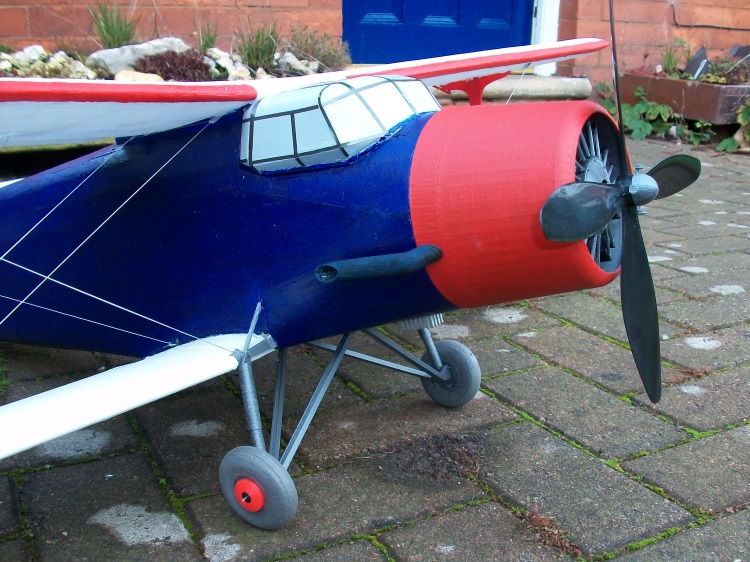
Just the cabin window to paint.
50" span. With a 2200 mAh 3s it weighs 25.5 oz (723 g) which gives a wing loading of 7.4 oz/sqft.
Just the cabin window to paint.
50" span. With a 2200 mAh 3s it weighs 25.5 oz (723 g) which gives a wing loading of 7.4 oz/sqft.
Thanks: Klipkopwildlife, THE BLACKBIRD
Please Log in or Create an account to join the conversation.
- Reach
-

- Offline
- Senior Member
-

Less
More
- Posts: 50
- Thank you received: 28
05 Feb 2019 19:43 #77
by Reach
Replied by Reach on topic Tupolev AN 2
I love the things you do. I find it amazing.
Please Log in or Create an account to join the conversation.
- Quorneng
-
Topic Author
- Offline
- Forum Master
-
Less
More
- Posts: 9436
- Thank you received: 19043
08 Feb 2019 16:08 #78
by Quorneng
Replied by Quorneng on topic Tupolev AN 2
Very much waiting for some suitable weather. It will a slow flyer so it really needs pretty calm conditions, particularly as my field is rough
soggy grass and partly surrounded by high trees!
The final scale bits.

Carb intake on top and oil cooler below.
I have also changed the u/c lower struts so the wheels are 10 mm further forward.
soggy grass and partly surrounded by high trees!
The final scale bits.
Carb intake on top and oil cooler below.
I have also changed the u/c lower struts so the wheels are 10 mm further forward.
Thanks: Klipkopwildlife, THE BLACKBIRD
Please Log in or Create an account to join the conversation.
- Quorneng
-
Topic Author
- Offline
- Forum Master
-
Less
More
- Posts: 9436
- Thank you received: 19043
10 Feb 2019 21:59 - 10 Feb 2019 22:03 #79
by Quorneng
Replied by Quorneng on topic Tupolev AN 2
The danger of the weather preventing it maiden means you start thinking. :woohoo:
I was mildly surprised that the complete motor mount and cowling actually weighed nearly as much as the motor! Although the weight is not a problem as it has plenty of power and a low wing loading, it just meant the battery had to go a little further back. However it still annoyed me a bit . further more for true scale the printed ASh 62 is a bit too far forward in the cowl and its diameter is 4mm under size! :ohmy:
I wanted to see if I could do better and by re-printing everything ahead of the first fuselage former as there is at least a possibility that with a bit of surgery it might actually be substituted for the original.
So first was to increase the ASh-62 crankcase diameter by 4 mm as this would allow the original's cylinders, heads and push rods to be used unchanged. At the same time changing the layout so the cylinders are 5 mm further back.
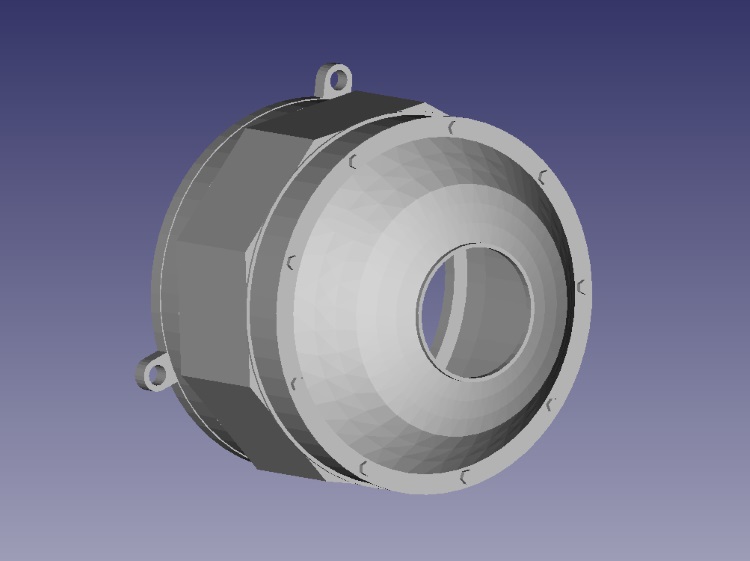
Just a CAD image at this stage as there is no need to actually print it.
In terms of 'fit' the revised and lighter motor mount and cowling do need to to printed, both just as cut down parts to reduce printing time and test exact fits and then as the full assembly to confirm rigidity and weight.
The radius 'nose' of the cowling glued to just a 10 mm long part of the circular cowling to test it was an exact fit.

At this point I realised that when the motor mount and cowling were glued together it would plenty rigid enough to directly replace the first fuselage former and so be glued directly to the Depron skin.
The lightweight motor mount and cowling.


Note the carb intake and oil cooler are now part of the cowl print.
Together these two parts weigh 33 g or just half the weight of the equivalent original bits and will be directly transferable to the Depron air frame.
The slightly larger diameter 9 cylinder will weight a bit more but only by a gram or two as just the hollow single wall crankcase is bigger, all the other parts will be the same.
With my OCD satisfied I must get on and finish repairing the Albatross!
I was mildly surprised that the complete motor mount and cowling actually weighed nearly as much as the motor! Although the weight is not a problem as it has plenty of power and a low wing loading, it just meant the battery had to go a little further back. However it still annoyed me a bit .
further more for true scale the printed ASh 62 is a bit too far forward in the cowl and its diameter is 4mm under size! :ohmy:I wanted to see if I could do better and by re-printing everything ahead of the first fuselage former as there is at least a possibility that with a bit of surgery it might actually be substituted for the original.
So first was to increase the ASh-62 crankcase diameter by 4 mm as this would allow the original's cylinders, heads and push rods to be used unchanged. At the same time changing the layout so the cylinders are 5 mm further back.
Just a CAD image at this stage as there is no need to actually print it.
In terms of 'fit' the revised and lighter motor mount and cowling do need to to printed, both just as cut down parts to reduce printing time and test exact fits and then as the full assembly to confirm rigidity and weight.
The radius 'nose' of the cowling glued to just a 10 mm long part of the circular cowling to test it was an exact fit.
At this point I realised that when the motor mount and cowling were glued together it would plenty rigid enough to directly replace the first fuselage former and so be glued directly to the Depron skin.
The lightweight motor mount and cowling.
Note the carb intake and oil cooler are now part of the cowl print.
Together these two parts weigh 33 g or just half the weight of the equivalent original bits and will be directly transferable to the Depron air frame.
The slightly larger diameter 9 cylinder will weight a bit more but only by a gram or two as just the hollow single wall crankcase is bigger, all the other parts will be the same.
With my OCD satisfied I must get on and finish repairing the Albatross!
Last edit: 10 Feb 2019 22:03 by Quorneng.
Thanks: Klipkopwildlife, THE BLACKBIRD
Please Log in or Create an account to join the conversation.
- Quorneng
-
Topic Author
- Offline
- Forum Master
-
Less
More
- Posts: 9436
- Thank you received: 19043
19 Feb 2019 21:06 - 19 Feb 2019 21:13 #80
by Quorneng
Replied by Quorneng on topic Tupolev AN 2
The AN2 as it stands has a fully detailed engine but its rather hidden away inside a non removable cowling! :ohmy:
With several days of non flying weather I started thinking how it might be possible to have an easily removable cowling particularly as I had already made a start on a new engine, ASh-62X, that would be a more accurate fit in the cowling.
I discounted using screws as they would have to be small not to be obvious and would not really fall into the category of 'easy to remove'.
The preferred solution would be a multi point 'turn and lock' arrangement where the components might also be printed as part of the cowl and motor mounting.
So first the revised slightly larger ASh-62X, all 64 printed parts, was glued together. This was followed by a revised motor mount bulkhead (3 hours to print) that incorporates the 4 recess slots

that match the 4 pegs in the cowling (2 hours).
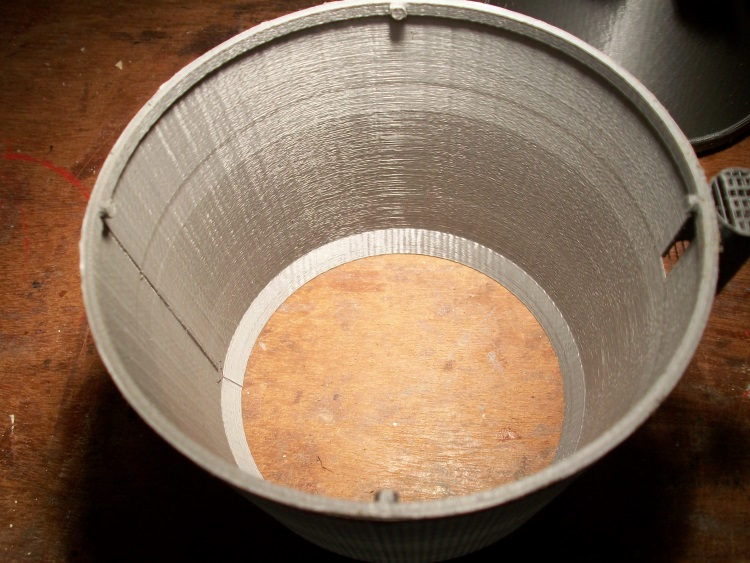
The two parts with the ASh-62X bolted in place.

And the cowl and mount 'locked' together.
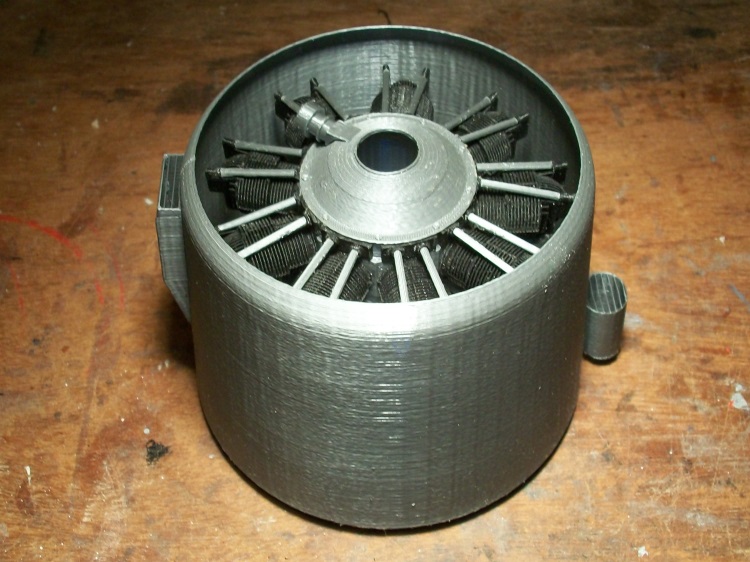
When finally complete (exhaust and carb still to do) the whole assembly can simply replace the existing cowling, motor & mount and first fuselage former as it can be glued directly to the inside of the existing fuselage Depron.
The final picture is a bit of a joke showing just how thin the cowling really is!

I have no immediate plans to use the ASh-62X and cowl - unless flying results in some significant nose damage! :woohoo:
With several days of non flying weather I started thinking how it might be possible to have an easily removable cowling particularly as I had already made a start on a new engine, ASh-62X, that would be a more accurate fit in the cowling.
I discounted using screws as they would have to be small not to be obvious and would not really fall into the category of 'easy to remove'.
The preferred solution would be a multi point 'turn and lock' arrangement where the components might also be printed as part of the cowl and motor mounting.
So first the revised slightly larger ASh-62X, all 64 printed parts, was glued together. This was followed by a revised motor mount bulkhead (3 hours to print) that incorporates the 4 recess slots
that match the 4 pegs in the cowling (2 hours).
The two parts with the ASh-62X bolted in place.
And the cowl and mount 'locked' together.
When finally complete (exhaust and carb still to do) the whole assembly can simply replace the existing cowling, motor & mount and first fuselage former as it can be glued directly to the inside of the existing fuselage Depron.
The final picture is a bit of a joke showing just how thin the cowling really is!
I have no immediate plans to use the ASh-62X and cowl - unless flying results in some significant nose damage! :woohoo:
Last edit: 19 Feb 2019 21:13 by Quorneng.
Thanks: Eric, Klipkopwildlife, Ralpharr2001
Please Log in or Create an account to join the conversation.
- Quorneng
-
Topic Author
- Offline
- Forum Master
-
Less
More
- Posts: 9436
- Thank you received: 19043
07 Mar 2019 14:01 - 07 Mar 2019 14:02 #81
by Quorneng
Replied by Quorneng on topic Tupolev AN 2
With the current wind and rain that looks like it will stay for some time I wondered what could be improved on the AN2.
Although satisfactory the balsa/Depron wing struts and the rigging attachments were not 'neat' in engineering terms.
First could the wing strut be printed and so remove one of the last bits of balsa used in the AN2's construction?
The only other balsa is in the tail plane struts.
The printed strut.

It is 4 mm thick, has a rounded leading and trailing edge, is hollow with internal bracing and weighs 4.5 g.
Rather than attaching the rigging to the wing the strut has a 0.8 mm hole at the end of each 'leg' so the line can be attached directly to it

I don't why I bother. Its not as if I an likely to build another. It must be OCD!
Although satisfactory the balsa/Depron wing struts and the rigging attachments were not 'neat' in engineering terms.
First could the wing strut be printed and so remove one of the last bits of balsa used in the AN2's construction?
The only other balsa is in the tail plane struts.
The printed strut.
It is 4 mm thick, has a rounded leading and trailing edge, is hollow with internal bracing and weighs 4.5 g.
Rather than attaching the rigging to the wing the strut has a 0.8 mm hole at the end of each 'leg' so the line can be attached directly to it
I don't why I bother. Its not as if I an likely to build another. It must be OCD!
Last edit: 07 Mar 2019 14:02 by Quorneng.
Thanks: Klipkopwildlife
Please Log in or Create an account to join the conversation.
- Quorneng
-
Topic Author
- Offline
- Forum Master
-
Less
More
- Posts: 9436
- Thank you received: 19043
08 Mar 2019 21:11 - 08 Mar 2019 21:12 #82
by Quorneng
Replied by Quorneng on topic Tupolev AN 2
Just because in the original they contain the last little bit of balsa in the build the alternative 'printed' tail plane braces and associated fuselage former.

Of course in this picture its upside down but to actually use it would require the rear fuselage to be cut open to install the former!. :ohmy:
Note the retaining pins made from printer filament.
I will add it to the 'bag of bits' I have set aside for a 'future' AN2!
Of course in this picture its upside down but to actually use it would require the rear fuselage to be cut open to install the former!. :ohmy:
Note the retaining pins made from printer filament.
I will add it to the 'bag of bits' I have set aside for a 'future' AN2!
Last edit: 08 Mar 2019 21:12 by Quorneng.
Thanks: Klipkopwildlife
Please Log in or Create an account to join the conversation.
- Mowerman
-

- Offline
- Elite Member
-

Less
More
- Posts: 218
- Thank you received: 139
09 Mar 2019 10:32 #83
by Mowerman
Replied by Mowerman on topic Tupolev AN 2
Fantastic work there Simon
Just a thought, we are all being urged to use less plastic but does any one produce bio-degradable printer filament ?
Just a thought, we are all being urged to use less plastic but does any one produce bio-degradable printer filament ?
Please Log in or Create an account to join the conversation.
- Quorneng
-
Topic Author
- Offline
- Forum Master
-
Less
More
- Posts: 9436
- Thank you received: 19043
09 Mar 2019 13:21 #84
by Quorneng
Replied by Quorneng on topic Tupolev AN 2
Mowerman
Don't worry all my 'plastic' components are made from PLA {Polylactic acid} as it is easy to print with. Surprisingly it is not an oil based plastic (its made from plant starch) and is biodegradable.
It has a further advantage that is does not give off any nasty gases when heated as do most oil based plastics. An important consideration when most DIY 3D printers are used indoors without proper 'ventilated' enclosures.
The big disadvantage of PLA is its low 'softening' temperature of about 50 Celsius. A surface temperature that can be easily reached on a hot sunny day. Seems to be a real problem in the US although not so much in the UK.
Up to now i have largely avoided the problem by only using printed PLA components inside Depron skinned planes and Depron (polystyrene) will withstand 100+ Celsius before it significantly softens.
To be honest all this was not due to any "green" credentials on my part but by pure accident!
Thanks: Klipkopwildlife, Mowerman
Please Log in or Create an account to join the conversation.
- Eric
-

- Offline
- Moderator
-

Less
More
- Posts: 13726
- Thank you received: 14467
09 Mar 2019 19:34 #85
by Eric
if you are calm and collected when all about you are going berserk - you've missed something important!
Replied by Eric on topic Tupolev AN 2
Hmmm! The big disadvantage of PLA is its low 'softening' temperature of about 50 Celsius. - You know how hot it gets in a car, with the windows shut, on a sunny day. Have you tried leaving a depron model outside, with a thermometer inside it, to see how hot it gets in there with no air movement?
if you are calm and collected when all about you are going berserk - you've missed something important!
Please Log in or Create an account to join the conversation.
- Quorneng
-
Topic Author
- Offline
- Forum Master
-
Less
More
- Posts: 9436
- Thank you received: 19043
10 Mar 2019 00:13 #86
by Quorneng
Replied by Quorneng on topic Tupolev AN 2
But when its warm and sunny I don't keep my planes in the car, I'm flying them outside!!!
Further I can't imagine that in the UK the surface temperature of Depron even in direct sunshine ever gets to 100 Celsius and being a very good insulator it will not transmit much heat to the PLA inside.
As a result Depron/PLA construction has not been a "sun" problem for me - so far.
Further I can't imagine that in the UK the surface temperature of Depron even in direct sunshine ever gets to 100 Celsius and being a very good insulator it will not transmit much heat to the PLA inside.
As a result Depron/PLA construction has not been a "sun" problem for me - so far.
Please Log in or Create an account to join the conversation.
- Eric
-
- Offline
- Moderator
-
Less
More
- Posts: 13726
- Thank you received: 14467
10 Mar 2019 09:36 #87
by Eric
if you are calm and collected when all about you are going berserk - you've missed something important!
Replied by Eric on topic Tupolev AN 2
Agreed - but I meant with the model outside, in direct sun, and the thermo inside the model! :evil:
if you are calm and collected when all about you are going berserk - you've missed something important!
Please Log in or Create an account to join the conversation.
- Quorneng
-
Topic Author
- Offline
- Forum Master
-
Less
More
- Posts: 9436
- Thank you received: 19043
22 Mar 2019 21:10 - 22 Mar 2019 21:11 #88
by Quorneng
Replied by Quorneng on topic Tupolev AN 2
As its flight characteristics appear to be sorted I did a bit of printing - the cabin windows with clear filament.

Of course not optically flat but all eight only weigh 2g and they do let light in.

Visible cabin lighting for night flying?
Of course not optically flat but all eight only weigh 2g and they do let light in.
Visible cabin lighting for night flying?
Last edit: 22 Mar 2019 21:11 by Quorneng.
Thanks: Klipkopwildlife, THE BLACKBIRD
Please Log in or Create an account to join the conversation.
Time to create page: 1.044 seconds