
- Posts: 234
- Thank you received: 328
Precedent T180 Restoration
- squareflux
- Topic Author
- Offline
- Elite Member
-

Less
More
21 Jun 2021 21:09 #1
by squareflux
Precedent T180 Restoration was created by squareflux
I picked up this Precedent T180 and I'm going to restore it to flying condition.
I started by stripping the covering from the wing. It looks to be in decent condition, with just one possible repaired thumb hole next to one of the wing bolts.There's a bit of a gap in the bottom where the wings are joined.
I need to lengthen the control rods and use longer control horns, as the rods were running against the wing surface.
I also need to use better hinges. The ones that were used were really thin, and only one of the three on each aileron were glued in properly.
Any tips for removing the leftover residue from the covering other than sanding?
Thanks: Klipkopwildlife
Please Log in or Create an account to join the conversation.
- Quorneng
-

- Offline
- Forum Master
-

Less
More
- Posts: 9436
- Thank you received: 19043
21 Jun 2021 21:25 #2
by Quorneng
Replied by Quorneng on topic Precedent T180 Restoration
Squareflux
That skin joint at the dihedral break does indeed look rather suspect.
Under a bending load very little of the skin strength would be transferred across so you would be relying almost entirely on the spar.
I would be tempted to use a glass cloth/resin 'bandage' over the joint, top and bottom, to ensure the wing had something like its full bending strength.
Thanks: Klipkopwildlife, squareflux
Please Log in or Create an account to join the conversation.
- Eric
-

- Offline
- Moderator
-

Less
More
- Posts: 13726
- Thank you received: 14470
21 Jun 2021 21:35 #3
by Eric
if you are calm and collected when all about you are going berserk - you've missed something important!
Replied by Eric on topic Precedent T180 Restoration
That poor model has had a hard life!
As Simon put, that wing joint is suspect. It might be cheaper to subject it to a 'bend' test before you go any further. That r/h panel appears to be ready-creased near the root.
I'd also dispose of those bellcranks and push-rods, and fit direct drive servos and a Y lead - much easier on the servos, and more accurate too.
Lots of minor dents in that wing skin, they will need to be filled, or the re-covered wing will have pox marks all over it!
if you are calm and collected when all about you are going berserk - you've missed something important!
Thanks: Klipkopwildlife, squareflux
Please Log in or Create an account to join the conversation.
- squareflux
- Topic Author
- Offline
- Elite Member
-
Less
More
- Posts: 234
- Thank you received: 328
21 Jun 2021 21:54 #4
by squareflux
Replied by squareflux on topic Precedent T180 Restoration
Thanks for the advice. If I could join a club, I'm sure I'd be able to ask these questions. But I'll need to wait for covid to bugger off first.
I've watched a few build videos, and they've talked about "glassing" surfaces. Is that what you're talking about? I'd need to read up/research what it is, and how to do it. I'm willing to do what will make this rebuild better and last. My hope is my son can fly it, and keep it, and pass it on to his kids (yeah, I'm sentimental) :lol:
As for the servos, before I removed the covering, I had thought about using individual servos, and making an access panel with the servos on it. I know I'd need to add some ply spars for it to screw into.
But then when I saw the pulleys, I thought they looked ok. But I agree that the individual servos would be better.
And about the bend test, how would that work? Would it be putting the join on the edge of a table, and flexing the wing lengthways to see what gives? Would it be better to try and separate the wing and rejoin it, or would a glass cloth over that section give it enough strength?
Thanks: Klipkopwildlife
Please Log in or Create an account to join the conversation.
- paul d
-
- Offline
- Forum Veteran
-

Less
More
- Posts: 2074
- Thank you received: 2292
21 Jun 2021 21:54 #5
by paul d
balsa is best.
Replied by paul d on topic Precedent T180 Restoration
cellulose thinner will remove the residue..it's a messy and smelly job!
wouldn't worry to much about the sheeting, it's the spar that takes all the load but as suggested I would give it a good look and a hard wiggle and maybe add some gussets to any suspect joints.
It has seen some action that's for sure but it's not terminal.
wouldn't worry to much about the sheeting, it's the spar that takes all the load but as suggested I would give it a good look and a hard wiggle and maybe add some gussets to any suspect joints.
It has seen some action that's for sure but it's not terminal.
balsa is best.
Thanks: Klipkopwildlife, squareflux
Please Log in or Create an account to join the conversation.
- Klipkopwildlife
-

- Offline
- Administrator
-

- I'm supposed to be retired!
22 Jun 2021 07:59 #6
by Klipkopwildlife
Do it now, you may never get another chance
Replied by Klipkopwildlife on topic Precedent T180 Restoration
The bell crank supports in the wing will be quite ok to support the individual aileron servos. Glassing involves covering the entire structure with light weight cloth and painting it with resin. Very good for adding weight! A bandage around the centre section will be great. As for dings fill them with Spackle and a light rub down with 600 water paper.
Do it now, you may never get another chance
Thanks: squareflux
Please Log in or Create an account to join the conversation.
- THE BLACKBIRD
-

- Offline
- Forum Master
-
Less
More
- Posts: 6368
- Thank you received: 10844
22 Jun 2021 09:06 #7
by THE BLACKBIRD
Replied by THE BLACKBIRD on topic Precedent T180 Restoration
B&Q do a very good super light filler, its not the cheapest but i always used it, you can feel the difference when you pick up the tub
Thanks: Klipkopwildlife, squareflux
Please Log in or Create an account to join the conversation.
- paul d
-
- Offline
- Forum Veteran
-
Less
More
- Posts: 2074
- Thank you received: 2292
22 Jun 2021 09:10 #8
by paul d
balsa is best.
Replied by paul d on topic Precedent T180 Restoration
I picked up a tub recently from home bargains...99p!!
balsa is best.
Thanks: Klipkopwildlife
Please Log in or Create an account to join the conversation.
- Quorneng
-
- Offline
- Forum Master
-
Less
More
- Posts: 9436
- Thank you received: 19043
22 Jun 2021 11:51 #9
by Quorneng
Replied by Quorneng on topic Precedent T180 Restoration
I personally am not a fan of 'over all' glassing although it can, with appropriate preparation of the structure, give an excellent finish if that is what you want however it does add some weight.
My advice is to add strength only where it is needed and reduce it where it is not. It is all too easy to make a plane apparently indestructible to 'knocks and dings' but the extra weight means it flies faster so it crashes harder too. A 'well worn' plane that is enjoyable to fly is likely to survive longer than one that is a handful even if it has spectacular looks.
My own favourite wing bend test is to load the plane up to its flying weight with the correct CofG and then support it by just its wing tips. This will impose a bending load on the wing root about the same as pulling a 4g manoeuvre (a circular loop). Obviously if you add weight to the fuselage so it is twice the normal flying weight the wing tip test is then equivalent to pulling 8g. Only high powered 'full house' aerobatic planes are likely to be able to do manoeuvres that exceed such a figure.
Of course you don't usually want to determine its ultimate strength (unless you want to build another! ) but simply is it strong enough for normal use.
This is a wing tip test on my 242 g flying weight Super Cub with an additional 510g added to the wing centre.
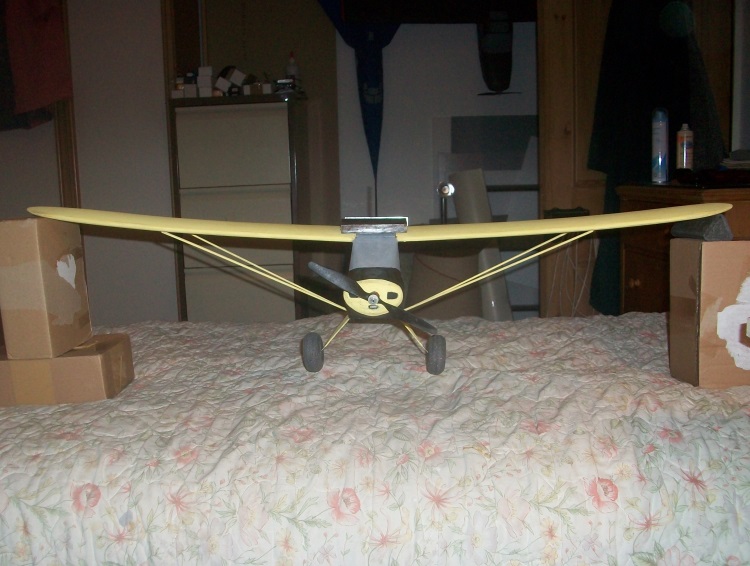
At least I know it will not break under any flight load it could possibly generate.
Of course this test is only determining the wing bending strength. In flight, particularly at speed, there are twisting forces as well. A wing that twists in flight can cause an almost instant failure even though it might only be flying straight and level at the time.
My advice is to add strength only where it is needed and reduce it where it is not. It is all too easy to make a plane apparently indestructible to 'knocks and dings' but the extra weight means it flies faster so it crashes harder too. A 'well worn' plane that is enjoyable to fly is likely to survive longer than one that is a handful even if it has spectacular looks.
My own favourite wing bend test is to load the plane up to its flying weight with the correct CofG and then support it by just its wing tips. This will impose a bending load on the wing root about the same as pulling a 4g manoeuvre (a circular loop). Obviously if you add weight to the fuselage so it is twice the normal flying weight the wing tip test is then equivalent to pulling 8g. Only high powered 'full house' aerobatic planes are likely to be able to do manoeuvres that exceed such a figure.
Of course you don't usually want to determine its ultimate strength (unless you want to build another! ) but simply is it strong enough for normal use.
This is a wing tip test on my 242 g flying weight Super Cub with an additional 510g added to the wing centre.
At least I know it will not break under any flight load it could possibly generate.
Of course this test is only determining the wing bending strength. In flight, particularly at speed, there are twisting forces as well. A wing that twists in flight can cause an almost instant failure even though it might only be flying straight and level at the time.
Thanks: Eric, Klipkopwildlife, squareflux
Please Log in or Create an account to join the conversation.
- squareflux
- Topic Author
- Offline
- Elite Member
-
Less
More
- Posts: 234
- Thank you received: 328
22 Jun 2021 17:10 #10
by squareflux
Replied by squareflux on topic Precedent T180 Restoration
I tried flexing the wing today, and there is some movement at the join. So I don't want to try further and risk damaging it. I'll do the glass bandage as suggested.
I took the pulleys out of the wings.
This is how I was thinking of positioning the servos, obviously on the inside :lol:
I'll need to remove the plate that's there, and build little plate to attach the servo to, and then add some thicker balsa or ply on the inside for the plate to screw into, so I can access the servos again if needed.
Thanks: Klipkopwildlife
Please Log in or Create an account to join the conversation.
- squareflux
- Topic Author
- Offline
- Elite Member
-
Less
More
- Posts: 234
- Thank you received: 328
22 Jun 2021 19:21 #11
by squareflux
Replied by squareflux on topic Precedent T180 Restoration
Stripped the fuselage. It's looking ok.
There's a cracked panel at the front. It looks like it's been sliced and had the front of the windscreen in it, but then the panel has been pressed and cracked.
The windows were epoxied on, so it's left a bit of a mess getting them off and will need tidied up.
There's a former in the bottom that's not attached to either side, and it's only lightly attached. I'm not sure what to do with it...
The wood looks like it's been quite well protected from fuel. There's no spongy areas. I got my camera down into the fuel tank bay, and also underneath it.
Thanks: Klipkopwildlife
Please Log in or Create an account to join the conversation.
- squareflux
- Topic Author
- Offline
- Elite Member
-
Less
More
- Posts: 234
- Thank you received: 328
22 Jun 2021 19:30 - 22 Jun 2021 19:32 #12
by squareflux
Replied by squareflux on topic Precedent T180 Restoration
The tail is a different story.
One of the tailplane ribs has been broken, so I'll need to try and make a new one.
It also looks like the tail has either been repaired or strengthened. There's glue on top of the coating, so it's been done after build.
I'd read that the tail was a weak area and prone to damage in heavy landings.
Would it be advisable to try cutting through and removing the tail, then strengething it all proberly when reassembling?
A rough look showed it didn't seem to be quite level either, but I'll need to take some measurements, and also check it's on straight.
Last edit: 22 Jun 2021 19:32 by squareflux.
Thanks: Klipkopwildlife
Please Log in or Create an account to join the conversation.
- Klipkopwildlife
-
- Offline
- Administrator
-
- I'm supposed to be retired!
23 Jun 2021 09:58 #13
by Klipkopwildlife
Do it now, you may never get another chance
Replied by Klipkopwildlife on topic Precedent T180 Restoration
I would try and cut the empenage off, clean and sand, then cover. Cut out the covering where you need to glue, then once you have covered the fuselage you can glue the tailplane back on properly/
Do it now, you may never get another chance
Thanks: Flytilbroke, squareflux
Please Log in or Create an account to join the conversation.
- squareflux
- Topic Author
- Offline
- Elite Member
-
Less
More
- Posts: 234
- Thank you received: 328
23 Jun 2021 10:25 #14
by squareflux
Replied by squareflux on topic Precedent T180 Restoration
Thanks. I'm heading to the RC shop later today for supplies.
Thanks: Klipkopwildlife
Please Log in or Create an account to join the conversation.
- Eric
-
- Offline
- Moderator
-
Less
More
- Posts: 13726
- Thank you received: 14470
23 Jun 2021 10:56 #15
by Eric
if you are calm and collected when all about you are going berserk - you've missed something important!
Replied by Eric on topic Precedent T180 Restoration
Looking at those photo's, that woodwork is pretty rough, with lots of 'gappy' almost joints! :woohoo:
You have a challenge on, reviving that model.
You have a challenge on, reviving that model.
if you are calm and collected when all about you are going berserk - you've missed something important!
Thanks: Klipkopwildlife, squareflux
Please Log in or Create an account to join the conversation.
Time to create page: 1.191 seconds