
- Posts: 9436
- Thank you received: 19043
Printing with Light Weight PLA
- Quorneng
-
 Topic Author
- Offline
- Forum Master
-

Less
More
11 Mar 2023 14:44 #61
by Quorneng
Replied by Quorneng on topic Printing with Light Weight PLA
Having decided to simply glues the seros onto the wing underside I ave included a simple fairing.
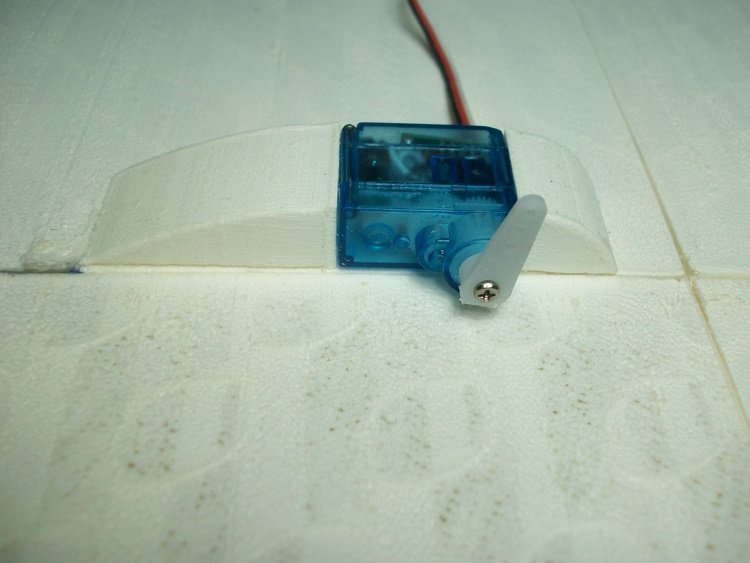
More than jst aerodynamic it also helps to secure the servo.
For simplicity the servo wire will be taped to the wing underside.
I have also tested the 1010 mm span wing with the likely flight loads. It did not break but flexed quite a bit.
I may 'chicken out' and add a thin PLA stiffener to the underside of at least to the centre & .inboard wing panel.
Thanks: Klipkopwildlife
Please Log in or Create an account to join the conversation.
- Quorneng
-
Topic Author
- Offline
- Forum Master
-
Less
More
- Posts: 9436
- Thank you received: 19043
12 Mar 2023 15:35 #62
by Quorneng
Replied by Quorneng on topic Printing with Light Weight PLA
Nothing earth shattering but the first servo is working the close fitting printed aileron.
More for my own record as just another daft idea than anything particularly interesting!
More for my own record as just another daft idea than anything particularly interesting!
Thanks: Klipkopwildlife
Please Log in or Create an account to join the conversation.
- jon.in.swansea
-

- Offline
- Elite Member
-

Less
More
- Posts: 766
- Thank you received: 1192
12 Mar 2023 17:08 #63
by jon.in.swansea
Replied by jon.in.swansea on topic Printing with Light Weight PLA
This 1st version looks very nice. Can't wait to see how it flies! And the weight is super-low. We are all hoping that you have quite a few hours in the air before you are forced to 2nd version.
Thanks: Klipkopwildlife
Please Log in or Create an account to join the conversation.
- jon.in.swansea
-
- Offline
- Elite Member
-
Less
More
- Posts: 766
- Thank you received: 1192
12 Mar 2023 17:10 #64
by jon.in.swansea
Replied by jon.in.swansea on topic Printing with Light Weight PLA
The adding to the face of the wing is an interesting alternative to my attempt at forming in a depression for the servo. Where are you going to run the wiring?
Thanks: Klipkopwildlife
Please Log in or Create an account to join the conversation.
- Klipkopwildlife
-

- Offline
- Administrator
-

- I'm supposed to be retired!
12 Mar 2023 17:13 #65
by Klipkopwildlife
Do it now, you may never get another chance
Replied by Klipkopwildlife on topic Printing with Light Weight PLA
Taped to the wing underside.
Do it now, you may never get another chance
Thanks: jon.in.swansea
Please Log in or Create an account to join the conversation.
- Quorneng
-
Topic Author
- Offline
- Forum Master
-
Less
More
- Posts: 9436
- Thank you received: 19043
12 Mar 2023 20:56 - 12 Mar 2023 21:00 #66
by Quorneng
Replied by Quorneng on topic Printing with Light Weight PLA
Here is the wing mounted on the Wing Dragon fuselage.
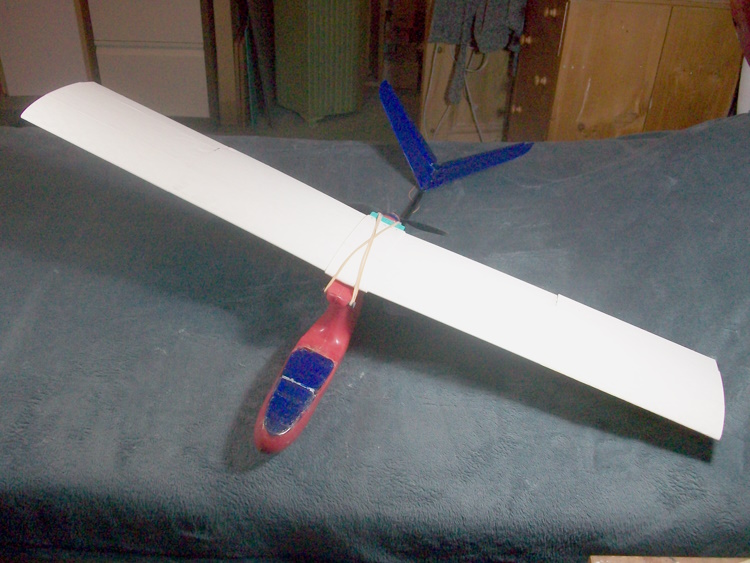
Of course not yet flown, much too windy!
I do not do taped! The servo wires are simply glued to the wing underside.
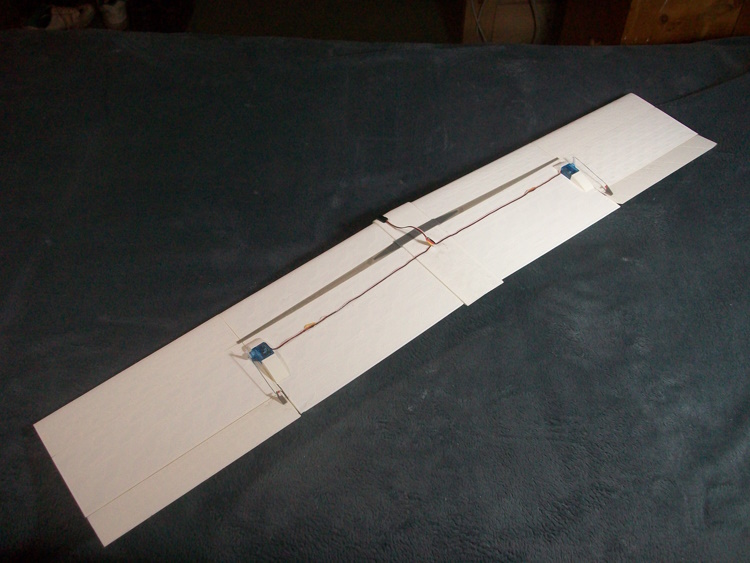
As they a 3.7g servo with 32AWG leads they are soft and flexible so easy to glue although they were taped until the glue set.
You may also note the thin, 0.5 mm, PLA 'flange' also glued on the underside. It provides a bit more bending resistance, just in case.
The servos are on a Y lead just as they are on the Blue Dragon XPS wing and fortunately I even mounted them the same way round.
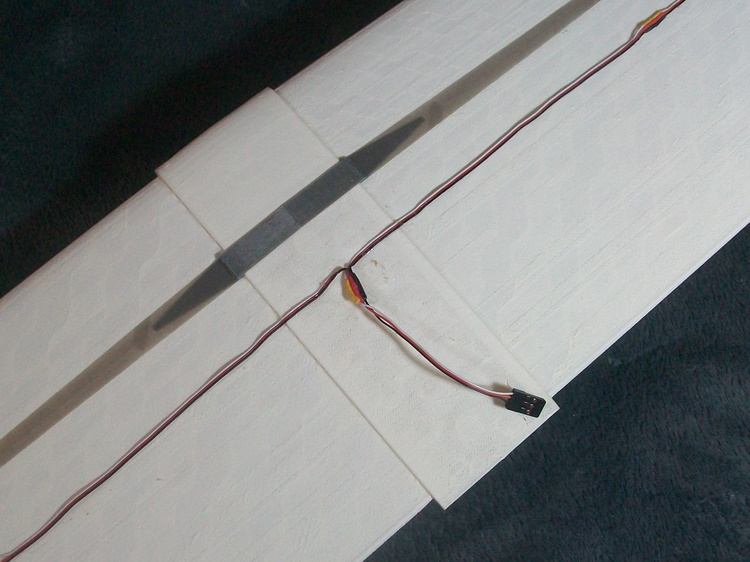
A significant point on a 35 meg Tx with no model memories.
For simplicity all my planes on 35 meg are set up the same.

Of course not yet flown, much too windy!
I do not do taped! The servo wires are simply glued to the wing underside.
As they a 3.7g servo with 32AWG leads they are soft and flexible so easy to glue although they were taped until the glue set.
You may also note the thin, 0.5 mm, PLA 'flange' also glued on the underside. It provides a bit more bending resistance, just in case.
The servos are on a Y lead just as they are on the Blue Dragon XPS wing and fortunately I even mounted them the same way round.
A significant point on a 35 meg Tx with no model memories.
For simplicity all my planes on 35 meg are set up the same.
Last edit: 12 Mar 2023 21:00 by Quorneng.
Thanks: Klipkopwildlife, jon.in.swansea
Please Log in or Create an account to join the conversation.
- Klipkopwildlife
-
- Offline
- Administrator
-
- I'm supposed to be retired!
13 Mar 2023 06:52 #67
by Klipkopwildlife
Do it now, you may never get another chance
Replied by Klipkopwildlife on topic Printing with Light Weight PLA
But in post #61 you said "For simplicity the servo wire will be taped to the wing underside.". Pedantry strikes again.

Do it now, you may never get another chance
Please Log in or Create an account to join the conversation.
- Quorneng
-
Topic Author
- Offline
- Forum Master
-
Less
More
- Posts: 9436
- Thank you received: 19043
13 Mar 2023 12:04 - 13 Mar 2023 12:06 #68
by Quorneng
Replied by Quorneng on topic Printing with Light Weight PLA
Fair enough. I stand admonished.
I my defence I did add it was taped to the underside as the glue dried.
After doing some strength tests it appears the limit of such a printed structure is not tension but compression. The skin buckles before it tears.
To be expected as although there is adequate of cross section area in the wing skin it is basically wide and thin. Not good to resist compression.
It could be improved by giving the skin closer support but that rapidly adds weight.
Keen to keep the wing 'just printed' I looked at creating the equivalent of a spar as part of the skin and with a structural shear web between them but still all in LW-PLA.
The first step might be considered a bit of a cheat.
Adding a series of closely spaced lines to the CAD wing sketch

When printed it effectively creates a 4x4 mm solid 'spar' top and bottom in the wing without changing the outer wing profile. A square section should adequately resist compression. All the filaments in each spar run along the length of the span as they do in the skin.
Using the "modify setting for overlaps" feature in CURA it is possible to add a 'truss' type infill just between the spar flanges leaving the rest of the wing with a Gyroid 4% infill as before.
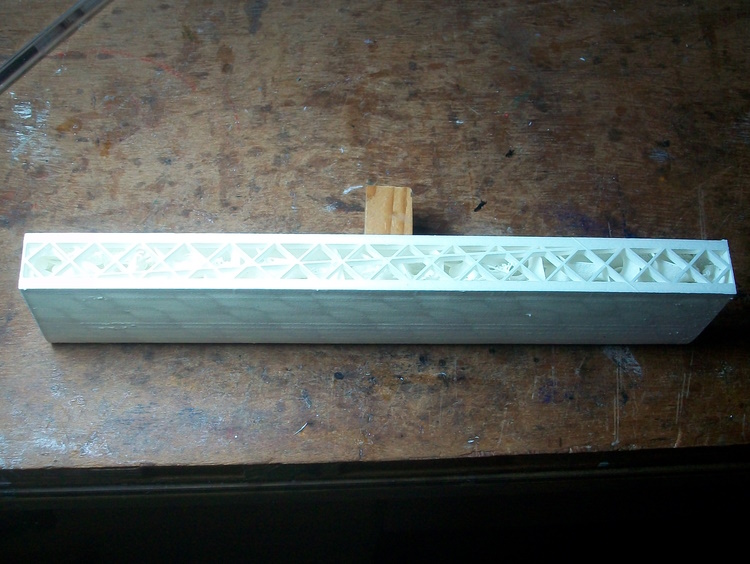
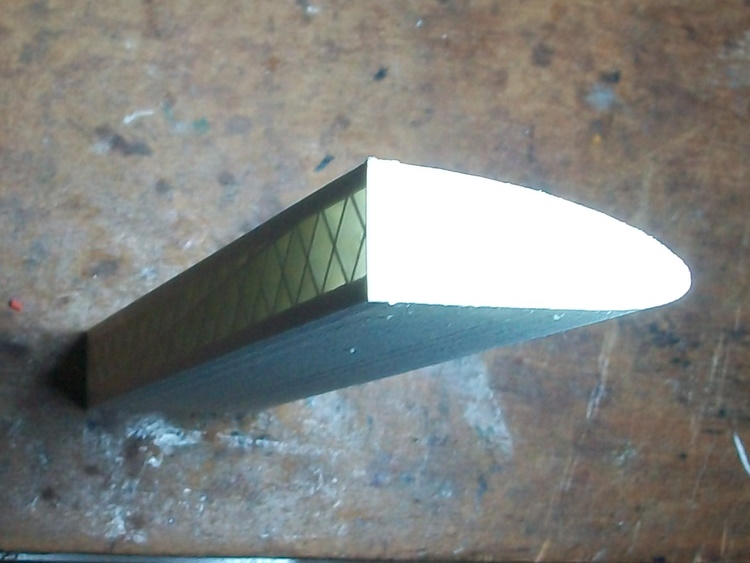
It makes a considerable difference with the skin showing no signs of buckling at bending forces much greater than with the simple printed wing.
It adds 2.7 g to the weight.
I doubt doing the same for the rear wing part will be necessary so the total weigh gain for a complete "spar" wing might be as little as 12g.

However first I will flight test the simple printed wing.
Then I might have to buy some more LW-PLA!
I my defence I did add it was taped to the underside as the glue dried.
After doing some strength tests it appears the limit of such a printed structure is not tension but compression. The skin buckles before it tears.
To be expected as although there is adequate of cross section area in the wing skin it is basically wide and thin. Not good to resist compression.
It could be improved by giving the skin closer support but that rapidly adds weight.
Keen to keep the wing 'just printed' I looked at creating the equivalent of a spar as part of the skin and with a structural shear web between them but still all in LW-PLA.
The first step might be considered a bit of a cheat.
Adding a series of closely spaced lines to the CAD wing sketch
When printed it effectively creates a 4x4 mm solid 'spar' top and bottom in the wing without changing the outer wing profile. A square section should adequately resist compression. All the filaments in each spar run along the length of the span as they do in the skin.
Using the "modify setting for overlaps" feature in CURA it is possible to add a 'truss' type infill just between the spar flanges leaving the rest of the wing with a Gyroid 4% infill as before.
It makes a considerable difference with the skin showing no signs of buckling at bending forces much greater than with the simple printed wing.
It adds 2.7 g to the weight.
I doubt doing the same for the rear wing part will be necessary so the total weigh gain for a complete "spar" wing might be as little as 12g.
However first I will flight test the simple printed wing.
Then I might have to buy some more LW-PLA!
Last edit: 13 Mar 2023 12:06 by Quorneng.
Thanks: Klipkopwildlife, jon.in.swansea
Please Log in or Create an account to join the conversation.
- Klipkopwildlife
-
- Offline
- Administrator
-
- I'm supposed to be retired!
13 Mar 2023 13:54 #69
by Klipkopwildlife
Do it now, you may never get another chance
Replied by Klipkopwildlife on topic Printing with Light Weight PLA
Sorry Simon, I just couldn't resist.
Do it now, you may never get another chance
Please Log in or Create an account to join the conversation.
- Quorneng
-
Topic Author
- Offline
- Forum Master
-
Less
More
- Posts: 9436
- Thank you received: 19043
13 Mar 2023 22:41 - 13 Mar 2023 22:43 #70
by Quorneng
Replied by Quorneng on topic Printing with Light Weight PLA
Following on from jon's "servo depression" I set about the same for the second wing if it ever gets built.
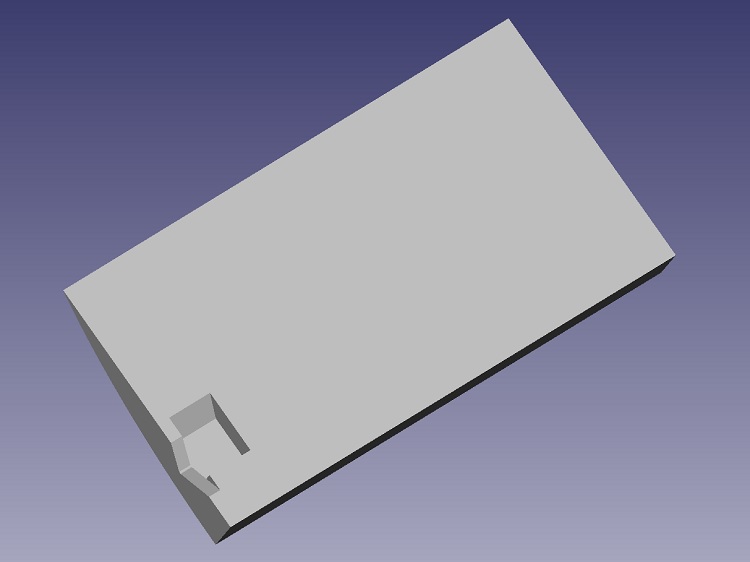
Sized to fit a 3,7 g servo so it lies exactly flush with the wing underside..
I printed just a small portion to check it actually fitted.
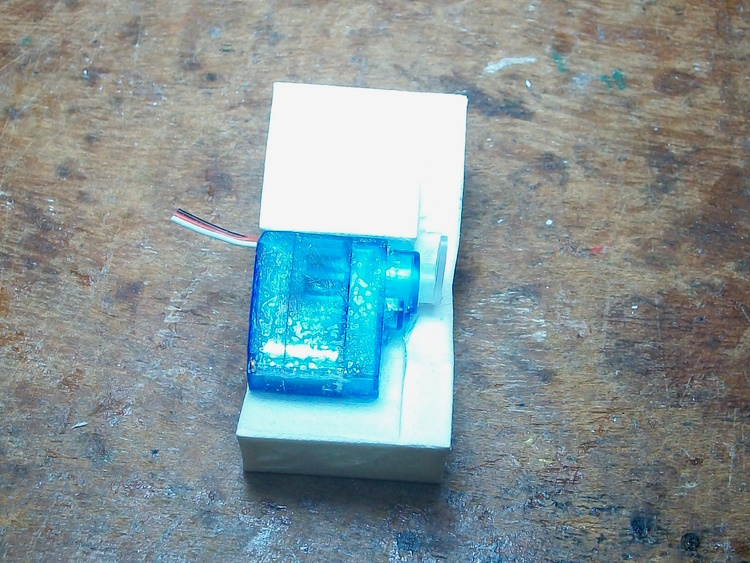
This servo is actually the one cut out of the Lippisch wing with stripped gears.
Sized to fit a 3,7 g servo so it lies exactly flush with the wing underside..
I printed just a small portion to check it actually fitted.
This servo is actually the one cut out of the Lippisch wing with stripped gears.
Last edit: 13 Mar 2023 22:43 by Quorneng.
Thanks: Klipkopwildlife, jon.in.swansea
Please Log in or Create an account to join the conversation.
- Quorneng
-
Topic Author
- Offline
- Forum Master
-
Less
More
- Posts: 9436
- Thank you received: 19043
14 Mar 2023 12:00 - 14 Mar 2023 12:01 #71
by Quorneng
Replied by Quorneng on topic Printing with Light Weight PLA
Feeling particularly "nerdy" today so expended far too much time completing the design to install the aileron servos flush with the wing underside.
A CAD view of the assembled bits that relate to the servo installation.
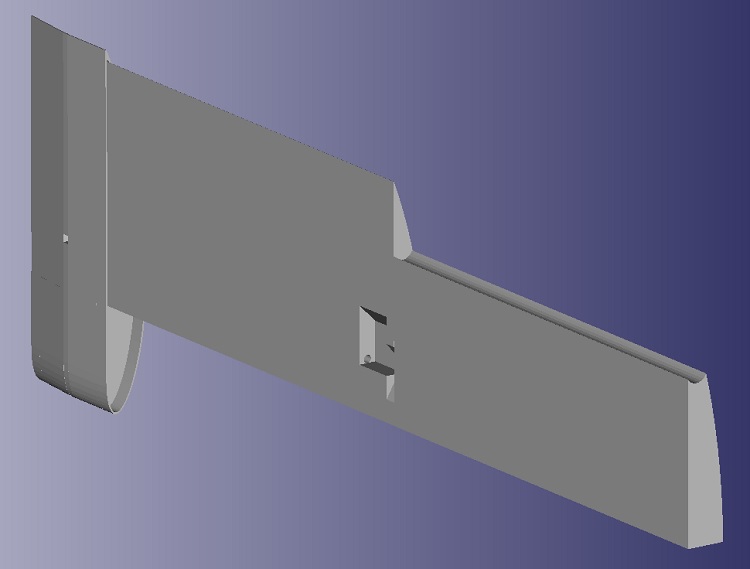
The inner wing panel has a small hole in the right place to feed through the servo wire. The centre section has a matching hole and an underside centre exit.
Looks good in theory but how easy it will be to do in reality is another matter.
Not shown are a pair of small 'infill' pieces so only the servo arm "slot" remains open on the underside.
A CAD view of the assembled bits that relate to the servo installation.
The inner wing panel has a small hole in the right place to feed through the servo wire. The centre section has a matching hole and an underside centre exit.
Looks good in theory but how easy it will be to do in reality is another matter.
Not shown are a pair of small 'infill' pieces so only the servo arm "slot" remains open on the underside.
Last edit: 14 Mar 2023 12:01 by Quorneng.
Thanks: Klipkopwildlife
Please Log in or Create an account to join the conversation.
- jon.in.swansea
-
- Offline
- Elite Member
-
Less
More
- Posts: 766
- Thank you received: 1192
15 Mar 2023 07:39 #72
by jon.in.swansea
Replied by jon.in.swansea on topic Printing with Light Weight PLA
Nice lateral thinking to get some spar compression stiffness.
Thanks: Klipkopwildlife
Please Log in or Create an account to join the conversation.
- jon.in.swansea
-
- Offline
- Elite Member
-
Less
More
- Posts: 766
- Thank you received: 1192
15 Mar 2023 07:42 #73
by jon.in.swansea
Replied by jon.in.swansea on topic Printing with Light Weight PLA
The thing that is a bit tedious about an inset for the servo is to allow access to a screwdriver in case the arm needs some adjustment. The number of times it would have been nice to have a short right-angle screwdriver to fit into tiny spaces....
Thanks: Klipkopwildlife
Please Log in or Create an account to join the conversation.
- Quorneng
-
Topic Author
- Offline
- Forum Master
-
Less
More
- Posts: 9436
- Thank you received: 19043
15 Mar 2023 09:06 #74
by Quorneng
Replied by Quorneng on topic Printing with Light Weight PLA
jon
With the 3.7 g plastic gear servos I have never had to replace a servo arm, the gears strip long before the arm breaks!

I do agree if you ever want to change the position of the arm on the spline it can be a problem with a "fixed" servo.
With a foam plane I have in the past simply gouged out a suitable long slot to get at the screw and then glued a piece of foam back in. Crude but it works.
With the 3.7 g plastic gear servos I have never had to replace a servo arm, the gears strip long before the arm breaks!
I do agree if you ever want to change the position of the arm on the spline it can be a problem with a "fixed" servo.
With a foam plane I have in the past simply gouged out a suitable long slot to get at the screw and then glued a piece of foam back in. Crude but it works.
Thanks: Klipkopwildlife, jon.in.swansea
Please Log in or Create an account to join the conversation.
- Klipkopwildlife
-
- Offline
- Administrator
-
- I'm supposed to be retired!
15 Mar 2023 09:36 #75
by Klipkopwildlife
Do it now, you may never get another chance
Replied by Klipkopwildlife on topic Printing with Light Weight PLA
With modern radios you don't change the arm setting, just use sub trim.
Do it now, you may never get another chance
Thanks: jon.in.swansea
Please Log in or Create an account to join the conversation.
Time to create page: 1.247 seconds