
- Posts: 15406
- Thank you received: 14306
Antonov AN2
- Eric
-

- Offline
- Moderator
-

Less
More
29 Dec 2018 23:51 #46
by Eric
if you are calm and collected when all about you are going berserk - you've missed something important!
Replied by Eric on topic Tupolev AN 2
Do I hear applause? 
if you are calm and collected when all about you are going berserk - you've missed something important!
Please Log in or Create an account to join the conversation.
- Quorneng
-
 Topic Author
- Offline
- Forum Master
-

Less
More
- Posts: 10058
- Thank you received: 19043
31 Dec 2018 00:27 #47
by Quorneng
Replied by Quorneng on topic Tupolev AN 2
The wings have quite high aspect ratio, particularly without the flaps in place.
The bottom wing.

No spar just a Depron shear web at the point of maximum thickness.
So far so good.
The bottom wing.
No spar just a Depron shear web at the point of maximum thickness.
So far so good.
Thanks: Phil Wood, Klipkopwildlife, THE BLACKBIRD
Please Log in or Create an account to join the conversation.
- Quorneng
-
Topic Author
- Offline
- Forum Master
-
Less
More
- Posts: 10058
- Thank you received: 19043
01 Jan 2019 16:53 #48
by Quorneng
Replied by Quorneng on topic Tupolev AN 2
With the bottom wing centre section glued in place all the undercarriage mounting points are available so after some serious geometry in CAD we have a 'working' undercarriage and all printed.

This is about the fully extended position.
The spring units don't have springs in them, yet, but it will have about 25 mm of suspension travel.
The only metal bits will be the stub axles.
Now to print some wheel hubs.
This is about the fully extended position.
The spring units don't have springs in them, yet, but it will have about 25 mm of suspension travel.
The only metal bits will be the stub axles.
Now to print some wheel hubs.
Thanks: Phil Wood, THE BLACKBIRD, Ralpharr2001
Please Log in or Create an account to join the conversation.
- Quorneng
-
Topic Author
- Offline
- Forum Master
-
Less
More
- Posts: 10058
- Thank you received: 19043
03 Jan 2019 23:21 #49
by Quorneng
Replied by Quorneng on topic Tupolev AN 2
To complete a working U/C I needed springs. The initial spring unit were designed for 8 mm OD springs which is on order.
I discovered I had a long length of 9 mm spring so I completely reprinted the undercarriage to suite and took the opportunity to make some adjustment as well. Took nearly all yesterday. Today I set about creating the wheels which also took a ridiculous amount of time. 3 sets of hubs before I got it right but at least it now sits on its wheels.
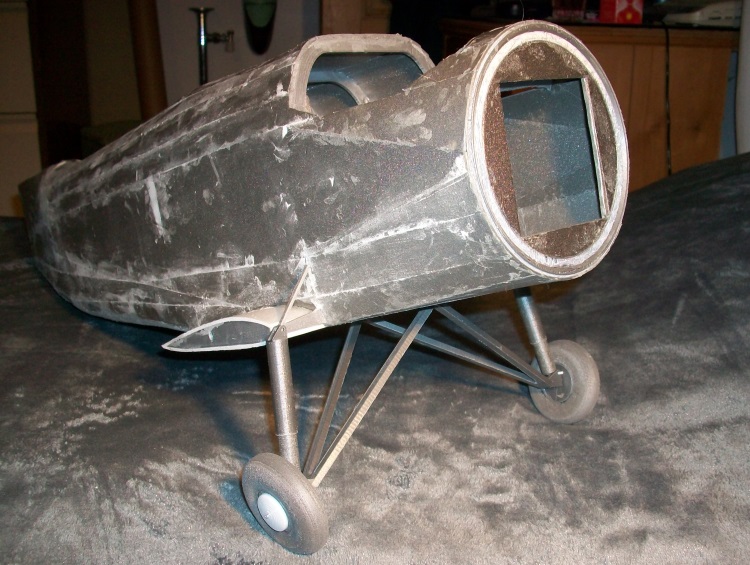
The 9 mm springs are really much too stiff so the original spring units will be used once the softer spring arrives.
The tail wheel requires a rather complex reinforcing bracket to fit between the last two formers.

I have one new servo (the rest are on order) so once the tail wheel is done the tail plane is next.
I discovered I had a long length of 9 mm spring so I completely reprinted the undercarriage to suite and took the opportunity to make some adjustment as well. Took nearly all yesterday. Today I set about creating the wheels which also took a ridiculous amount of time. 3 sets of hubs before I got it right but at least it now sits on its wheels.
The 9 mm springs are really much too stiff so the original spring units will be used once the softer spring arrives.
The tail wheel requires a rather complex reinforcing bracket to fit between the last two formers.
I have one new servo (the rest are on order) so once the tail wheel is done the tail plane is next.
Thanks: Klipkopwildlife, THE BLACKBIRD
Please Log in or Create an account to join the conversation.
- Quorneng
-
Topic Author
- Offline
- Forum Master
-
Less
More
- Posts: 10058
- Thank you received: 19043
05 Jan 2019 23:53 #50
by Quorneng
Replied by Quorneng on topic Tupolev AN 2
The elevator servo and tail wheel installed.

A start on the tail plane.

As it is braced to the fuselage it too has no spar!
A start on the tail plane.
As it is braced to the fuselage it too has no spar!
Thanks: Eric, Klipkopwildlife, THE BLACKBIRD
Please Log in or Create an account to join the conversation.
- Quorneng
-
Topic Author
- Offline
- Forum Master
-
Less
More
- Posts: 10058
- Thank you received: 19043
08 Jan 2019 00:47 #51
by Quorneng
Replied by Quorneng on topic Tupolev AN 2
The tail plane and fin go on.

The rudder will be fixed.
The tail plane brace.

The brace is Depron but with a balsa leading and trailing edge.
The rudder will be fixed.
The tail plane brace.
The brace is Depron but with a balsa leading and trailing edge.
Thanks: Klipkopwildlife, THE BLACKBIRD
Please Log in or Create an account to join the conversation.
- Quorneng
-
Topic Author
- Offline
- Forum Master
-
Less
More
- Posts: 10058
- Thank you received: 19043
08 Jan 2019 18:15 #52
by Quorneng
Replied by Quorneng on topic Tupolev AN 2
With the ESC installed.

The first run of the 950 kV motor at very low power.
Well at least it works and goes round the right way!
The first run of the 950 kV motor at very low power.
Well at least it works and goes round the right way!
Thanks: Eric, Klipkopwildlife, THE BLACKBIRD
Please Log in or Create an account to join the conversation.
- one tenor
-

- Offline
- Forum Veteran
-

- johnpcalex@gmail.com
10 Jan 2019 01:22 #53
by one tenor
Anything will fly given enough power
Replied by one tenor on topic Tupolev AN 2
Can't the WASTE bits be recycled some way?
Anything will fly given enough power
Please Log in or Create an account to join the conversation.
- Klipkopwildlife
-

- Offline
- Administrator
-

- I'm supposed to be retired!
10 Jan 2019 17:20 #54
by Klipkopwildlife
Do it now, you may never get another chance
Replied by Klipkopwildlife on topic Tupolev AN 2
Easy, all you do is extrude the bits at about 200o into a 1.75mm dia filament cool it in an air blast and wind it onto a spool, simple!![[badass]](/media/kunena/emoticons/bad_boys_20.gif "[badass]")
Do it now, you may never get another chance
Please Log in or Create an account to join the conversation.
- Quorneng
-
Topic Author
- Offline
- Forum Master
-
Less
More
- Posts: 10058
- Thank you received: 19043
10 Jan 2019 23:46 #55
by Quorneng
Replied by Quorneng on topic Tupolev AN 2
The lower wing panels complete.
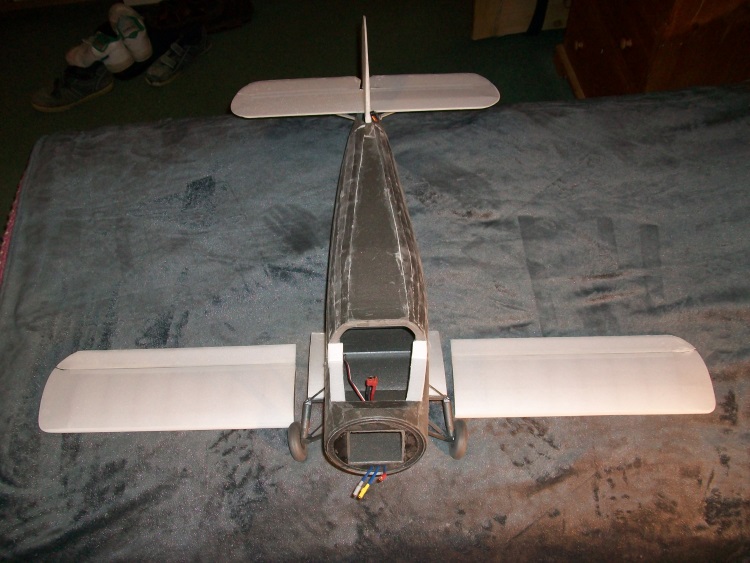
Like the full size the full span lower wing flaps are hinged to drop to about 20 degrees whereas the half span top wing flaps will be able to travel to 40 degrees.
Until I get a better 2.4 Tx (DX8?) I think I will use 35 meg as the Futaba Skysport has a "knob" for the flaps so allowing them to be set anywhere over their full range. An important feature for a plane with such a generous flap area.
Like the full size the full span lower wing flaps are hinged to drop to about 20 degrees whereas the half span top wing flaps will be able to travel to 40 degrees.
Until I get a better 2.4 Tx (DX8?) I think I will use 35 meg as the Futaba Skysport has a "knob" for the flaps so allowing them to be set anywhere over their full range. An important feature for a plane with such a generous flap area.
Thanks: Klipkopwildlife
Please Log in or Create an account to join the conversation.
- Quorneng
-
Topic Author
- Offline
- Forum Master
-
Less
More
- Posts: 10058
- Thank you received: 19043
11 Jan 2019 15:51 - 11 Jan 2019 15:53 #56
by Quorneng
Replied by Quorneng on topic Tupolev AN 2
Almost out of things I can proceed on as I am waiting for deliveries so I printed out the upper wing.
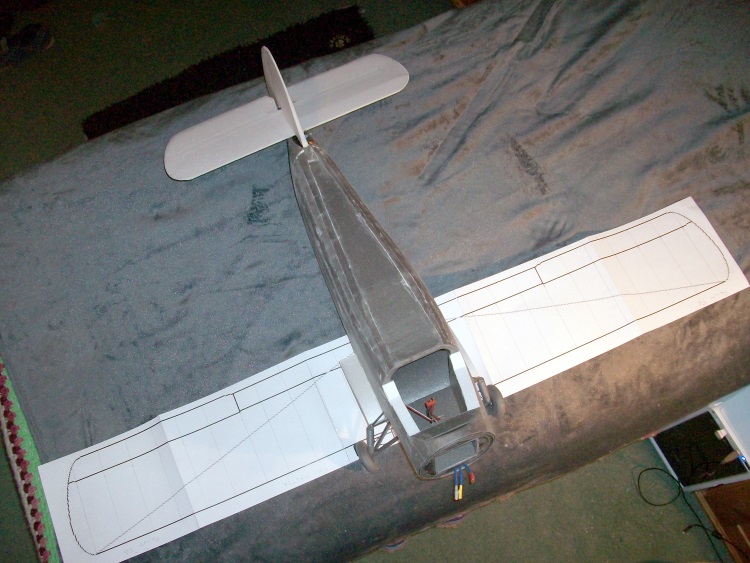
Quite a bit more area than the lower wing.
The 3D printed full set of ribs.

3 different types. C a full rib for the centre section. F for those with the flap and A for those with the aileron. Although the wing section is the same for all the aileron has a wider chord than the flap so the rib has to be 2 mm shorter.
It does look like it is going to be pretty light so motor torque could be an issue but at least for a scale job the ailerons are of quite generous proportions.
Quite a bit more area than the lower wing.
The 3D printed full set of ribs.
3 different types. C a full rib for the centre section. F for those with the flap and A for those with the aileron. Although the wing section is the same for all the aileron has a wider chord than the flap so the rib has to be 2 mm shorter.
It does look like it is going to be pretty light so motor torque could be an issue but at least for a scale job the ailerons are of quite generous proportions.
Last edit: 11 Jan 2019 15:53 by Quorneng.
Thanks: Eric, Klipkopwildlife, THE BLACKBIRD, Ralpharr2001
Please Log in or Create an account to join the conversation.
- Quorneng
-
Topic Author
- Offline
- Forum Master
-
Less
More
- Posts: 10058
- Thank you received: 19043
13 Jan 2019 18:25 - 13 Jan 2019 18:28 #57
by Quorneng
Replied by Quorneng on topic Tupolev AN 2
As the weather was not playing (I did not even have to go outside to make that decision!) I organised fitting the servo and printing a suitable flap horn for the lower wing full span flap.
Now I just have to replicate it for the other side but remembering to mount the servo the right way round!
In theory at least the four servos for top wing ailerons and flaps will follow the same principles.
Now I just have to replicate it for the other side but remembering to mount the servo the right way round!
In theory at least the four servos for top wing ailerons and flaps will follow the same principles.
Last edit: 13 Jan 2019 18:28 by Quorneng.
Thanks: Klipkopwildlife, THE BLACKBIRD
Please Log in or Create an account to join the conversation.
- Quorneng
-
Topic Author
- Offline
- Forum Master
-
Less
More
- Posts: 10058
- Thank you received: 19043
16 Jan 2019 00:19 #58
by Quorneng
Replied by Quorneng on topic Tupolev AN 2
The LH top wing completed.
First test of the aileron and flap.
It takes a ridiculously long time to do and of course there are 4 to do!
First test of the aileron and flap.
It takes a ridiculously long time to do and of course there are 4 to do!
Thanks: Klipkopwildlife
Please Log in or Create an account to join the conversation.
- Quorneng
-
Topic Author
- Offline
- Forum Master
-
Less
More
- Posts: 10058
- Thank you received: 19043
17 Jan 2019 21:24 - 17 Jan 2019 21:25 #59
by Quorneng
Replied by Quorneng on topic Tupolev AN 2
Still ploughing on installing servos in the top wing but progress on the bottom one. Its actually glued on.

And temporarily braced with string!
Next to test that those full span flaps go down the same amount both sides.
And temporarily braced with string!
Next to test that those full span flaps go down the same amount both sides.
Last edit: 17 Jan 2019 21:25 by Quorneng.
Thanks: Klipkopwildlife
Please Log in or Create an account to join the conversation.
- Quorneng
-
Topic Author
- Offline
- Forum Master
-
Less
More
- Posts: 10058
- Thank you received: 19043
18 Jan 2019 23:40 - 18 Jan 2019 23:41 #60
by Quorneng
Replied by Quorneng on topic Tupolev AN 2
With a little bit of adjustment the bottom wing flaps seem to move virtually identically.
I have now completed all the components of the upper wing but I have an embarrassing problem.
I built the RH wing first and sort of delayed putting in the servos until I was sure the wing would actually be strong enough, which fortunately it proved to be, however in doing this I forgot about the difficulty of threading the aileron servo wire through 7 solid printed wing ribs!
I avoided this problem when I built the LH wing and installed both servos and wires before adding the top skin.
So far I have not come up with a simple solution. I fear I may have to cut a series of holes in the lower skin adjacent to each rib to give access to cut a suitable sized hole in it and then feed the servo wire through to the next rib and repeat 6 times!
The slight concern is that with its "no spar" construction the wing skin is providing all the stiffness & strength so the last thing it needs is a series of holes cut in it!
Once this little hurdle is overcome the AN 2 can be fully completed.
I have now completed all the components of the upper wing but I have an embarrassing problem.
I built the RH wing first and sort of delayed putting in the servos until I was sure the wing would actually be strong enough, which fortunately it proved to be, however in doing this I forgot about the difficulty of threading the aileron servo wire through 7 solid printed wing ribs!
I avoided this problem when I built the LH wing and installed both servos and wires before adding the top skin.
So far I have not come up with a simple solution. I fear I may have to cut a series of holes in the lower skin adjacent to each rib to give access to cut a suitable sized hole in it and then feed the servo wire through to the next rib and repeat 6 times!
The slight concern is that with its "no spar" construction the wing skin is providing all the stiffness & strength so the last thing it needs is a series of holes cut in it!
Once this little hurdle is overcome the AN 2 can be fully completed.
Last edit: 18 Jan 2019 23:41 by Quorneng.
Thanks: Klipkopwildlife
Please Log in or Create an account to join the conversation.
Time to create page: 0.226 seconds