
- Posts: 15406
- Thank you received: 14306
Antonov AN2
- Eric
-

- Offline
- Moderator
-

Less
More
19 Jan 2019 09:05 #61
by Eric
if you are calm and collected when all about you are going berserk - you've missed something important!
Replied by Eric on topic Tupolev AN 2
Hot wire poker fed in from the root?
if you are calm and collected when all about you are going berserk - you've missed something important!
Please Log in or Create an account to join the conversation.
- Klipkopwildlife
-

- Offline
- Administrator
-

- I'm supposed to be retired!
19 Jan 2019 09:26 #62
by Klipkopwildlife
Do it now, you may never get another chance
Replied by Klipkopwildlife on topic Tupolev AN 2
A long series 8mm (5/16") wood drill from B&Q? Irvin (or similar) make a very nice range.
Do it now, you may never get another chance
Please Log in or Create an account to join the conversation.
- Eric
-
- Offline
- Moderator
-
Less
More
- Posts: 15406
- Thank you received: 14306
19 Jan 2019 10:13 #63
by Eric
if you are calm and collected when all about you are going berserk - you've missed something important!
Replied by Eric on topic Tupolev AN 2
That would do it, but a bit OTT for making holes in a 1 micron or thereabouts printed rib film, between the diagonals!
if you are calm and collected when all about you are going berserk - you've missed something important!
Please Log in or Create an account to join the conversation.
- Klipkopwildlife
-
- Offline
- Administrator
-
- I'm supposed to be retired!
19 Jan 2019 11:19 #64
by Klipkopwildlife
Do it now, you may never get another chance
Replied by Klipkopwildlife on topic Tupolev AN 2
Yes but you need 8mm to get the plug through!
Do it now, you may never get another chance
Please Log in or Create an account to join the conversation.
- Quorneng
-
 Topic Author
- Offline
- Forum Master
-

Less
More
- Posts: 10058
- Thank you received: 19043
19 Jan 2019 11:51 #65
by Quorneng
Replied by Quorneng on topic Tupolev AN 2
On the second wing half I used a fine soldering iron to melt the printed 'film' in each rib to make a 3 mm hole to pass the wire through. There was no plug as the wire was extended with soldered connections. 
With easy access to each rib the process works well as the melted plastic actually 'reinforces' the hole, but on the first wing the servo is 13" and 7 ribs from the root so cutting access holes in the wing skin to 'melt' a hole in the rib is the favoured option at the moment.
With its simple construction and printed ribs I have seriously considered making a duplicate wing panel and simply doing it "right" as far as the servos are concerned, indeed I may still have to if cutting holes weakens the first one too much!
With easy access to each rib the process works well as the melted plastic actually 'reinforces' the hole, but on the first wing the servo is 13" and 7 ribs from the root so cutting access holes in the wing skin to 'melt' a hole in the rib is the favoured option at the moment.
With its simple construction and printed ribs I have seriously considered making a duplicate wing panel and simply doing it "right" as far as the servos are concerned, indeed I may still have to if cutting holes weakens the first one too much!
Thanks: Eric
Please Log in or Create an account to join the conversation.
- THE BLACKBIRD
-

- Offline
- Forum Master
-
Less
More
- Posts: 6781
- Thank you received: 10722
19 Jan 2019 12:06 - 19 Jan 2019 12:07 #66
by THE BLACKBIRD
Replied by THE BLACKBIRD on topic Tupolev AN 2
I use a normal drill bit on the end of a length of brass tube or wire, i silver solder them on but they could be glued, 3mm put it though detach what ever you use to turn the bit, then attache the servo wire to the end pull the whole thing right through
Last edit: 19 Jan 2019 12:07 by THE BLACKBIRD.
Please Log in or Create an account to join the conversation.
- Quorneng
-
Topic Author
- Offline
- Forum Master
-
Less
More
- Posts: 10058
- Thank you received: 19043
19 Jan 2019 19:17 #67
by Quorneng
Replied by Quorneng on topic Tupolev AN 2
BB
A good idea but I am not sure I could keep a 13" long 3 mm drill on the correct line particularly as the very thin web on each rib does not drill at all well and the resultant 'ragged' hole would not accurately support the drill properly. The holes for flap servo which is only 2 ribs in from the root was 'drilled' reasonably well with a pointed needle file.
Feeding the aileron servo wire through the 'melted' holes in the ribs.

Seems to work well enough.
As long as the Depron repair 'inserts' are a really good fit UHU POR should restore virtually the full skin strength - I hope.
A good idea but I am not sure I could keep a 13" long 3 mm drill on the correct line particularly as the very thin web on each rib does not drill at all well and the resultant 'ragged' hole would not accurately support the drill properly. The holes for flap servo which is only 2 ribs in from the root was 'drilled' reasonably well with a pointed needle file.
Feeding the aileron servo wire through the 'melted' holes in the ribs.
Seems to work well enough.
As long as the Depron repair 'inserts' are a really good fit UHU POR should restore virtually the full skin strength - I hope.
Thanks: Klipkopwildlife
Please Log in or Create an account to join the conversation.
- one tenor
-

- Offline
- Forum Veteran
-

- johnpcalex@gmail.com
19 Jan 2019 23:21 #68
by one tenor
Anything will fly given enough power
Replied by one tenor on topic Tupolev AN 2
The hot wire for me.
Anything will fly given enough power
Please Log in or Create an account to join the conversation.
- Quorneng
-
Topic Author
- Offline
- Forum Master
-
Less
More
- Posts: 10058
- Thank you received: 19043
20 Jan 2019 21:37 #69
by Quorneng
Replied by Quorneng on topic Tupolev AN 2
The wings in place although the top one is only 'resting'.

Although the top wing has a wider chord there is actually no stagger. The wing struts are perpendicular.
Still quite a bit to do.
At 50" span it only just a bit smaller than the 55" Maxford kit although it will be quite a bit lighter.
Although the top wing has a wider chord there is actually no stagger. The wing struts are perpendicular.
Still quite a bit to do.
At 50" span it only just a bit smaller than the 55" Maxford kit although it will be quite a bit lighter.
Thanks: Eric, Klipkopwildlife, THE BLACKBIRD
Please Log in or Create an account to join the conversation.
- Quorneng
-
Topic Author
- Offline
- Forum Master
-
Less
More
- Posts: 10058
- Thank you received: 19043
23 Jan 2019 00:08 #70
by Quorneng
Replied by Quorneng on topic Tupolev AN 2
The wing struts are in.
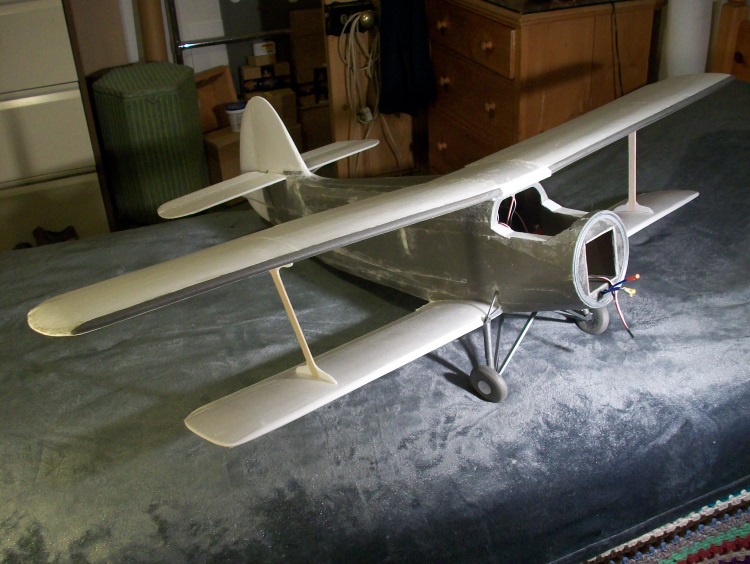
The ailerons are tested, just the top wing flaps to connect.
Next is to figure out how to fix the bracing wires to Depron!
The ailerons are tested, just the top wing flaps to connect.
Next is to figure out how to fix the bracing wires to Depron!
Thanks: Eric, Klipkopwildlife, THE BLACKBIRD
Please Log in or Create an account to join the conversation.
- Quorneng
-
Topic Author
- Offline
- Forum Master
-
Less
More
- Posts: 10058
- Thank you received: 19043
23 Jan 2019 21:54 #71
by Quorneng
Replied by Quorneng on topic Tupolev AN 2
The final control test.
All six wing servos running from a single servo tester in 'auto' mode.
The six channel 35 meg 'synthesised' Rx I bought off ebay does not "synthesise" so it is stuck on what ever channel it was on!
Got my money back and the seller says I can keep it. Maybe just maybe it is simply a bad contact on its tiny,tiny push button.
All six wing servos running from a single servo tester in 'auto' mode.
The six channel 35 meg 'synthesised' Rx I bought off ebay does not "synthesise" so it is stuck on what ever channel it was on!
Got my money back and the seller says I can keep it. Maybe just maybe it is simply a bad contact on its tiny,tiny push button.
Thanks: Klipkopwildlife, THE BLACKBIRD
Please Log in or Create an account to join the conversation.
- Quorneng
-
Topic Author
- Offline
- Forum Master
-
Less
More
- Posts: 10058
- Thank you received: 19043
25 Jan 2019 22:48 - 25 Jan 2019 22:51 #72
by Quorneng
Replied by Quorneng on topic Tupolev AN 2
Not a lot to show for virtually a days work but the first 'panel' of the rigging is done.

Painted black so the camera can see it!
Really only a test to see if the process was practicable and it will be removed to allow painting.
The fuselage has a first coat of acrylic blue and the softer springs are in the UC.
Painted black so the camera can see it!
Really only a test to see if the process was practicable and it will be removed to allow painting.
The fuselage has a first coat of acrylic blue and the softer springs are in the UC.
Last edit: 25 Jan 2019 22:51 by Quorneng.
Thanks: Eric, Klipkopwildlife
Please Log in or Create an account to join the conversation.
- Quorneng
-
Topic Author
- Offline
- Forum Master
-
Less
More
- Posts: 10058
- Thank you received: 19043
30 Jan 2019 00:06 #73
by Quorneng
Replied by Quorneng on topic Tupolev AN 2
Waiting for a suitable receiver so I started the decoration.

The blue acrylic on the fuselage has added a bit of weight but the Depron was a bit 'rough' so when rubbed down between two coats has produced an acceptable finish.
The wings being white Depron only needed a 'dusting' to achieve a uniform finish.
The cowling will be red and white.
Rigging and the cockpit canopy next.
The blue acrylic on the fuselage has added a bit of weight but the Depron was a bit 'rough' so when rubbed down between two coats has produced an acceptable finish.
The wings being white Depron only needed a 'dusting' to achieve a uniform finish.
The cowling will be red and white.
Rigging and the cockpit canopy next.
Thanks: Klipkopwildlife
Please Log in or Create an account to join the conversation.
- Quorneng
-
Topic Author
- Offline
- Forum Master
-
Less
More
- Posts: 10058
- Thank you received: 19043
02 Feb 2019 00:11 #74
by Quorneng
Replied by Quorneng on topic Tupolev AN 2
The cockpit/battery hatch. Not entirely happy with it but it will do and its light!
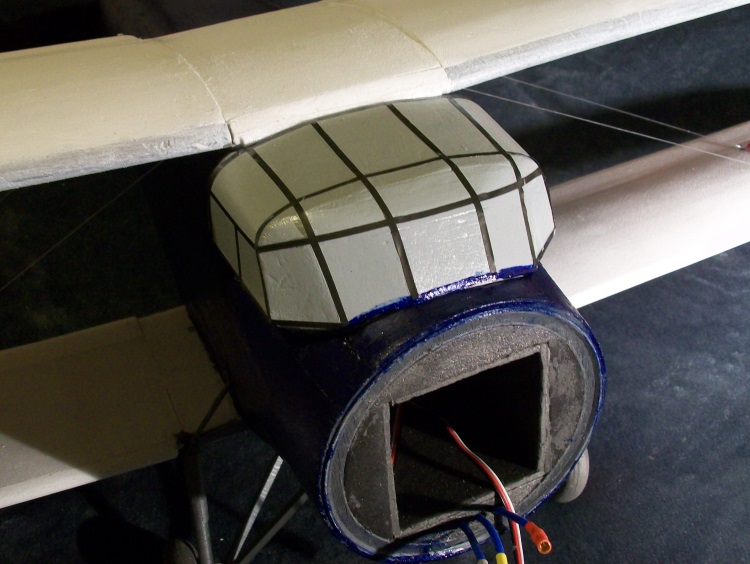
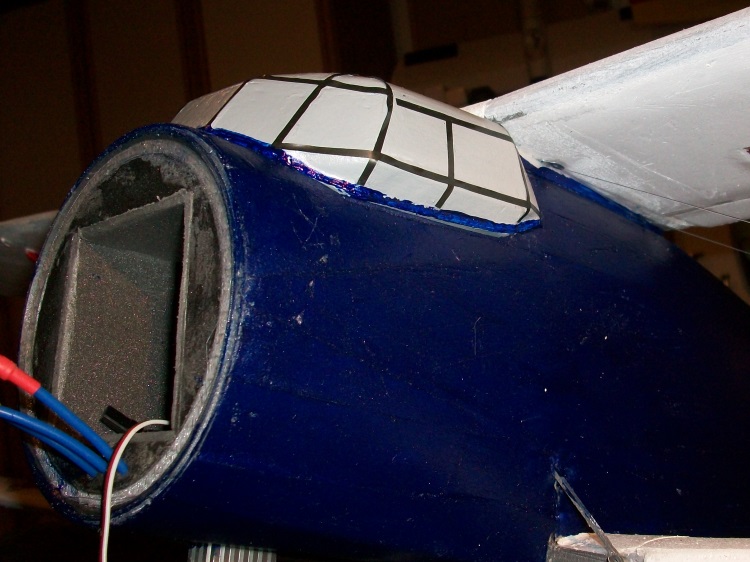
Basically a multi faceted hollow Depron box with Fablon glazing frame strips.
Would you believe I made the engine cowling no less than 15 mm too long!
It is surprising noticeable now the rest of the plane is more or less complete so it all has to be reprinted!
Basically a multi faceted hollow Depron box with Fablon glazing frame strips.
Would you believe I made the engine cowling no less than 15 mm too long!
It is surprising noticeable now the rest of the plane is more or less complete so it all has to be reprinted!
Thanks: Klipkopwildlife
Please Log in or Create an account to join the conversation.
- Quorneng
-
Topic Author
- Offline
- Forum Master
-
Less
More
- Posts: 10058
- Thank you received: 19043
03 Feb 2019 22:29 #75
by Quorneng
Replied by Quorneng on topic Tupolev AN 2
Slowly moving forward.
The new 'correct length' motor mount & cowl is on but not glued yet.

The replacement radio is in and it all works although the internal wiring needs to be tidied up a bit.
I fear the U/C is just a bit too far back as it topples forward a bit too easily.
Fortunately it is not that much of a chore to alter the geometry and reprint the undercarriage legs so the wheels are moved forward 10 mm.
The ASh-62 looks the part.

I think I might try and print a representation of the AN2's characteristic variable pitch hub assembly.
The new 'correct length' motor mount & cowl is on but not glued yet.
The replacement radio is in and it all works although the internal wiring needs to be tidied up a bit.
I fear the U/C is just a bit too far back as it topples forward a bit too easily.
Fortunately it is not that much of a chore to alter the geometry and reprint the undercarriage legs so the wheels are moved forward 10 mm.
The ASh-62 looks the part.
I think I might try and print a representation of the AN2's characteristic variable pitch hub assembly.
Thanks: Klipkopwildlife
Please Log in or Create an account to join the conversation.
Time to create page: 0.246 seconds