
- Posts: 15334
- Thank you received: 14141
Fokker V25
- Eric
-

- Offline
- Moderator
-

Less
More
05 Jul 2025 18:22 #16
by Eric
if you are calm and collected when all about you are going berserk - you've missed something important!
Replied by Eric on topic Fokker V25
Like all 'servers', You-Tube insist on fiddling with things that work perfectly well, and f - - mess it up!
Generally,for vids less than five minutes, and those in vertical slit format, I normally skip those, and just delete them - unless it is something I really want to see.
I have a normal wide-screen monitor, and having squirly patterns or blank black on both sides of a tall thin vid really annoys me, and gives my eyes the 'cringes'!
Generally,for vids less than five minutes, and those in vertical slit format, I normally skip those, and just delete them - unless it is something I really want to see.
I have a normal wide-screen monitor, and having squirly patterns or blank black on both sides of a tall thin vid really annoys me, and gives my eyes the 'cringes'!
if you are calm and collected when all about you are going berserk - you've missed something important!
Thanks: Klipkopwildlife
Please Log in or Create an account to join the conversation.
- Quorneng
-
 Topic Author
- Offline
- Forum Master
-

Less
More
- Posts: 10058
- Thank you received: 19042
05 Jul 2025 21:28 #17
by Quorneng
Replied by Quorneng on topic Fokker V25
This insistence on the short video format is relatively recent. My camera is a true camera not a phone
In the past I have many short videos that appeared in a full screen format like this one from Jan this year and its just 15 seconds long!
Now such a short video appears to be automatically handled as a "short" and I have found no way to alter it.
I presume there must be a video length that stops it being treated as a short.
In the past I have many short videos that appeared in a full screen format like this one from Jan this year and its just 15 seconds long!
Now such a short video appears to be automatically handled as a "short" and I have found no way to alter it.
I presume there must be a video length that stops it being treated as a short.
Thanks: Klipkopwildlife
Please Log in or Create an account to join the conversation.
- Quorneng
-
Topic Author
- Offline
- Forum Master
-
Less
More
- Posts: 10058
- Thank you received: 19042
07 Jul 2025 10:02 - 07 Jul 2025 10:04 #18
by Quorneng
Replied by Quorneng on topic Fokker V25
After the 2 minute full power run left the totally enclosed motor a bit on the warm side this is the first attempt at a cooling solution but not easy when the motor is inside the crank case!
6 inlet holes in the crankcase front plate.
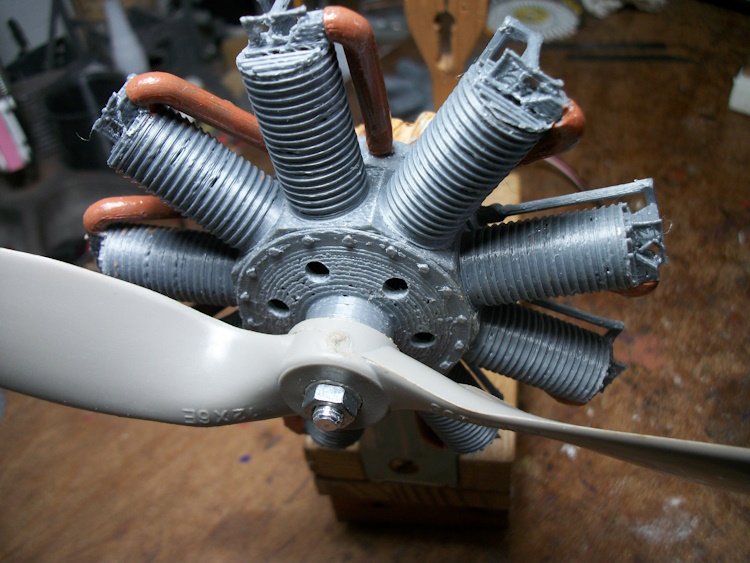
The rear of the crank case is closed off so all the air that does get in can only exit through the motor.

At least what air that does get through will be cooling the hottest part!
I am undecided as to how to dispose of this warm air. Conventionally would be holes in the motor mounting bulkhead, into the fuselage and out through the cockpit opening, however it does occur to me that considerable "windage" of the cylinders rotating in the cowling (it has a bottom open section) could act as an exhaust "fan" and actually suck the hot air out!
This option suggests the next step would be to build a cowling with a bulkhead and bench test it.
Building a cowling before the airframe is probably a good idea any way as it will be quite tricky to do. Maybe in LW-PLA?
6 inlet holes in the crankcase front plate.
The rear of the crank case is closed off so all the air that does get in can only exit through the motor.
At least what air that does get through will be cooling the hottest part!
I am undecided as to how to dispose of this warm air. Conventionally would be holes in the motor mounting bulkhead, into the fuselage and out through the cockpit opening, however it does occur to me that considerable "windage" of the cylinders rotating in the cowling (it has a bottom open section) could act as an exhaust "fan" and actually suck the hot air out!
This option suggests the next step would be to build a cowling with a bulkhead and bench test it.
Building a cowling before the airframe is probably a good idea any way as it will be quite tricky to do. Maybe in LW-PLA?
Attachments:
Last edit: 07 Jul 2025 10:04 by Quorneng.
Thanks: Eric, Klipkopwildlife, THE BLACKBIRD, jon.in.swansea
Please Log in or Create an account to join the conversation.
- Eric
-
- Offline
- Moderator
-
Less
More
- Posts: 15334
- Thank you received: 14141
07 Jul 2025 11:35 #19
by Eric
if you are calm and collected when all about you are going berserk - you've missed something important!
Replied by Eric on topic Fokker V25
Too late now - but I would have angled the drilled vent holes in the direction of rotation, so they act as scoops, not just holes.
if you are calm and collected when all about you are going berserk - you've missed something important!
Thanks: Klipkopwildlife
Please Log in or Create an account to join the conversation.
- Quorneng
-
Topic Author
- Offline
- Forum Master
-
Less
More
- Posts: 10058
- Thank you received: 19042
07 Jul 2025 22:06 #20
by Quorneng
Replied by Quorneng on topic Fokker V25
The Oberursel in its LW-PLA cowling.
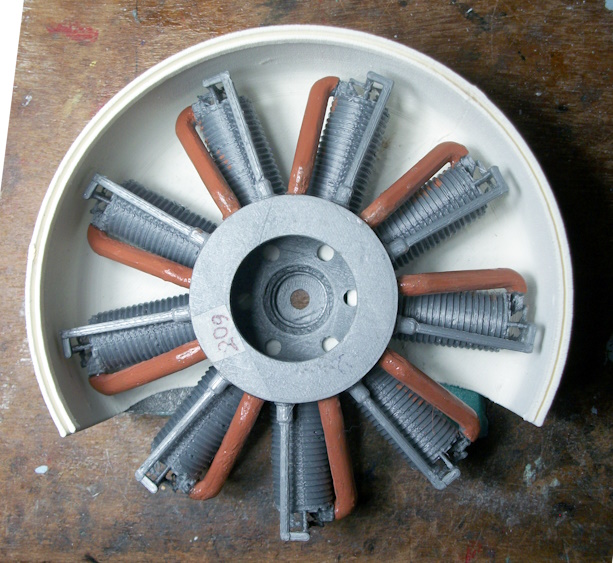
Quite a tight fit!
The cowling weighs 6.7g.
The Oberursel itself weighs 20g.
Quite a tight fit!
The cowling weighs 6.7g.
The Oberursel itself weighs 20g.
Attachments:
Thanks: Eric, Klipkopwildlife, THE BLACKBIRD
Please Log in or Create an account to join the conversation.
- Quorneng
-
Topic Author
- Offline
- Forum Master
-
Less
More
- Posts: 10058
- Thank you received: 19042
08 Jul 2025 16:17 #21
by Quorneng
Replied by Quorneng on topic Fokker V25
A sequence of pics showing the Uberursel being assembled into the cowling.
The parts
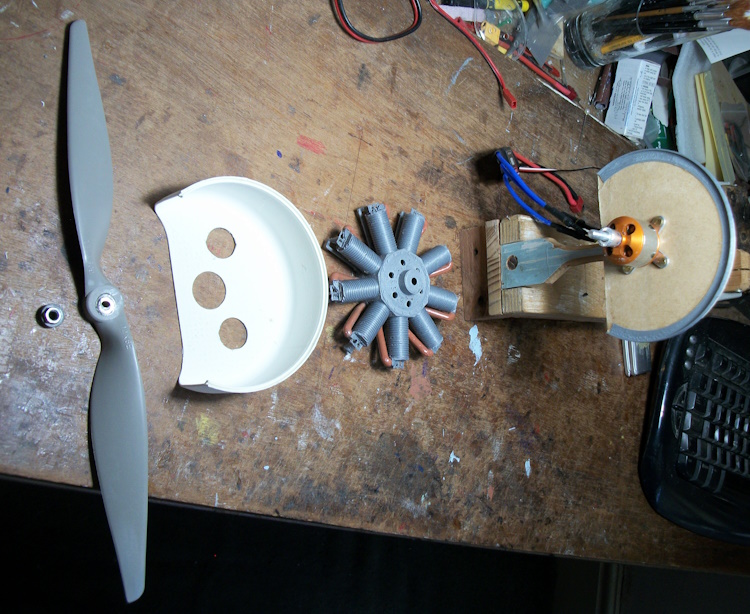
First the rotary is fitted onto the motor.

Note the use of a temporary washer so the prop driver nut can be tightened and the grey printed flange that retains the cowling..
Next the cowling is fitted.
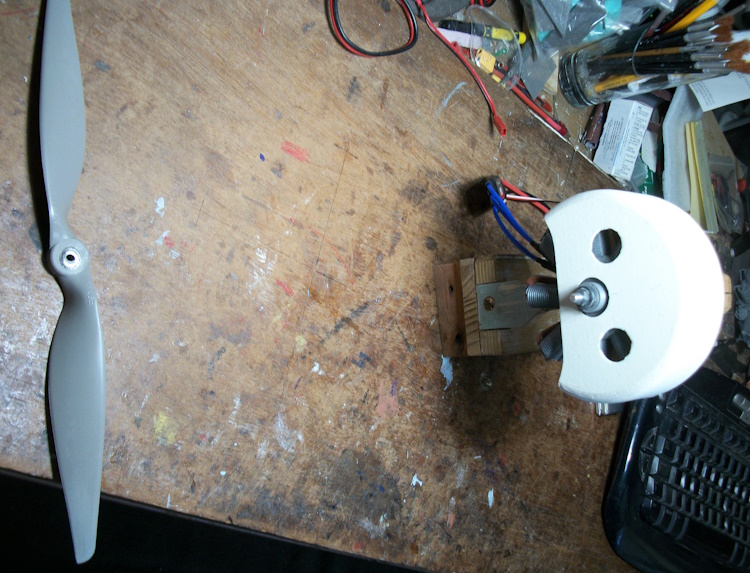
It is a tight fit over the rotary and is pressed into place.
The prop is then fitted and it is ready to go.

Oooops! I have just noted it is a CCW prop but the rotary should rotate CW!
A short test run.
www.youtube.com/shorts/9CWa-rKoraE
With the rotary inside the cowling "windage" is reduced so the RPM is noticeably higher.

The parts
First the rotary is fitted onto the motor.
Note the use of a temporary washer so the prop driver nut can be tightened and the grey printed flange that retains the cowling..
Next the cowling is fitted.
It is a tight fit over the rotary and is pressed into place.
The prop is then fitted and it is ready to go.
Oooops! I have just noted it is a CCW prop but the rotary should rotate CW!
A short test run.
www.youtube.com/shorts/9CWa-rKoraE
With the rotary inside the cowling "windage" is reduced so the RPM is noticeably higher.
Attachments:
Thanks: Eric, Klipkopwildlife, THE BLACKBIRD, jon.in.swansea
Please Log in or Create an account to join the conversation.
- Eric
-
- Offline
- Moderator
-
Less
More
- Posts: 15334
- Thank you received: 14141
08 Jul 2025 17:11 #22
by Eric
if you are calm and collected when all about you are going berserk - you've missed something important!
Replied by Eric on topic Fokker V25
So that keyboard isn't going in as well, then?

if you are calm and collected when all about you are going berserk - you've missed something important!
Thanks: Klipkopwildlife
Please Log in or Create an account to join the conversation.
- THE BLACKBIRD
-

- Offline
- Forum Master
-
Less
More
- Posts: 6732
- Thank you received: 10572
08 Jul 2025 17:21 #23
by THE BLACKBIRD
Replied by THE BLACKBIRD on topic Fokker V25
You are the best scratch builder iv come across Simon as you make your own drawings and figure out how it is going to fit together and the different subjects
Respect Sir
Respect Sir
Thanks: Eric, Klipkopwildlife, Quorneng
Please Log in or Create an account to join the conversation.
- Klipkopwildlife
-

- Offline
- Administrator
-

- I'm supposed to be retired!
08 Jul 2025 18:18 #24
by Klipkopwildlife
Do it now, you may never get another chance
Replied by Klipkopwildlife on topic Fokker V25
Respect from me too

Do it now, you may never get another chance
Thanks: Quorneng
Please Log in or Create an account to join the conversation.
- Quorneng
-
Topic Author
- Offline
- Forum Master
-
Less
More
- Posts: 10058
- Thank you received: 19042
09 Jul 2025 20:52 #25
by Quorneng
Replied by Quorneng on topic Fokker V25
I printed some parts that allowed the Oberursel to be mounted on my magnetic prop balancer.
With some careful addition of painted on dope a near perfect balance has been obtained.
When it stops rotating it does not rotate back at all!
Note
This video in not a "short" despite only being 21 seconds long!
It all comes down to setting the right size video format.
With some careful addition of painted on dope a near perfect balance has been obtained.
When it stops rotating it does not rotate back at all!
Note
This video in not a "short" despite only being 21 seconds long!
It all comes down to setting the right size video format.
Thanks: Klipkopwildlife, Flytilbroke, THE BLACKBIRD
Please Log in or Create an account to join the conversation.
- Quorneng
-
Topic Author
- Offline
- Forum Master
-
Less
More
- Posts: 10058
- Thank you received: 19042
10 Jul 2025 23:31 - 10 Jul 2025 23:33 #26
by Quorneng
Replied by Quorneng on topic Fokker V25
The cowling I made rather annoys me. The nose radius is much too small but was set to clear the rotary inside
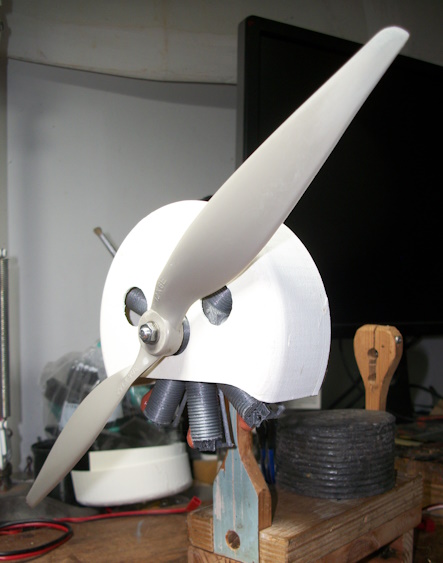
Compared to the full size.
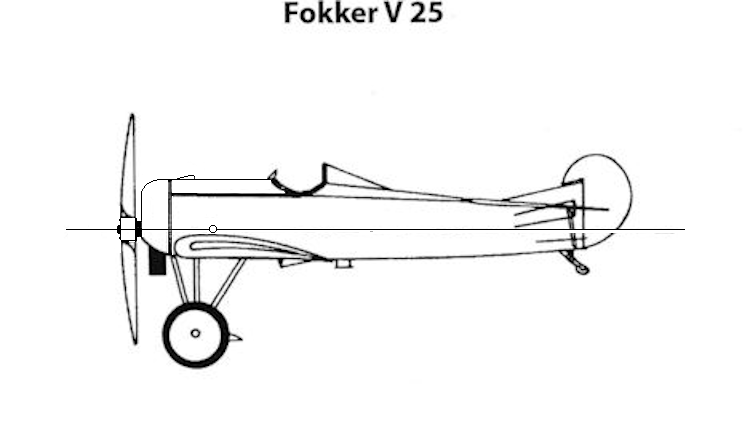
To achieve anything like the scale cowling nose radius the rotary needs to be set further back in the cowling. It is quite possible to do this but it requires a modified crank case. No problem I have printed a modified one already but it is not practicle to remove the cylinders, inlet pipes and push rods from the old one. In other words it means printing a completely new rotary! Given the cowling will also be new about the only thing not changed is the motor and prop! Come to think of it I have ordered a wooden prop that is much closer to true scale than the nylon "electric" one.
The things one does in pursuit of scale!

Compared to the full size.
To achieve anything like the scale cowling nose radius the rotary needs to be set further back in the cowling. It is quite possible to do this but it requires a modified crank case. No problem I have printed a modified one already but it is not practicle to remove the cylinders, inlet pipes and push rods from the old one. In other words it means printing a completely new rotary! Given the cowling will also be new about the only thing not changed is the motor and prop! Come to think of it I have ordered a wooden prop that is much closer to true scale than the nylon "electric" one.
The things one does in pursuit of scale!
Attachments:
Last edit: 10 Jul 2025 23:33 by Quorneng.
Thanks: Eric, Klipkopwildlife, Flytilbroke, THE BLACKBIRD
Please Log in or Create an account to join the conversation.
- Quorneng
-
Topic Author
- Offline
- Forum Master
-
Less
More
- Posts: 10058
- Thank you received: 19042
13 Jul 2025 18:46 #27
by Quorneng
Replied by Quorneng on topic Fokker V25
After a full day of printing the revised rotary and a new cowling with a bigger nose radius.
www.youtube.com/shorts/m5y06VMlSUE
Second time round I made a slightly better job of the rotary.
It is still rotating the wrong way until the CW wooden prop arrives.
I have now printed out the plans for the V25.
The next job is to construct the fuselage so the rotary and cowling can be mounted on it. There will be quite a few issues to be addressed for that to happen!
www.youtube.com/shorts/m5y06VMlSUE
Second time round I made a slightly better job of the rotary.
It is still rotating the wrong way until the CW wooden prop arrives.
I have now printed out the plans for the V25.
The next job is to construct the fuselage so the rotary and cowling can be mounted on it. There will be quite a few issues to be addressed for that to happen!
Thanks: Eric, Klipkopwildlife
Please Log in or Create an account to join the conversation.
- Quorneng
-
Topic Author
- Offline
- Forum Master
-
Less
More
- Posts: 10058
- Thank you received: 19042
14 Jul 2025 22:04 #28
by Quorneng
Replied by Quorneng on topic Fokker V25
Still not quite finished with the cowling. It has to match up with the basic frame of the fuselage which is 80 mm x 80 mm.
This requires the cowling to go round further than I had expected.
The revised motor mount now with a 80x80 square to represent the fuselage.

The lower bottom edge of the cowling extended to match the 80x80 fuselage.
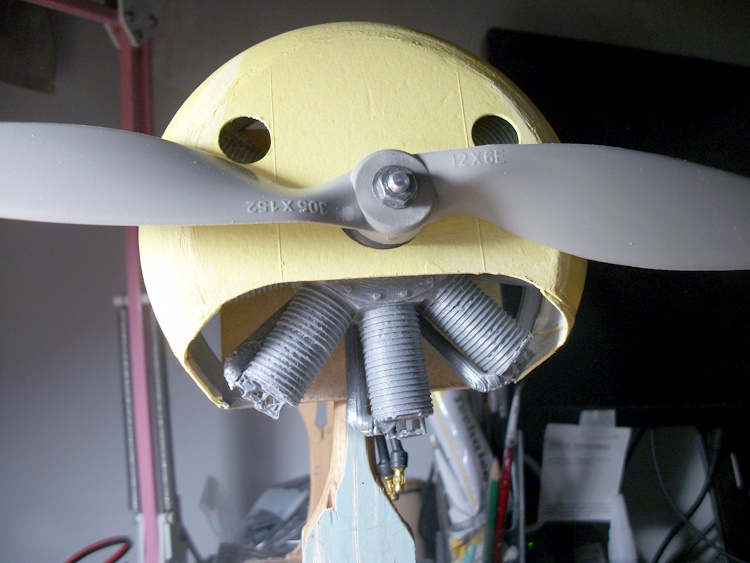
Hopefully I can now start the fuselage!
This requires the cowling to go round further than I had expected.
The revised motor mount now with a 80x80 square to represent the fuselage.
The lower bottom edge of the cowling extended to match the 80x80 fuselage.
Hopefully I can now start the fuselage!
Attachments:
Thanks: Eric, Klipkopwildlife, THE BLACKBIRD
Please Log in or Create an account to join the conversation.
- Quorneng
-
Topic Author
- Offline
- Forum Master
-
Less
More
- Posts: 10058
- Thank you received: 19042
15 Jul 2025 23:58 #29
by Quorneng
Replied by Quorneng on topic Fokker V25
It a long time since I have built anything like this.
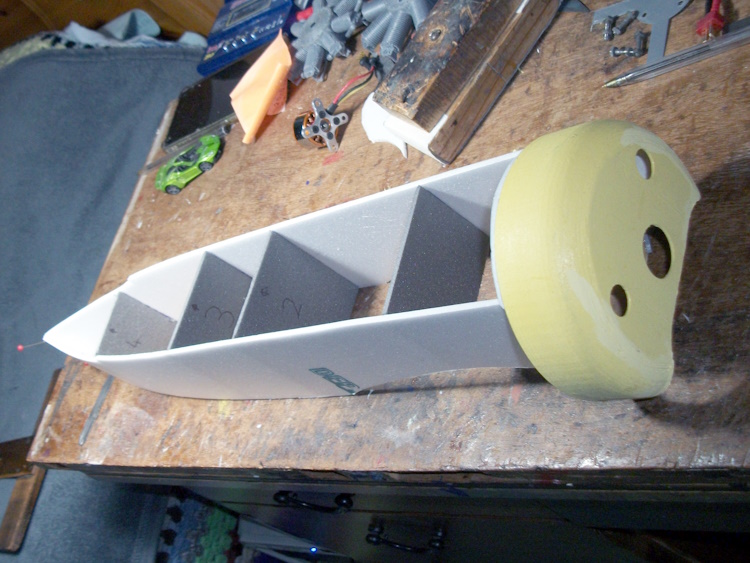
So far so good!
So far so good!
Attachments:
Thanks: Eric, Klipkopwildlife
Please Log in or Create an account to join the conversation.
- Quorneng
-
Topic Author
- Offline
- Forum Master
-
Less
More
- Posts: 10058
- Thank you received: 19042
16 Jul 2025 22:14 #30
by Quorneng
Replied by Quorneng on topic Fokker V25
A bit further with the fuselage.
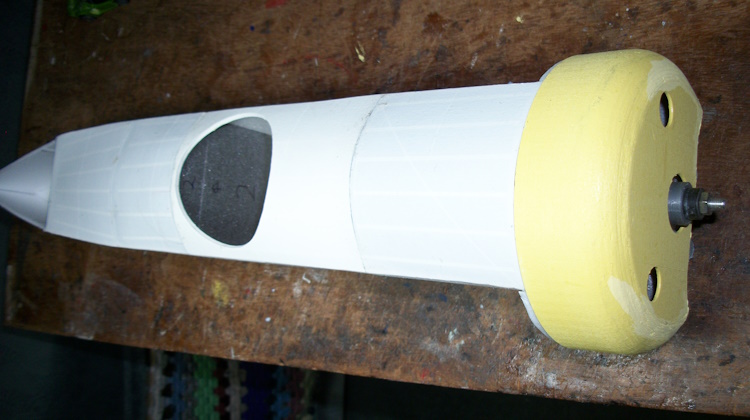
The top surfaces are a bit unusual. They are printed as flat sheets of single layer LW-LA with stiffening bars included on the under side.. They are flexible enough to be simply glued in place held down with little bits of masking tape.
The tapering side fairings back from the cowling will be done in the same way.
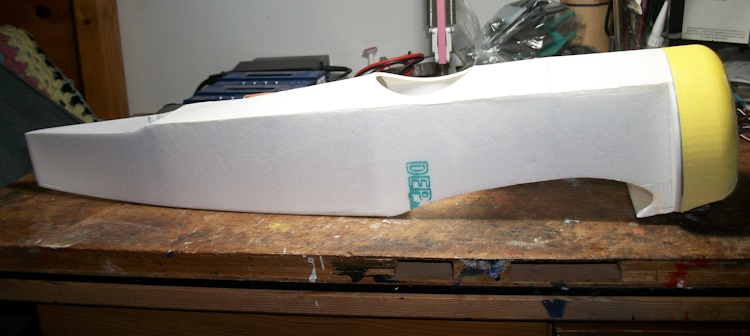
I suspect the ESC, battery box and elevator and rudder servos will have to be installed before the wing goes on. The battery will be inserted trough the cockpit!.
The top surfaces are a bit unusual. They are printed as flat sheets of single layer LW-LA with stiffening bars included on the under side.. They are flexible enough to be simply glued in place held down with little bits of masking tape.
The tapering side fairings back from the cowling will be done in the same way.
I suspect the ESC, battery box and elevator and rudder servos will have to be installed before the wing goes on. The battery will be inserted trough the cockpit!.
Attachments:
Thanks: Eric, Klipkopwildlife, THE BLACKBIRD, jon.in.swansea
Please Log in or Create an account to join the conversation.
Time to create page: 0.584 seconds