
- Posts: 10058
- Thank you received: 19043
Fokker V25
- Quorneng
-
 Topic Author
- Offline
- Forum Master
-

Less
More
02 Aug 2025 11:24 #46
by Quorneng
Replied by Quorneng on topic Fokker V25
I suspect the aces did not mind about being visible but more about "Come and have a go - if you dare!".
After all Richthofen's Triplane was bright red overall!
A short test of one of the ailerons. Note the arm of the tiny 2g servo is glued directly to the aileron!
After all Richthofen's Triplane was bright red overall!
A short test of one of the ailerons. Note the arm of the tiny 2g servo is glued directly to the aileron!
Thanks: Klipkopwildlife, THE BLACKBIRD
Please Log in or Create an account to join the conversation.
- Quorneng
-
Topic Author
- Offline
- Forum Master
-
Less
More
- Posts: 10058
- Thank you received: 19043
03 Aug 2025 21:41 #47
by Quorneng
Replied by Quorneng on topic Fokker V25
At last its actually starting to look like plane.

At the moment the undercarriage is a single wire type. The remaining scale elements will be just collapsible mock ups.
The motor bulkhead is the only strong point in the entire airframe so it carries the single undercarriage wire.

Assembled like this it allowed a guestimate of the CG position. With rotary and prop added it is not far out but I expect the battery will have to go well forward possibly right up against the motor bulkhead.
Just realised I have forgotten the pilot head rest/roll over fairing!
At the moment the undercarriage is a single wire type. The remaining scale elements will be just collapsible mock ups.
The motor bulkhead is the only strong point in the entire airframe so it carries the single undercarriage wire.
Assembled like this it allowed a guestimate of the CG position. With rotary and prop added it is not far out but I expect the battery will have to go well forward possibly right up against the motor bulkhead.
Just realised I have forgotten the pilot head rest/roll over fairing!
Attachments:
Thanks: Eric, Klipkopwildlife, THE BLACKBIRD, jon.in.swansea
Please Log in or Create an account to join the conversation.
- Quorneng
-
Topic Author
- Offline
- Forum Master
-
Less
More
- Posts: 10058
- Thank you received: 19043
05 Aug 2025 22:31 - 05 Aug 2025 22:34 #48
by Quorneng
Replied by Quorneng on topic Fokker V25
Today I robbed a stability receiver from the HP 115 to put in the Fokker V25. It certainly worked but was set up using the "Delta" option and with no rudder and I have long since deleted that model set up on the DX6i.
It is an old Orange 3 axis unit in fact so old it is DSM2 which probably explains why it would not work on the Hobby King TX6i which is DSMX only so out came the even older Spektrum DX6I which is DSM2 compatible.
Of course the instructions have long since disappeared so it took some time to get it to work correctly although it does not support "dual aileron" so they had to go on a Y lead..
The only bit that I could not get to work was the gyro ON/OFF control which is on the AUX channel. Flicking the appropriate switch on the TX had no effect After much Google searching I found that the Gyro is only OFF when the AUX signal is between 1.7 and 2.1 ms otherwise it is ON. Where is that on the full range? As far as the transmitter is concerned the range can be set anywhere between -100% & +100%.
Is 1.7 to 2.1 ms somewhere around the range mid point? If so it would certainly explain why the switch at its default full range setting had no effect.
Any ideas?
It is an old Orange 3 axis unit in fact so old it is DSM2 which probably explains why it would not work on the Hobby King TX6i which is DSMX only so out came the even older Spektrum DX6I which is DSM2 compatible.
Of course the instructions have long since disappeared so it took some time to get it to work correctly although it does not support "dual aileron" so they had to go on a Y lead..
The only bit that I could not get to work was the gyro ON/OFF control which is on the AUX channel. Flicking the appropriate switch on the TX had no effect After much Google searching I found that the Gyro is only OFF when the AUX signal is between 1.7 and 2.1 ms otherwise it is ON. Where is that on the full range? As far as the transmitter is concerned the range can be set anywhere between -100% & +100%.
Is 1.7 to 2.1 ms somewhere around the range mid point? If so it would certainly explain why the switch at its default full range setting had no effect.
Any ideas?
Last edit: 05 Aug 2025 22:34 by Quorneng.
Thanks: Klipkopwildlife, THE BLACKBIRD
Please Log in or Create an account to join the conversation.
- Eric
-

- Offline
- Moderator
-

Less
More
- Posts: 15406
- Thank you received: 14305
06 Aug 2025 07:32 - 06 Aug 2025 07:35 #49
by Eric
if you are calm and collected when all about you are going berserk - you've missed something important!
Replied by Eric on topic Fokker V25
I have a dx6i manual! (in several languages!)
After a quick look, I cannot see anywhere that shows the frame rate range - it is all percentage from 0 to 125.
If memory serves 1.5 msec is the mid range of the frames, but what the end-points are is anyone's guess. You'd need a sillyscope to have a look.
If you want to borrow the book, you are welcome.
What you could do is temporarily plug the gyro on/off into a regular stick, so you can vary the frame lengths, and see where on the stick position, the gyro turns on or off.
After a quick look, I cannot see anywhere that shows the frame rate range - it is all percentage from 0 to 125.
If memory serves 1.5 msec is the mid range of the frames, but what the end-points are is anyone's guess. You'd need a sillyscope to have a look.
If you want to borrow the book, you are welcome.
What you could do is temporarily plug the gyro on/off into a regular stick, so you can vary the frame lengths, and see where on the stick position, the gyro turns on or off.
if you are calm and collected when all about you are going berserk - you've missed something important!
Last edit: 06 Aug 2025 07:35 by Eric. Reason: added a comment
Thanks: Klipkopwildlife, Quorneng, THE BLACKBIRD
Please Log in or Create an account to join the conversation.
- Klipkopwildlife
-

- Offline
- Administrator
-

- I'm supposed to be retired!
06 Aug 2025 08:01 #50
by Klipkopwildlife
Do it now, you may never get another chance
Replied by Klipkopwildlife on topic Fokker V25
1,500ms is centre, you can go up to 700 either way, 600 would be 100% travel
Do it now, you may never get another chance
Thanks: Quorneng, THE BLACKBIRD
Please Log in or Create an account to join the conversation.
- Quorneng
-
Topic Author
- Offline
- Forum Master
-
Less
More
- Posts: 10058
- Thank you received: 19043
06 Aug 2025 22:17 - 06 Aug 2025 22:29 #51
by Quorneng
Replied by Quorneng on topic Fokker V25
Setting AUX switch (on a DX6i it is marked "Gyro") to 100% gave gyro ON and to 0% did indeed switch the gyro OFF. Thanks Klippy
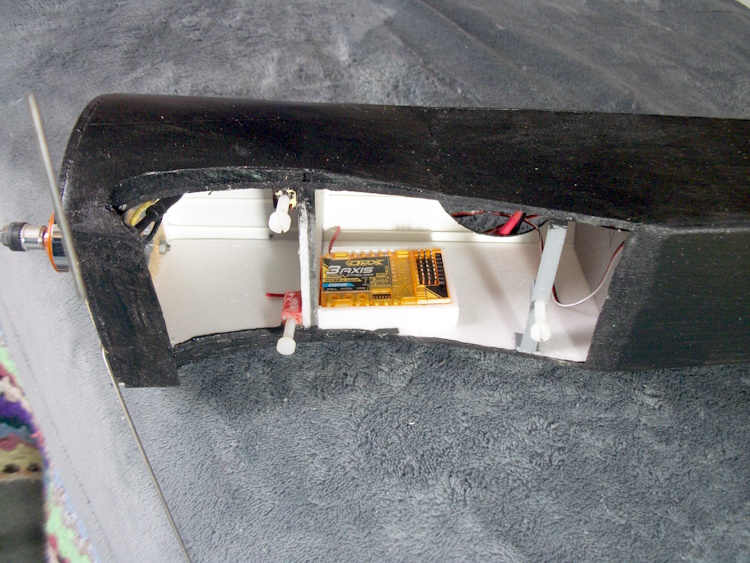
I mounted both the ESC and the Rx in the cockpit area.
 .
.
Not that surprising but the "first pass" at establishing the CG indicated it would be a bit behind the spar even with the heavy 2200mAh 2s right up against the motor mount! I spent most of this afternoon working out how to move both the ESC and Rx forward closer to the motor mount but still leave enough room for the battery to go between them.
The best solution was to mount the Rx on top of the leading edge of the wing along with long enough leads so everything could be plugged in before the wing is screwed in place.
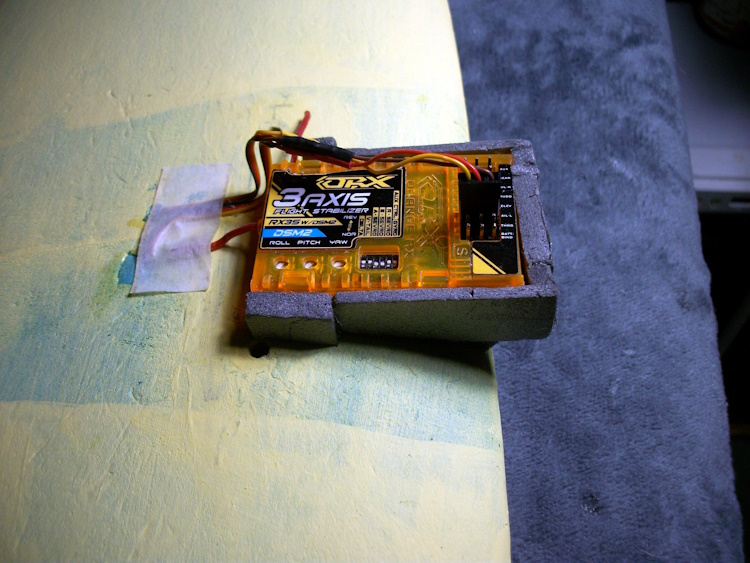
If you look carefully the little blue label states DSM2!
Its a bit of a tight fit but there is still room to install a battery box in the fuselage that will sit just above the Rx. Now even the lighter 1800mAh 2s should give a satisfactory CG position.
As originally intended and which ever battery is used can be put in through the cockpit aperture meaning the wing will only have to be removed for maintenance or storage.
Next to start thinking about making the wheels and the "dummy" part of the scale "Fokker" undercarriage.
I mounted both the ESC and the Rx in the cockpit area.
Not that surprising but the "first pass" at establishing the CG indicated it would be a bit behind the spar even with the heavy 2200mAh 2s right up against the motor mount! I spent most of this afternoon working out how to move both the ESC and Rx forward closer to the motor mount but still leave enough room for the battery to go between them.
The best solution was to mount the Rx on top of the leading edge of the wing along with long enough leads so everything could be plugged in before the wing is screwed in place.
If you look carefully the little blue label states DSM2!
Its a bit of a tight fit but there is still room to install a battery box in the fuselage that will sit just above the Rx. Now even the lighter 1800mAh 2s should give a satisfactory CG position.
As originally intended and which ever battery is used can be put in through the cockpit aperture meaning the wing will only have to be removed for maintenance or storage.
Next to start thinking about making the wheels and the "dummy" part of the scale "Fokker" undercarriage.
Attachments:
Last edit: 06 Aug 2025 22:29 by Quorneng.
Thanks: Klipkopwildlife, jon.in.swansea
Please Log in or Create an account to join the conversation.
- Quorneng
-
Topic Author
- Offline
- Forum Master
-
Less
More
- Posts: 10058
- Thank you received: 19043
07 Aug 2025 22:50 - 07 Aug 2025 22:51 #52
by Quorneng
Replied by Quorneng on topic Fokker V25
The position of the Rx proved to be just to tight so its onto position 3!

May not look much different but it now gives clearance for the servo connectors.
The battery box is now installed along with the extended elevator and rudder servo leads

And more to the point it does now all go together (just) and it works!
Next to make those 3" wheels!
May not look much different but it now gives clearance for the servo connectors.
The battery box is now installed along with the extended elevator and rudder servo leads
And more to the point it does now all go together (just) and it works!
Next to make those 3" wheels!
Attachments:
Last edit: 07 Aug 2025 22:51 by Quorneng.
Thanks: Eric, Klipkopwildlife, THE BLACKBIRD, jon.in.swansea
Please Log in or Create an account to join the conversation.
- Quorneng
-
Topic Author
- Offline
- Forum Master
-
Less
More
- Posts: 10058
- Thank you received: 19043
09 Aug 2025 01:10 - 09 Aug 2025 01:12 #53
by Quorneng
Replied by Quorneng on topic Fokker V25
Now it has wheels!

3" diameter, scale and printed in LW-PLA. Each weighs 4.8g.
They will be water proof when acrylic painted.
As the V25 will only ever be flown from grass I doubt tyre wear will ever be problem.
Although the complete wheel is printed as a single item and takes 65 minutes the "tyre" section uses a different infill to the "hub" section.
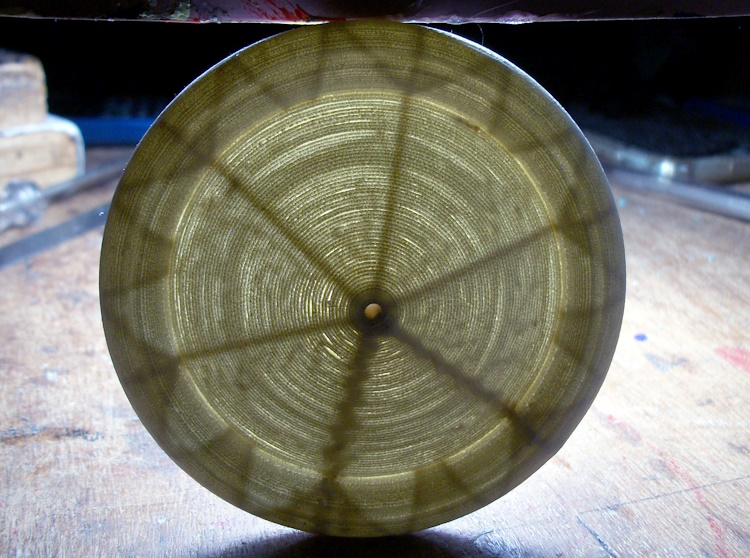
Still working on how to make the rest of the UC struts but as "dummies" that will not effect the "springiness" of the wire.
3" diameter, scale and printed in LW-PLA. Each weighs 4.8g.
They will be water proof when acrylic painted.
As the V25 will only ever be flown from grass I doubt tyre wear will ever be problem.
Although the complete wheel is printed as a single item and takes 65 minutes the "tyre" section uses a different infill to the "hub" section.
Still working on how to make the rest of the UC struts but as "dummies" that will not effect the "springiness" of the wire.
Attachments:
Last edit: 09 Aug 2025 01:12 by Quorneng.
Thanks: Eric, Klipkopwildlife, THE BLACKBIRD, jon.in.swansea, old ugly
Please Log in or Create an account to join the conversation.
- jon.in.swansea
-

- Offline
- Elite Member
-

Less
More
- Posts: 757
- Thank you received: 1164
09 Aug 2025 08:53 #54
by jon.in.swansea
Replied by jon.in.swansea on topic Fokker V25
Nice touch with the light shining through!
Thanks: Klipkopwildlife, Quorneng
Please Log in or Create an account to join the conversation.
- Quorneng
-
Topic Author
- Offline
- Forum Master
-
Less
More
- Posts: 10058
- Thank you received: 19043
14 Aug 2025 12:37 - 14 Aug 2025 12:38 #55
by Quorneng
Replied by Quorneng on topic Fokker V25
Slowly moving forward.
The trade mark Fokker "wing" between the wheels.
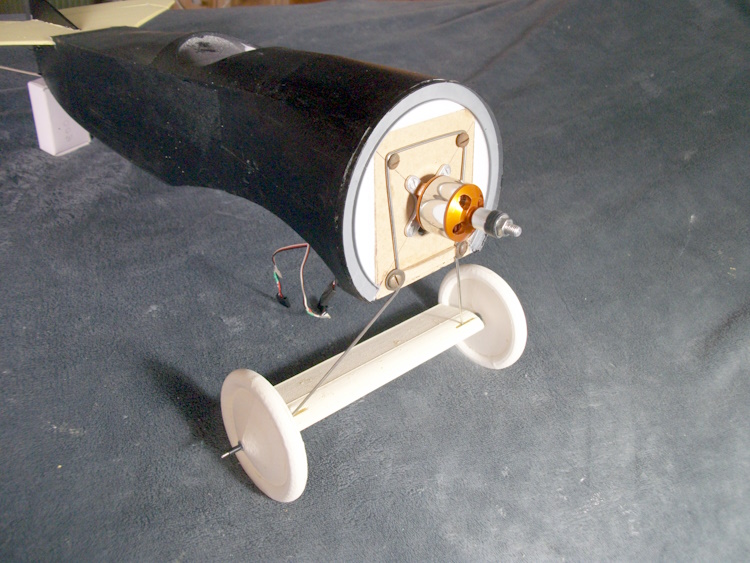
Printed in LW-PLA it is arranged so that the wheels have some freedom to "spread apart" on landing but return to a "closed up" state once the shock load is removed.
That still leaves the rear UC strut!
The trade mark Fokker "wing" between the wheels.
Printed in LW-PLA it is arranged so that the wheels have some freedom to "spread apart" on landing but return to a "closed up" state once the shock load is removed.
That still leaves the rear UC strut!
Attachments:
Last edit: 14 Aug 2025 12:38 by Quorneng.
Thanks: Eric, Klipkopwildlife, jon.in.swansea
Please Log in or Create an account to join the conversation.
- Quorneng
-
Topic Author
- Offline
- Forum Master
-
Less
More
- Posts: 10058
- Thank you received: 19043
20 Aug 2025 17:55 #56
by Quorneng
Replied by Quorneng on topic Fokker V25
The Fokker V25 with is "rotary" is now substantially complete.

The cockpit surround is a separate item in LW-PLA as is the head rest pad.
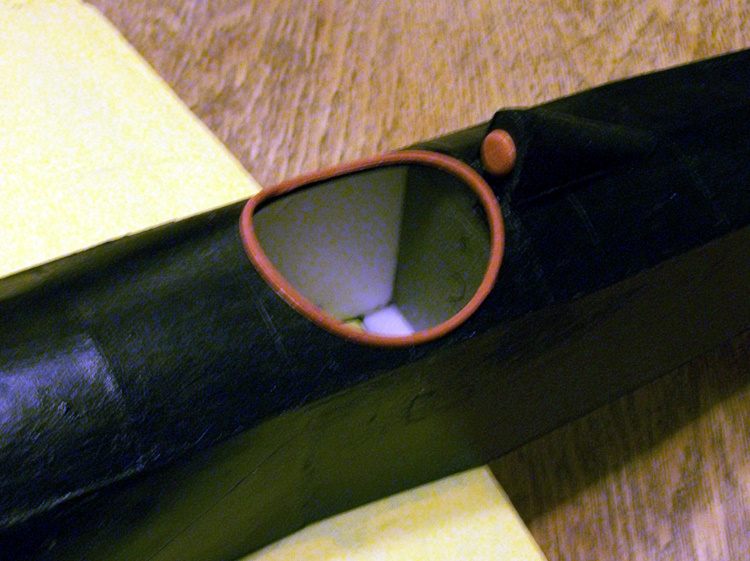
I still have to add a small windscreen.
The flexible tail skid was an interesting challenge as it is printed in PLA as one piece.

Like all such period planes with very short noses it feels terribly nose heavy when you pick it up but even with its 1800 mAh 2s pressed right up against the motor bulkhead the CG is at a "just acceptable" 28% root chord. It weighs 437g (15.4oz) ready to go.
The stab function in the Rx will definitely be on for the maiden!
The cockpit surround is a separate item in LW-PLA as is the head rest pad.
I still have to add a small windscreen.
The flexible tail skid was an interesting challenge as it is printed in PLA as one piece.
Like all such period planes with very short noses it feels terribly nose heavy when you pick it up but even with its 1800 mAh 2s pressed right up against the motor bulkhead the CG is at a "just acceptable" 28% root chord. It weighs 437g (15.4oz) ready to go.
The stab function in the Rx will definitely be on for the maiden!
Attachments:
Thanks: Eric, Klipkopwildlife, THE BLACKBIRD, jon.in.swansea
Please Log in or Create an account to join the conversation.
- Quorneng
-
Topic Author
- Offline
- Forum Master
-
Less
More
- Posts: 10058
- Thank you received: 19043
21 Aug 2025 15:48 #57
by Quorneng
Replied by Quorneng on topic Fokker V25
Having assembled the Fokker V25 I though I had better test it.
The controls all worked but the motor was just gave rapid beeping. Normally a sign the Rx is not delivering the correct "throttle" signal.
It had all worked earlier including being able to switch off the gyro.
So the first test was to test if the Rx and Tx would drive a different ESC and motor. It did with no problem! This suggests the problem was with the V25's motor &/or ESC.
I then drove the V25 ESC and motor via s servo tester and that also worked perfectly. This confirming the problem was not with the V25's motor or ESC.
I am thus left with a situation where an ESC and motor and a Tx and Rx that both work individually but not when they are coupled together!

www.youtube.com/shorts/5Mb7XtDQ8Ag
I suspect it is something simple but at the moment I cannot work out what it might be!
The controls all worked but the motor was just gave rapid beeping. Normally a sign the Rx is not delivering the correct "throttle" signal.
It had all worked earlier including being able to switch off the gyro.
So the first test was to test if the Rx and Tx would drive a different ESC and motor. It did with no problem! This suggests the problem was with the V25's motor &/or ESC.
I then drove the V25 ESC and motor via s servo tester and that also worked perfectly. This confirming the problem was not with the V25's motor or ESC.
I am thus left with a situation where an ESC and motor and a Tx and Rx that both work individually but not when they are coupled together!
www.youtube.com/shorts/5Mb7XtDQ8Ag
I suspect it is something simple but at the moment I cannot work out what it might be!
Thanks: Klipkopwildlife, THE BLACKBIRD
Please Log in or Create an account to join the conversation.
- Eric
-
- Offline
- Moderator
-
Less
More
- Posts: 15406
- Thank you received: 14305
21 Aug 2025 17:33 #58
by Eric
if you are calm and collected when all about you are going berserk - you've missed something important!
Replied by Eric on topic Fokker V25
At a guess, the throttle stick calibration doesn't suit the speedo. It is thinking the throttle isn't closed, so it is failing-safe.
Take the prop off, or fasten the model down. With the rx power off, set the tx throttle to about 50%, trim mid-range, power up the rx, and re-teach it top and bottom throttle stick range.
Turn everything off, then tx on, throttle stick to bottom, turn rx on - and see if it responds now.
Take the prop off, or fasten the model down. With the rx power off, set the tx throttle to about 50%, trim mid-range, power up the rx, and re-teach it top and bottom throttle stick range.
Turn everything off, then tx on, throttle stick to bottom, turn rx on - and see if it responds now.
if you are calm and collected when all about you are going berserk - you've missed something important!
Thanks: Klipkopwildlife, THE BLACKBIRD
Please Log in or Create an account to join the conversation.
- Quorneng
-
Topic Author
- Offline
- Forum Master
-
Less
More
- Posts: 10058
- Thank you received: 19043
21 Aug 2025 19:50 #59
by Quorneng
Replied by Quorneng on topic Fokker V25
You are quite right.
The throttle on the Hobby King TX6i (but marked as channel 3!) is by default is set to +/-100% and that includes the trim! The servo tester full range is I understand 25% wider
It was simply the ESC saying the minimum throttle was to high.
Just to be sure I set the throttle minimum to -140% the minimum possible value and it works fine.
Now I have just got to set the right channel to the right value to be able to switch the gyro off.
The throttle on the Hobby King TX6i (but marked as channel 3!) is by default is set to +/-100% and that includes the trim! The servo tester full range is I understand 25% wider
It was simply the ESC saying the minimum throttle was to high.
Just to be sure I set the throttle minimum to -140% the minimum possible value and it works fine.
Now I have just got to set the right channel to the right value to be able to switch the gyro off.
Thanks: Eric, Klipkopwildlife, Flytilbroke, THE BLACKBIRD
Please Log in or Create an account to join the conversation.
Time to create page: 0.346 seconds