
- Posts: 587
- Thank you received: 1047
The Model Barn - Slider
- Magpie
-
 Topic Author
- Offline
- Elite Member
-

Less
More
24 Mar 2025 13:28 - 24 Mar 2025 13:34 #16
by Magpie
Replied by Magpie on topic The Model Barn - Slider
I went for a training session last weekend on the club trainer. The most important revelation was that the ailerons only bank the plane, you have to use some elevon with them to get it to turn & then cancel the elevon & level the wing using just the ailerons. I nearly got it but being abit ham-fisted I tended to overshoot the cancelling the elevon & cause a dive - fortunately no damage done as the trainer intervened.
It had been a beautifull warm morning but it turned cold about noon, just before my turn, & my fingers were stiffening up - thats my excuse anyway.
I had taken the Slider up to get someone to christen it.
There were three attempted take offs.
The first resulted in a cartwheel on the ground. Then it was realised that the aileron stick wasn't doing anything ( there not being any), I had the rudder & elevons set up as straightforward channels, the transmitter has to be set up so that the aileron stick is mixed to the rudder channel so that with the elevon the plane behaves like it has ailerons.
The second was slightly better but still couldnt be described as a take-off.
There was then a discussion about the the CG. I had it set up as per the plan, 95mm back from the leading edge (on a 230mm chord wing) so it was very tail-heavy.
Someone produced some stick-on weights & it was moved forward.
On the third the plane left the ground but at about 4 feet it wouldn't turn left into the wind, which caught it & swept it about 20 feet to the right & into the ground.
The only damage was a broken propellor, the wing must have left the fuselage before it hit the ground - it was unscathed.
The wing bands were on a single dowel at the centre of the wings & when I looked at it later I could see that the wing was rocking on the centre point of the dihedral.
So I have widened the wing seat & added two dowels to hold the wing steady on two support rails.
I have also added some lead to the nose so that it balances nose-heavy 70mm back from the leading edge. I'll take it up again on my next training session (the weather hasn't been settled enough to make any arrangements) & get the experts to look at it.

Meanwhile I've started on the Model Barn Buzzard. The first thing I checked was the CG position, its shown at about 30% of the chord!
The battery compartment is only 90mm long so I have moved the second former back 40mm & extended the nose by 30mm to give room for some lead.
This is a four channel plane but the instructions say it will fly well on just three. It is the same span as the Slider but is slightly narrower & has squarer wing tips. I wonder ( as an interim measure) whether it would fly with the Slider wings.
It had been a beautifull warm morning but it turned cold about noon, just before my turn, & my fingers were stiffening up - thats my excuse anyway.
I had taken the Slider up to get someone to christen it.
There were three attempted take offs.
The first resulted in a cartwheel on the ground. Then it was realised that the aileron stick wasn't doing anything ( there not being any), I had the rudder & elevons set up as straightforward channels, the transmitter has to be set up so that the aileron stick is mixed to the rudder channel so that with the elevon the plane behaves like it has ailerons.
The second was slightly better but still couldnt be described as a take-off.
There was then a discussion about the the CG. I had it set up as per the plan, 95mm back from the leading edge (on a 230mm chord wing) so it was very tail-heavy.
Someone produced some stick-on weights & it was moved forward.
On the third the plane left the ground but at about 4 feet it wouldn't turn left into the wind, which caught it & swept it about 20 feet to the right & into the ground.
The only damage was a broken propellor, the wing must have left the fuselage before it hit the ground - it was unscathed.
The wing bands were on a single dowel at the centre of the wings & when I looked at it later I could see that the wing was rocking on the centre point of the dihedral.
So I have widened the wing seat & added two dowels to hold the wing steady on two support rails.
I have also added some lead to the nose so that it balances nose-heavy 70mm back from the leading edge. I'll take it up again on my next training session (the weather hasn't been settled enough to make any arrangements) & get the experts to look at it.
Meanwhile I've started on the Model Barn Buzzard. The first thing I checked was the CG position, its shown at about 30% of the chord!
The battery compartment is only 90mm long so I have moved the second former back 40mm & extended the nose by 30mm to give room for some lead.
This is a four channel plane but the instructions say it will fly well on just three. It is the same span as the Slider but is slightly narrower & has squarer wing tips. I wonder ( as an interim measure) whether it would fly with the Slider wings.
Attachments:
Last edit: 24 Mar 2025 13:34 by Magpie.
Thanks: Klipkopwildlife, Flytilbroke, Quorneng, jon.in.swansea
Please Log in or Create an account to join the conversation.
- Klipkopwildlife
-

- Offline
- Administrator
-

- I'm supposed to be retired!
25 Mar 2025 09:41 - 25 Mar 2025 09:46 #17
by Klipkopwildlife
Do it now, you may never get another chance
Replied by Klipkopwildlife on topic The Model Barn - Slider
I'm gobsmacked that the so called expert didn't notice the rudder problem, correct control movements are the first thing you check before every flight.
70mm on a 230mm wing is a good starting point. I always set to 28% of chord and then move back until I get a good power off glide.
70mm on a 230mm wing is a good starting point. I always set to 28% of chord and then move back until I get a good power off glide.
Do it now, you may never get another chance
Last edit: 25 Mar 2025 09:46 by Klipkopwildlife.
Please Log in or Create an account to join the conversation.
- Eric
-

- Offline
- Moderator
-

Less
More
- Posts: 15334
- Thank you received: 14141
25 Mar 2025 10:02 - 25 Mar 2025 10:11 #18
by Eric
if you are calm and collected when all about you are going berserk - you've missed something important!
Replied by Eric on topic The Model Barn - Slider
you have to use some elevon with them to get it to turn - Elevons?
They are found on a flying wing, combining elevator and aileron to apply both functions to one control surface on each side!
the plane left the ground but at about 4 feet it wouldn't turn left into the wind,
Why were you not taking off into wind? (or am I misreading your comment?)
Then it was realised that the aileron stick wasn't doing anything
Standard practice with a three channel model is to put the rudder (primary turning control) on the Aileron stick (primary control stick). - - (the rudder stick then does nothing).
Did your 'test' pilot not check that all the controls worked in the correct direction, before attempting to fly it?
I could see that the wing was rocking on the centre point of the dihedral.
That wouldn't help either! (Another thing your 'test' pilot should have picked up on!) I hope you used more than one band on each side, too - multiple redundancy!
the wing must have left the fuselage before it hit the ground
Not enough wing-bands! Imagine the mess if the wing came off at 100 feet or more altitude!
C of G - I always start with the balance set slightly forward of the spar (which is also usually the thickest part of the wing) on a straight-wing model. Taper or swept wings need a different approach.
They are found on a flying wing, combining elevator and aileron to apply both functions to one control surface on each side!
the plane left the ground but at about 4 feet it wouldn't turn left into the wind,
Why were you not taking off into wind? (or am I misreading your comment?)
Then it was realised that the aileron stick wasn't doing anything
Standard practice with a three channel model is to put the rudder (primary turning control) on the Aileron stick (primary control stick). - - (the rudder stick then does nothing).
Did your 'test' pilot not check that all the controls worked in the correct direction, before attempting to fly it?
I could see that the wing was rocking on the centre point of the dihedral.
That wouldn't help either! (Another thing your 'test' pilot should have picked up on!) I hope you used more than one band on each side, too - multiple redundancy!
the wing must have left the fuselage before it hit the ground
Not enough wing-bands! Imagine the mess if the wing came off at 100 feet or more altitude!
C of G - I always start with the balance set slightly forward of the spar (which is also usually the thickest part of the wing) on a straight-wing model. Taper or swept wings need a different approach.
if you are calm and collected when all about you are going berserk - you've missed something important!
Last edit: 25 Mar 2025 10:11 by Eric. Reason: added a comment
Thanks: Klipkopwildlife, Flytilbroke, jon.in.swansea
Please Log in or Create an account to join the conversation.
- jon.in.swansea
-

- Offline
- Elite Member
-
Less
More
- Posts: 750
- Thank you received: 1147
25 Mar 2025 10:11 #19
by jon.in.swansea
Replied by jon.in.swansea on topic The Model Barn - Slider
It was nice to read a 1st person account of a training session. A reminder of how one mentally puts together a checklist of what to notice is a benefit of writing down the experience. For those of us who haven't flown for some time this is a great reminder to pause and imagine a few times before nudging that throttle. Well done and well spotted.
Please Log in or Create an account to join the conversation.
- Eric
-
- Offline
- Moderator
-
Less
More
- Posts: 15334
- Thank you received: 14141
25 Mar 2025 11:42 - 20 Apr 2025 06:32 #20
by Eric
if you are calm and collected when all about you are going berserk - you've missed something important!
Replied by Eric on topic The Model Barn - Slider
Pre-flight checklist
Begins at home!
Suitable clothing for the weather!
Midge repellant/sun-block/de-icer for yourself!
Are all flight batteries fully charged, and have the correct plugs on the wires (or adapters for same).
Transmitter battery charged (or new AA's installed if you use loose cells).
Check you have the correct wings for the fuselages you intend to take! (It has been known for people to take the wrong wing!)
All parts of the model are together - not scattered in different rooms!
Check that servos aren't coming loose in their positions, and have screws holdng the disk or arm on.
Check that hinges aren't pulling out, control horns aren't loose in the surface, pushrod connectors fitted, (clevises, or z-bends with a clip-on keeper, etc)
Spare parts, props, bands or wing-bolts, screws, tools, etc.
Take the prop off, for safety - turn everything on, and CHECK that the surfaces move in the correct directions, one at a time. Don't just wiggle the sticks and see if things waggle or the servos whizz.
Put the prop back on when the battery is disconnected.
Test to see that your timer runs out before the battery does at medium to high power. (so you have a bit left to go round again if needed!)
At home, warm, dry, with all the tools - is the place to start messing wth servo reversing, and fault correcting!
Load up the car.
Check again that you have put ALL the parts and spares in!
At the field.
Make all your checks again, just in case something got bashed en-route.
Assemble the model(s).
Is the tx set for the correct model memory.
Check control directions and functions again.
If there is only you there, this next line doesn't matter - What do club rules stipulate about the number of models in the air at the same time? (our club states four).
Ready to fly?
Have you previously done a range check, and a failsafe check? See the radio instructions!
Check the wind direction, so you can take off and land INTO it!
Make sure you have charged batteries in the model!
Switch the radios on, and check (YES AGAIN!) that controls really work. (switches/connectors have been known to fail!)
ASK for permission from the others actively flying, if you can go onto the field or take-off. (OK if I - - - ??)
Look where the other models are - if someone is landing, wait until they have done, and recovered their model. (They should have called "Hang on a moment - I'm landing)
Call Taking off! and start your timer or telemetry - so you don't run out of volts in the air!
Do so, and fly away from the pits area/pilot box/whatever system the club uses - before doing anything.
Whilst flying - try to avoid crashing into other models! (It is hard to do - deliberately - but surprisingly easy when you are not trying to!)
Keep away from 'no-fly' areas, (see your club rules, typically the pits area, or the carpark, etc)
Landing.
Be aware of where other flying models and people are.
Check the wind-sock
CALL preparing to land.
Make your downwind run, losing height.
CALL LANDING! - and turn into wind , then land.
Taxi back or call RETRIEVING, and do so promptly, to clear the landing strip.
Make your model safe by disconnecting the flight battery, then turn the transmitter off.
When you've finished shaking, check your model over for anything that has come loose.
Next flight - do it all again from the beginning!
Do you know WHY you should take off or land INTO wind?
For convenient numbers, the wind speed is 10 mph.
Your model flies at 20 mph.
So you are flying at 20 into the wind BUT your speed over the ground is 10 (20 minus 10)
Now you are flying downwind, still at 20 mph with the wind at 10 mph - (20 plus 10) so your speed over the ground is 30 mph. (Visually 20 mph faster!)
Now the wind has increased to 20 mph. Your model still flies at 20 mph - so it's visual speed over the ground is zero. BUT turn downwind, and now your visual speed over the ground is 40 mph!
Remember - it is supposed to be fun!

Begins at home!
Suitable clothing for the weather!
Midge repellant/sun-block/de-icer for yourself!
Are all flight batteries fully charged, and have the correct plugs on the wires (or adapters for same).
Transmitter battery charged (or new AA's installed if you use loose cells).
Check you have the correct wings for the fuselages you intend to take! (It has been known for people to take the wrong wing!)
All parts of the model are together - not scattered in different rooms!
Check that servos aren't coming loose in their positions, and have screws holdng the disk or arm on.
Check that hinges aren't pulling out, control horns aren't loose in the surface, pushrod connectors fitted, (clevises, or z-bends with a clip-on keeper, etc)
Spare parts, props, bands or wing-bolts, screws, tools, etc.
Take the prop off, for safety - turn everything on, and CHECK that the surfaces move in the correct directions, one at a time. Don't just wiggle the sticks and see if things waggle or the servos whizz.
Put the prop back on when the battery is disconnected.
Test to see that your timer runs out before the battery does at medium to high power. (so you have a bit left to go round again if needed!)
At home, warm, dry, with all the tools - is the place to start messing wth servo reversing, and fault correcting!
Load up the car.
Check again that you have put ALL the parts and spares in!
At the field.
Make all your checks again, just in case something got bashed en-route.
Assemble the model(s).
Is the tx set for the correct model memory.
Check control directions and functions again.
If there is only you there, this next line doesn't matter - What do club rules stipulate about the number of models in the air at the same time? (our club states four).
Ready to fly?
Have you previously done a range check, and a failsafe check? See the radio instructions!
Check the wind direction, so you can take off and land INTO it!
Make sure you have charged batteries in the model!
Switch the radios on, and check (YES AGAIN!) that controls really work. (switches/connectors have been known to fail!)
ASK for permission from the others actively flying, if you can go onto the field or take-off. (OK if I - - - ??)
Look where the other models are - if someone is landing, wait until they have done, and recovered their model. (They should have called "Hang on a moment - I'm landing)
Call Taking off! and start your timer or telemetry - so you don't run out of volts in the air!
Do so, and fly away from the pits area/pilot box/whatever system the club uses - before doing anything.
Whilst flying - try to avoid crashing into other models! (It is hard to do - deliberately - but surprisingly easy when you are not trying to!)
Keep away from 'no-fly' areas, (see your club rules, typically the pits area, or the carpark, etc)
Landing.
Be aware of where other flying models and people are.
Check the wind-sock
CALL preparing to land.
Make your downwind run, losing height.
CALL LANDING! - and turn into wind , then land.
Taxi back or call RETRIEVING, and do so promptly, to clear the landing strip.
Make your model safe by disconnecting the flight battery, then turn the transmitter off.
When you've finished shaking, check your model over for anything that has come loose.
Next flight - do it all again from the beginning!
Do you know WHY you should take off or land INTO wind?
For convenient numbers, the wind speed is 10 mph.
Your model flies at 20 mph.
So you are flying at 20 into the wind BUT your speed over the ground is 10 (20 minus 10)
Now you are flying downwind, still at 20 mph with the wind at 10 mph - (20 plus 10) so your speed over the ground is 30 mph. (Visually 20 mph faster!)
Now the wind has increased to 20 mph. Your model still flies at 20 mph - so it's visual speed over the ground is zero. BUT turn downwind, and now your visual speed over the ground is 40 mph!
Remember - it is supposed to be fun!
if you are calm and collected when all about you are going berserk - you've missed something important!
Last edit: 20 Apr 2025 06:32 by Eric. Reason: added a comment
Thanks: Klipkopwildlife, THE BLACKBIRD, jon.in.swansea
Please Log in or Create an account to join the conversation.
- THE BLACKBIRD
-

- Offline
- Forum Master
-

Less
More
- Posts: 6732
- Thank you received: 10572
25 Mar 2025 12:13 #21
by THE BLACKBIRD
Replied by THE BLACKBIRD on topic The Model Barn - Slider
When in Cyprus i took one of my turbines to fly (the hunter i think ) and forgot to take the wings
 iv also been known to forget the Tx

Thanks: Eric, Klipkopwildlife
Please Log in or Create an account to join the conversation.
- Magpie
-
Topic Author
- Offline
- Elite Member
-
Less
More
- Posts: 587
- Thank you received: 1047
11 Apr 2025 14:05 - 11 Apr 2025 14:07 #22
by Magpie
Replied by Magpie on topic The Model Barn - Slider
I took the Slider up on my next training day but contrary to the forecast it was too windy to fly it. The flying field is quite high, I could feel the wind buffeting when I got out of the car.
I had improved on my first training flight but on the second I was losing my concentration & was worse.
The forecast was better for the following day (& turned out to be more accurate) so got someone to give the slider another whirl. It wouldn't take off from the grass so had to be hand launched then stalled & hit the ground, shedding its nose with the extra weight I had added. It only needs glueing back on but the opinion was that it was under-powered. It also tended to roll & veer off to the right. It has a warp in the tail which probably caused that so it needs correcting.
It has the motor specified on the plans & is well within the weight range. I had put a 7 x 4 prop on, looking on a website which calculates a motor/prop combination a 7 x 5 one (which I have) will give 22% more pitch speed & 5% more thrust. I don't know if that will be enough.
Meanwhile I have been looking for a motor & prop which will fit with minimal alterations.
In a motor on ebay there are these instructions;
To set the throttle lift calibration:
1. Connect the ESC to the motor, another end connect to the receiver.
2.Turn on the remote control and push the throttle stick to the highest point
3. Plug the controller into the batteries
4. There is double-click sound (the highest point of the throttle confirmed)
5.After getting the clicking sound, bring the throttle stick to the lowest point
6.Confirm the three click sound that means OK.
Is this correct?
Is it setting up the ESC?
What is supposed to make the clicking sound?
I haven't come across this anywhere else.
I had improved on my first training flight but on the second I was losing my concentration & was worse.
The forecast was better for the following day (& turned out to be more accurate) so got someone to give the slider another whirl. It wouldn't take off from the grass so had to be hand launched then stalled & hit the ground, shedding its nose with the extra weight I had added. It only needs glueing back on but the opinion was that it was under-powered. It also tended to roll & veer off to the right. It has a warp in the tail which probably caused that so it needs correcting.
It has the motor specified on the plans & is well within the weight range. I had put a 7 x 4 prop on, looking on a website which calculates a motor/prop combination a 7 x 5 one (which I have) will give 22% more pitch speed & 5% more thrust. I don't know if that will be enough.
Meanwhile I have been looking for a motor & prop which will fit with minimal alterations.
In a motor on ebay there are these instructions;
To set the throttle lift calibration:
1. Connect the ESC to the motor, another end connect to the receiver.
2.Turn on the remote control and push the throttle stick to the highest point
3. Plug the controller into the batteries
4. There is double-click sound (the highest point of the throttle confirmed)
5.After getting the clicking sound, bring the throttle stick to the lowest point
6.Confirm the three click sound that means OK.
Is this correct?
Is it setting up the ESC?
What is supposed to make the clicking sound?
I haven't come across this anywhere else.
Last edit: 11 Apr 2025 14:07 by Magpie.
Thanks: Klipkopwildlife
Please Log in or Create an account to join the conversation.
- Eric
-
- Offline
- Moderator
-
Less
More
- Posts: 15334
- Thank you received: 14141
11 Apr 2025 21:33 #23
by Eric
if you are calm and collected when all about you are going berserk - you've missed something important!
Replied by Eric on topic The Model Barn - Slider
Most speedo's make a beeping noise to acknowledge an instruction. In this case you are teaching (calibrating) it where full power, and power off, are.
if you are calm and collected when all about you are going berserk - you've missed something important!
Thanks: Klipkopwildlife, Flytilbroke
Please Log in or Create an account to join the conversation.
- Magpie
-
Topic Author
- Offline
- Elite Member
-
Less
More
- Posts: 587
- Thank you received: 1047
12 Apr 2025 07:52 - 12 Apr 2025 07:54 #24
by Magpie
Replied by Magpie on topic The Model Barn - Slider
Aren't speedos what MAMILs wear?
Seriously, do you mean ESCs?
So are my ESCs uncalibrated so not giving the correct power?
When my wattmeter is delivered I'm going to make a seasaw thing to measure the thrust on the kitchen scales.
Seriously, do you mean ESCs?
So are my ESCs uncalibrated so not giving the correct power?
When my wattmeter is delivered I'm going to make a seasaw thing to measure the thrust on the kitchen scales.
Last edit: 12 Apr 2025 07:54 by Magpie.
Please Log in or Create an account to join the conversation.
- Quorneng
-

- Offline
- Forum Master
-
Less
More
- Posts: 10058
- Thank you received: 19042
12 Apr 2025 09:12 #25
by Quorneng
Replied by Quorneng on topic The Model Barn - Slider
Magpie
Actually many ESCs today are "self calibrating" during the switch on arming process.
Given that at the same time they refuse to arm unless the throttle is completely closed the rule is if it does arm then it is good to go.
Yesterday I went through the calibration process with an ESC that although in use it had never been manually calibrated. Calibration made absolutely no difference,. Both the throttle start point and the max power remained the same.
Actually many ESCs today are "self calibrating" during the switch on arming process.
Given that at the same time they refuse to arm unless the throttle is completely closed the rule is if it does arm then it is good to go.
Yesterday I went through the calibration process with an ESC that although in use it had never been manually calibrated. Calibration made absolutely no difference,. Both the throttle start point and the max power remained the same.
Thanks: Klipkopwildlife, jon.in.swansea
Please Log in or Create an account to join the conversation.
- Klipkopwildlife
-
- Offline
- Administrator
-
- I'm supposed to be retired!
12 Apr 2025 10:30 #26
by Klipkopwildlife
Do it now, you may never get another chance
Replied by Klipkopwildlife on topic The Model Barn - Slider
A Speedo is what we used to call them back in the days when we only had brushed motors, they were very unintelligent by todays standards. With the advent of brushless 3 phase motors the ESC (Electronic Speed Control) became much more sophisticated, giving us things like soft start and soft braking for helicopters, variable timing and a host of other things that make our lives easier.
Do it now, you may never get another chance
Thanks: THE BLACKBIRD
Please Log in or Create an account to join the conversation.
- Eric
-
- Offline
- Moderator
-
Less
More
- Posts: 15334
- Thank you received: 14141
14 Apr 2025 07:25 #27
by Eric
if you are calm and collected when all about you are going berserk - you've missed something important!
Replied by Eric on topic The Model Barn - Slider
And trying to set one up - just using the beep tone counts - makes you wonder if it IS easier!
(Speedo's are also known as budgie smugglers, for some strange reason!)
(Speedo's are also known as budgie smugglers, for some strange reason!)
if you are calm and collected when all about you are going berserk - you've missed something important!
Thanks: Klipkopwildlife
Please Log in or Create an account to join the conversation.
- Magpie
-
Topic Author
- Offline
- Elite Member
-
Less
More
- Posts: 587
- Thank you received: 1047
19 Apr 2025 15:59 - 19 Apr 2025 16:02 #28
by Magpie
Replied by Magpie on topic The Model Barn - Slider
I've built my test rig. It also has a perspex safety screen as my face is only inches off the prop.
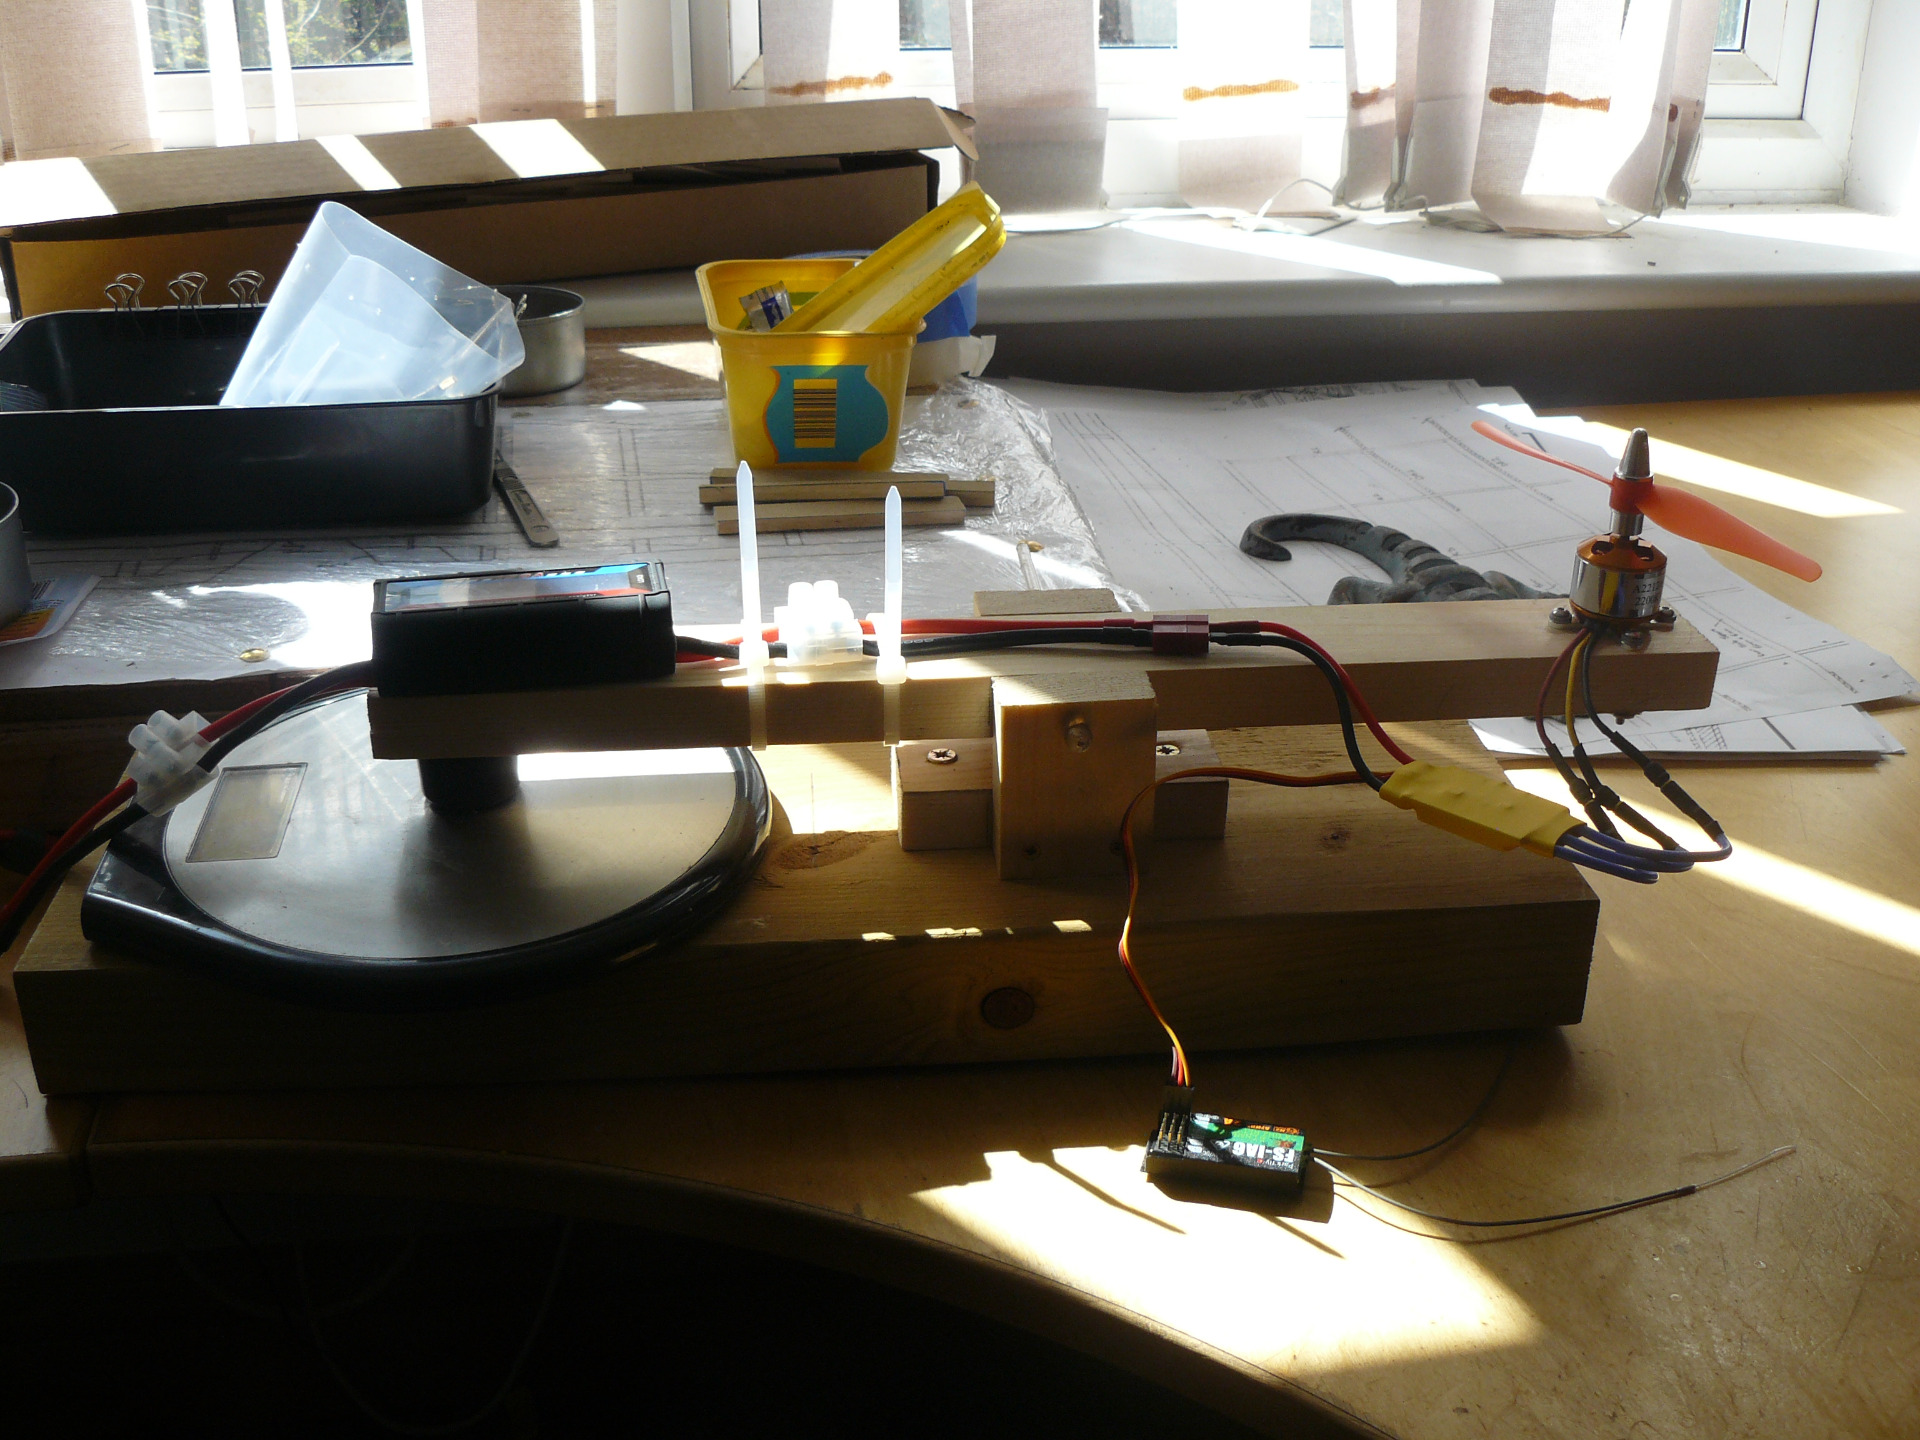
I tried the calibration business, it wasn't as described but did wiggle the prop & beep so it was definitely doing something.
I bought a cheapo A2212 2200kv package on ebay & an Overlander T2830 1300kv motor plus a few props and tried a few combinations & made up an excell spreadsheet.

The values of Current, Voltage & Power are that going into the ESC so are not accurate motor data but are a good indication.
The Slider weighs 1100g so from what I've read it needs 366g thrust so as not to stall & 550g to TOG.
The A2212 2200kv motor would match these values but is being thrashed so I don't suppose it would last long (or the 30A ESC).
The A2212 1400kv with the 7 x 4 prop shouldn't have ROG (which it didn't) but it shouldn't have stalled. Maybe the twist in the tail upset it.
So I think the T2830 with an APC 8x6 prop is the combination to go for.
I tried the calibration business, it wasn't as described but did wiggle the prop & beep so it was definitely doing something.
I bought a cheapo A2212 2200kv package on ebay & an Overlander T2830 1300kv motor plus a few props and tried a few combinations & made up an excell spreadsheet.
The values of Current, Voltage & Power are that going into the ESC so are not accurate motor data but are a good indication.
The Slider weighs 1100g so from what I've read it needs 366g thrust so as not to stall & 550g to TOG.
The A2212 2200kv motor would match these values but is being thrashed so I don't suppose it would last long (or the 30A ESC).
The A2212 1400kv with the 7 x 4 prop shouldn't have ROG (which it didn't) but it shouldn't have stalled. Maybe the twist in the tail upset it.
So I think the T2830 with an APC 8x6 prop is the combination to go for.

Last edit: 19 Apr 2025 16:02 by Magpie.
Thanks: Klipkopwildlife, Flytilbroke, Quorneng, jon.in.swansea
Please Log in or Create an account to join the conversation.
- Quorneng
-
- Offline
- Forum Master
-
Less
More
- Posts: 10058
- Thank you received: 19042
19 Apr 2025 19:15 #29
by Quorneng
Replied by Quorneng on topic The Model Barn - Slider
Magpie
Interesting but the figure that most interests me from your testing is the thrust/watt (g/W)
In the order of your table they are
3.25
3.20
3.90
3.49
2.92
3.84
3.60
This indicates that the T2830 1300kV turning the APC 8 x 6 is is the most efficient and is over 30% better than the A2212 1400kV turning a similar but non APC prop.
It would be interesting to swap the the props over and compare the results. It would indicate whether it is the motor that was less efficient of the prop.
Further I suspect if the T2830 with the 8x6 APC was throttled to match the 640g thrust of the A2212 on its 8x6 it would demonstrate an even higher g/W figure.
It does rather show that getting the right motor & prop that matches the plane's requirement (but that's the difficult bit!) can give substantial benefits Over 30% more duration with the same performance has got to be worth it.
Interesting but the figure that most interests me from your testing is the thrust/watt (g/W)
In the order of your table they are
3.25
3.20
3.90
3.49
2.92
3.84
3.60
This indicates that the T2830 1300kV turning the APC 8 x 6 is is the most efficient and is over 30% better than the A2212 1400kV turning a similar but non APC prop.
It would be interesting to swap the the props over and compare the results. It would indicate whether it is the motor that was less efficient of the prop.
Further I suspect if the T2830 with the 8x6 APC was throttled to match the 640g thrust of the A2212 on its 8x6 it would demonstrate an even higher g/W figure.
It does rather show that getting the right motor & prop that matches the plane's requirement (but that's the difficult bit!) can give substantial benefits Over 30% more duration with the same performance has got to be worth it.
Thanks: Klipkopwildlife, jon.in.swansea
Please Log in or Create an account to join the conversation.
- Magpie
-
Topic Author
- Offline
- Elite Member
-
Less
More
- Posts: 587
- Thank you received: 1047
19 Apr 2025 19:38 #30
by Magpie
Replied by Magpie on topic The Model Barn - Slider
The central boss of the APC props are a bigger diameter than the the others & so is the prop driver of the Overlander so I wouldn't be happy swapping them over.
I agree that the T2830 could be throttled back to give a more economical performance.
My ambition at the moment is to get the bugger in the air - AND back down unscathed!
I agree that the T2830 could be throttled back to give a more economical performance.
My ambition at the moment is to get the bugger in the air - AND back down unscathed!
Thanks: Klipkopwildlife, Flytilbroke, THE BLACKBIRD
Please Log in or Create an account to join the conversation.
Time to create page: 0.291 seconds