
- Posts: 9436
- Thank you received: 19043
Depron Heinkel HE162
- Quorneng
-
 Topic Author
- Offline
- Forum Master
-

Less
More
07 Feb 2021 14:46 #61
by Quorneng
Replied by Quorneng on topic Depron Heinkel HE162
The wing top skin complete so is now structurally complete.
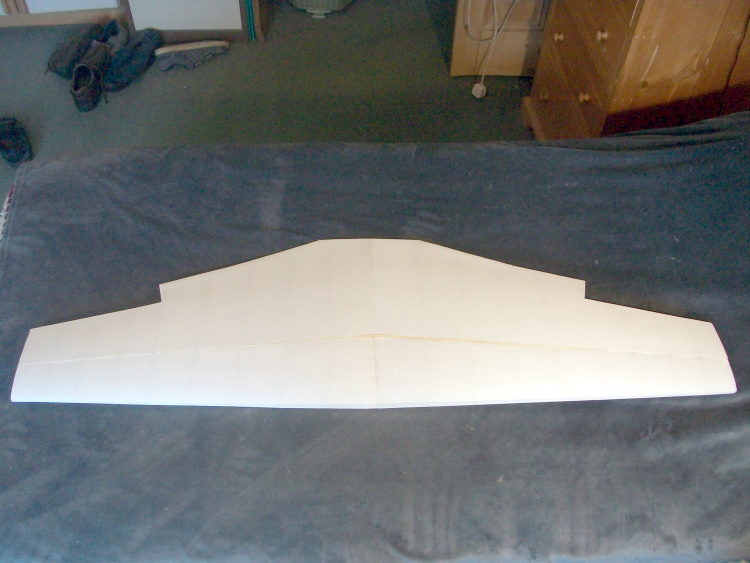
All very smooth & bland!
One aileron is complete and the parts cut for the second but will not be fitted yet.
A started made on the rear fuselage.
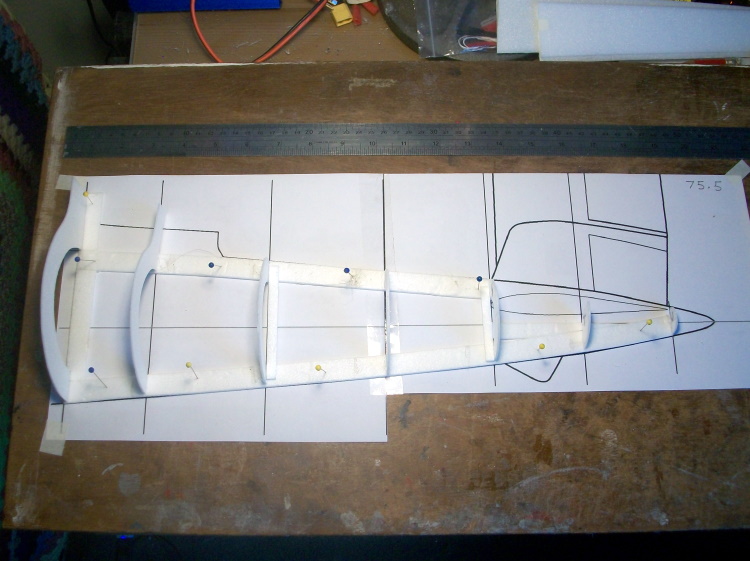
It will be built in exactly the same way as the centre part except the planks will be extremely tapered.
All the plans are now printed out including the 'developed' views of the tail plane and fin to give the correct size so it should just be building from now on. The only printed parts are likely to be the nose and tail cones.
All very smooth & bland!
One aileron is complete and the parts cut for the second but will not be fitted yet.
A started made on the rear fuselage.
It will be built in exactly the same way as the centre part except the planks will be extremely tapered.
All the plans are now printed out including the 'developed' views of the tail plane and fin to give the correct size so it should just be building from now on. The only printed parts are likely to be the nose and tail cones.
Thanks: Eric, Klipkopwildlife, THE BLACKBIRD, Ralpharr2001, paul d, crash happy
Please Log in or Create an account to join the conversation.
- Quorneng
-
Topic Author
- Offline
- Forum Master
-
Less
More
- Posts: 9436
- Thank you received: 19043
08 Feb 2021 19:06 - 08 Feb 2021 19:16 #62
by Quorneng
Replied by Quorneng on topic Depron Heinkel HE162
Still moving on.
The half tail section planked, lifted from the plan and the other half of the formers added.

Once the planking is fully completed it can be added to the centre section.

The fuselage is too 'fat' to hold so I expect it will need some 'bowling ball' figure hole grips like I did on the AN124.
Probably the tail plane and fins next although they will only be finally fitted along with the wings to make sure they all line up. If possible to save rear end weight I would like to work the elevators with just one servo.
A printed miniature CV joint?
The half tail section planked, lifted from the plan and the other half of the formers added.
Once the planking is fully completed it can be added to the centre section.
The fuselage is too 'fat' to hold so I expect it will need some 'bowling ball' figure hole grips like I did on the AN124.
Probably the tail plane and fins next although they will only be finally fitted along with the wings to make sure they all line up. If possible to save rear end weight I would like to work the elevators with just one servo.
A printed miniature CV joint?
Last edit: 08 Feb 2021 19:16 by Quorneng.
Thanks: Klipkopwildlife, THE BLACKBIRD, crash happy
Please Log in or Create an account to join the conversation.
- paul d
-
- Offline
- Forum Veteran
-

Less
More
- Posts: 2074
- Thank you received: 2292
08 Feb 2021 19:15 #63
by paul d
balsa is best.
Replied by paul d on topic Depron Heinkel HE162
looking good! suppose the power available won't allow the use of a dolly? seems a shame to spoil the lines with finger holds.
Edit: Bungee assisted launch???
Edit: Bungee assisted launch???
balsa is best.
Thanks: Klipkopwildlife
Please Log in or Create an account to join the conversation.
- Quorneng
-
Topic Author
- Offline
- Forum Master
-
Less
More
- Posts: 9436
- Thank you received: 19043
09 Feb 2021 00:32 - 09 Feb 2021 00:39 #64
by Quorneng
Replied by Quorneng on topic Depron Heinkel HE162
paul
A bungee could certainly be made to work but I am not sure I would be confident doing it on an untried plane's maiden.
Just had a "oh! no" moment with the aileron servos. I decided to 'y' connect them (outside the wing) and extend with a lead long enough to reach the cockpit area. All joints soldered and shrink wrapped. Connected it up to a servo tester and had very hesitant movement on both servos. :woohoo: I had tested both individually before closing up the wing.
Tried another servo tester then another power source all with no improvement. Then added another servo to the spare servo tester port and that worked normally so it had to be a soldered joint somewhere. Took off all the shrink wrap and touched all the solder joints with a iron still no improvement.
Finally unsoldered all the joints and re soldered the servo plug directly onto the Y connection. The servos worked perfectly. The problem was a bad contact within the long extension wire itself!
Have some more wire on order.
Last edit: 09 Feb 2021 00:39 by Quorneng.
Thanks: Eric, Klipkopwildlife, THE BLACKBIRD, paul d, crash happy
Please Log in or Create an account to join the conversation.
- Quorneng
-
Topic Author
- Offline
- Forum Master
-
Less
More
- Posts: 9436
- Thank you received: 19043
09 Feb 2021 23:09 - 09 Feb 2021 23:10 #65
by Quorneng
Replied by Quorneng on topic Depron Heinkel HE162
At last it is beginning to look like an HE162 rather than just the parts of one!
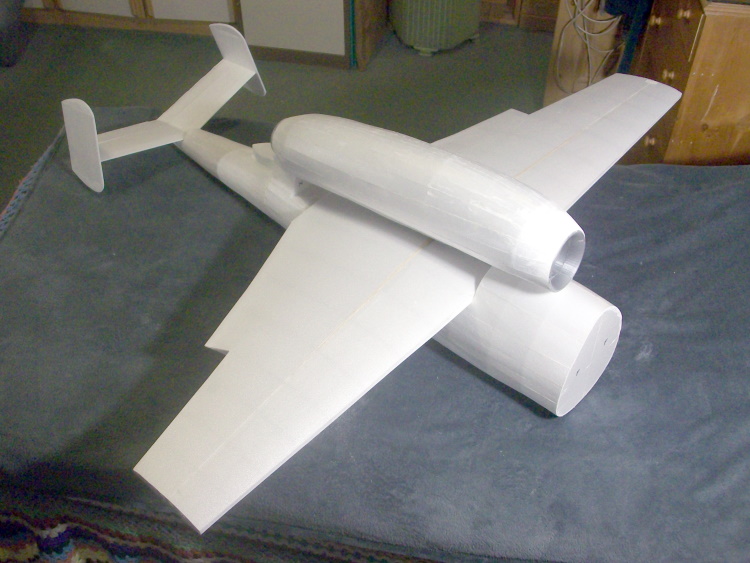
Nothing fixed it is all just positioned.
I may regret it but there are no rudders, it saves the weight of two servos right at the tail, so it will have to be flown bank and yank. On the plus side there will be some 'mechanical' aileron differential.
Cockpit next which will give me an idea of the weight needed up front to achieve a workable CofG. I suspect it will mean everything crammed right up in the nose!
It also looks pretty big so I hay have to revise my plan for it to be a 'one piece' plane. I will have to have a good 'think' about the best way to do it.
Last edit: 09 Feb 2021 23:10 by Quorneng.
Thanks: Eric, Klipkopwildlife, THE BLACKBIRD, crash happy, supertigrefan
Please Log in or Create an account to join the conversation.
- paul d
-
- Offline
- Forum Veteran
-
Less
More
- Posts: 2074
- Thank you received: 2292
10 Feb 2021 08:32 #66
by paul d
balsa is best.
Replied by paul d on topic Depron Heinkel HE162
I bloody love it Simon! back in the days when servos cost a fortune I had a couple of models with 3 channels, elevator, aileron and throttle, good fun.
balsa is best.
Thanks: Klipkopwildlife
Please Log in or Create an account to join the conversation.
- Rich griff
- Offline
- Elite Member
-

Less
More
- Posts: 299
- Thank you received: 344
10 Feb 2021 15:24 #67
by Rich griff
Replied by Rich griff on topic Depron Heinkel HE162
Make/break contact inside wire, car problematic, suspect make/break contact in engine loom to ECU, 88 wires, one broken wire ( easy to find and fix ,) 6 suspect, wires completely different to oe wiring diagram, dam french !
Good job it malfunctioned now !
Superb job and engineering, gunna do a jindi next, with RC trolly.. ?
Good job it malfunctioned now !
Superb job and engineering, gunna do a jindi next, with RC trolly.. ?
Thanks: Klipkopwildlife
Please Log in or Create an account to join the conversation.
- Eric
-

- Offline
- Moderator
-

Less
More
- Posts: 13726
- Thank you received: 14467
10 Feb 2021 15:45 #68
by Eric
if you are calm and collected when all about you are going berserk - you've missed something important!
Replied by Eric on topic Depron Heinkel HE162
I've commented previously about my Berlingo, multi-coloured bi-coloured wires in the loom.
Get the Haynes out, and all the wires are shown black!
Which one is which?
AAARGH!
(still haven't found where the fuses are hidden!)
Get the Haynes out, and all the wires are shown black!
Which one is which?
AAARGH!
(still haven't found where the fuses are hidden!)
if you are calm and collected when all about you are going berserk - you've missed something important!
Thanks: Klipkopwildlife
Please Log in or Create an account to join the conversation.
- paul d
-
- Offline
- Forum Veteran
-
Less
More
- Posts: 2074
- Thank you received: 2292
10 Feb 2021 16:39 #69
by paul d
balsa is best.
Replied by paul d on topic Depron Heinkel HE162
Eric, fuse board is behind the glove box mate on that..
Rich, all due respect but your post made no sense at all..
Rich, all due respect but your post made no sense at all..
balsa is best.
Thanks: Klipkopwildlife
Please Log in or Create an account to join the conversation.
- Eric
-
- Offline
- Moderator
-
Less
More
- Posts: 13726
- Thank you received: 14467
10 Feb 2021 19:25 #70
by Eric
if you are calm and collected when all about you are going berserk - you've missed something important!
Replied by Eric on topic Depron Heinkel HE162
Paul, I'll have a look next warm dry day, see how to get at it! :evil:
if you are calm and collected when all about you are going berserk - you've missed something important!
Thanks: Klipkopwildlife
Please Log in or Create an account to join the conversation.
- paul d
-
- Offline
- Forum Veteran
-
Less
More
- Posts: 2074
- Thank you received: 2292
10 Feb 2021 21:03 #71
by paul d
balsa is best.
Replied by paul d on topic Depron Heinkel HE162
open the glove box and there's a clip at the back, press it and the box will fall upside down revealing the fuse box.
balsa is best.
Thanks: Eric, Klipkopwildlife
Please Log in or Create an account to join the conversation.
- Quorneng
-
Topic Author
- Offline
- Forum Master
-
Less
More
- Posts: 9436
- Thank you received: 19043
11 Feb 2021 01:05 #72
by Quorneng
Replied by Quorneng on topic Depron Heinkel HE162
Spent some time thinking about storage of the HE 162.
I believe it will be possible to break it down into 3 pieces.
1. The fuselage and tail.
2. The one piece wing bolted on to it.
3. The engine nacelle bolted on top of the fuselage over the wing.
Using M4 nylon bolts it should only cost a few extra grams.
Just for fun a view inside the fuselage from the cockpit rear wall towards the tail.

The only thing inside all that space will be the elevator and aileron servo wires. :ohmy:
I believe it will be possible to break it down into 3 pieces.
1. The fuselage and tail.
2. The one piece wing bolted on to it.
3. The engine nacelle bolted on top of the fuselage over the wing.
Using M4 nylon bolts it should only cost a few extra grams.
Just for fun a view inside the fuselage from the cockpit rear wall towards the tail.
The only thing inside all that space will be the elevator and aileron servo wires. :ohmy:
Thanks: Klipkopwildlife, THE BLACKBIRD, crash happy
Please Log in or Create an account to join the conversation.
- Quorneng
-
Topic Author
- Offline
- Forum Master
-
Less
More
- Posts: 9436
- Thank you received: 19043
12 Feb 2021 21:48 - 12 Feb 2021 21:50 #73
by Quorneng
Replied by Quorneng on topic Depron Heinkel HE162
I was hoping to have complete the half nose shell this evening but the planking is taking ages.
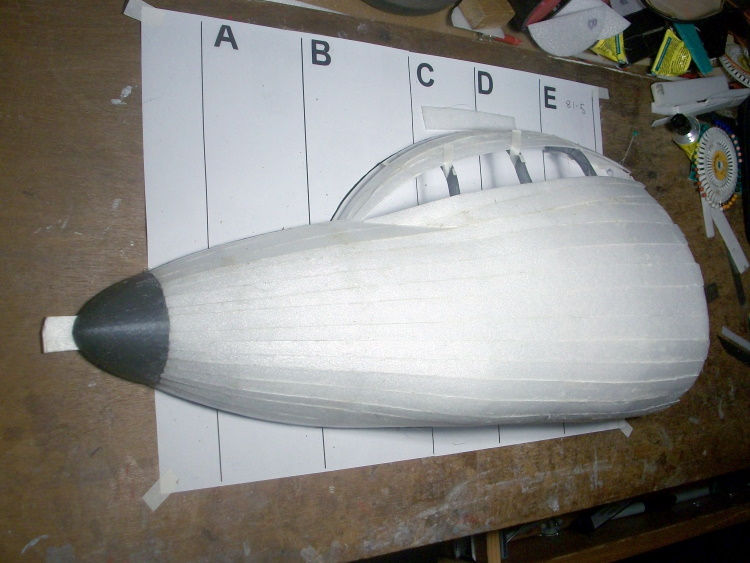
To save Depron I used 'printed' formers although they are a few grams heavier but the extra weight in the nose will not go amiss. The big problem the printed formers is you cannot stick pins onto them to hold the planks in place so each plank has to be taped in position. As the glue has to dry before any tape can be removed before the next plank can be fitted. The result is the rate of planking is slowed down by at least 50%.
Should be complete tomorrow no problem but I am definitely not looking forward to planking the other half.
I have also elected to create no battery hatch as I simply don't know where it will need to go.
Last edit: 12 Feb 2021 21:50 by Quorneng.
Thanks: Eric, Klipkopwildlife, THE BLACKBIRD, Ralpharr2001, crash happy
Please Log in or Create an account to join the conversation.
- Quorneng
-
Topic Author
- Offline
- Forum Master
-
Less
More
- Posts: 9436
- Thank you received: 19043
13 Feb 2021 13:59 - 13 Feb 2021 14:02 #74
by Quorneng
Replied by Quorneng on topic Depron Heinkel HE162
The nose half shell complete and the other half formers added.

The all Depron former is a temporary lash up and will be removed before the nose is added to the fuselage.
Note the nose cone also acts as the initial former so it is printed as a 'half' as well.
Just because I made a video of it printing.
As it takes over 20 minutes to print the video only includes short sections at 25, 50, 75 and 100% completion.
In the finished nose I am expecting the battery to actually go in the nose cone. :woohoo:
Last edit: 13 Feb 2021 14:02 by Quorneng.
Thanks: Eric, Klipkopwildlife, THE BLACKBIRD, crash happy
Please Log in or Create an account to join the conversation.
- Quorneng
-
Topic Author
- Offline
- Forum Master
-
Less
More
- Posts: 9436
- Thank you received: 19043
14 Feb 2021 21:28 #75
by Quorneng
Replied by Quorneng on topic Depron Heinkel HE162
Here's another post today!
Made good progress basically because I did virtually nothing else however the nose is complete and fixed in place so........

Note the two elevator servos sitting on the centre of the tail plane and, yes, the battery will have to go that far forward. :ohmy:
The Little Bee ESC and the Optp BEC together only weigh 15 g and the rx will be about the same but will make just a small nose weight contribution but it does all at least appear 'doable although there is still quite a bit to do'.
Made good progress basically because I did virtually nothing else however the nose is complete and fixed in place so........
Note the two elevator servos sitting on the centre of the tail plane and, yes, the battery will have to go that far forward. :ohmy:
The Little Bee ESC and the Optp BEC together only weigh 15 g and the rx will be about the same but will make just a small nose weight contribution but it does all at least appear 'doable although there is still quite a bit to do'.
Thanks: Eric, Klipkopwildlife, THE BLACKBIRD, crash happy, supertigrefan
Please Log in or Create an account to join the conversation.
Time to create page: 1.051 seconds