
- Thank you received: 0
Here's one for the serious builders. Show us your ideas
PA-18 Super Cub for the BMFA R/C Scale Indoor Nats
- Ex-Member
- User
-

Less
More
17 Nov 2016 07:54 #241
by Ex-Member
Replied by Ex-Member on topic PA-18 Super Cub for the BMFA R/C Scale Indoor Nats
wonderful sir.
could be mistaken for the full size.
well done
could be mistaken for the full size.
well done
Please Log in or Create an account to join the conversation.
- Septic
-
 Topic Author
- Offline
- Elite Member
-

Less
More
- Posts: 307
- Thank you received: 690
17 Nov 2016 08:14 #242
by Septic
tap - tap.......rivet
Replied by Septic on topic PA-18 Super Cub for the BMFA R/C Scale Indoor Nats
Thanks Tony  still a few fiddly bits to do, but ready for another indoor session at Shawbury on Sunday.
Fingers crossed the extra 10g of paint and detail doesn't upset the flying too much.
still a few fiddly bits to do, but ready for another indoor session at Shawbury on Sunday.Fingers crossed the extra 10g of paint and detail doesn't upset the flying too much.
tap - tap.......rivet
Please Log in or Create an account to join the conversation.
- martynk
-
- Offline
- Premium Member
-

18 Nov 2016 22:14 #243
by martynk
--
Martyn
mad-aeromodeller.blogspot.co.uk/
Replied by martynk on topic PA-18 Super Cub for the BMFA R/C Scale Indoor Nats
I am in awe Danny - that is superb. Does the pilot look like your Dad?
Martyn
Martyn
--
Martyn
mad-aeromodeller.blogspot.co.uk/
Thanks: Septic
Please Log in or Create an account to join the conversation.
- Septic
-
Topic Author
- Offline
- Elite Member
-
Less
More
- Posts: 307
- Thank you received: 690
18 Nov 2016 22:47 #244
by Septic
tap - tap.......rivet
Replied by Septic on topic PA-18 Super Cub for the BMFA R/C Scale Indoor Nats
Hi Martyn and thank you. I have really enjoyed drawing and building this one. Am quite shocked that I could do it to be honest. Lots of help and support from friends
Nah doesn't look like Dad, that would be kind of fun to get one made from a pic though
Nah doesn't look like Dad, that would be kind of fun to get one made from a pic though
tap - tap.......rivet
Please Log in or Create an account to join the conversation.
- one tenor
-

- Offline
- Forum Veteran
-

- johnpcalex@gmail.com
19 Nov 2016 20:22 #245
by one tenor
Anything will fly given enough power
Replied by one tenor on topic PA-18 Super Cub for the BMFA R/C Scale Indoor Nats
What do you do with the tabs ?
Anything will fly given enough power
Please Log in or Create an account to join the conversation.
- Septic
-
Topic Author
- Offline
- Elite Member
-
Less
More
- Posts: 307
- Thank you received: 690
19 Nov 2016 23:55 #246
by Septic
tap - tap.......rivet
Replied by Septic on topic PA-18 Super Cub for the BMFA R/C Scale Indoor Nats
Sorry OT you have lost me, it is late and easily done 
tap - tap.......rivet
Please Log in or Create an account to join the conversation.
- one tenor
-
- Offline
- Forum Veteran
-
- johnpcalex@gmail.com
20 Nov 2016 01:41 #247
by one tenor
Anything will fly given enough power
Replied by one tenor on topic PA-18 Super Cub for the BMFA R/C Scale Indoor Nats
The tabs in /on the wings to line up the stencils
Anything will fly given enough power
Please Log in or Create an account to join the conversation.
- Ex-Member
- User
-
Less
More
- Thank you received: 0
20 Nov 2016 09:26 #248
by Ex-Member
Replied by Ex-Member on topic PA-18 Super Cub for the BMFA R/C Scale Indoor Nats
They are the strut mounts i think John.
Please Log in or Create an account to join the conversation.
- one tenor
-
- Offline
- Forum Veteran
-
- johnpcalex@gmail.com
20 Nov 2016 09:41 #249
by one tenor
Anything will fly given enough power
Replied by one tenor on topic PA-18 Super Cub for the BMFA R/C Scale Indoor Nats
Do think you're right Old Chap
Anything will fly given enough power
Please Log in or Create an account to join the conversation.
- Septic
-
Topic Author
- Offline
- Elite Member
-
Less
More
- Posts: 307
- Thank you received: 690
20 Nov 2016 09:45 #250
by Septic
tap - tap.......rivet
Replied by Septic on topic PA-18 Super Cub for the BMFA R/C Scale Indoor Nats
Hi OT the tabs under the wings are made of G10 (ProSkin from Mick Reeves) drilled to receive the strut ends.
the procedure of fitting the wings are to hold the wing against the centre sections and slide the retaining wire through the two 1/16 Glass board lugs on the wings and the two lugs attached to the centre section, from front to rear. This locks the wings laterally to the fuselage.
The wing struts then set the dihedral and take the flying and landing loads. The struts are attached in a very specific sequence and are retained simply by tension in the setup. The first step is to slide the forward strut anchorage through the wing tab and rotate through 90 degrees. The attachment alongside requires the struts to be sprung lightly apart befor sliding the strut end through its corresponding plate. The two riser struts are sprung apart and fit into their two corresonding tabs. This makes for a rigid assembly, with the final remaining tab on the fuselage is slightly forward of the apex of the wing struts. This needs the struts to be sprung forward to fit. The tension to spring back holds it all together and the wing cannot move. Very simple but aleviates any need for clips etc to hold the wings on. On a hard landing the tabs pull out of the fus and are easily glued back in again. It sounds fiddly but the wings come off fairly easily.
Hopefully pictures may help explain?


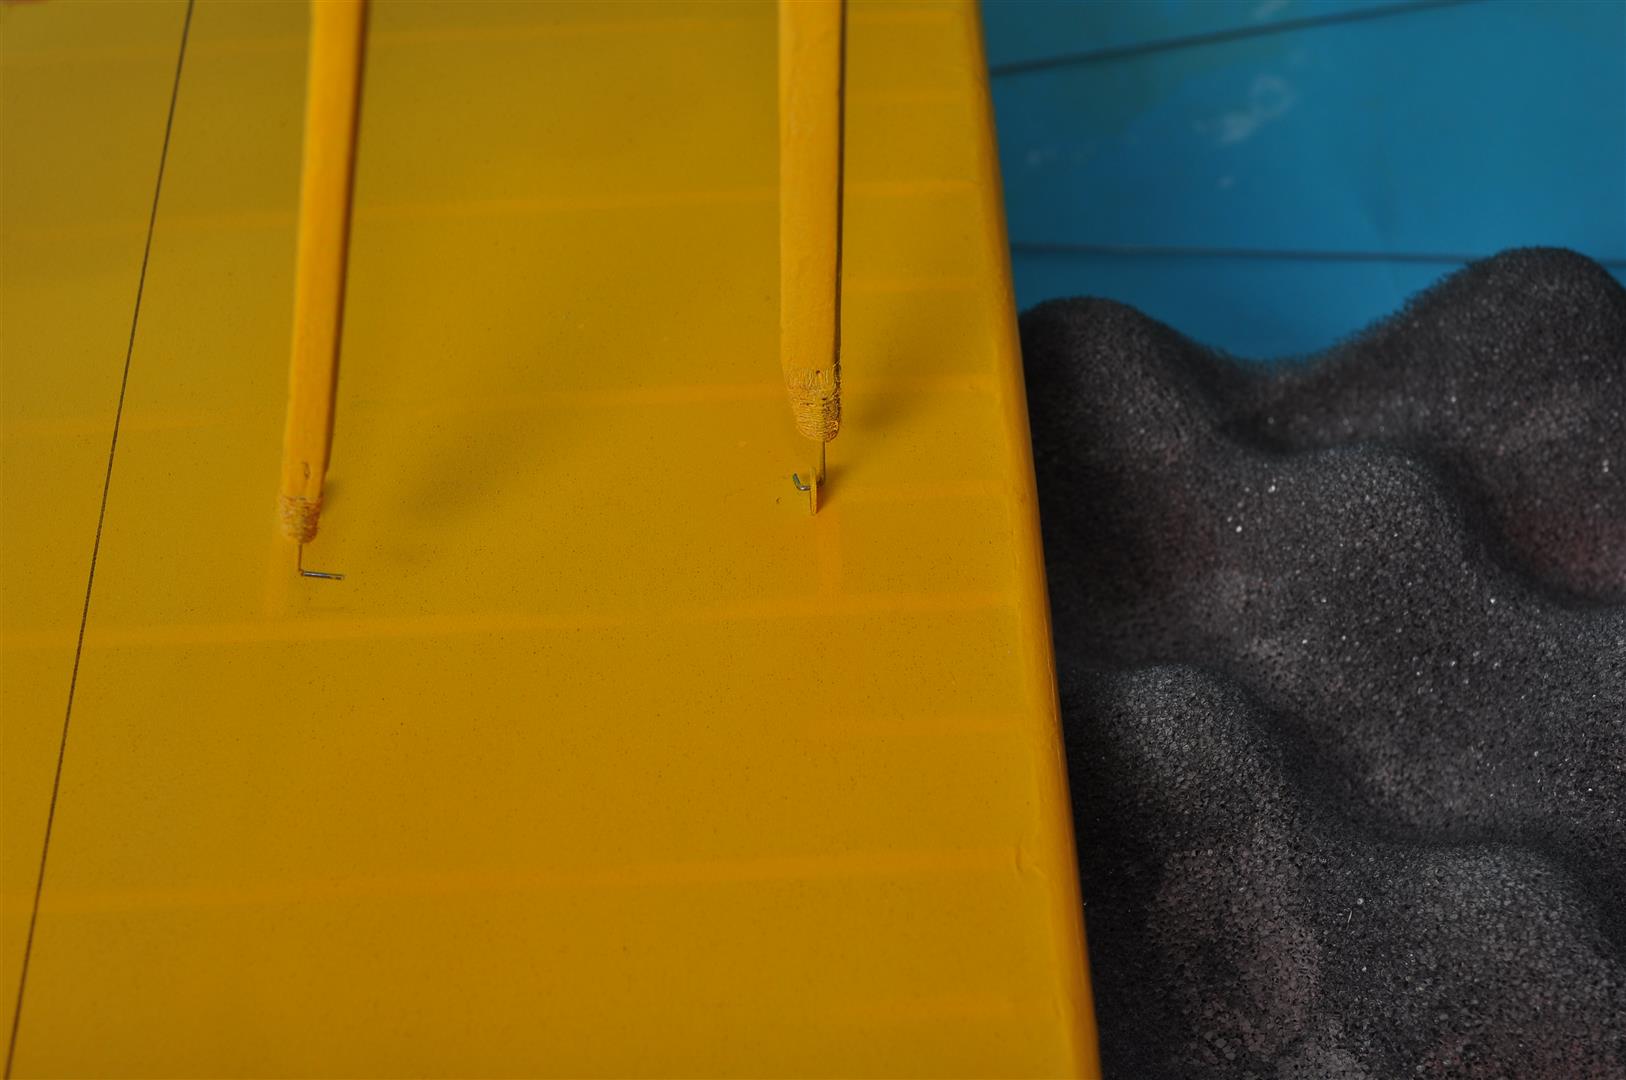
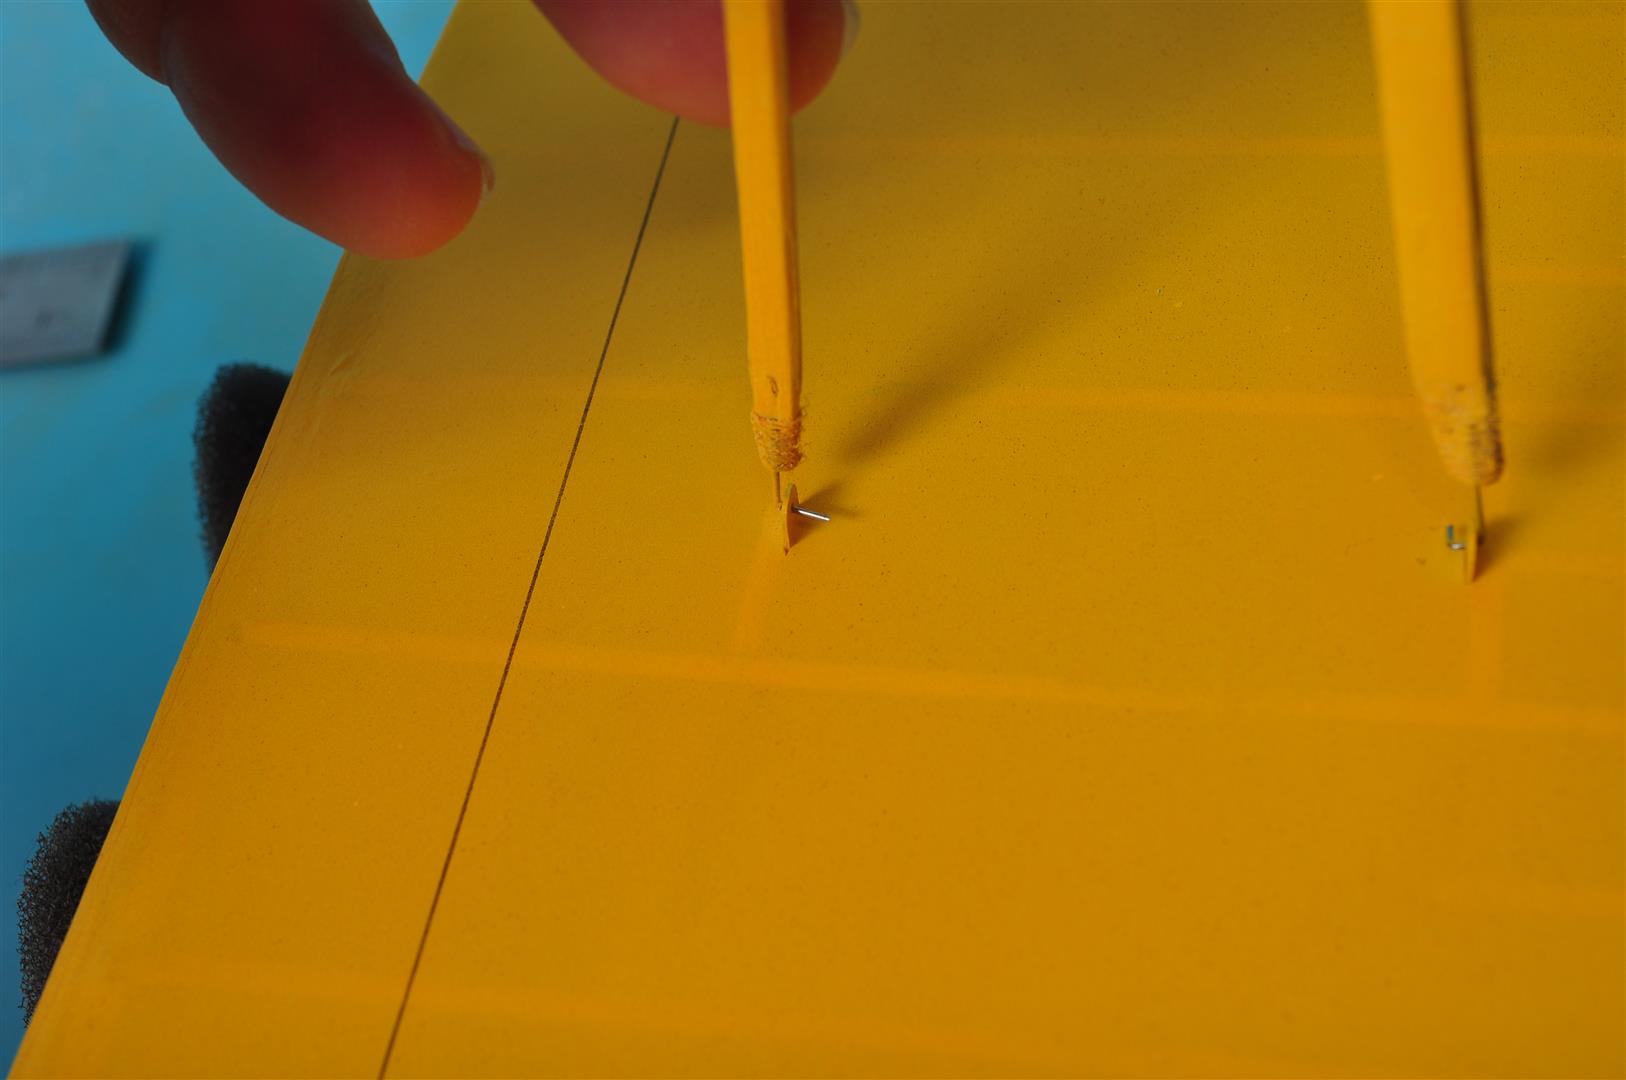
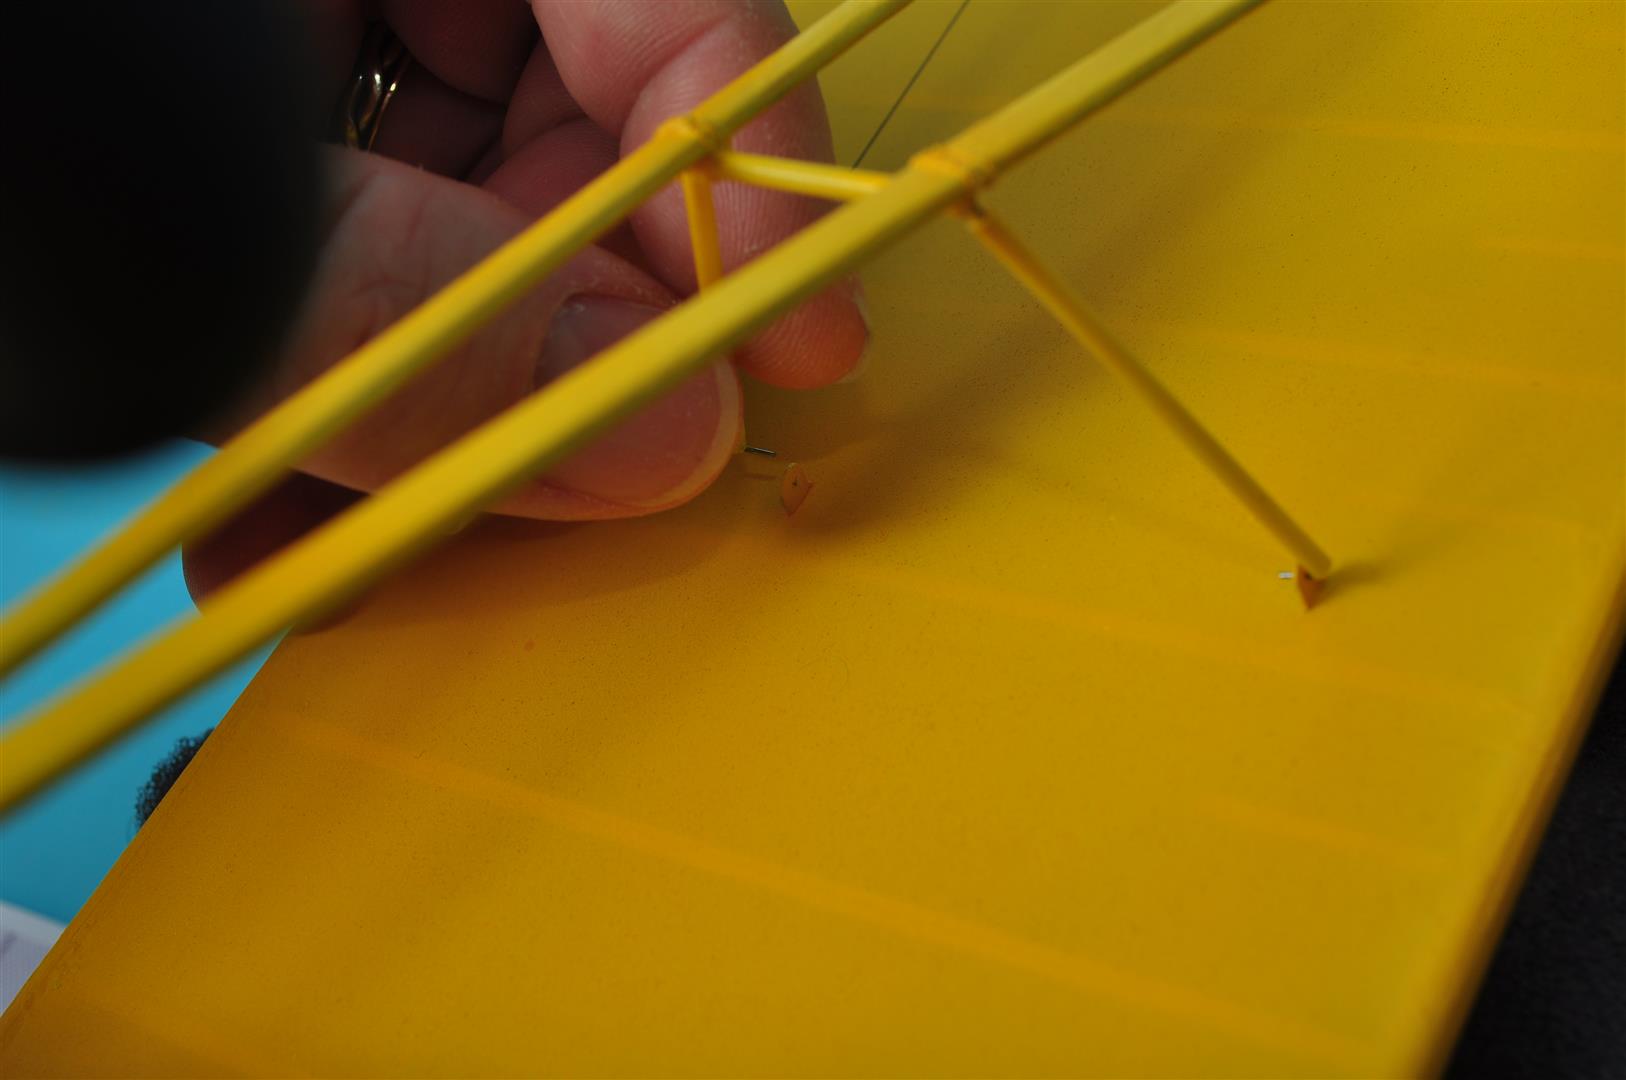
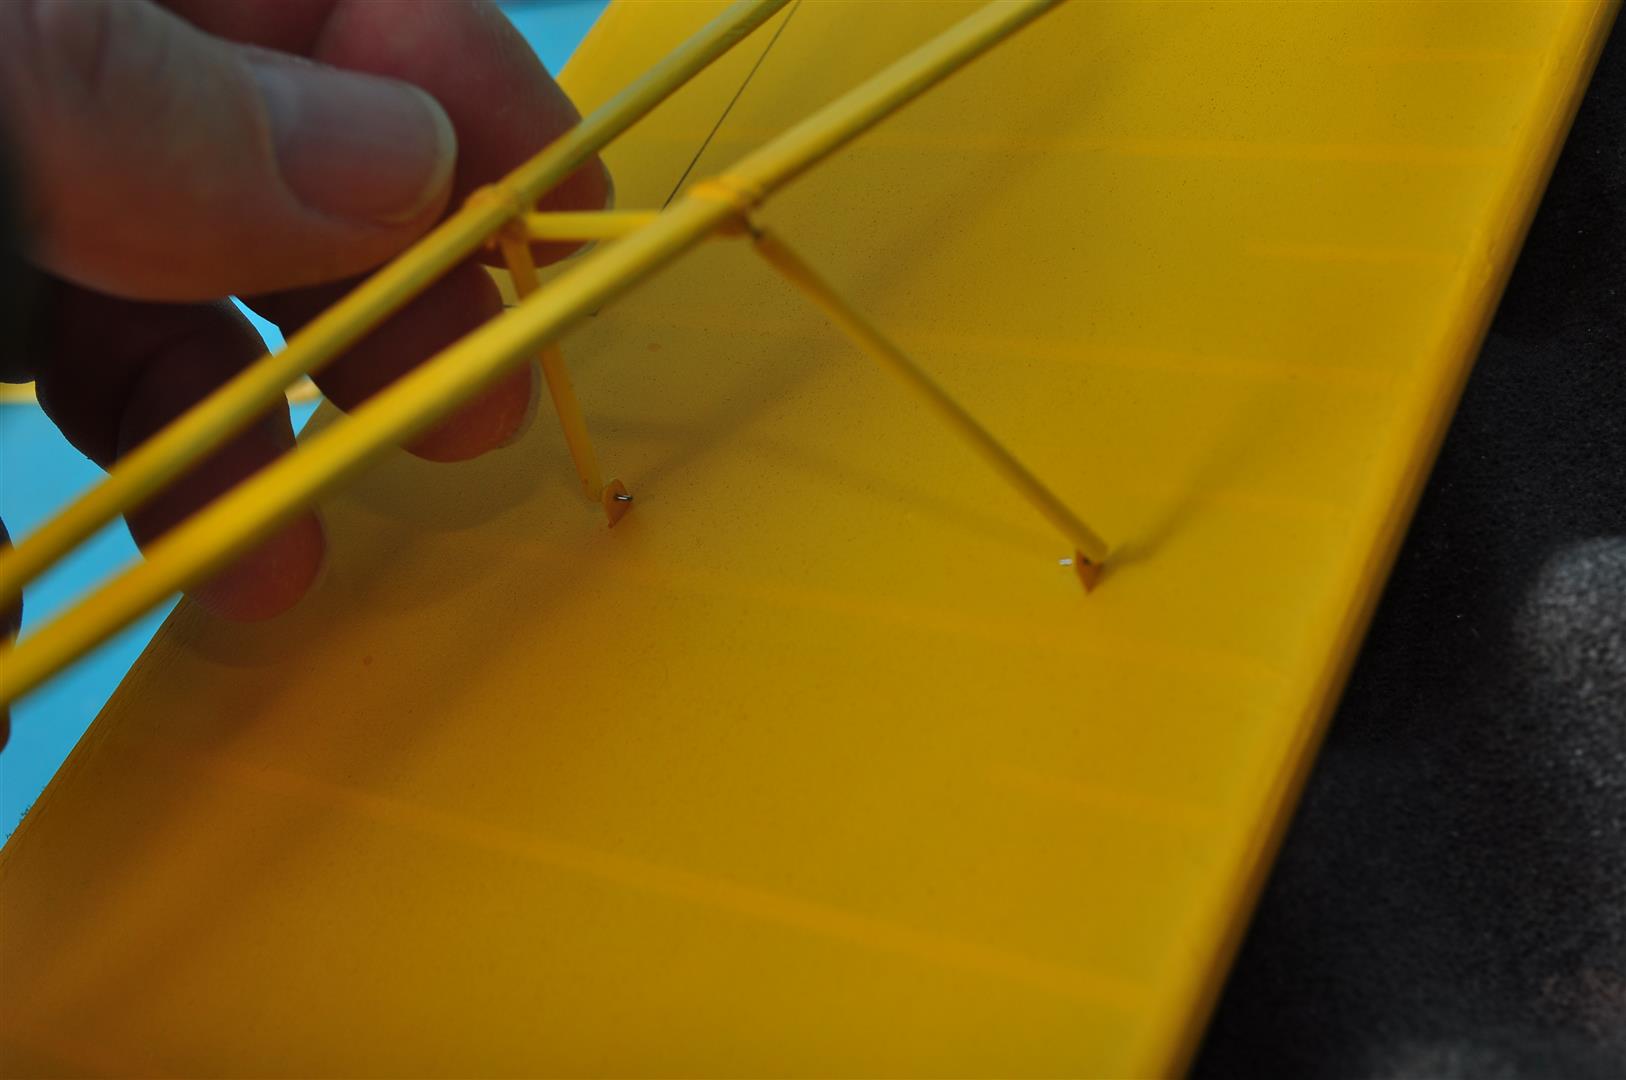

Hope this is what you meant?
Oh I used the location of these tabs on the plan to make the stencils, so I could use them to allign the stencil
Cheers
Danny
the procedure of fitting the wings are to hold the wing against the centre sections and slide the retaining wire through the two 1/16 Glass board lugs on the wings and the two lugs attached to the centre section, from front to rear. This locks the wings laterally to the fuselage.
The wing struts then set the dihedral and take the flying and landing loads. The struts are attached in a very specific sequence and are retained simply by tension in the setup. The first step is to slide the forward strut anchorage through the wing tab and rotate through 90 degrees. The attachment alongside requires the struts to be sprung lightly apart befor sliding the strut end through its corresponding plate. The two riser struts are sprung apart and fit into their two corresonding tabs. This makes for a rigid assembly, with the final remaining tab on the fuselage is slightly forward of the apex of the wing struts. This needs the struts to be sprung forward to fit. The tension to spring back holds it all together and the wing cannot move. Very simple but aleviates any need for clips etc to hold the wings on. On a hard landing the tabs pull out of the fus and are easily glued back in again. It sounds fiddly but the wings come off fairly easily.
Hopefully pictures may help explain?
Hope this is what you meant?
Oh I used the location of these tabs on the plan to make the stencils, so I could use them to allign the stencil
Cheers
Danny
tap - tap.......rivet
Thanks: Klipkopwildlife, Firewood
Please Log in or Create an account to join the conversation.
- Septic
-
Topic Author
- Offline
- Elite Member
-
Less
More
- Posts: 307
- Thank you received: 690
20 Nov 2016 09:49 #251
by Septic
tap - tap.......rivet
Replied by Septic on topic PA-18 Super Cub for the BMFA R/C Scale Indoor Nats
I added some airbrushing to try and simulate the ailerons, not sure how effective it has been, I should have dropped to a smaller needle in the brush as the paint was not atomising finely enough.....
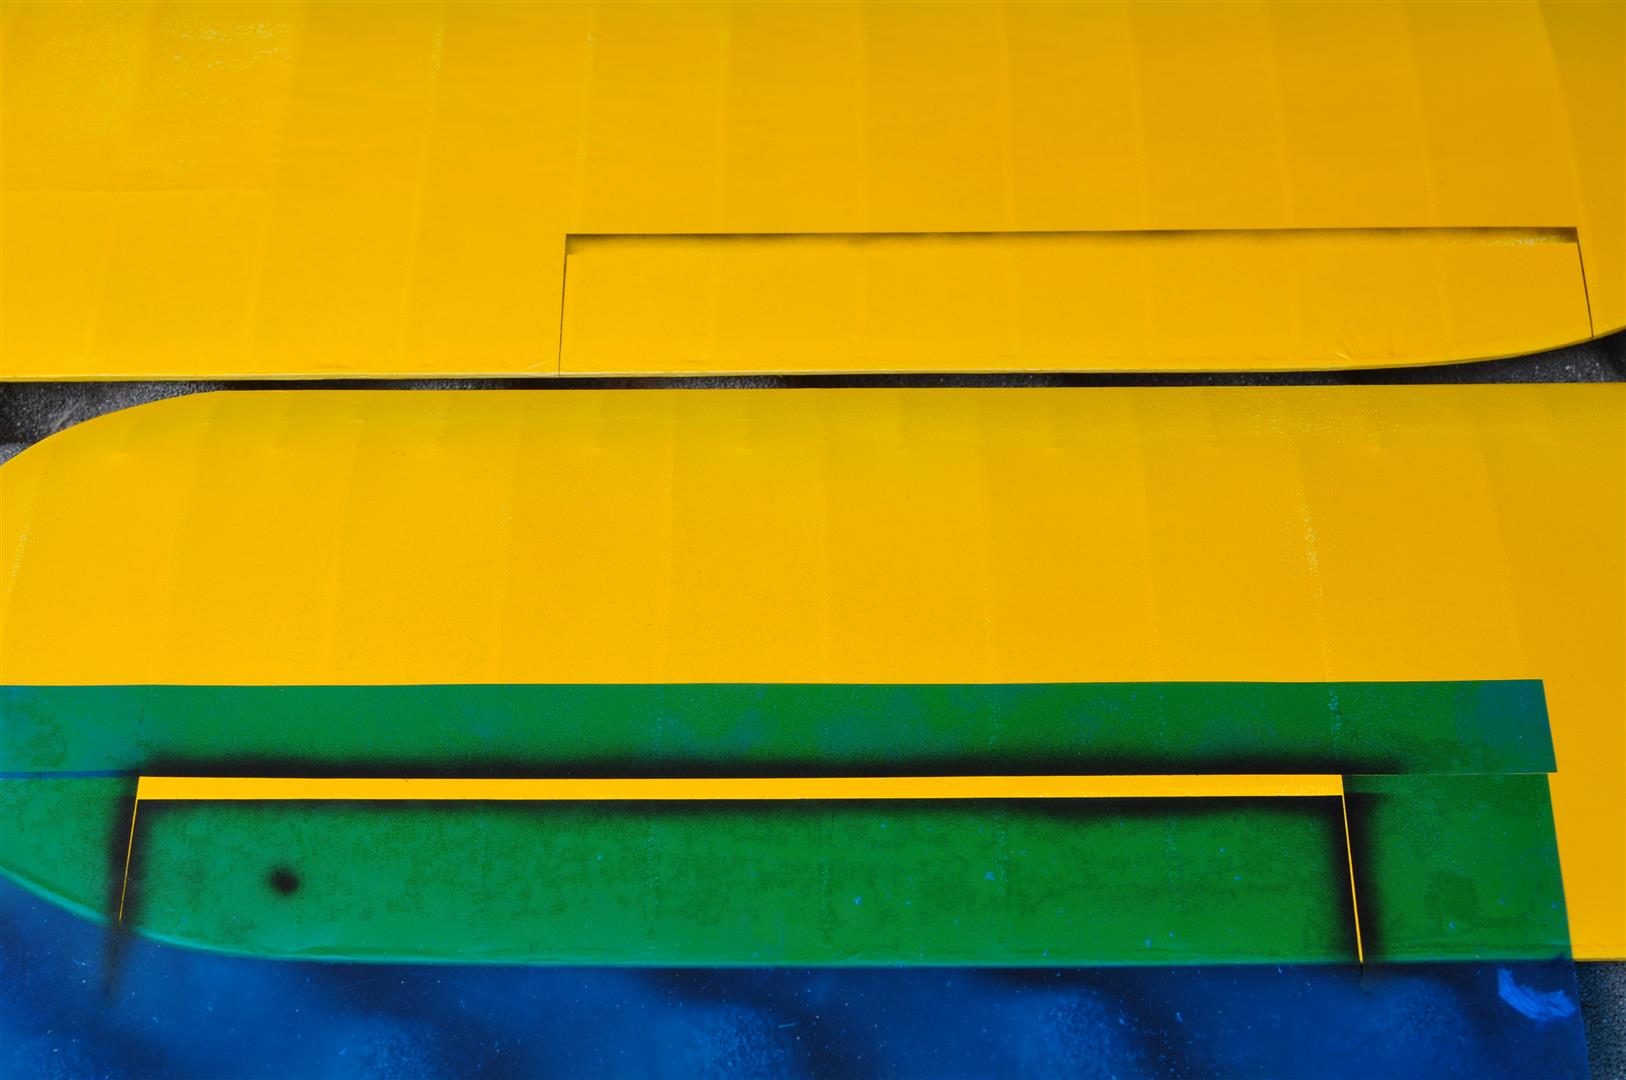
Cheers
Danny
Cheers
Danny
tap - tap.......rivet
Thanks: Ex-Member, Quorneng, Firewood, Kintosh
Please Log in or Create an account to join the conversation.
- boz
-

- Offline
- Platinum Member
-

Less
More
- Posts: 1176
- Thank you received: 1420
20 Nov 2016 14:05 #252
by boz
Replied by boz on topic PA-18 Super Cub for the BMFA R/C Scale Indoor Nats
Looks good, boz
Thanks: Septic
Please Log in or Create an account to join the conversation.
- Monz
-

- Offline
- Elite Member
-
20 Nov 2016 17:27 #253
by Monz
Replied by Monz on topic PA-18 Super Cub for the BMFA R/C Scale Indoor Nats
Very nice Danny, like the airbrushed control surfaces. I've done this a few times, with varying success.
Hope today went well at Shawbury. Pics and vids please, or it didn't happen
Hope today went well at Shawbury. Pics and vids please, or it didn't happen
Thanks: Septic
Please Log in or Create an account to join the conversation.
- Septic
-
Topic Author
- Offline
- Elite Member
-
Less
More
- Posts: 307
- Thank you received: 690
20 Nov 2016 23:56 #254
by Septic
tap - tap.......rivet
Replied by Septic on topic PA-18 Super Cub for the BMFA R/C Scale Indoor Nats
Not quite the result I had wanted today. First of all the video camera failed to record, it hasn't let me down before but it did today, so sorry no video.
The flight did not go to plan, the yellow dope finish had gotten into the thread hinges and they were not as free as they were, so centring was vague. I should have remembered that we threaded hinges AFTER painting. An easy fix. The stiff hinges and slightly rearward c of g from the paint meant a very hairy flight, which ended with a bumpy landing. One wing tab loosened and the blessed cowl knocked loose again. Anyway that curtailed further testing. It did however prove that the model can turn tight in both left and right hand circuits, one observer couldn't believe how well it turned with scale dihedral of almost zero! But it does.
Anyway a few repairs and then its back to Shawbury in a month. The extra weight didn't have any effect on the models lovely slow speed I am pleased to say
Cheers
Danny
tap - tap.......rivet
Thanks: Ex-Member, Monz, boz, Firewood, Kintosh
Please Log in or Create an account to join the conversation.
- Ex-Member
- User
-
Less
More
- Thank you received: 0
21 Nov 2016 19:27 - 21 Nov 2016 19:30 #255
by Ex-Member
Replied by Ex-Member on topic PA-18 Super Cub for the BMFA R/C Scale Indoor Nats
The video camera failed to record.....hmmmm, there's a law about that sort of thing Septic, and I think you've just proved it!
Your comment on the extra weight of the paint not seeming to affect the model's flying speed is interesting and set me to thinking.... Weight is against us in the model world on several counts. The lift on a model is proportional to the square of the speed, which means that if we double the speed, then the lift increases by a factor of four. Conversely, and since for level flight lift must equal weight, if we double the weight of the model, the flying speed goes up only by the square root of 2, i.e. a factor of only 1.4. I'm not sure what the weight increase is on your model, but lets say it's 15%. That would equate to an increase in flying speed of only 7%, which is not really noticeable.
Now, considering the rearward C of G. That makes the model fly with less up elevator, which means less trim drag and therefore, less required thrust. But, it also means that there is less down force on the tailplane, and therefore, the wing needs to provide less overall lift. This reduces the required flying speed slightly.
Putting the above two together would explain why you didn't notice a change of speed.
Now, when you get the C of G in the right position by adding weight to the nose.....you may then see a difference! :lol:
Your comment on the extra weight of the paint not seeming to affect the model's flying speed is interesting and set me to thinking.... Weight is against us in the model world on several counts. The lift on a model is proportional to the square of the speed, which means that if we double the speed, then the lift increases by a factor of four. Conversely, and since for level flight lift must equal weight, if we double the weight of the model, the flying speed goes up only by the square root of 2, i.e. a factor of only 1.4. I'm not sure what the weight increase is on your model, but lets say it's 15%. That would equate to an increase in flying speed of only 7%, which is not really noticeable.
Now, considering the rearward C of G. That makes the model fly with less up elevator, which means less trim drag and therefore, less required thrust. But, it also means that there is less down force on the tailplane, and therefore, the wing needs to provide less overall lift. This reduces the required flying speed slightly.
Putting the above two together would explain why you didn't notice a change of speed.
Now, when you get the C of G in the right position by adding weight to the nose.....you may then see a difference!
:lol:
Last edit: 21 Nov 2016 19:30 by . Reason: spellering
Please Log in or Create an account to join the conversation.
Time to create page: 1.624 seconds