
- Posts: 2290
- Thank you received: 1918
Piper Tripacer to Pacer refurb
- alan cantwell
-

- Offline
- Inactivated User
-

Less
More
20 Jan 2013 04:32 #16
by alan cantwell
i have 2 sides
no you dont,
yes i do,
Replied by alan cantwell on topic Piper Tripacer to Pacer refurb
lot of work for not a lot of weight loss in those ribs Chris, is there a lot to come out of the fuzz and tail?
i have 2 sides
no you dont,
yes i do,
Please Log in or Create an account to join the conversation.
- Ex-Member
- Visitor
-

20 Jan 2013 04:33 #17
by Ex-Member
Replied by Ex-Member on topic Piper Tripacer to Pacer refurb
that will be a big weight loss program then.
be an interesting thread to follow.
i should be able to pick up some good tips then.
be an interesting thread to follow.
i should be able to pick up some good tips then.
Please Log in or Create an account to join the conversation.
- CeeJayP
-
 Topic Author
- Offline
- Elite Member
-

- Hi Peeps
Less
More
- Posts: 445
- Thank you received: 833
20 Jan 2013 05:13 - 20 Jan 2013 05:14 #18
by CeeJayP
Replied by CeeJayP on topic Piper Tripacer to Pacer refurb
Alan i know but i have to try,
any way heres a couple of pics purely for interest
i have picked the full size aircraft i am doing the scheme of
here,s a picture of it in its 1980,s guise

and here is one of it now

how neat is that
i also have a load of detail photo,s i took at Stow Maries last year when it flew in for the vintage aircraft weekend i spoke to owner to will be neat to get the two together
chris
any way heres a couple of pics purely for interest
i have picked the full size aircraft i am doing the scheme of
here,s a picture of it in its 1980,s guise
and here is one of it now
how neat is that
i also have a load of detail photo,s i took at Stow Maries last year when it flew in for the vintage aircraft weekend i spoke to owner to will be neat to get the two together
chris
Last edit: 20 Jan 2013 05:14 by CeeJayP.
Thanks: Eric, Sarah-Jane Smith
Please Log in or Create an account to join the conversation.
- Sarah-Jane Smith
-

- Offline
- Forum Veteran
-

- Gone
Less
More
- Posts: 3094
- Thank you received: 2182
20 Jan 2013 05:57 #19
by Sarah-Jane Smith
hmmm dont see any sticky back tape and plastic washing up bottles so you dont get the blue peter badge Mr P!
Must admit prefer as a taildragger. Seen a nice colour scheme on a tripacer on google- cream with a burgundy trim
I wish I was a glow worm, a glow worm's never glum.
Cos how can you be grumpy when the sun shines out your bum?!
Replied by Sarah-Jane Smith on topic Piper Tripacer to Pacer refurb
So as Blue Peter says, here,s on i did earlier
hmmm dont see any sticky back tape and plastic washing up bottles so you dont get the blue peter badge Mr P!
Must admit prefer as a taildragger. Seen a nice colour scheme on a tripacer on google- cream with a burgundy trim
I wish I was a glow worm, a glow worm's never glum.
Cos how can you be grumpy when the sun shines out your bum?!
Please Log in or Create an account to join the conversation.
- CeeJayP
-
Topic Author
- Offline
- Elite Member
-
- Hi Peeps
Less
More
- Posts: 445
- Thank you received: 833
20 Jan 2013 15:42 #20
by CeeJayP
Replied by CeeJayP on topic Piper Tripacer to Pacer refurb
yes i got that picture too!
the reason for the colour picked is its history, it was a tripacer, and i know the owner slightly and it fliy,s into Stow Maries where i spend a lot of time over the year
chris
the reason for the colour picked is its history, it was a tripacer, and i know the owner slightly and it fliy,s into Stow Maries where i spend a lot of time over the year
chris
Please Log in or Create an account to join the conversation.
- alan cantwell
-
- Offline
- Inactivated User
-
Less
More
- Posts: 2290
- Thank you received: 1918
20 Jan 2013 16:11 #21
by alan cantwell
i have 2 sides
no you dont,
yes i do,
Replied by alan cantwell on topic Piper Tripacer to Pacer refurb
lovely scheme, it does look nice as a taildragger, carry on losing weight, then start on the model 
i have 2 sides
no you dont,
yes i do,
Thanks: Sarah-Jane Smith
Please Log in or Create an account to join the conversation.
- old fart
-

- Offline
- Forum Veteran
-
Less
More
- Posts: 2571
- Thank you received: 705
20 Jan 2013 16:31 #22
by old fart
There is nothing like a dream to create the future.
Electrickery is the work of the devil.
Replied by old fart on topic Piper Tripacer to Pacer refurb
alan cantwell wrote: .....carry on losing weight, then start on the model
There is nothing like a dream to create the future.
Electrickery is the work of the devil.
Please Log in or Create an account to join the conversation.
- CeeJayP
-
Topic Author
- Offline
- Elite Member
-
- Hi Peeps
Less
More
- Posts: 445
- Thank you received: 833
20 Jan 2013 16:58 #23
by CeeJayP
Replied by CeeJayP on topic Piper Tripacer to Pacer refurb
havin a haircut tommorrow should save a few oz,s 
chris
chris
Thanks: Sarah-Jane Smith
Please Log in or Create an account to join the conversation.
- CeeJayP
-
Topic Author
- Offline
- Elite Member
-
- Hi Peeps
Less
More
- Posts: 445
- Thank you received: 833
20 Jan 2013 18:14 - 20 Jan 2013 18:16 #24
by CeeJayP
Replied by CeeJayP on topic Piper Tripacer to Pacer refurb
Hi all
been and had a play with camera and will try to show the major components in its change of identity fro Tri to Pacer
first of all what has been removed.

this shows the main and nose wheel assy,s the main is made from 1/4 inch thick alluminium plate!!!! and is very heavy and has no springing other than flex in the material. obviously would have been two main wheels but binned em and can only locate one for pics.

this one is all the accompanying fittings for the nose leg to this add a servo and plywood mounts and all the box for the nose to mount on that was made from 1/4 ply.
this last shot shows where all this ply mount and nose leg used to be, now all open, fresh air is much lighter

chris
been and had a play with camera and will try to show the major components in its change of identity fro Tri to Pacer
first of all what has been removed.
this shows the main and nose wheel assy,s the main is made from 1/4 inch thick alluminium plate!!!! and is very heavy and has no springing other than flex in the material. obviously would have been two main wheels but binned em and can only locate one for pics.
this one is all the accompanying fittings for the nose leg to this add a servo and plywood mounts and all the box for the nose to mount on that was made from 1/4 ply.
this last shot shows where all this ply mount and nose leg used to be, now all open, fresh air is much lighter
chris
Last edit: 20 Jan 2013 18:16 by CeeJayP.
Thanks: Sarah-Jane Smith
Please Log in or Create an account to join the conversation.
- CeeJayP
-
Topic Author
- Offline
- Elite Member
-
- Hi Peeps
Less
More
- Posts: 445
- Thank you received: 833
20 Jan 2013 18:22 #25
by CeeJayP
Replied by CeeJayP on topic Piper Tripacer to Pacer refurb
so onto the new u/c
first a shot of the complete fitted leg

next close ups of bits and pieces, this is the wheel attachment point and the joint allowing the suspension to work,
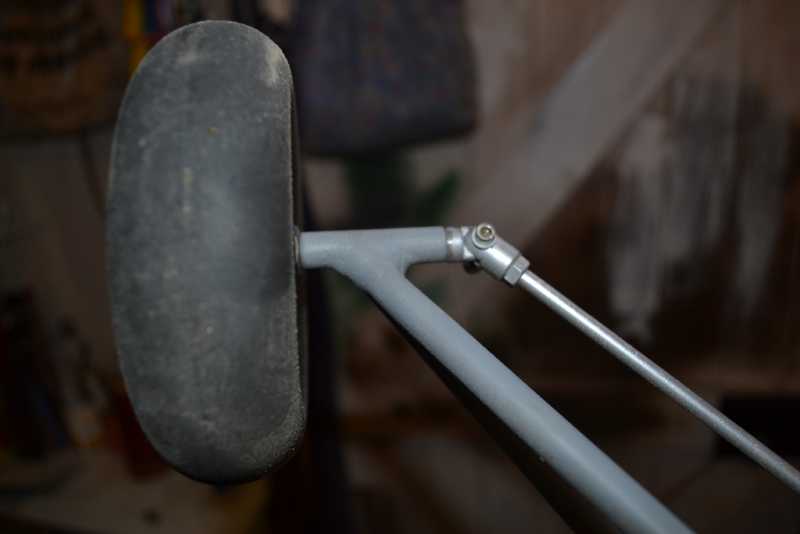
here is the other end where it fits to fus

wider angle shots of same


chris
first a shot of the complete fitted leg
next close ups of bits and pieces, this is the wheel attachment point and the joint allowing the suspension to work,
here is the other end where it fits to fus
wider angle shots of same
chris
Thanks: Dean M, Sarah-Jane Smith
Please Log in or Create an account to join the conversation.
- CeeJayP
-
Topic Author
- Offline
- Elite Member
-
- Hi Peeps
Less
More
- Posts: 445
- Thank you received: 833
20 Jan 2013 18:28 #26
by CeeJayP
Replied by CeeJayP on topic Piper Tripacer to Pacer refurb
now i can get to some components
first off the axle, turned out of a 10mm high tensile bolt,


this one shows it fitted to u/c leg, it slides in from the inside and locks into place with the thin nut,

wheel on

chris
first off the axle, turned out of a 10mm high tensile bolt,
this one shows it fitted to u/c leg, it slides in from the inside and locks into place with the thin nut,
wheel on
chris
Thanks: Klipkopwildlife, Dean M, Sarah-Jane Smith
Please Log in or Create an account to join the conversation.
- CeeJayP
-
Topic Author
- Offline
- Elite Member
-
- Hi Peeps
Less
More
- Posts: 445
- Thank you received: 833
20 Jan 2013 18:35 - 20 Jan 2013 18:36 #27
by CeeJayP
Replied by CeeJayP on topic Piper Tripacer to Pacer refurb
here is the suspension rod that connects the axle to the suspension assy inside fus

its made from medium carbon 6mm steel bar,
axle joint

here is the suspension assy inside fus

the suspension is made from two short lengths of springs for each leg one soft one hard to allow for some progressive springing. the terrible finish is cheap paint blasted on to stop it rusting!!
chris
its made from medium carbon 6mm steel bar,
axle joint
here is the suspension assy inside fus
the suspension is made from two short lengths of springs for each leg one soft one hard to allow for some progressive springing. the terrible finish is cheap paint blasted on to stop it rusting!!
chris
Last edit: 20 Jan 2013 18:36 by CeeJayP.
Thanks: Sarah-Jane Smith
Please Log in or Create an account to join the conversation.
- CeeJayP
-
Topic Author
- Offline
- Elite Member
-
- Hi Peeps
Less
More
- Posts: 445
- Thank you received: 833
20 Jan 2013 18:42 #28
by CeeJayP
Replied by CeeJayP on topic Piper Tripacer to Pacer refurb
and now some close ups of various bits
first the mounting points on fus bottom, the exterior brackets bolt through the fus to a strap that goes accross fus to take the landing loads.

fus attachment/pivot point
and one of the tail wheel, cheated here its a commercial one

chris
first the mounting points on fus bottom, the exterior brackets bolt through the fus to a strap that goes accross fus to take the landing loads.
Attachment DSC_0015.JPG not found
fus attachment/pivot point
Attachment DSC_0014.JPG not found
and one of the tail wheel, cheated here its a commercial one
chris
Thanks: admin, Eric, Dean M, Sarah-Jane Smith
Please Log in or Create an account to join the conversation.
- Ex-Member
- Visitor
-
20 Jan 2013 18:44 #29
by Ex-Member
Replied by Ex-Member on topic Piper Tripacer to Pacer refurb
wow is all i can say.

Please Log in or Create an account to join the conversation.
- CeeJayP
-
Topic Author
- Offline
- Elite Member
-
- Hi Peeps
Less
More
- Posts: 445
- Thank you received: 833
20 Jan 2013 18:53 - 20 Jan 2013 18:54 #30
by CeeJayP
Replied by CeeJayP on topic Piper Tripacer to Pacer refurb
a few random ones now
this one shows the fus underside just to illustrate whats changed, all the underside was previously sheeted in 1/2 inch balsa now its all open frame work filled in on areas where fingers will handle it with blue foam the all the rest will be covered in lithoplate panels as the one accross at u/c mount point, the balsa at front is the last rmenant and will dissapere as the refurb continues

this one is a view of the underside of motor with standard exhaust boxes, these are fine noise wise but do not let the motor produce its best, so these will be changed for the can in the next picture, hence the large space still where the noseleg mounts were


chris
this one shows the fus underside just to illustrate whats changed, all the underside was previously sheeted in 1/2 inch balsa
now its all open frame work filled in on areas where fingers will handle it with blue foam the all the rest will be covered in lithoplate panels as the one accross at u/c mount point, the balsa at front is the last rmenant and will dissapere as the refurb continues
this one is a view of the underside of motor with standard exhaust boxes, these are fine noise wise but do not let the motor produce its best, so these will be changed for the can in the next picture, hence the large space still where the noseleg mounts were
chris
Last edit: 20 Jan 2013 18:54 by CeeJayP.
Thanks: Sarah-Jane Smith
Please Log in or Create an account to join the conversation.
Time to create page: 0.331 seconds