
- Posts: 10058
- Thank you received: 19043
Anet A6 3D printer
- Quorneng
-

- Offline
- Forum Master
-

Less
More
21 May 2021 19:11 #46
by Quorneng
Replied by Quorneng on topic Anet A6 3D printer
"printing first time every time."
If my experience is anything to go by it wont last!
Change anything, including the outside temperature, and the bed will need re adjusting.
Even just accidentally pressing on the bed and compressing the springs a tiny bit can be enough as they can reseat giving a slightly different pressure distribution on the bed.
If my experience is anything to go by it wont last!
Change anything, including the outside temperature, and the bed will need re adjusting.
Even just accidentally pressing on the bed and compressing the springs a tiny bit can be enough as they can reseat giving a slightly different pressure distribution on the bed.
Thanks: Klipkopwildlife
Please Log in or Create an account to join the conversation.
- Klipkopwildlife
-
 Topic Author
- Offline
- Administrator
-

- I'm supposed to be retired!
22 May 2021 09:49 #47
by Klipkopwildlife
Do it now, you may never get another chance
Replied by Klipkopwildlife on topic Anet A6 3D printer
Which is why, as soon as I have sorted the Bowden feed I'm going to look at auto leveling.
Do it now, you may never get another chance
Please Log in or Create an account to join the conversation.
- Klipkopwildlife
-
Topic Author
- Offline
- Administrator
-
- I'm supposed to be retired!
23 May 2021 07:59 #48
by Klipkopwildlife
Do it now, you may never get another chance
Replied by Klipkopwildlife on topic Anet A6 3D printer
Hmmm, pride cometh before a fall! I set up to print a new X carriage for the new extruder yesterday, I failed to notice that the filament had crossed under itself on the spool, walked away and left it! When I returned the filament had locked on the spool and the carriage was under a serious amount of upward stress. All attempts to print have since failed!
Do it now, you may never get another chance
Please Log in or Create an account to join the conversation.
- crash happy
-

- Offline
- Platinum Member
-

- Oops. did I say that out loud!
Less
More
- Posts: 1250
- Thank you received: 1203
23 May 2021 08:37 #49
by crash happy
Replied by crash happy on topic Anet A6 3D printer
From the above, I am starting to think that my aspirations to buy a 3D printer may be a tad missguided. 

I hope you get it working Klippy !
I hope you get it working Klippy !
Thanks: Klipkopwildlife
Please Log in or Create an account to join the conversation.
- Klipkopwildlife
-
Topic Author
- Offline
- Administrator
-
- I'm supposed to be retired!
23 May 2021 10:29 - 23 May 2021 10:29 #50
by Klipkopwildlife
As an aside, I re-leveled the bed and I'm up and running again.
Do it now, you may never get another chance
Replied by Klipkopwildlife on topic Anet A6 3D printer
Crash, part, if not most of the problem is that I'm always looking for improvement, I can't leave well enough alone! I would say that you shouldn't buy at the bottom end, Mary was very upset with me that I didn't buy at the higher end of the market. Tony Bennett, one of our past members bought an Anet, couldn't get on with it and very quickly upgraded to a Prusa. My recommendation to anyone is to start with a Prusa i3, it has an aluminium frame for starters, many of the upgrades for the Anet centre on strengthening the frame.crash happy wrote: From the above, I am starting to think that my aspirations to buy a 3D printer may be a tad misguided.
I hope you get it working Klippy !
As an aside, I re-leveled the bed and I'm up and running again.
Do it now, you may never get another chance
Last edit: 23 May 2021 10:29 by Klipkopwildlife.
Thanks: crash happy
Please Log in or Create an account to join the conversation.
- Quorneng
-
- Offline
- Forum Master
-
Less
More
- Posts: 10058
- Thank you received: 19043
23 May 2021 14:53 #51
by Quorneng
Replied by Quorneng on topic Anet A6 3D printer
My take on 3D printers is, like Klippy, you get what you pay for.
The problem is it is hard to know beforehand what you really want. It is all too easy to be drawn in by this feature or that but, just as it is with RC, much of it comes down to understanding what a system can or cannot do well and how satisfied you are with the results you may obtain.
If your goal is to print a complete airframe from a purchased set of machine data files then you are well advised to do the research to find out what machine the designer used and the exact material he used to print it. You stand a pretty good chance with a bit of perseverance you will end up with what you want but don't assume it is universal and will work as well with designs that were developed using other machines and their related software.
The problem is it is hard to know beforehand what you really want. It is all too easy to be drawn in by this feature or that but, just as it is with RC, much of it comes down to understanding what a system can or cannot do well and how satisfied you are with the results you may obtain.
If your goal is to print a complete airframe from a purchased set of machine data files then you are well advised to do the research to find out what machine the designer used and the exact material he used to print it. You stand a pretty good chance with a bit of perseverance you will end up with what you want but don't assume it is universal and will work as well with designs that were developed using other machines and their related software.
Thanks: Klipkopwildlife, crash happy
Please Log in or Create an account to join the conversation.
- Klipkopwildlife
-
Topic Author
- Offline
- Administrator
-
- I'm supposed to be retired!
24 May 2021 12:32 #52
by Klipkopwildlife
Do it now, you may never get another chance
Replied by Klipkopwildlife on topic Anet A6 3D printer
To move on, most of the 3D printers use the same electronics, motors etc. If you have some computer experience and the ability to follow printed or Youtube instructions, it's not difficult, there's a wealth of information out there. I am now printing again, I noticed the Y axis was a bit jerky, somehow some crud had got into one of the linear bearings, some Silicon spray and pushing it up and down a few times has fixed it.
I still really rate the PEI bed plate, I decided to print a temperature tower which fell over after the first level. On the second try I noticed the bed temperature had been reduced by the program to 30oC from 60oC. I used the "Tune" function to put it back up to 60o, end of problem.
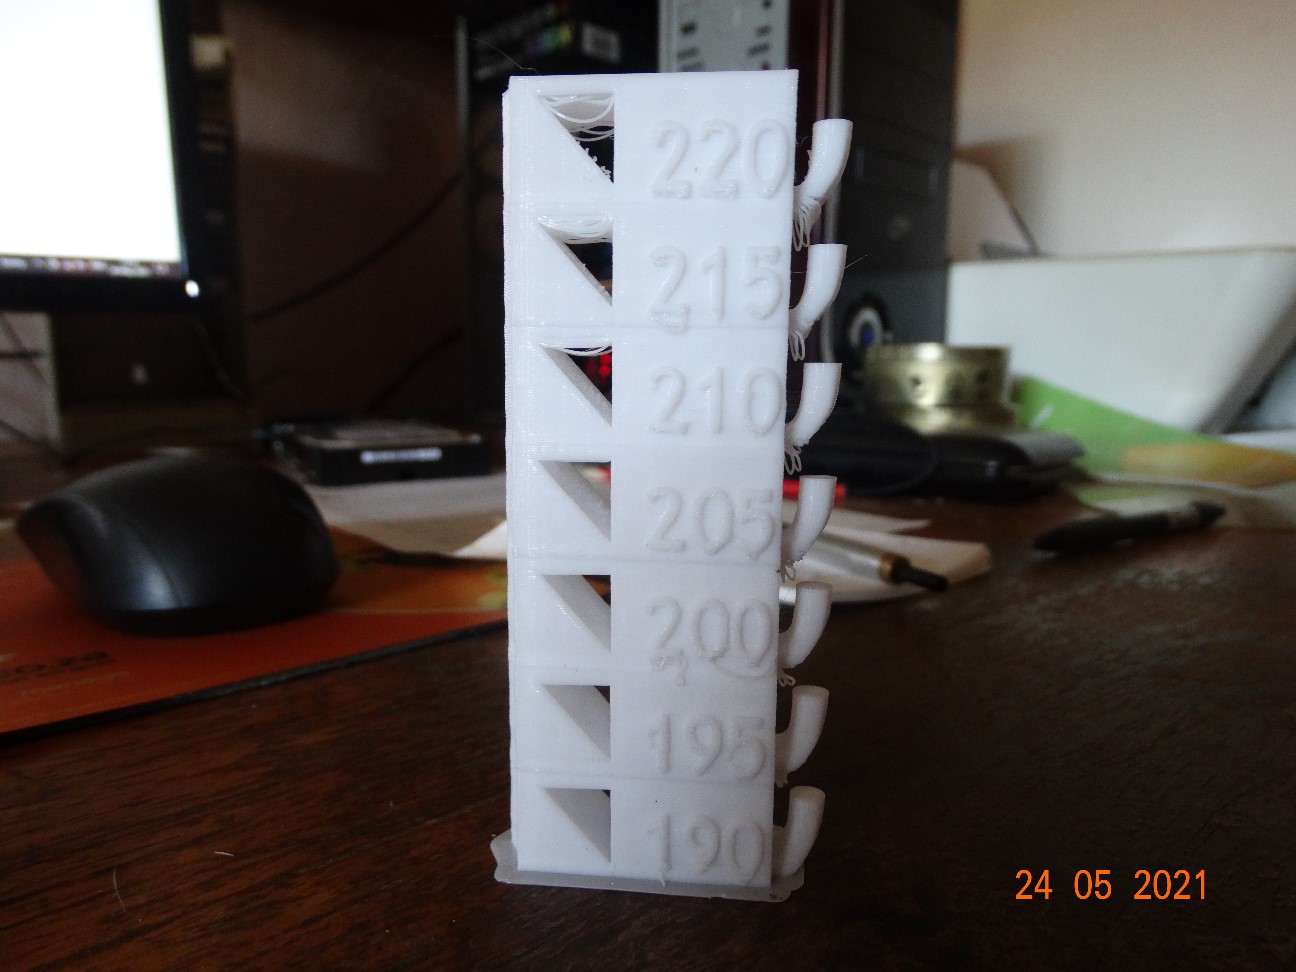
You can clearly see that for my white PLA the best temperature is 190oC, anymore than that and the filament starts to sag on unsupported passes.
I assume that one of these tests should be done with each new reel, then you know where your limits are.
I still really rate the PEI bed plate, I decided to print a temperature tower which fell over after the first level. On the second try I noticed the bed temperature had been reduced by the program to 30oC from 60oC. I used the "Tune" function to put it back up to 60o, end of problem.
You can clearly see that for my white PLA the best temperature is 190oC, anymore than that and the filament starts to sag on unsupported passes.
I assume that one of these tests should be done with each new reel, then you know where your limits are.
Do it now, you may never get another chance
Attachments:
Thanks: Quorneng, Ralpharr2001, crash happy
Please Log in or Create an account to join the conversation.
- Klipkopwildlife
-
Topic Author
- Offline
- Administrator
-
- I'm supposed to be retired!
31 May 2021 10:26 #53
by Klipkopwildlife
Do it now, you may never get another chance
Replied by Klipkopwildlife on topic Anet A6 3D printer
I suppose it's a guy thing, in another life my employer bought me an Oscilloscope to use, as I recall it cost about 3 months salary! After an hour of fiddling and nearly deciding to send it back I decided to read the instructions. Just inside the face page, "when all else fails, read the instructions"
I think 3D printing comes under the same heading, I've been ready to chuck it in a few times, all the information you need is out there, you just have to find it and read it.
I have to make (print) a new X carriage in order to fit the new extruder nozzle, after many failed prints I decided to do some reading. The thing is, first you have to get the component to stick to the heated bed, which is why I upgraded to a PEI plate, I've discovered, more temperature = more sticktion, different colours of the same material need different temperatures! The white needs 70o, the black only 60o. At the correct temperatures they both stick like baby shit to a blanket! At room temperature you can push them off with your finger.
Then there is the nozzle temperature, too hot and you get what I call 'wicking' (tiny hairs of filament that have dribbled out of the, too hot, nozzle), too cool and the layers don't stick together!
I am incapable of working up a component in 3D CAD and I doubt I ever will, but, just about everything you need is out there, Thingiverse is your first port of call, once you've found what you need you download the stl file and run it through the processing program that came with your printer. Several are provided, I use Cura, there are others. You tell Cura where you put the stl file and it generates the code you need to drive your printer.
I think 3D printing comes under the same heading, I've been ready to chuck it in a few times, all the information you need is out there, you just have to find it and read it.
I have to make (print) a new X carriage in order to fit the new extruder nozzle, after many failed prints I decided to do some reading. The thing is, first you have to get the component to stick to the heated bed, which is why I upgraded to a PEI plate, I've discovered, more temperature = more sticktion, different colours of the same material need different temperatures! The white needs 70o, the black only 60o. At the correct temperatures they both stick like baby shit to a blanket! At room temperature you can push them off with your finger.
Then there is the nozzle temperature, too hot and you get what I call 'wicking' (tiny hairs of filament that have dribbled out of the, too hot, nozzle), too cool and the layers don't stick together!
I am incapable of working up a component in 3D CAD and I doubt I ever will, but, just about everything you need is out there, Thingiverse is your first port of call, once you've found what you need you download the stl file and run it through the processing program that came with your printer. Several are provided, I use Cura, there are others. You tell Cura where you put the stl file and it generates the code you need to drive your printer.
Do it now, you may never get another chance
Thanks: Flytilbroke
Please Log in or Create an account to join the conversation.
- Klipkopwildlife
-
Topic Author
- Offline
- Administrator
-
- I'm supposed to be retired!
31 May 2021 10:45 #54
by Klipkopwildlife
Do it now, you may never get another chance
Replied by Klipkopwildlife on topic Anet A6 3D printer
If you've got your SD card plugged in Cura then even asks if you want to save it, and then tells you that you can remove the card to plug into your printer. There's even a program called Repetier host that can communicate directly to your printer, I had trouble with it when I was first playing and haven't tried it since.
After several buggered prints, this is my first successful print of the new X carriage.

I haven't fettled it yet, one of the problems with complex objects is you can't print in fresh air, that was my first problem, I had to tell Cura to put in supports, my second was it wouldn't stick to the bed, being a scrooge I was trying to use as little filament as possible, bad idea, the are 4 different ways of telling Cura what to do, 1, do nothing, this is ok if your component has a nice flat base, 2, put a skirt around the component, this has the plus of showing you that the nozzle is printing and the rough size of the component, 3, put a brim around the component, this increases sticktion area and can be broken off after printing, and finally, 4, print a raft under the component that supports everything. On this component the raft took an hour to print of the 11 hour print!
After several buggered prints, this is my first successful print of the new X carriage.
I haven't fettled it yet, one of the problems with complex objects is you can't print in fresh air, that was my first problem, I had to tell Cura to put in supports, my second was it wouldn't stick to the bed, being a scrooge I was trying to use as little filament as possible, bad idea, the are 4 different ways of telling Cura what to do, 1, do nothing, this is ok if your component has a nice flat base, 2, put a skirt around the component, this has the plus of showing you that the nozzle is printing and the rough size of the component, 3, put a brim around the component, this increases sticktion area and can be broken off after printing, and finally, 4, print a raft under the component that supports everything. On this component the raft took an hour to print of the 11 hour print!
Do it now, you may never get another chance
Attachments:
Thanks: Flytilbroke
Please Log in or Create an account to join the conversation.
- Klipkopwildlife
-
Topic Author
- Offline
- Administrator
-
- I'm supposed to be retired!
31 May 2021 11:06 #55
by Klipkopwildlife
Do it now, you may never get another chance
Replied by Klipkopwildlife on topic Anet A6 3D printer
Flushed with my success I decided to print the bearings I need, the first attempt was a bust, you can see the program has very carefully filled in the centre, it's using a function called 'vase' which means the whole thing is printed from the bottom in a continuous string. I didn't tell it 'no infill', the left most item is the success story.

Here you can see the very accurate shape of the bearing that is slightly deformable, the brim at the bottom just breaks off.
Here you can see the very accurate shape of the bearing that is slightly deformable, the brim at the bottom just breaks off.
Do it now, you may never get another chance
Attachments:
Please Log in or Create an account to join the conversation.
- Klipkopwildlife
-
Topic Author
- Offline
- Administrator
-
- I'm supposed to be retired!
31 May 2021 11:14 #56
by Klipkopwildlife
Do it now, you may never get another chance
Replied by Klipkopwildlife on topic Anet A6 3D printer
Just in case it's not obvious.

Do it now, you may never get another chance
Attachments:
Please Log in or Create an account to join the conversation.
- Quorneng
-
- Offline
- Forum Master
-
Less
More
- Posts: 10058
- Thank you received: 19043
31 May 2021 12:25 #57
by Quorneng
Replied by Quorneng on topic Anet A6 3D printer
Klippy
Yes. Picking a suitable 'edge' to use as the base can be quite significant to allowing a print without (or a minimum of) support.
Note also you can 'submerge' a print into the bed using a negative value on the position z axis to create an edge that benefits printing. You can then flip it 180 and print what was the submerged bit. Of course it means you end up with two (or more) parts but if done correctly they will match exactly when glued together.
Sometimes it is worth creating 'easy to print' parts rather than trying to print as one single piece.
Yes. Picking a suitable 'edge' to use as the base can be quite significant to allowing a print without (or a minimum of) support.
Note also you can 'submerge' a print into the bed using a negative value on the position z axis to create an edge that benefits printing. You can then flip it 180 and print what was the submerged bit. Of course it means you end up with two (or more) parts but if done correctly they will match exactly when glued together.
Sometimes it is worth creating 'easy to print' parts rather than trying to print as one single piece.
Thanks: Klipkopwildlife
Please Log in or Create an account to join the conversation.
- Klipkopwildlife
-
Topic Author
- Offline
- Administrator
-
- I'm supposed to be retired!
01 Jun 2021 07:55 #58
by Klipkopwildlife
Do it now, you may never get another chance
Replied by Klipkopwildlife on topic Anet A6 3D printer
Thanks Simon, I'm back to not having to re-level the bed for every print. I leveled the bed yesterday morning, after every print I waited until the bed had returned to close to room temperature. Then just pushed the print off with my finger, loaded the next component and pressed go! A whole day with no problems!
We're out today to visit a Snake Oil salesman who runs a Wellness centre to see if he can fix my Shingles (he says he can). When we get back I'm going to try another print without leveling.
We're out today to visit a Snake Oil salesman who runs a Wellness centre to see if he can fix my Shingles (he says he can). When we get back I'm going to try another print without leveling.
Do it now, you may never get another chance
Thanks: Quorneng
Please Log in or Create an account to join the conversation.
- Klipkopwildlife
-
Topic Author
- Offline
- Administrator
-
- I'm supposed to be retired!
13 Jun 2021 17:54 #59
by Klipkopwildlife
Do it now, you may never get another chance
Replied by Klipkopwildlife on topic Anet A6 3D printer
My 'pick up and drop' life continues, however I did get back to my printer for a few hours (spread over a week:( )
I fettled the new X carriage.

You can see how much of the support structure had to be taken off.
And then I've managed to fit it. The sharp eyed will notice I didn't use the printed bearings, I used the ones out of the original carriage, it now runs up and down so smoothly!


I've reduced the all up weight of the X from over 600gms to under 200. 400gms that the stepper doesn't have to accelerate and decelerate!
I fettled the new X carriage.
You can see how much of the support structure had to be taken off.
And then I've managed to fit it. The sharp eyed will notice I didn't use the printed bearings, I used the ones out of the original carriage, it now runs up and down so smoothly!
I've reduced the all up weight of the X from over 600gms to under 200. 400gms that the stepper doesn't have to accelerate and decelerate!
Do it now, you may never get another chance
Attachments:
Thanks: Quorneng
Please Log in or Create an account to join the conversation.
- Klipkopwildlife
-
Topic Author
- Offline
- Administrator
-
- I'm supposed to be retired!
14 Jun 2021 08:31 #60
by Klipkopwildlife
Do it now, you may never get another chance
Replied by Klipkopwildlife on topic Anet A6 3D printer
My first attempt at printing kept pushing the Bowden outer out of the drive block, the lock is not really fit for purpose, but it may be the extreme applied pressure because the lock doesn't hold the outer very well any more. Further checks (I should have checked first) show that the extruder temperature is 50o below what has been programmed! It's hard to push a 1.75mm solid through a 0.4mm hole!
Do it now, you may never get another chance
Thanks: Flytilbroke
Please Log in or Create an account to join the conversation.
Time to create page: 0.264 seconds