
- Posts: 9436
- Thank you received: 19043
Big Dragon 2
- Quorneng
-
 Topic Author
- Offline
- Forum Master
-

Less
More
14 Mar 2022 13:28 #106
by Quorneng
Replied by Quorneng on topic Big Dragon 2
jon
Neat video!
That heat forming looks very successful but as you pointed out in the notes at the end doing the same on a sheet for a full wing might be a bit more difficult to get the foam soft enough over a big area without risking over heating the foam and permanently damaging it.
Big sheets on a full wing is one of the reasons I avoid wrapping the leading edge and go for a more conventional solid foam leading edge sanded to profile. Once the profile is sanded one trick I use is to smear wood adhesive over the sanded area. It fills the now 'open' foam cells and once dry it can be sanded to a really smooth hard surface with a fine paper.
You can do the same thing with lightweight filler but the wood glue gives a stronger surface that is a bit more 'ding' proof. An important consideration for the leading edge.
The 'fancy' wing tip.
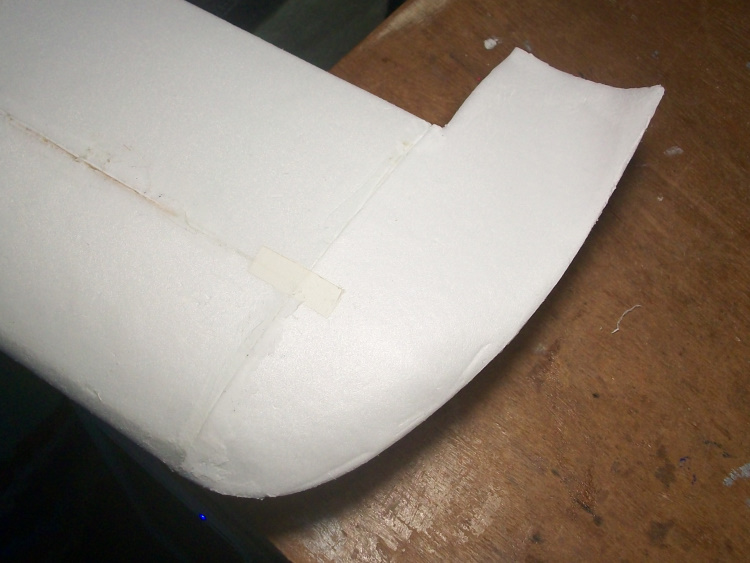
I doubt it will make the slightest difference aerodynamically but it is light being hollow with just 'formed' 2 mm Depron skins.
Neat video!
That heat forming looks very successful but as you pointed out in the notes at the end doing the same on a sheet for a full wing might be a bit more difficult to get the foam soft enough over a big area without risking over heating the foam and permanently damaging it.
Big sheets on a full wing is one of the reasons I avoid wrapping the leading edge and go for a more conventional solid foam leading edge sanded to profile. Once the profile is sanded one trick I use is to smear wood adhesive over the sanded area. It fills the now 'open' foam cells and once dry it can be sanded to a really smooth hard surface with a fine paper.
You can do the same thing with lightweight filler but the wood glue gives a stronger surface that is a bit more 'ding' proof. An important consideration for the leading edge.
The 'fancy' wing tip.
I doubt it will make the slightest difference aerodynamically but it is light being hollow with just 'formed' 2 mm Depron skins.
Thanks: Klipkopwildlife
Please Log in or Create an account to join the conversation.
- Eric
-

- Offline
- Moderator
-

Less
More
- Posts: 13726
- Thank you received: 14467
14 Mar 2022 14:16 #107
by Eric
if you are calm and collected when all about you are going berserk - you've missed something important!
Replied by Eric on topic Big Dragon 2
Wing-tip - usually fitted t'other way up on skid-landing models. Then the very tip of the tip gets the wear and tear!
if you are calm and collected when all about you are going berserk - you've missed something important!
Thanks: Klipkopwildlife
Please Log in or Create an account to join the conversation.
- Quorneng
-
Topic Author
- Offline
- Forum Master
-
Less
More
- Posts: 9436
- Thank you received: 19043
14 Mar 2022 14:26 #108
by Quorneng
Replied by Quorneng on topic Big Dragon 2
Agreed Eric but more often than not the Big Dragon lands so slowly it is stationary before the wing drops.
Thanks: Eric, Klipkopwildlife
Please Log in or Create an account to join the conversation.
- jon.in.swansea
-

- Offline
- Elite Member
-

Less
More
- Posts: 766
- Thank you received: 1192
14 Mar 2022 18:27 #109
by jon.in.swansea
Replied by jon.in.swansea on topic Big Dragon 2
I actually have 3 160mm templates printed out and a board to attach them to so I can get the ~500mm of skin trained. -Jon
Thanks: Klipkopwildlife, Quorneng
Please Log in or Create an account to join the conversation.
- Quorneng
-
Topic Author
- Offline
- Forum Master
-
Less
More
- Posts: 9436
- Thank you received: 19043
16 Mar 2022 15:56 #110
by Quorneng
Replied by Quorneng on topic Big Dragon 2
The maiden of the new wing. Not that much wind but it was raining. :woohoo:
Just a short edited video.
The landing is for Eric. The wing tip did not drop until long after it had stopped!
Just a short edited video.
The landing is for Eric. The wing tip did not drop until long after it had stopped!
Thanks: Eric, Klipkopwildlife, Flytilbroke, jon.in.swansea
Please Log in or Create an account to join the conversation.
- Eric
-
- Offline
- Moderator
-
Less
More
- Posts: 13726
- Thank you received: 14467
16 Mar 2022 16:03 #111
by Eric
if you are calm and collected when all about you are going berserk - you've missed something important!
Replied by Eric on topic Big Dragon 2
Your 'gunsight' is offset too far left! [badass]
-
The sky is crying here - too! It is supposed to be sunny tomorrow afternoon.
-
The sky is crying here - too! It is supposed to be sunny tomorrow afternoon.
if you are calm and collected when all about you are going berserk - you've missed something important!
Thanks: Klipkopwildlife
Please Log in or Create an account to join the conversation.
- Quorneng
-
Topic Author
- Offline
- Forum Master
-
Less
More
- Posts: 9436
- Thank you received: 19043
17 Mar 2022 19:18 #112
by Quorneng
Replied by Quorneng on topic Big Dragon 2
At last the weather did calm down this evening so I managed to properly test the new & now decorated wing with a full 15 minutes flight.
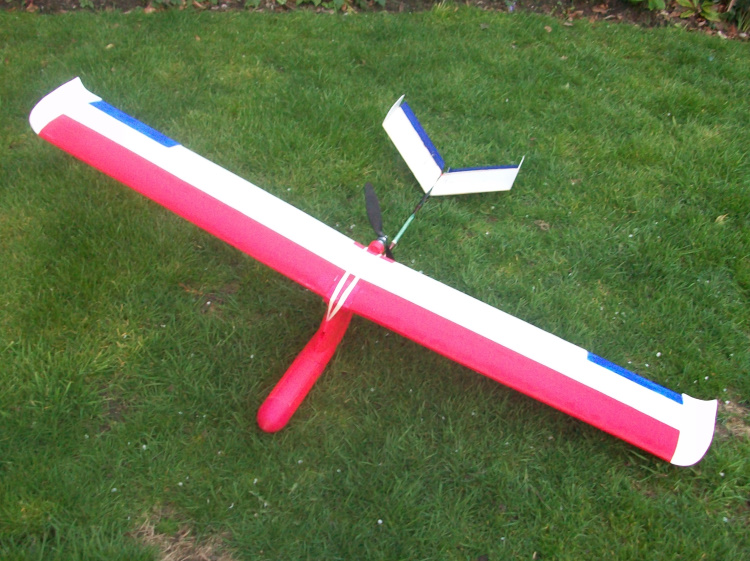
I suspect the new wing is a little bit more efficient as it now flies even slower or rather it needs more positive 'down' elevator to make progress into even a very modest wind. In addition the ailerons do not have the same travel as the direct drive ones so its aileron response is rather 'slow' at least compared to the elevator..
I can't do the usual remedy of shortening the aileron horn to increase the travel as it is already at zero! :woohoo:
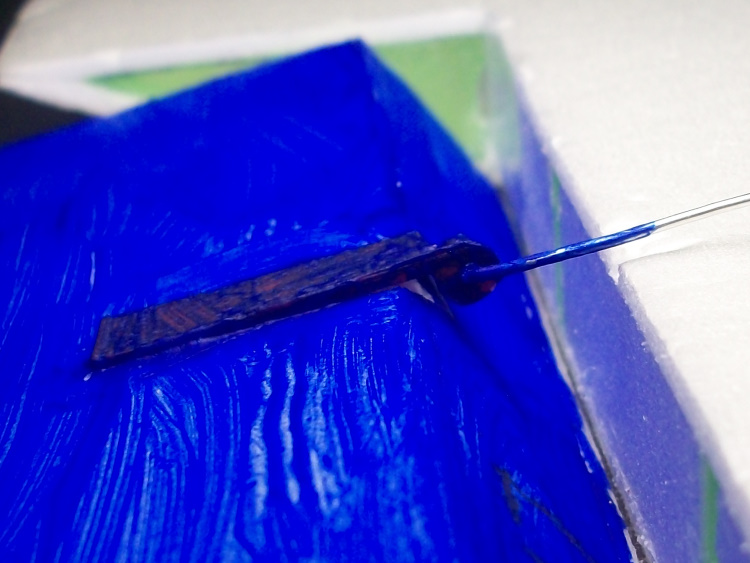
The aileron is so thick I could have arranged the link to be beneath with wing surface so everything would be completely buried but it would require the servos to be repositioned. As I have only just completed the wing this mod may be 'for later'.
I suspect the new wing is a little bit more efficient as it now flies even slower or rather it needs more positive 'down' elevator to make progress into even a very modest wind. In addition the ailerons do not have the same travel as the direct drive ones so its aileron response is rather 'slow' at least compared to the elevator..
I can't do the usual remedy of shortening the aileron horn to increase the travel as it is already at zero! :woohoo:
The aileron is so thick I could have arranged the link to be beneath with wing surface so everything would be completely buried but it would require the servos to be repositioned. As I have only just completed the wing this mod may be 'for later'.
Thanks: Klipkopwildlife
Please Log in or Create an account to join the conversation.
- Eric
-
- Offline
- Moderator
-
Less
More
- Posts: 13726
- Thank you received: 14467
17 Mar 2022 19:56 #113
by Eric
if you are calm and collected when all about you are going berserk - you've missed something important!
Replied by Eric on topic Big Dragon 2
Longer servo arm?
if you are calm and collected when all about you are going berserk - you've missed something important!
Thanks: Klipkopwildlife
Please Log in or Create an account to join the conversation.
- Quorneng
-
Topic Author
- Offline
- Forum Master
-
Less
More
- Posts: 9436
- Thank you received: 19043
23 Apr 2022 13:13 #114
by Quorneng
Replied by Quorneng on topic Big Dragon 2
A longer servo arm would indeed be a solution to increase the aileron travel but I have never seen a longer arm for the 3.7 g micro servo (I have lots of shorter!) so I went back to considering completely 'submerging' the servo and its arm within the wing so the link rod also be under the wing skin to a point on the aileron closer to the hinge line. This would however require considerable 'surgery' to the wing to do.
One alternative would be print a new arm but the servo splines are very small well beyond what a printer could be expected to duplicate so maybe a printed arm extension? In order not to have to remove the built in servo or even undo the arm retaining screw the extension would have to added in situ and glued in place. Not ideal as the arm is nylon and almost nothing sticks to that. :woohoo:
This is what I ended up with. It extends the outer hole radius from 12 to 18 mm.
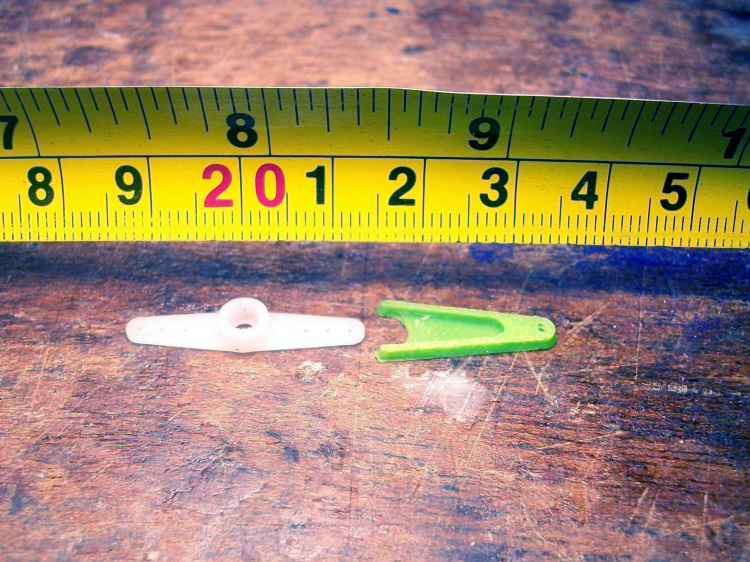
The extension in place.
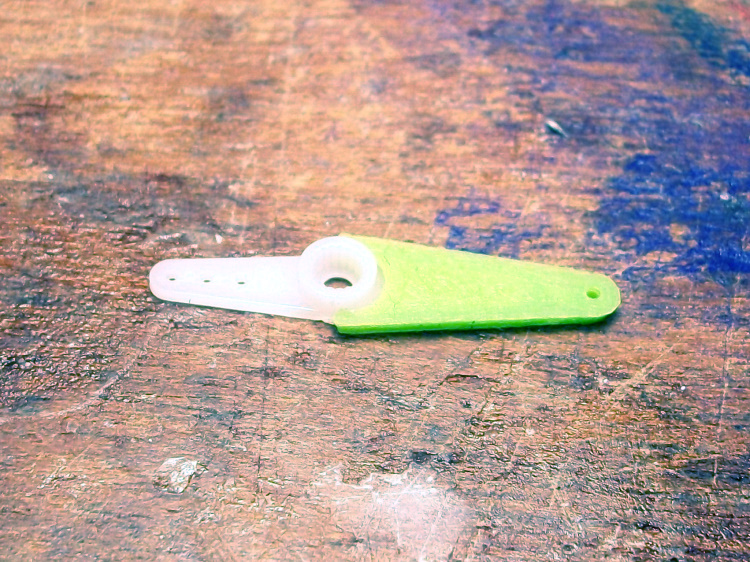
The extension simply fits over the arm. The servo arms on the wing have had one arm cut off.
The extension is an exact fit so the majority of the forces are mechanically transferred from the arm to the extension. The glue just has keep the extension in place. Glue should alsoextrude through the 3 original arm holes which will help with hat.
A video if the new arm in action.
It now has travel close to that of the original wing's 'direct coupled' servos which should restore a similar degree aileron control. The proof will have to wait until this persistent easterly dies down! :woohoo:
One alternative would be print a new arm but the servo splines are very small well beyond what a printer could be expected to duplicate so maybe a printed arm extension? In order not to have to remove the built in servo or even undo the arm retaining screw the extension would have to added in situ and glued in place. Not ideal as the arm is nylon and almost nothing sticks to that. :woohoo:
This is what I ended up with. It extends the outer hole radius from 12 to 18 mm.
The extension in place.
The extension simply fits over the arm. The servo arms on the wing have had one arm cut off.
The extension is an exact fit so the majority of the forces are mechanically transferred from the arm to the extension. The glue just has keep the extension in place. Glue should alsoextrude through the 3 original arm holes which will help with hat.
A video if the new arm in action.
It now has travel close to that of the original wing's 'direct coupled' servos which should restore a similar degree aileron control. The proof will have to wait until this persistent easterly dies down! :woohoo:
Thanks: Klipkopwildlife, jon.in.swansea
Please Log in or Create an account to join the conversation.
- Quorneng
-
Topic Author
- Offline
- Forum Master
-
Less
More
- Posts: 9436
- Thank you received: 19043
19 Oct 2023 11:45 #115
by Quorneng
Replied by Quorneng on topic Big Dragon 2
In the Cafe a couple of weeks back I noted that I broke off the nose of the Big Dragon 2. Its pod and wing pylon is a glued together 3D printed structure and of course the break occurred the a point of maximum stress in any sort of a landing incident.
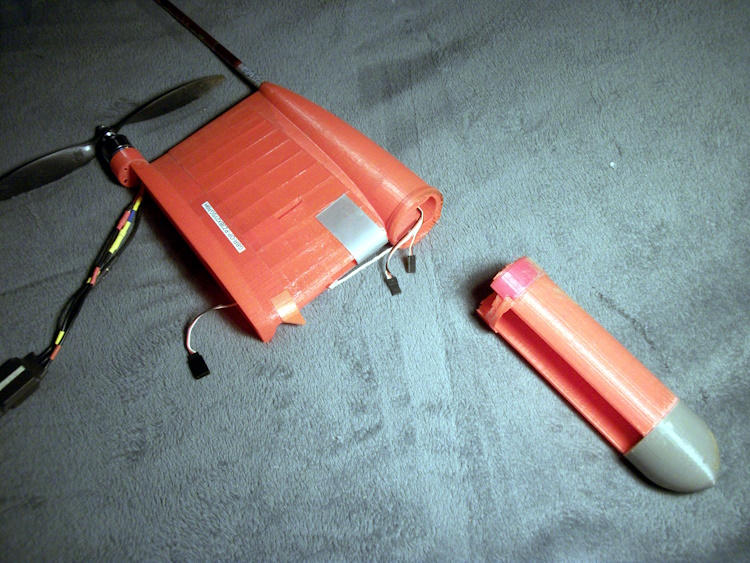
To make matters worse the break occurred exactlybetween two previous repairs achieved using an overlapping printed sleeves of different shapes & diameters. Hmmmm.
The only prectical solution is some specially shaped printed 'joining' pieces to give as big a glue area as possible.
In addition the wing pylon had suffered some localised 'compression' damage so it now looks like this:
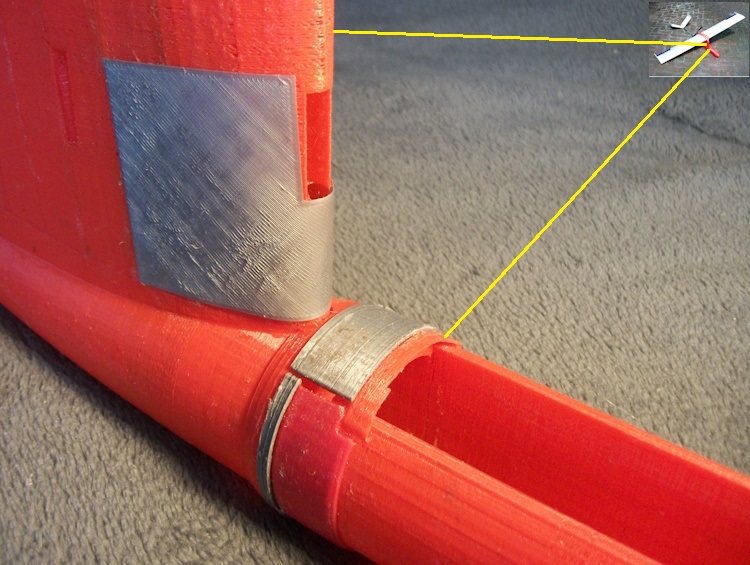
Unlkely to be quite a strong as the original but hopefully adequate.
I suspect the Big Dragon 2 is close to the end of it life as I really do not relish the thought of reprinting the complete fuselage pod and wing mount as it is made up of atleast 7 different pieces and there are a good many variations I developed as I went along and I have no idea which were used in the final version.

Still as the electrics still work and with 5 years printing design experience i could probaly do a structurally better job. We shall see!
To make matters worse the break occurred exactlybetween two previous repairs achieved using an overlapping printed sleeves of different shapes & diameters. Hmmmm.
The only prectical solution is some specially shaped printed 'joining' pieces to give as big a glue area as possible.
In addition the wing pylon had suffered some localised 'compression' damage so it now looks like this:
Unlkely to be quite a strong as the original but hopefully adequate.
I suspect the Big Dragon 2 is close to the end of it life as I really do not relish the thought of reprinting the complete fuselage pod and wing mount as it is made up of atleast 7 different pieces and there are a good many variations I developed as I went along and I have no idea which were used in the final version.
Still as the electrics still work and with 5 years printing design experience i could probaly do a structurally better job. We shall see!
Thanks: Eric, Klipkopwildlife, Flytilbroke, jon.in.swansea
Please Log in or Create an account to join the conversation.
- jon.in.swansea
-
- Offline
- Elite Member
-
Less
More
- Posts: 766
- Thank you received: 1192
23 Oct 2023 16:11 #116
by jon.in.swansea
Replied by jon.in.swansea on topic Big Dragon 2
I have also used such printed joining pieces - tend to work if done with some layers so at least some will provide strength. I also found that reinforced tape will hold fuse half together quite well - I often did just a tape join for early flights while still working out COG (I had two different lengths of front fuse to go with two possible battery arrangements. That was good for a dozen flights, several with slightly aggressive landings.
Thanks: Klipkopwildlife
Please Log in or Create an account to join the conversation.
- Quorneng
-
Topic Author
- Offline
- Forum Master
-
Less
More
- Posts: 9436
- Thank you received: 19043
24 Oct 2023 10:56 - 24 Oct 2023 11:01 #117
by Quorneng
Replied by Quorneng on topic Big Dragon 2
To my annoyance and embarassment I broke the Big Dragon again!
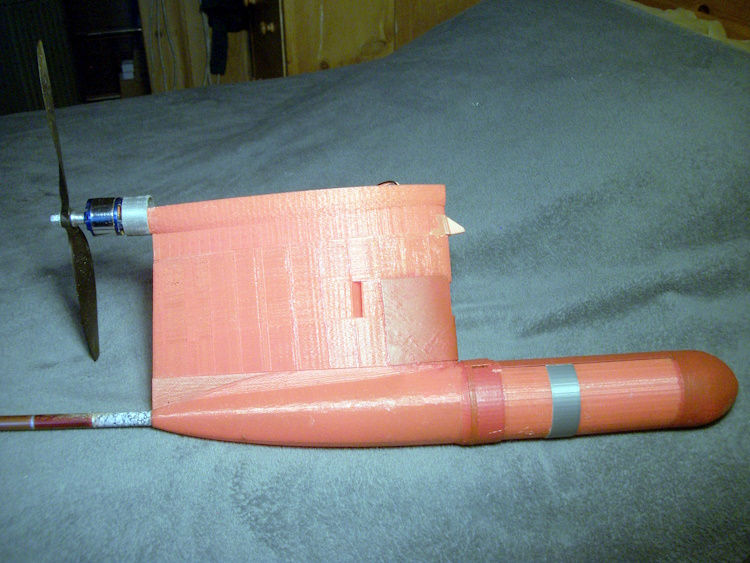
At least it did not break at the previous repair but further towards the nose.
A fairly simple repair. Glue on the break and an all round printed patch glued over the joint.
This time the motor broke free as well. Not that surprising as it is a relatively heavy.lump on a rather precarious mounting. The previous impact had probably weakened it.
The new mount is a bit better designed and more to the point the motor can now actually be removed. A feature that was lost when additional reinforcing was added to the original motor mount.
Need to let the glue harden for 24 hours so will try again tomorrow if as forecast the wind remains light and the rain stops for long enough. I will also get out my unused "reserve" set of boots.
So now it is back to the seemingly endless job of repairing the Big Skyray.
Last edit: 24 Oct 2023 11:01 by Quorneng.
Thanks: Klipkopwildlife, jon.in.swansea
Please Log in or Create an account to join the conversation.
- Quorneng
-
Topic Author
- Offline
- Forum Master
-
Less
More
- Posts: 9436
- Thank you received: 19043
25 Oct 2023 22:50 #118
by Quorneng
Replied by Quorneng on topic Big Dragon 2
Calm and sunny today, once the fog had lifted, so as phoped the Big Dragon was tested.
No problem it flew very nicely. The added repairs have added a few gms so some mild trimming required.
Had to make a very limited cicuit to ensure it landed on the small not muddy patch!
No problem it flew very nicely. The added repairs have added a few gms so some mild trimming required.
Had to make a very limited cicuit to ensure it landed on the small not muddy patch!
Thanks: Eric, Klipkopwildlife, Flytilbroke, jon.in.swansea
Please Log in or Create an account to join the conversation.
- Quorneng
-
Topic Author
- Offline
- Forum Master
-
Less
More
- Posts: 9436
- Thank you received: 19043
05 Dec 2023 11:57 #119
by Quorneng
Replied by Quorneng on topic Big Dragon 2
After the substantial crash on the 1 Dec 23

By 5 Dec 23 all repaired with new printed parts and some minor repairs
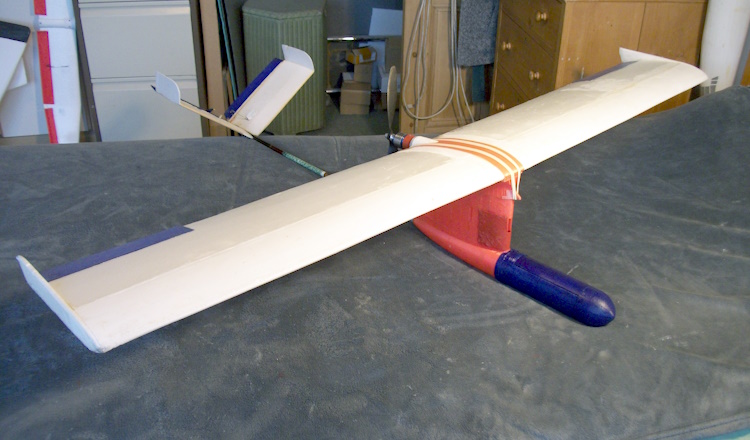
Not yet flown.
By 5 Dec 23 all repaired with new printed parts and some minor repairs
Not yet flown.
Thanks: Eric, Klipkopwildlife, Flytilbroke
Please Log in or Create an account to join the conversation.
- Quorneng
-
Topic Author
- Offline
- Forum Master
-
Less
More
- Posts: 9436
- Thank you received: 19043
03 Feb 2024 00:25 #120
by Quorneng
Replied by Quorneng on topic Big Dragon 2
As described in "Been flying" the maiden of the repaired Big Dragon on the 30Jan24 was a disaster.
The wing survived undamaged but the middle of the fuselage and the wing pylon were destroyed.
These are the salvaged bits.

Took a while to work out which print files went were as there were many specials from previous repairs over 6 years of flying.
Nearly 8 hours of printing and it now looks like this.

The glue will take some time to get fully hard.
Some filler and paint and you won't be able to see the joints!
The wing survived undamaged but the middle of the fuselage and the wing pylon were destroyed.
These are the salvaged bits.
Took a while to work out which print files went were as there were many specials from previous repairs over 6 years of flying.
Nearly 8 hours of printing and it now looks like this.
The glue will take some time to get fully hard.
Some filler and paint and you won't be able to see the joints!
Thanks: Eric, Klipkopwildlife, Flytilbroke, THE BLACKBIRD
Please Log in or Create an account to join the conversation.
Time to create page: 1.119 seconds