
- Posts: 1176
- Thank you received: 1420
Big Dragon 2
- boz
-

- Offline
- Platinum Member
-

Less
More
21 Mar 2018 03:16 #61
by boz
Replied by boz on topic Big Dragon 2
Congratulations
Please Log in or Create an account to join the conversation.
- Quorneng
-
 Topic Author
- Offline
- Forum Master
-

Less
More
- Posts: 9436
- Thank you received: 19043
09 Apr 2018 20:06 #62
by Quorneng
Replied by Quorneng on topic Big Dragon 2
As reported in the "Been Flying" thread the Big Dragon 2 took a serious hit with a truly impressive lawn dart job. The wings folded after I got a bit too enthusiastic doing glide aerobatics
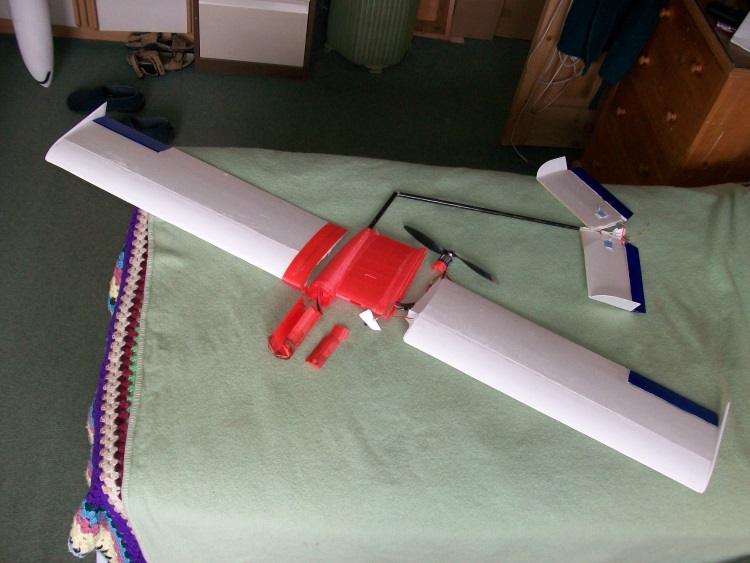
Everything can be repaired/reprinted except the tail boom. I have ordered a replacement (2.1 m fishing pole) super cheap from China.
The most difficult repair will be rejoining the undamaged wing halves. To ensure it ends up significantly stronger I will probably have to cut each wing back by a rib or two and insert a new stronger and flat centre section so the dihedral braces are further out and under less stress.
There are also a few changes I can make to the printed pod to ease installation of the electrics and improve the strength of the motor mount (it broke off in the crash)
Of course I should really scrap the whole thing as I need space to store the the future DH91 (and the existing A350 and V-2!)
Thanks: Klipkopwildlife
Please Log in or Create an account to join the conversation.
- one tenor
-

- Offline
- Forum Veteran
-

- johnpcalex@gmail.com
10 Apr 2018 01:33 #63
by one tenor
Anything will fly given enough power
Replied by one tenor on topic Big Dragon 2
Harrisons rods in liverpool will supply rod sections cheaply too. You can actually go to the factory and pick your own. Even specify and watch it made. My eldest lad Andrew works there and would be glad to show you what you want if you ask for him.Mention my name of course They will also supply carbon sheet and give advice too You could be there in about half an hour allowing for the traffic LOL
www.google.co.uk/search?q=Harrison%27s+R...ceid=chrome&ie=UTF-8
www.google.co.uk/search?q=Harrison%27s+R...ceid=chrome&ie=UTF-8
Anything will fly given enough power
Please Log in or Create an account to join the conversation.
- Quorneng
-
Topic Author
- Offline
- Forum Master
-
Less
More
- Posts: 9436
- Thank you received: 19043
10 Apr 2018 09:35 #64
by Quorneng
Replied by Quorneng on topic Big Dragon 2
Thanks OT but I have already ordered a pole from China.
The first of the replacement printed parts - the battery compartment lid.

Showing the small 'indent' to hold the magnet which I have salvaged.
Its 'partner' magnet fixed into the nose cone is still buried 8" into the ground!
The first of the replacement printed parts - the battery compartment lid.
Showing the small 'indent' to hold the magnet which I have salvaged.
Its 'partner' magnet fixed into the nose cone is still buried 8" into the ground!
Thanks: Klipkopwildlife, boz
Please Log in or Create an account to join the conversation.
- Klipkopwildlife
-

- Offline
- Administrator
-

- I'm supposed to be retired!
10 Apr 2018 12:17 #65
by Klipkopwildlife
Do it now, you may never get another chance
Replied by Klipkopwildlife on topic Big Dragon 2
Take a shovel next time! [badass]
Where do you get the G code for your airfoil shapes? Is there any chance you could print out a relevant page (even if it's not all of it) scan it in and post it on the 3D printer page?
Where do you get the G code for your airfoil shapes? Is there any chance you could print out a relevant page (even if it's not all of it) scan it in and post it on the 3D printer page?
Do it now, you may never get another chance
Please Log in or Create an account to join the conversation.
- Quorneng
-
Topic Author
- Offline
- Forum Master
-
Less
More
- Posts: 9436
- Thank you received: 19043
10 Apr 2018 21:39 #66
by Quorneng
Replied by Quorneng on topic Big Dragon 2
klippy
I am afraid I 'draw' my airfoil sections using the 'part ellipse' function in FreeCad.
I find a print of the section I want to use on Google and then 'compare' it to a paper print of the one I have created.
I personally believe I can get as close as is necessary for the light slow planes (very low Reymolds number) I tend to create.
Also when you cover a built up wing with mylar or tissue the actual section of much of the wing is not quite that of the ribs so extreme section accuracy is likely not that significant.
Thanks: Klipkopwildlife, boz
Please Log in or Create an account to join the conversation.
- Quorneng
-
Topic Author
- Offline
- Forum Master
-
Less
More
- Posts: 9436
- Thank you received: 19043
10 Apr 2018 23:49 #67
by Quorneng
Replied by Quorneng on topic Big Dragon 2
Hot off the printer the second bit - the nose cone.
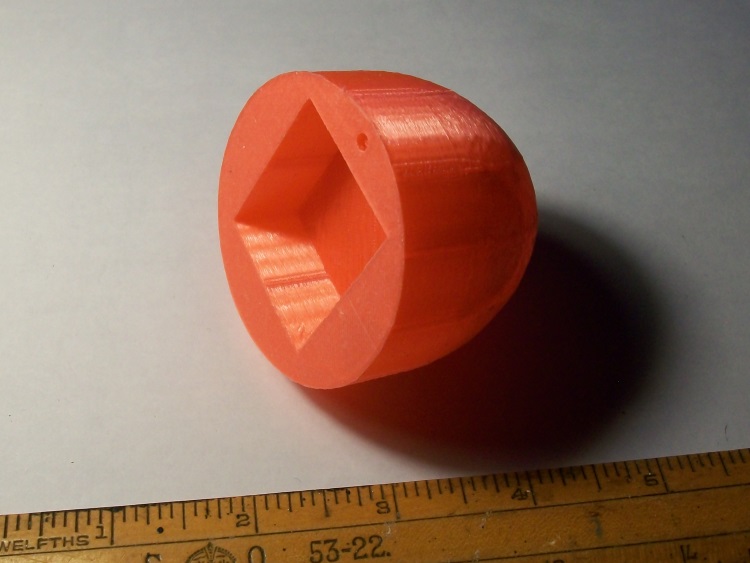
Exactly the same profile as before but the internal 'fill' is altered to give a slightly stronger structure.
Note the magnet recess.
This item actually stuck to the bed so well the only way I could get it off was by peeling off, and thus scrapping, the masking tape bed covering which I had only just replaced! :woohoo:
Now to design some improvements to the 3 main pod pieces .
Thanks: Klipkopwildlife, THE BLACKBIRD, boz
Please Log in or Create an account to join the conversation.
- one tenor
-
- Offline
- Forum Veteran
-
- johnpcalex@gmail.com
11 Apr 2018 23:04 #68
by one tenor
Anything will fly given enough power
Replied by one tenor on topic Big Dragon 2
The info may be useful to somebody. QQuorneng wrote: Thanks OT but I have already ordered a pole from China.
The first of the replacement printed parts - the battery compartment lid.
Showing the small 'indent' to hold the magnet which I have salvaged.
Its 'partner' magnet fixed into the nose cone is still buried 8" into the ground!
Anything will fly given enough power
Please Log in or Create an account to join the conversation.
- Quorneng
-
Topic Author
- Offline
- Forum Master
-
Less
More
- Posts: 9436
- Thank you received: 19043
12 Apr 2018 12:13 #69
by Quorneng
Replied by Quorneng on topic Big Dragon 2
A few more printed parts.

Still quite some way to go.
Next is to look at re joining the wing.
Still quite some way to go.
Next is to look at re joining the wing.
Thanks: Klipkopwildlife, boz, Squirrelnet
Please Log in or Create an account to join the conversation.
- Quorneng
-
Topic Author
- Offline
- Forum Master
-
Less
More
- Posts: 9436
- Thank you received: 19043
12 Apr 2018 19:08 - 12 Apr 2018 19:13 #70
by Quorneng
Replied by Quorneng on topic Big Dragon 2
As the printing the replacement (and slightly improved) parts is taking quite a long time and I am not over enamoured with the quality of the printing (different PLA supplier) I wondered if it was possible to print all the parts, except the nose, in one go.
Done as 3 pieces there has to be top and bottom surfaces to glues them together. Done as single print this time, and weight, would be avoided without compromising strength.

The blue bits are support structures that are designed to 'break out' easily.
The flat top of the pylon is set to 2 degrees incidence.
It took several goes (about 5 hours!) to establish what would be possible and practical but this is best so far but it still a mind blowing 14 hours 36 minutes! The thought of a failure in the last ten minutes doesn't bear thinking about :woohoo:
This is actually about 4 hours less than their combined separate print times. I have already spent nearly 13 hours printing two of the pieces and last bit will take another 6!
And I have cough and a cold. Have to wait 8 days to see the doc - I'll probably be better by then!
Done as 3 pieces there has to be top and bottom surfaces to glues them together. Done as single print this time, and weight, would be avoided without compromising strength.
The blue bits are support structures that are designed to 'break out' easily.
The flat top of the pylon is set to 2 degrees incidence.
It took several goes (about 5 hours!) to establish what would be possible and practical but this is best so far but it still a mind blowing 14 hours 36 minutes! The thought of a failure in the last ten minutes doesn't bear thinking about :woohoo:
This is actually about 4 hours less than their combined separate print times.
I have already spent nearly 13 hours printing two of the pieces and last bit will take another 6!And I have cough and a cold.
Have to wait 8 days to see the doc - I'll probably be better by then!
Last edit: 12 Apr 2018 19:13 by Quorneng.
Thanks: Klipkopwildlife, boz
Please Log in or Create an account to join the conversation.
- Ex-Member
- User
-

Less
More
- Thank you received: 0
12 Apr 2018 20:03 #71
by Ex-Member
Replied by Ex-Member on topic Big Dragon 2
Rather you than me Simon. 
i get nervous at anything longer than 5 hours.
would a raft on the base make things more stable when printing that high.
Tony B
i get nervous at anything longer than 5 hours.
would a raft on the base make things more stable when printing that high.
Tony B
Please Log in or Create an account to join the conversation.
- Eric
-

- Offline
- Moderator
-

Less
More
- Posts: 13726
- Thank you received: 14470
12 Apr 2018 20:48 #72
by Eric
if you are calm and collected when all about you are going berserk - you've missed something important!
Replied by Eric on topic Big Dragon 2
or print a tripod that can be removed after? :S
if you are calm and collected when all about you are going berserk - you've missed something important!
Please Log in or Create an account to join the conversation.
- Quorneng
-
Topic Author
- Offline
- Forum Master
-
Less
More
- Posts: 9436
- Thank you received: 19043
12 Apr 2018 22:03 - 12 Apr 2018 22:03 #73
by Quorneng
Replied by Quorneng on topic Big Dragon 2
I use a marking tape covering on the bed and so far the technique appear to be to print the bottom layer with insufficient bed clearance - less than the thickness of a piece of paper. It makes the initial layer very thin (almost hard to see!) but it really sticks to the point the finish part is hard to remove needing a sharp very thin blade to carefully 'work' it off,
The final bit not yet included is to set a 100% fill density of the motor mount area but retain the 8% fill for the rest.
I only found out how to do this a few days ago!
The final bit not yet included is to set a 100% fill density of the motor mount area but retain the 8% fill for the rest.
I only found out how to do this a few days ago!
Last edit: 12 Apr 2018 22:03 by Quorneng.
Thanks: Ex-Member, THE BLACKBIRD, one tenor, boz
Please Log in or Create an account to join the conversation.
- one tenor
-
- Offline
- Forum Veteran
-
- johnpcalex@gmail.com
13 Apr 2018 00:16 #74
by one tenor
Anything will fly given enough power
Replied by one tenor on topic Big Dragon 2
Well done that man. You're a better man than I am Gunga Din Regards JohnQuorneng wrote: I use a marking tape covering on the bed and so far the technique appear to be to print the bottom layer with insufficient bed clearance - less than the thickness of a piece of paper. It makes the initial layer very thin (almost hard to see!) but it really sticks to the point the finish part is hard to remove needing a sharp very thin blade to carefully 'work' it off,
The final bit not yet included is to set a 100% fill density of the motor mount area but retain the 8% fill for the rest.
I only found out how to do this a few days ago!
Anything will fly given enough power
Please Log in or Create an account to join the conversation.
- Quorneng
-
Topic Author
- Offline
- Forum Master
-
Less
More
- Posts: 9436
- Thank you received: 19043
13 Apr 2018 20:37 #75
by Quorneng
Replied by Quorneng on topic Big Dragon 2
Between bouts of coughing some progress. The replacement battery box and nose.
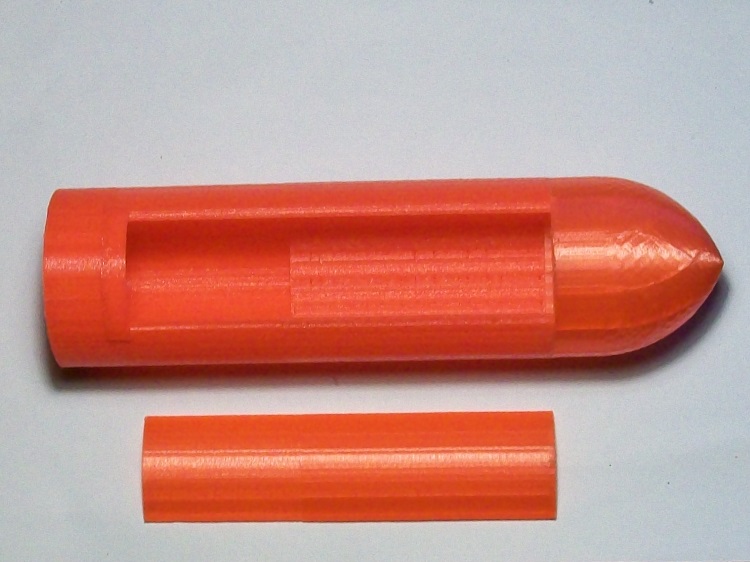
What is mildly satisfying is that the parts fit together perfectly straight from the printer!
Actually my second job as I had to print this part of a dolls buggy again!
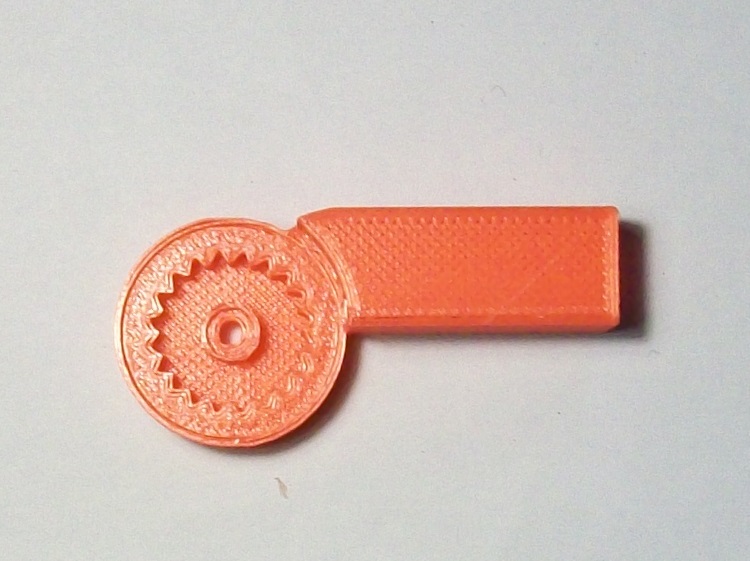
Just as well I kept both the CAD and STL files as creating that 20T external gear shape was quite a challenge.
What is mildly satisfying is that the parts fit together perfectly straight from the printer!
Actually my second job as I had to print this part of a dolls buggy again!
Just as well I kept both the CAD and STL files as creating that 20T external gear shape was quite a challenge.
Thanks: Klipkopwildlife, THE BLACKBIRD, boz
Please Log in or Create an account to join the conversation.
Time to create page: 0.883 seconds