
- Posts: 9436
- Thank you received: 19043
Big Dragon 2
- Quorneng
-
 Topic Author
- Offline
- Forum Master
-

Less
More
09 Mar 2022 19:25 #91
by Quorneng
Replied by Quorneng on topic Big Dragon 2
I still can't remeber so it was back to the drawing board or in this FreeCAD.
Provides the PLA strands area all in line a printed brace can be seriously strong.
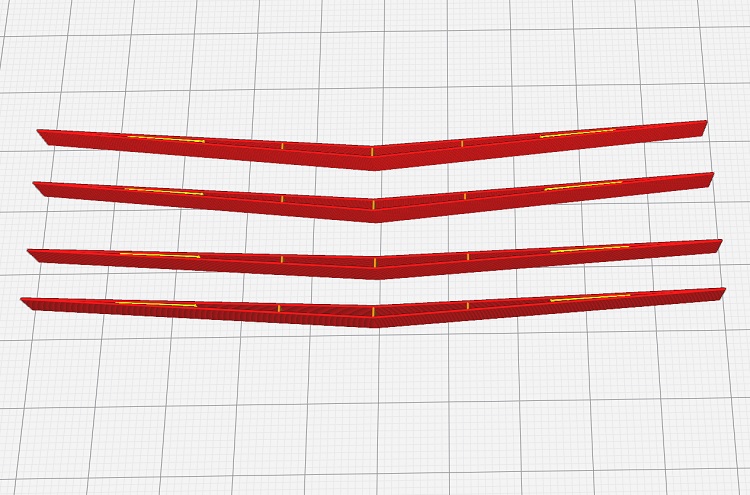
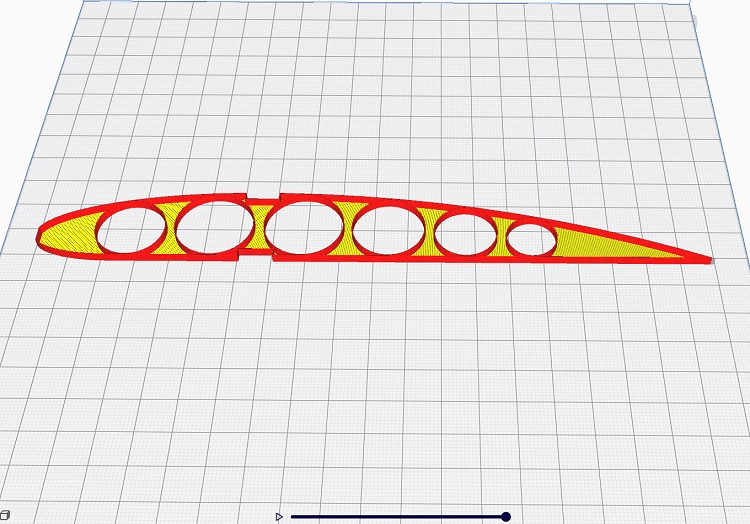
It requires cut outs in the centre rib to accommodate them.
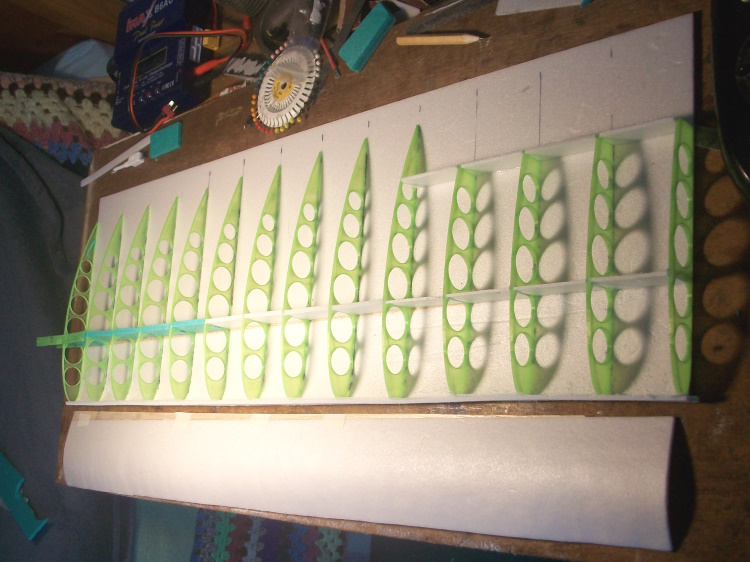
Gluing the ribs to the lower of the skin.

No plan required. The 1/2 wing is exactly 26" span, the ribs are 2" apart do their positions were drawn directly on the Depron.
Next will be the Depron shear webs between the ribs.
Provides the PLA strands area all in line a printed brace can be seriously strong.
It requires cut outs in the centre rib to accommodate them.
Gluing the ribs to the lower of the skin.
No plan required. The 1/2 wing is exactly 26" span, the ribs are 2" apart do their positions were drawn directly on the Depron.
Next will be the Depron shear webs between the ribs.
Thanks: Klipkopwildlife
Please Log in or Create an account to join the conversation.
- Quorneng
-
Topic Author
- Offline
- Forum Master
-
Less
More
- Posts: 9436
- Thank you received: 19043
10 Mar 2022 16:29 #92
by Quorneng
Replied by Quorneng on topic Big Dragon 2
The shear webs, the aileron shear webs and the leading edge, all Depron.
The top balsa spar flange is glued to the preformed front top skin.
When all the glue is dry and hard the Depron 'bits' can be sanded so they are flush with the top surface of the ribs.
Next is to glue on the front top skin.
Only then will the wing be rigid enough to safely handle.
The top balsa spar flange is glued to the preformed front top skin.
When all the glue is dry and hard the Depron 'bits' can be sanded so they are flush with the top surface of the ribs.
Next is to glue on the front top skin.
Only then will the wing be rigid enough to safely handle.
Thanks: Eric, Klipkopwildlife, jon.in.swansea
Please Log in or Create an account to join the conversation.
- paul d
-
- Offline
- Forum Veteran
-

Less
More
- Posts: 2074
- Thank you received: 2292
10 Mar 2022 18:10 #93
by paul d
balsa is best.
Replied by paul d on topic Big Dragon 2
Nice work Simon! Looks very delicate at the moment.
balsa is best.
Thanks: Klipkopwildlife
Please Log in or Create an account to join the conversation.
- Quorneng
-
Topic Author
- Offline
- Forum Master
-
Less
More
- Posts: 9436
- Thank you received: 19043
10 Mar 2022 19:08 #94
by Quorneng
Replied by Quorneng on topic Big Dragon 2
Paul
I would say flexible more than delicate but with 80% of the underside flat as long as it stays on the board with some weights on its very flexibility ensures it stays flat. Once it starts to become rigid as the top skin goes on is when keeping it flat really matters.
I have added slightly more dihedral this time and I will be using ordinary aileron horns with linkage to the servos with a top tape hinge which will allow a mechanical differential aileron set up. This in turn should make the wing endplates redundant.
Thanks: Klipkopwildlife
Please Log in or Create an account to join the conversation.
- Quorneng
-
Topic Author
- Offline
- Forum Master
-
Less
More
- Posts: 9436
- Thank you received: 19043
11 Mar 2022 11:49 - 11 Mar 2022 11:54 #95
by Quorneng
Replied by Quorneng on topic Big Dragon 2
The LH wing is now structurally as far as it can go for the moment.
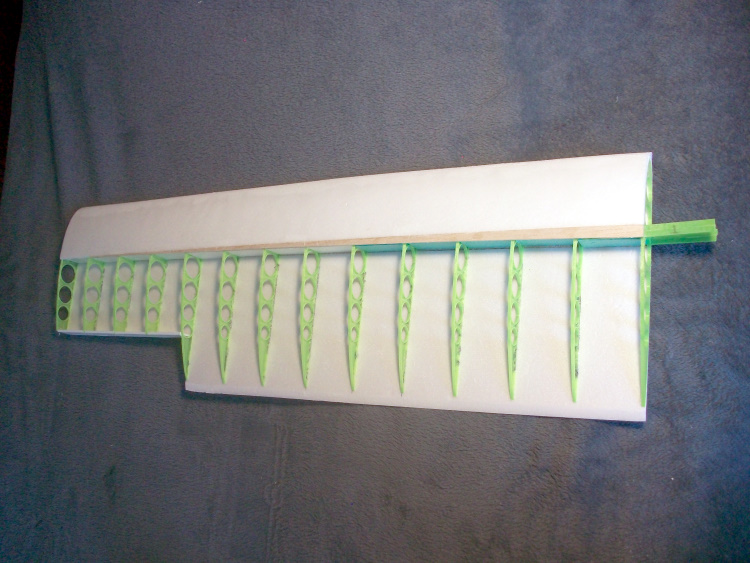
6mm Depron leading edge and the real stiff stuff too.
Aileron cut out and the bottom skin trailing edge sanded down.
Build the aileron and install the servo next.
Also been working on the RH wing.
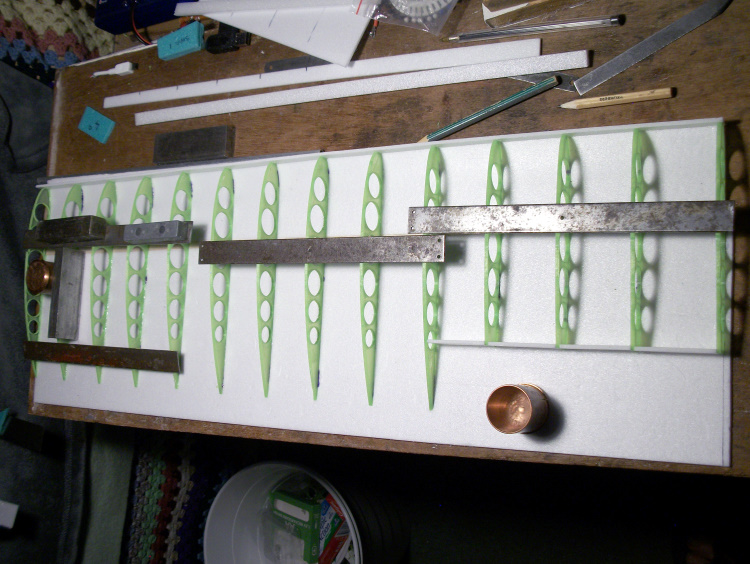
Exactly the same process although the ribs are reversed, smooth face outwards. except the root rib which is smooth surface inwards.
6mm Depron leading edge and the real stiff stuff too.
Aileron cut out and the bottom skin trailing edge sanded down.
Build the aileron and install the servo next.
Also been working on the RH wing.
Exactly the same process although the ribs are reversed, smooth face outwards. except the root rib which is smooth surface inwards.
Last edit: 11 Mar 2022 11:54 by Quorneng.
Thanks: Klipkopwildlife, paul d
Please Log in or Create an account to join the conversation.
- jon.in.swansea
-

- Offline
- Elite Member
-

Less
More
- Posts: 766
- Thank you received: 1192
11 Mar 2022 16:18 #96
by jon.in.swansea
Replied by jon.in.swansea on topic Big Dragon 2
Very interested in the 'preformed foam'. The wing I am building is scaled down to a 150 chord so the radius at the front is tighter. What is your secret of a nice smooth pre-form?
Also gluing the essentially flat bottom gets problematic as it nears the leading edge and begins to turn up. I am not getting the foam to track upwards into that curve. I am thinking about a full wrap from bottom trailing edge up and over the leading edge and back as one continuous 3mm foam run held down by some sand bags while it sets up. That is a slight variant on the ARMIN wing which is a continuous wrap around foam formers but relies on hot glue rather than a long cure.

I have printed singe perimeter ailerons using the trailing portion of the Clark-Y rib. 150mm length is coming in at 9g. I have put a notch-out for the servo arm. I have never attempted to glue the nylon of a servo arm and am wondering if this perhaps an overly ambitious leap and I should retreat back to a conventional servo position and horn? In the image note the bamboo skewers at leading/trailing edge to help in setting/holding position while gluing (2 weigh in at 3g). -Jon
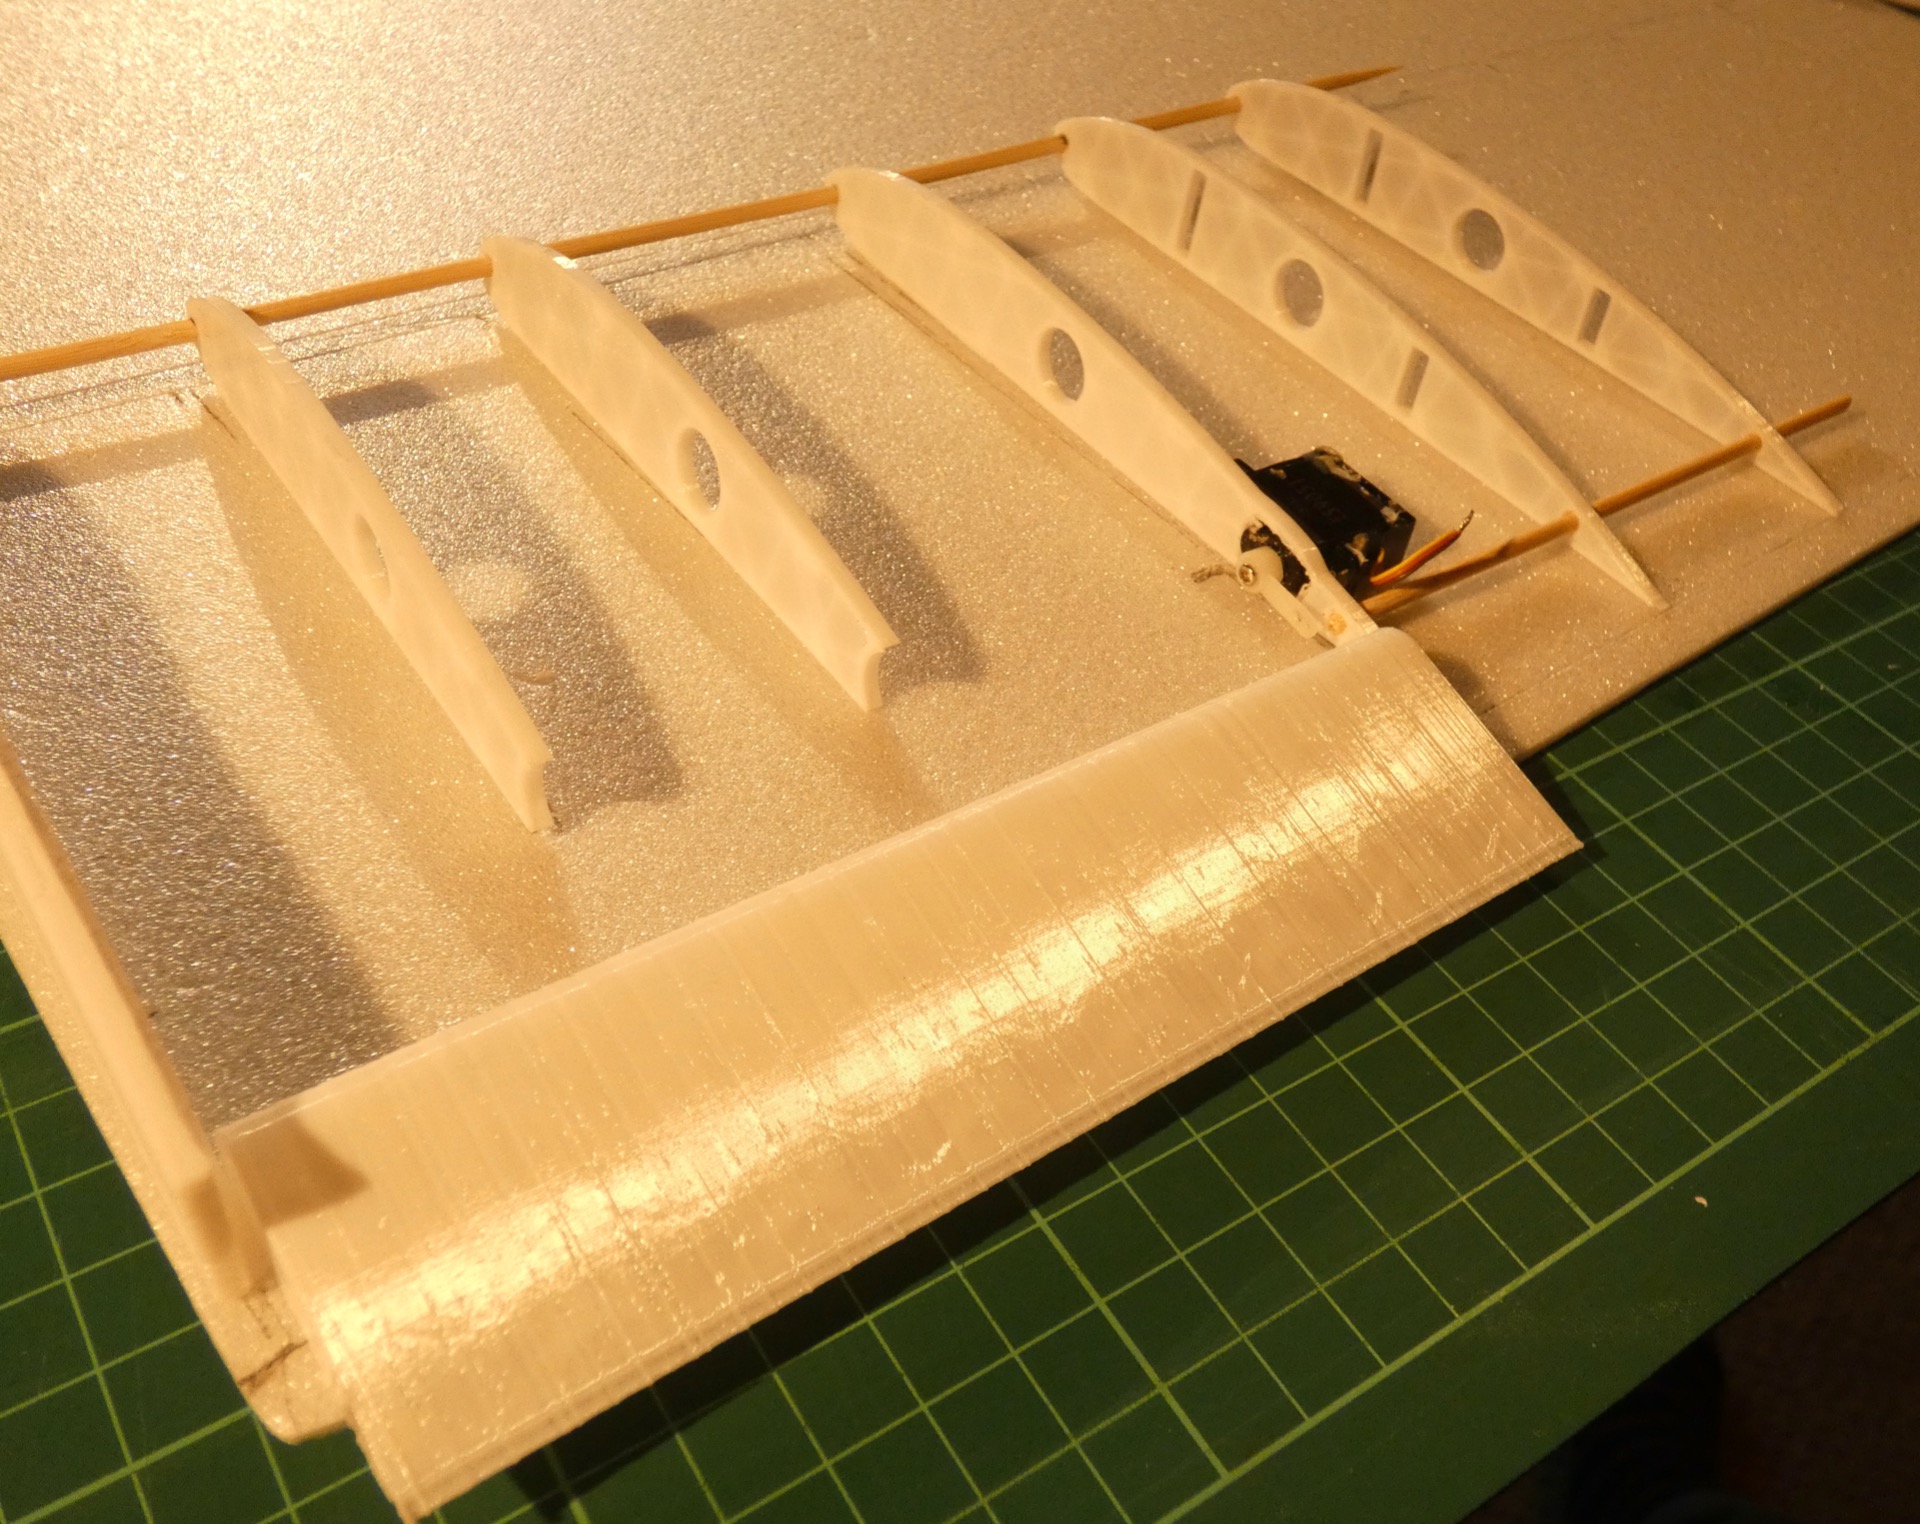
Also gluing the essentially flat bottom gets problematic as it nears the leading edge and begins to turn up. I am not getting the foam to track upwards into that curve. I am thinking about a full wrap from bottom trailing edge up and over the leading edge and back as one continuous 3mm foam run held down by some sand bags while it sets up. That is a slight variant on the ARMIN wing which is a continuous wrap around foam formers but relies on hot glue rather than a long cure.
I have printed singe perimeter ailerons using the trailing portion of the Clark-Y rib. 150mm length is coming in at 9g. I have put a notch-out for the servo arm. I have never attempted to glue the nylon of a servo arm and am wondering if this perhaps an overly ambitious leap and I should retreat back to a conventional servo position and horn? In the image note the bamboo skewers at leading/trailing edge to help in setting/holding position while gluing (2 weigh in at 3g). -Jon
Thanks: Klipkopwildlife
Please Log in or Create an account to join the conversation.
- Klipkopwildlife
-

- Offline
- Administrator
-

- I'm supposed to be retired!
11 Mar 2022 16:46 #97
by Klipkopwildlife
Do it now, you may never get another chance
Replied by Klipkopwildlife on topic Big Dragon 2
Jon, I don't see anything wrong with what you're doing, provided you can sand the fold lump back to a good shape.
Do it now, you may never get another chance
Thanks: jon.in.swansea
Please Log in or Create an account to join the conversation.
- Quorneng
-
Topic Author
- Offline
- Forum Master
-
Less
More
- Posts: 9436
- Thank you received: 19043
11 Mar 2022 21:13 - 11 Mar 2022 21:15 #98
by Quorneng
Replied by Quorneng on topic Big Dragon 2
jon
Preforming sheet foam is a vital attribute on anything but a gentle radius.
I call it 'manipulation' around a dowel.
The front portion of the bottom skin was also preformed to ensure it made contact with the rib.
A short video of me forming the rear top skin of the Big Dragon wing.
Although only a gentle radius is required for this area I have found it is much easier to hold an over curved skin down evenly on the ribs with weights than it is to bend one with too little curvature.
The foam that I am using is pretty soft so it bends and sets relatively easily. It is much more difficult with true Depron sheet which is a much stiffer material.
The finished wing section back as far as the spar.
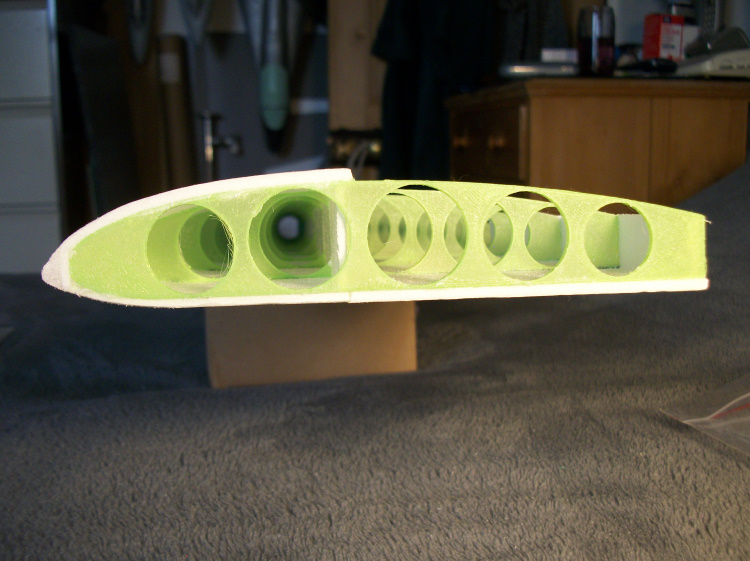
I hope this helps to show the process I use.
Preforming sheet foam is a vital attribute on anything but a gentle radius.
I call it 'manipulation' around a dowel.
The front portion of the bottom skin was also preformed to ensure it made contact with the rib.
A short video of me forming the rear top skin of the Big Dragon wing.
Although only a gentle radius is required for this area I have found it is much easier to hold an over curved skin down evenly on the ribs with weights than it is to bend one with too little curvature.
The foam that I am using is pretty soft so it bends and sets relatively easily. It is much more difficult with true Depron sheet which is a much stiffer material.
The finished wing section back as far as the spar.
I hope this helps to show the process I use.
Last edit: 11 Mar 2022 21:15 by Quorneng.
Thanks: Klipkopwildlife, jon.in.swansea
Please Log in or Create an account to join the conversation.
- Quorneng
-
Topic Author
- Offline
- Forum Master
-
Less
More
- Posts: 9436
- Thank you received: 19043
11 Mar 2022 22:06 #99
by Quorneng
Replied by Quorneng on topic Big Dragon 2
jon
As nylon does not really glue at all well the only way you will be able to fix the servo arm securely is to print a tight fit arm shaped recess into the end of the aileron. It will then be relying on the mechanical surfaces to transmit the forces. If it was a good enough fit it would not need to be glued at all.
Although the 'direct drive' has worked well enough for me the (I have done the same on two other planes) the risk of a glue failure and the general inaccessibility should it fail is one of the reasons I have decided on the new wing to use a conventional servo position, a link rod and a horn.
Thanks: Klipkopwildlife, jon.in.swansea
Please Log in or Create an account to join the conversation.
- jon.in.swansea
-
- Offline
- Elite Member
-
Less
More
- Posts: 766
- Thank you received: 1192
12 Mar 2022 16:33 #100
by jon.in.swansea
Replied by jon.in.swansea on topic Big Dragon 2
Thanks for the idea about nylon. I now think that the direct drive is something to come back to in the future. You said you were going to use a conventional servo position - do you have any particular technique for supporting the servo (there is a lot of air space inside that wing section)?
I decided to try heat forming foam. I printed out the forward 3/5th of the Clarke-Y and extruded it to create a former and then tried a heat gun on a section of 3mm foam and gradually shaped it over the former. It holds the shape well once cooled. I then put packing tape on the outer face to protect the foam and give it some tension strength. I have now got that glued with UHU POR under a bag of bird seed and will look at it in the morning.
I also tried heat forming some 3mm foam that already had packing tape on the outer face and that also seemed to work well if I was careful with the heat gun. If it works out well I have some video of the process that I might edit together so as to remember how I did it. Jon
Thanks: Klipkopwildlife
Please Log in or Create an account to join the conversation.
- Quorneng
-
Topic Author
- Offline
- Forum Master
-
Less
More
- Posts: 9436
- Thank you received: 19043
12 Mar 2022 23:47 #101
by Quorneng
Replied by Quorneng on topic Big Dragon 2
jon
In my usual quest for lightness I simply glue then in with POR.
The aileron servo in the new Big dragon wing.
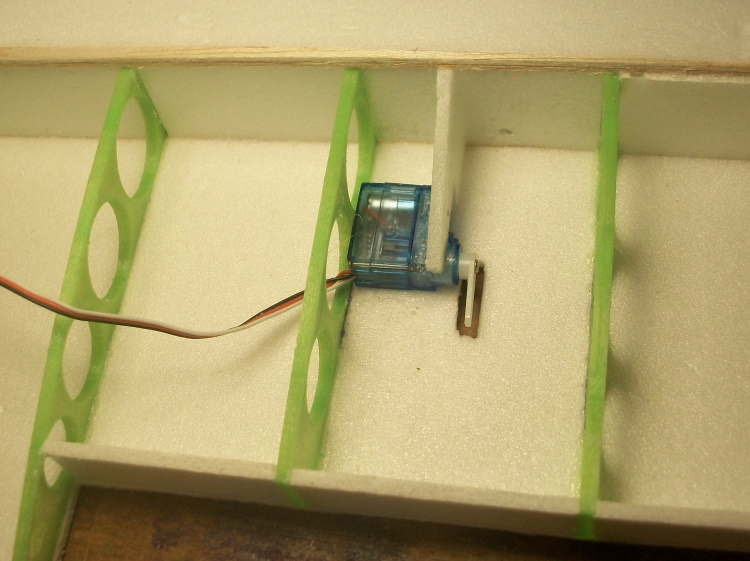 Glued to the flat bottom skin and the rib with an additional piece of Depron tp the rear of the spar web.
To ensure the glue sticks I have peeled of the servo labels and cut off the lugs for the retaining screws as well as I don't need them.
I have had quite a few comments "How do you replace the servo?". The answer is if I have to I simply cut it out but using free running hinges and very short & light links I have found the servos last as long as the plane even with the odd crash.
In my usual quest for lightness I simply glue then in with POR.
The aileron servo in the new Big dragon wing.
To ensure the glue sticks I have peeled of the servo labels and cut off the lugs for the retaining screws as well as I don't need them.
I have had quite a few comments "How do you replace the servo?". The answer is if I have to I simply cut it out but using free running hinges and very short & light links I have found the servos last as long as the plane even with the odd crash.
Thanks: Klipkopwildlife, paul d, jon.in.swansea
Please Log in or Create an account to join the conversation.
- Klipkopwildlife
-
- Offline
- Administrator
-
- I'm supposed to be retired!
13 Mar 2022 11:15 #102
by Klipkopwildlife
Do it now, you may never get another chance
Replied by Klipkopwildlife on topic Big Dragon 2
Wrapping the servo in a single layer of masking tape before gluing works well.
Do it now, you may never get another chance
Thanks: Quorneng, jon.in.swansea
Please Log in or Create an account to join the conversation.
- Quorneng
-
Topic Author
- Offline
- Forum Master
-
Less
More
- Posts: 9436
- Thank you received: 19043
13 Mar 2022 14:59 #103
by Quorneng
Replied by Quorneng on topic Big Dragon 2
I knew I would find a use for those big Free LiPo.
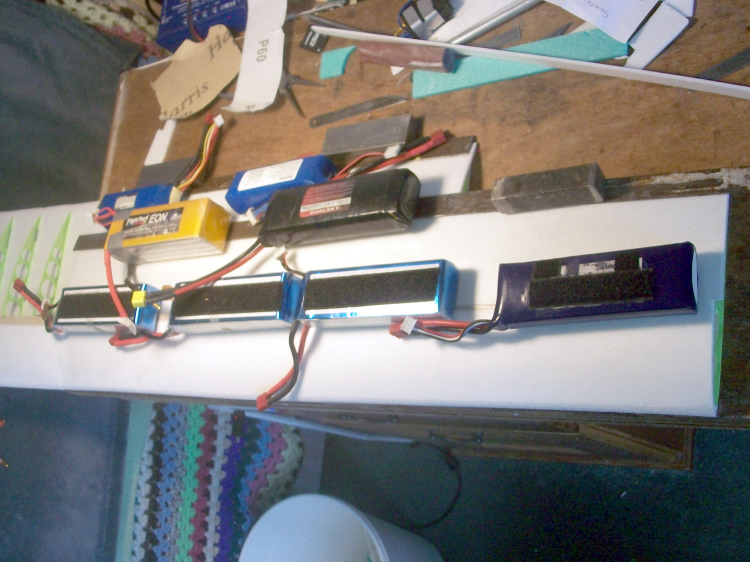
There is about 3 kg sitting on that wing holding the top skin down. It also makes sure the underside is flat with a capital F! :woohoo:
And yes the aileron servos are in, wired up and tested.
The 'open' end rib it will require some form of wing tip. Simplest would be a flat Depron sheet over the rib but.......
Thanks: Eric, Klipkopwildlife, Flytilbroke
Please Log in or Create an account to join the conversation.
- jon.in.swansea
-
- Offline
- Elite Member
-
Less
More
- Posts: 766
- Thank you received: 1192
14 Mar 2022 11:48 #104
by jon.in.swansea
Replied by jon.in.swansea on topic Big Dragon 2
Thanks for advise about 'training' the foam.
It might or not be a light-bulb moment but it seemed like a good template to train the foam on was something Clarke-Y shaped. So I extruded the Clark-Y to create some templates.
It worked on a short section, whether I can evolve the technique for a ~480mm length in one go is not yet know. It would be great to hear if anyone else has tried heat forming over a specific shape.
I filmed some tests of using a Clark-Y template to heat-form 3mm foam (if I don't record stuff I then have to either re-learn stuff later on). Here is a link - it is ~4 minutes. -Jon
Thanks: Klipkopwildlife
Please Log in or Create an account to join the conversation.
- Klipkopwildlife
-
- Offline
- Administrator
-
- I'm supposed to be retired!
14 Mar 2022 12:58 #105
by Klipkopwildlife
Do it now, you may never get another chance
Replied by Klipkopwildlife on topic Big Dragon 2
How about printing a long rib shape (just the leading edge back to the spar) 3 prints glued together will give you about 600mm of former that you can use as a buck to form the foam.
Do it now, you may never get another chance
Thanks: jon.in.swansea
Please Log in or Create an account to join the conversation.
Time to create page: 1.490 seconds