
- Posts: 9436
- Thank you received: 19043
DH 91 Albatross
- Quorneng
-
 Topic Author
- Offline
- Forum Master
-

Less
More
09 May 2018 11:43 #31
by Quorneng
Replied by Quorneng on topic DH 91 Albatross
The ribs glued on to the lower skin.
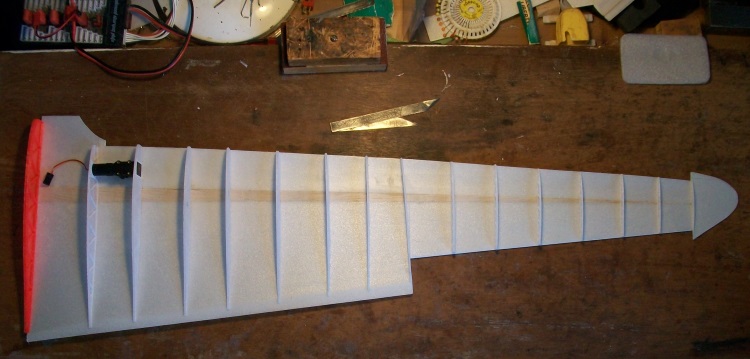
Four ribs, including the big centre one, had to be reprinted as they were not quite the right size.
This would have been no problem if they had been in Depron as they could easily be 'sanded to fit' and no one would ever know!
Four ribs, including the big centre one, had to be reprinted as they were not quite the right size.
This would have been no problem if they had been in Depron as they could easily be 'sanded to fit' and no one would ever know!
Thanks: Klipkopwildlife, THE BLACKBIRD, boz
Please Log in or Create an account to join the conversation.
- Quorneng
-
Topic Author
- Offline
- Forum Master
-
Less
More
- Posts: 9436
- Thank you received: 19043
10 May 2018 11:28 #32
by Quorneng
Replied by Quorneng on topic DH 91 Albatross
The interesting bit, actually doing what I imagined in my mind!
The completed wing as far as intended at this stage.
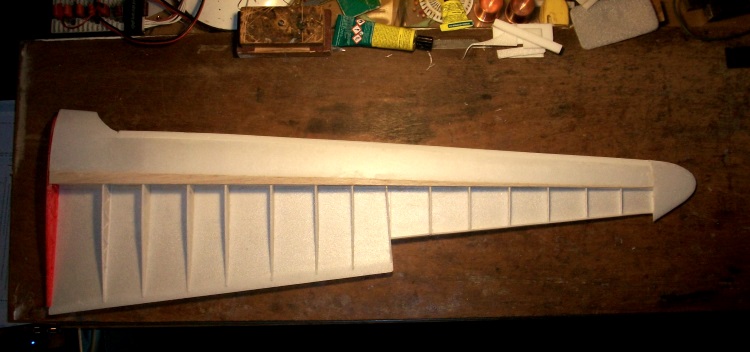
It feels slightly 'heavy' compared to say the A350's wing but is admirably stiff, probably unnecessarily so, but I was concerned at the weight of the 4 motors on the wing, not for flying loads (they actually distribute the load) but in any sort of any sort of hard landing.
One problem is that with my rough grass field it will not belly land well. The bottom of the fuselage is level with the under side of the wing so there is nothing to 'slide' on. As a result it will probably ground loop very easily and likely breaking off those low mounted tail fins in the process! :woohoo: .
Now the boring bit - making the other wing, but at least I have already cut out and printed virtually all the bits.
The completed wing as far as intended at this stage.
It feels slightly 'heavy' compared to say the A350's wing but is admirably stiff, probably unnecessarily so, but I was concerned at the weight of the 4 motors on the wing, not for flying loads (they actually distribute the load) but in any sort of any sort of hard landing.
One problem is that with my rough grass field it will not belly land well. The bottom of the fuselage is level with the under side of the wing so there is nothing to 'slide' on. As a result it will probably ground loop very easily and likely breaking off those low mounted tail fins in the process! :woohoo: .
Now the boring bit - making the other wing, but at least I have already cut out and printed virtually all the bits.
Thanks: Klipkopwildlife, THE BLACKBIRD, boz, Mike Rolls
Please Log in or Create an account to join the conversation.
- Quorneng
-
Topic Author
- Offline
- Forum Master
-
Less
More
- Posts: 9436
- Thank you received: 19043
13 May 2018 00:37 #33
by Quorneng
Replied by Quorneng on topic DH 91 Albatross
The two wing halves joined.
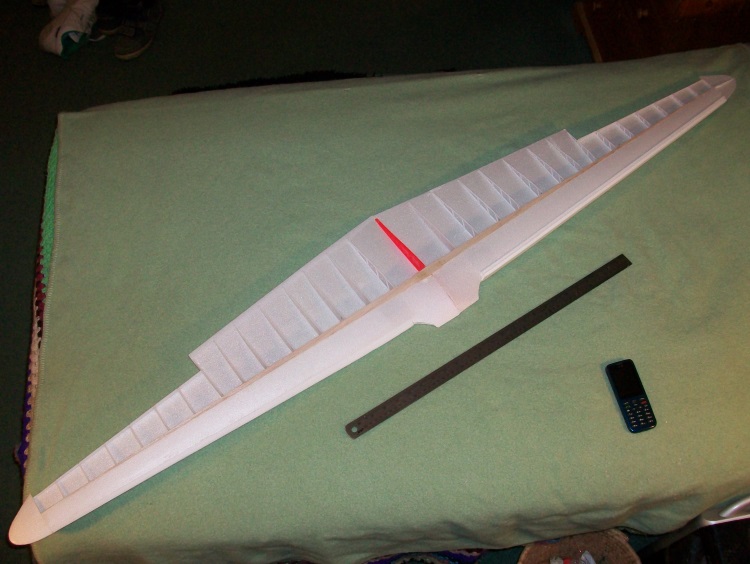
In this state the wing weighs 115g which of course includes the retract inits.
Still a bit of sanding to get both halves of the wing to the same standard, then its cutting out the wheel wells to ultimately get the retracts working. .
In this state the wing weighs 115g which of course includes the retract inits.
Still a bit of sanding to get both halves of the wing to the same standard, then its cutting out the wheel wells to ultimately get the retracts working.
.
Thanks: Klipkopwildlife, THE BLACKBIRD, blue123, boz, Mike Rolls, Squirrelnet, coleighf
Please Log in or Create an account to join the conversation.
- coleighf
- Offline
- Junior Member
-

Less
More
- Posts: 39
- Thank you received: 57
14 May 2018 13:53 #34
by coleighf
Replied by coleighf on topic DH 91 Albatross
You have a record of success with challenging projects and this must be one of the most challenging! I envy your progress with the practical use of 3D printing.
Please Log in or Create an account to join the conversation.
- Quorneng
-
Topic Author
- Offline
- Forum Master
-
Less
More
- Posts: 9436
- Thank you received: 19043
22 May 2018 09:34 - 22 May 2018 09:36 #35
by Quorneng
Replied by Quorneng on topic DH 91 Albatross
With the Big Dragon 2 rebuilt and flying attention can return to the Albatross.
I used 'printed' hinges for the A350's rudder. All the other surfaces use tape hinges.
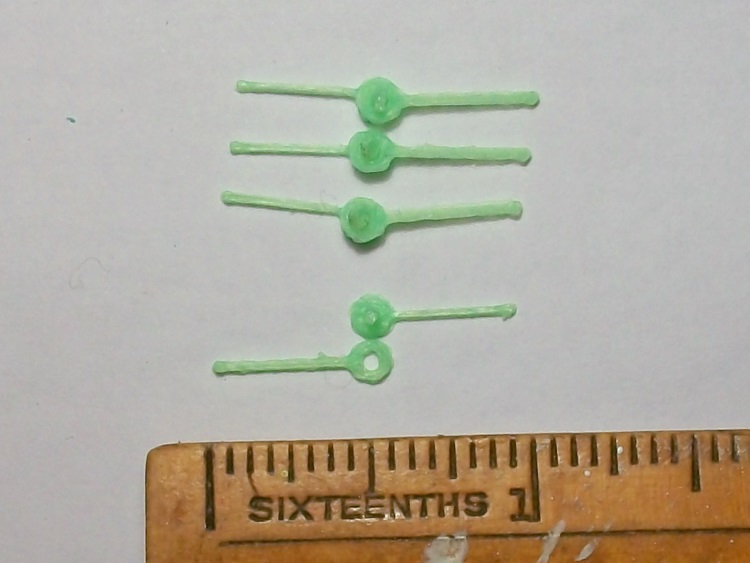
They work well enough but are not very strong so a better more robust version that will be used for all the control surfaces of the Albatross.
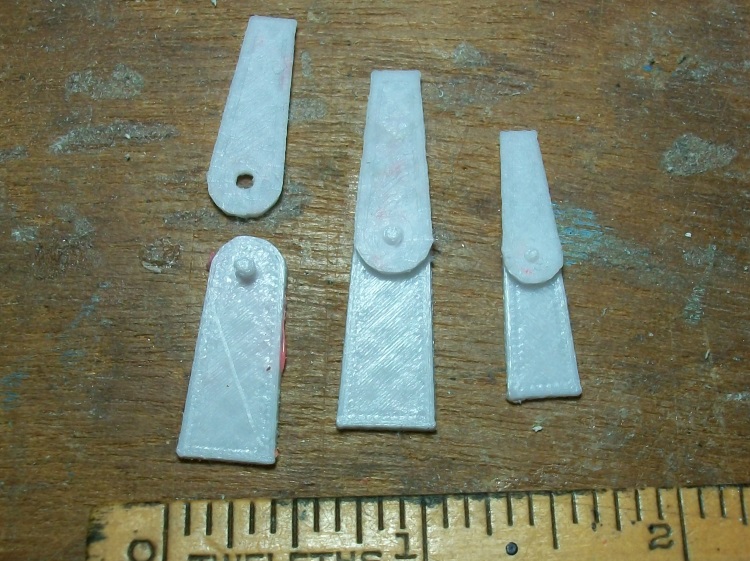
The two parts simply 'click' together and it can be 'scaled' in CURA to a suitable size but below 75% the hinge 'pin' (at that scale it is only 1.5 mm in diameter) does not print well enough to retain all the required diameters.
The air frame side of the hinge will be glued to a printed rib. The other side is simply glued into a slot in the solid Depron control surface.
If possible I would like to use surfaces 'direct coupled' to the servos as in 2.4 individual centring, range of travel and differential movement can be incorporated. The 'thorny' problem is how to do the rudders in a way that is both simple and light!
The lightest of all is of course "bank & yank" (no rudder) but that might not be a good idea with the inertia of 4 motors out on the wings and with a rather modest fin area.
This could be a significant issue as on the prototype the fins/rudders were enlarged and moved to the ends of the tail plane to overcome directional control issues!
I used 'printed' hinges for the A350's rudder. All the other surfaces use tape hinges.
They work well enough but are not very strong so a better more robust version that will be used for all the control surfaces of the Albatross.
The two parts simply 'click' together and it can be 'scaled' in CURA to a suitable size but below 75% the hinge 'pin' (at that scale it is only 1.5 mm in diameter) does not print well enough to retain all the required diameters.
The air frame side of the hinge will be glued to a printed rib. The other side is simply glued into a slot in the solid Depron control surface.
If possible I would like to use surfaces 'direct coupled' to the servos as in 2.4 individual centring, range of travel and differential movement can be incorporated. The 'thorny' problem is how to do the rudders in a way that is both simple and light!
The lightest of all is of course "bank & yank" (no rudder) but that might not be a good idea with the inertia of 4 motors out on the wings and with a rather modest fin area.
This could be a significant issue as on the prototype the fins/rudders were enlarged and moved to the ends of the tail plane to overcome directional control issues!
Last edit: 22 May 2018 09:36 by Quorneng.
Thanks: Eric, Klipkopwildlife, boz, Mike Rolls, Squirrelnet
Please Log in or Create an account to join the conversation.
- Quorneng
-
Topic Author
- Offline
- Forum Master
-
Less
More
- Posts: 9436
- Thank you received: 19043
23 May 2018 13:54 - 23 May 2018 13:55 #36
by Quorneng
Replied by Quorneng on topic DH 91 Albatross
The aileron fitted with the three hinges.
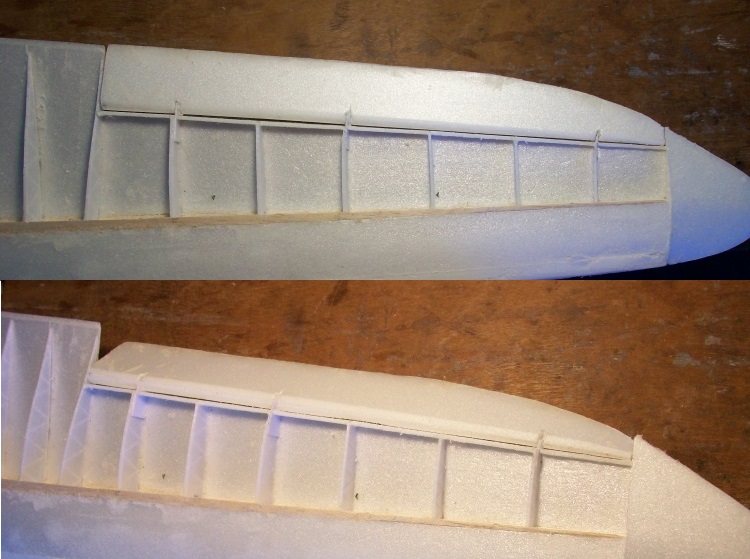
The biggest problem will be keeping it free moving after it is all painted! :woohoo:
The wing at the aileron is just to thin to fit a servo directly to the aileron so it will have to have conventional horns and links with some differential movement included in the geometry.
The biggest problem will be keeping it free moving after it is all painted! :woohoo:
The wing at the aileron is just to thin to fit a servo directly to the aileron so it will have to have conventional horns and links with some differential movement included in the geometry.
Last edit: 23 May 2018 13:55 by Quorneng.
Thanks: Eric, Klipkopwildlife, boz, Mike Rolls, Squirrelnet
Please Log in or Create an account to join the conversation.
- Quorneng
-
Topic Author
- Offline
- Forum Master
-
Less
More
- Posts: 9436
- Thank you received: 19043
25 May 2018 00:19 #37
by Quorneng
Replied by Quorneng on topic DH 91 Albatross
With the servo installed the aileron can be tested.
With a conventional aileron horn on the underside belly landings are not recommended!
The aileron horn is designed to be glued directly onto the Depron surface of the aileron.

It is 3D printed.
With a conventional aileron horn on the underside belly landings are not recommended!
The aileron horn is designed to be glued directly onto the Depron surface of the aileron.
It is 3D printed.
Thanks: Klipkopwildlife, boz, Squirrelnet
Please Log in or Create an account to join the conversation.
- Quorneng
-
Topic Author
- Offline
- Forum Master
-
Less
More
- Posts: 9436
- Thank you received: 19043
26 May 2018 21:10 #38
by Quorneng
Replied by Quorneng on topic DH 91 Albatross
Made a modest start on the rear part of the engine nacelles.
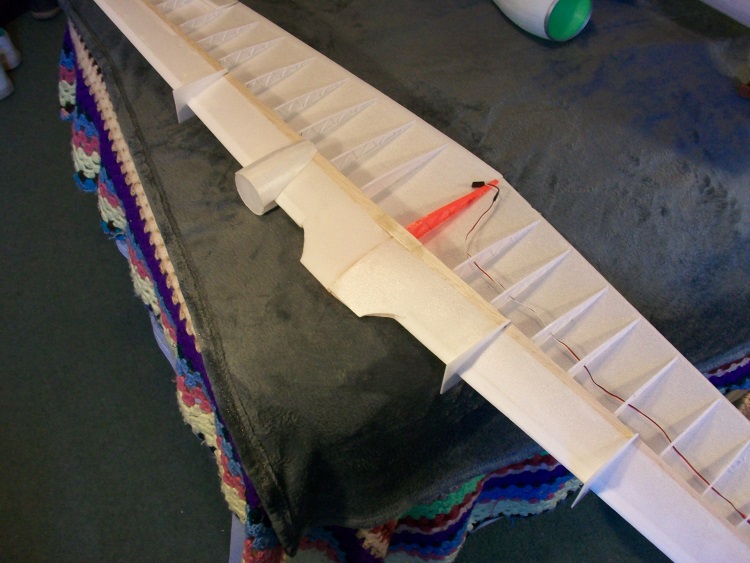
Slow going, planked, all in 2 mm Depron and there are 4 to do! :woohoo:
The motors and ESCs will have to be installed and all wired up before the wing rear top skin can go on.
The only question is will I go 'stir crazy' before I get to finish it!
Slow going, planked, all in 2 mm Depron and there are 4 to do! :woohoo:
The motors and ESCs will have to be installed and all wired up before the wing rear top skin can go on.
The only question is will I go 'stir crazy' before I get to finish it!
Thanks: Eric, Klipkopwildlife, boz, Squirrelnet
Please Log in or Create an account to join the conversation.
- Quorneng
-
Topic Author
- Offline
- Forum Master
-
Less
More
- Posts: 9436
- Thank you received: 19043
28 May 2018 22:56 - 28 May 2018 22:57 #39
by Quorneng
Replied by Quorneng on topic DH 91 Albatross
Still slow as I keep getting distracted to do other things - chicken perches and a new base (printed!) for an outside light. :woohoo:

About 16 Depron (2 mm) planks per engine nacelle and each individually cut/sanded/formed to shape. Its tedious and rather boring!
About 16 Depron (2 mm) planks per engine nacelle and each individually cut/sanded/formed to shape. Its tedious and rather boring!
Last edit: 28 May 2018 22:57 by Quorneng.
Thanks: boz, Mike Rolls
Please Log in or Create an account to join the conversation.
- Quorneng
-
Topic Author
- Offline
- Forum Master
-
Less
More
- Posts: 9436
- Thank you received: 19043
30 May 2018 10:48 #40
by Quorneng
Replied by Quorneng on topic DH 91 Albatross
As a break from the tedious planking I worried about the aileron servo horns sticking out of the wing underside and the possibility of them 'snagging' on any sort of belly landing. Very likely a necessity with my rough grass field!
So a printed horn cover seemed a good addition.

To allow it to be as thin as possible the cover itself actually retains the rod in the servo horn.
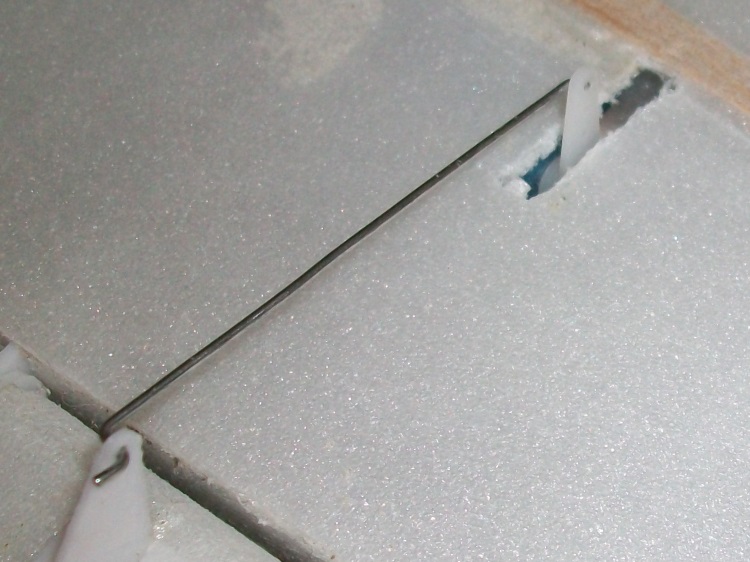
With a Z bend at the aileron horn end it becomes something else "permanently built in".
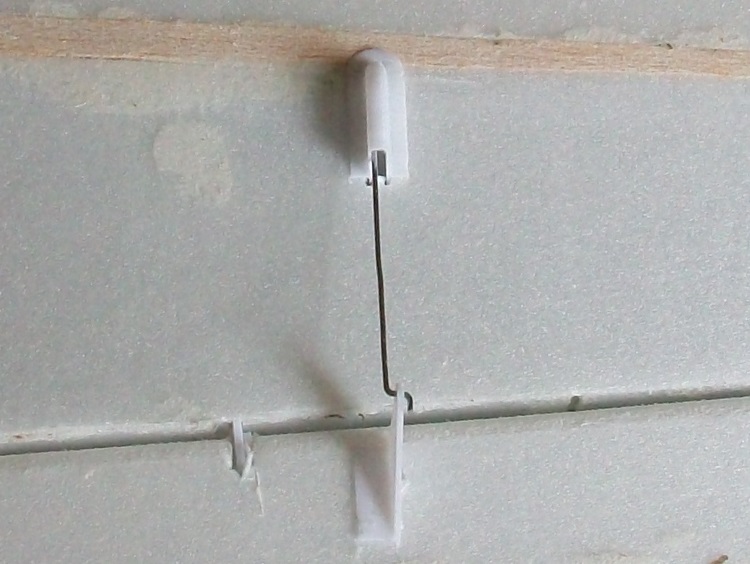
So a printed horn cover seemed a good addition.
To allow it to be as thin as possible the cover itself actually retains the rod in the servo horn.
With a Z bend at the aileron horn end it becomes something else "permanently built in".
Thanks: Mowerman, boz, Mike Rolls, Squirrelnet
Please Log in or Create an account to join the conversation.
- one tenor
-

- Offline
- Forum Veteran
-

- johnpcalex@gmail.com
30 May 2018 20:02 #41
by one tenor
Anything will fly given enough power
Replied by one tenor on topic DH 91 Albatross
Great idea. What about one for the aileron?
Anything will fly given enough power
Please Log in or Create an account to join the conversation.
- Quorneng
-
Topic Author
- Offline
- Forum Master
-
Less
More
- Posts: 9436
- Thank you received: 19043
31 May 2018 11:38 - 31 May 2018 11:51 #42
by Quorneng
Replied by Quorneng on topic DH 91 Albatross
OT
I am not sure a cover for the aileron horn would reduce any snagging.
At last I have finished all the nacelle planking.

Then there are the 4 nacelle 'tail ends' to do on the under side. :ohmy:
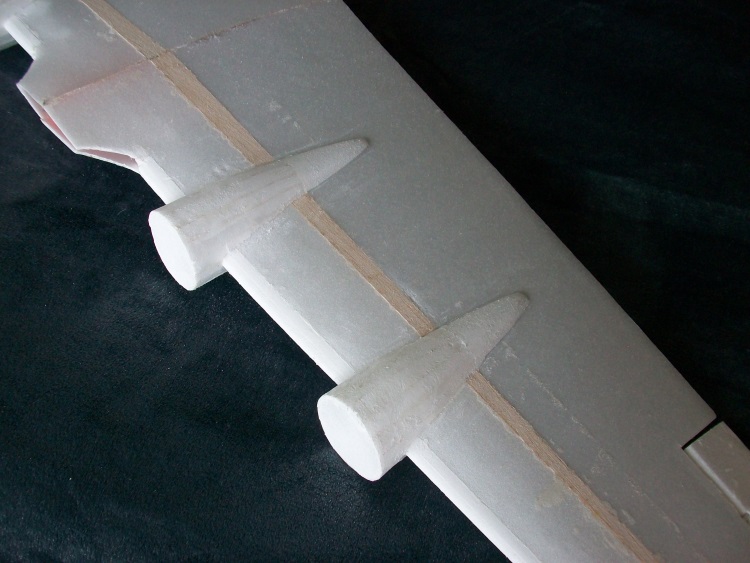
There are similar nacelle 'tail ends' on the wing top surface but they will have to wait until the rear top skin goes on.
The OPTO ESCs have not yet arrived so cutting out and fabricating the undercarriage wheel wells is next.
I am not sure a cover for the aileron horn would reduce any snagging.
At last I have finished all the nacelle planking.
Then there are the 4 nacelle 'tail ends' to do on the under side. :ohmy:
There are similar nacelle 'tail ends' on the wing top surface but they will have to wait until the rear top skin goes on.
The OPTO ESCs have not yet arrived so cutting out and fabricating the undercarriage wheel wells is next.
Last edit: 31 May 2018 11:51 by Quorneng.
Thanks: Eric, boz, Mike Rolls
Please Log in or Create an account to join the conversation.
- Quorneng
-
Topic Author
- Offline
- Forum Master
-
Less
More
- Posts: 9436
- Thank you received: 19043
01 Jun 2018 13:30 #43
by Quorneng
Replied by Quorneng on topic DH 91 Albatross
The lower wing skin cut out for the wheel wells.

The scale wheels will be 2.25" (57 mm) diameter.
Guessing from the relative size of the main and tail wheels I suspect the U/C was positioned pretty close to the CofG when in the "tail up" attitude so for a model with 'non scale' grass it may not be easy to avoid a landing 'nose over'.
The scale wheels will be 2.25" (57 mm) diameter.
Guessing from the relative size of the main and tail wheels I suspect the U/C was positioned pretty close to the CofG when in the "tail up" attitude so for a model with 'non scale' grass it may not be easy to avoid a landing 'nose over'.
Thanks: Klipkopwildlife, boz, Mike Rolls, Squirrelnet
Please Log in or Create an account to join the conversation.
- Quorneng
-
Topic Author
- Offline
- Forum Master
-
Less
More
- Posts: 9436
- Thank you received: 19043
04 Jun 2018 17:24 #44
by Quorneng
Replied by Quorneng on topic DH 91 Albatross
The 3 view suggests the tail end of the fuselage supporting the tail plane has a very small section and is where I would suspect it would break off in any sort of rough landing. 
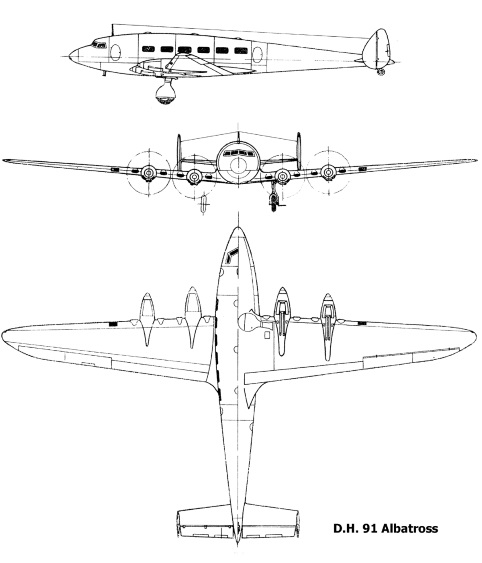
I intend to use 'printed' fuselage formers.
The tail plane also has slight dihedral so it makes use of printing's capabilities to incorporate a tail plane spar brace into the appropriate former. This will be last former as it is just a non structural tail cone after that.
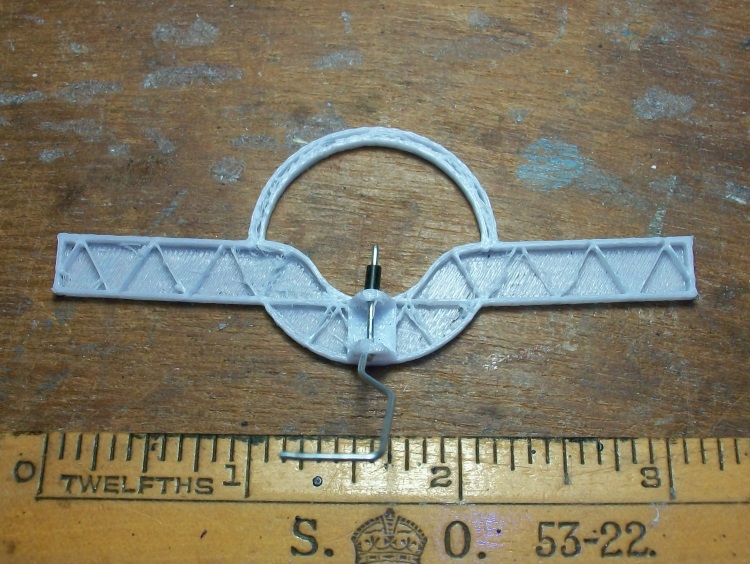
The tail wheel is also mounted at this point so the brace includes pivot pinions.
Printed braces will also be used for the tail plane to fin joints.
So far so good but I still have not decided on a method to connect and move the rudders! :ohmy:
I intend to use 'printed' fuselage formers.
The tail plane also has slight dihedral so it makes use of printing's capabilities to incorporate a tail plane spar brace into the appropriate former. This will be last former as it is just a non structural tail cone after that.
The tail wheel is also mounted at this point so the brace includes pivot pinions.
Printed braces will also be used for the tail plane to fin joints.
So far so good but I still have not decided on a method to connect and move the rudders! :ohmy:
Thanks: Eric, Klipkopwildlife, boz, Mike Rolls, Squirrelnet
Please Log in or Create an account to join the conversation.
- Eric
-

- Offline
- Moderator
-

Less
More
- Posts: 13726
- Thank you received: 14467
04 Jun 2018 21:31 #45
by Eric
if you are calm and collected when all about you are going berserk - you've missed something important!
Replied by Eric on topic DH 91 Albatross
The easiest way may be to run a normal push-rod down the fuselage to a 90' bellcrank. That changes the fore/aft to a left/right through the tailplane, then to rods extending forward from the rudders.
You could change through 90' again, for a fore/aft drive to horns on the rudders, but it's an open invitation for slop to creep in.
You could change through 90' again, for a fore/aft drive to horns on the rudders, but it's an open invitation for slop to creep in.
if you are calm and collected when all about you are going berserk - you've missed something important!
Thanks: boz
Please Log in or Create an account to join the conversation.
Time to create page: 1.082 seconds