
- Posts: 587
- Thank you received: 1048
3D printing Widgets
- Magpie
-

- Offline
- Elite Member
-

Less
More
08 Oct 2025 10:07 - 08 Oct 2025 10:13 #331
by Magpie
Replied by Magpie on topic 3D printing Widgets
We too have been playing host to the Covid bug for the past two or three weeks, my wife couldn't get out of bed for two days with it.
My flight trainer messaged me that he was back from his caravaning wanderings just as I was going down with it but hopefully I can get back in the air next week.
Meanwhile back at the ranch I've been working on FreeCad & Cura & have learnt alot of new tricks.
I had to replace the room thermostats, mainly because of the plastic crumbling, so I printed some adapter plates which was quite usefull.
My son has been buying Transformers (the 1980s toy) with missing parts off Ebay & cannibalising them to make some whole again. When he heard about my printer he downloaded STL files for the missing parts & I've been printing them out. Some were easy but others weren't & I've been trying to use supports & the support blocker which gave mixed results. I've also ordered some smaller nozzles to see if that helps with the finish as the parts are quite small & will have to get more organised on setting files.
I've been able to import the STL files & graft on additions but some things are proving troublesome. It seems that chamfers & external fillets are a well known problem which hasn't been solved.
The addition on this had to be done using the revolver function as the chamfer refused to be exported. I tried remaking it & 3MF & OBJ formats without success.
Last edit: 08 Oct 2025 10:13 by Magpie.
Thanks: Klipkopwildlife, Quorneng, THE BLACKBIRD, jon.in.swansea
Please Log in or Create an account to join the conversation.
- jon.in.swansea
-

- Offline
- Elite Member
-
Less
More
- Posts: 766
- Thank you received: 1192
08 Oct 2025 13:48 #332
by jon.in.swansea
Replied by jon.in.swansea on topic 3D printing Widgets
Glad you are getting more comfortable with the CAD tools. Both Tony & I so easily go into 'let's make a widget for that' mode. Great fun (usually).
Thanks: Klipkopwildlife
Please Log in or Create an account to join the conversation.
- Magpie
-
- Offline
- Elite Member
-
Less
More
- Posts: 587
- Thank you received: 1048
17 Dec 2025 12:41 - 17 Dec 2025 12:46 #333
by Magpie
Replied by Magpie on topic 3D printing Widgets
I've been keeping an eye on the site but have got out of the habit of logging in
After we got clear of the covid we must have been first in the queue for the latest flu so that took another 2 or 3 weeks to run its course.
I got some 0.2mm nozzles & got some decent results on the transformer parts which actually fitted very well on the toys.
The offspring are coming round next tuesday to collect their presents so I printed some labels. They're all into Star Trek so I downloaded a Klingon font to do their names in which will keep them occupied for a little bit translating them.
Decent plant labels are like hen's teeth, they are difficult to write on & fade in no time especially as some of my plants need at least 3 years. So I printed some, the names are recessed 0.4mm. I tried filling them with coloured wax but it tended to stick on the surface so I had to resort to inking them in. At least if the ink fades the names are engraved so will persist.
I had intended to go on a course at a local community thing to learn about using laser cutters & use their machines to make some parts but they don't seem to be running any so I've printed out some formers for the nose section. I don't know how much heavier filament is than ply.


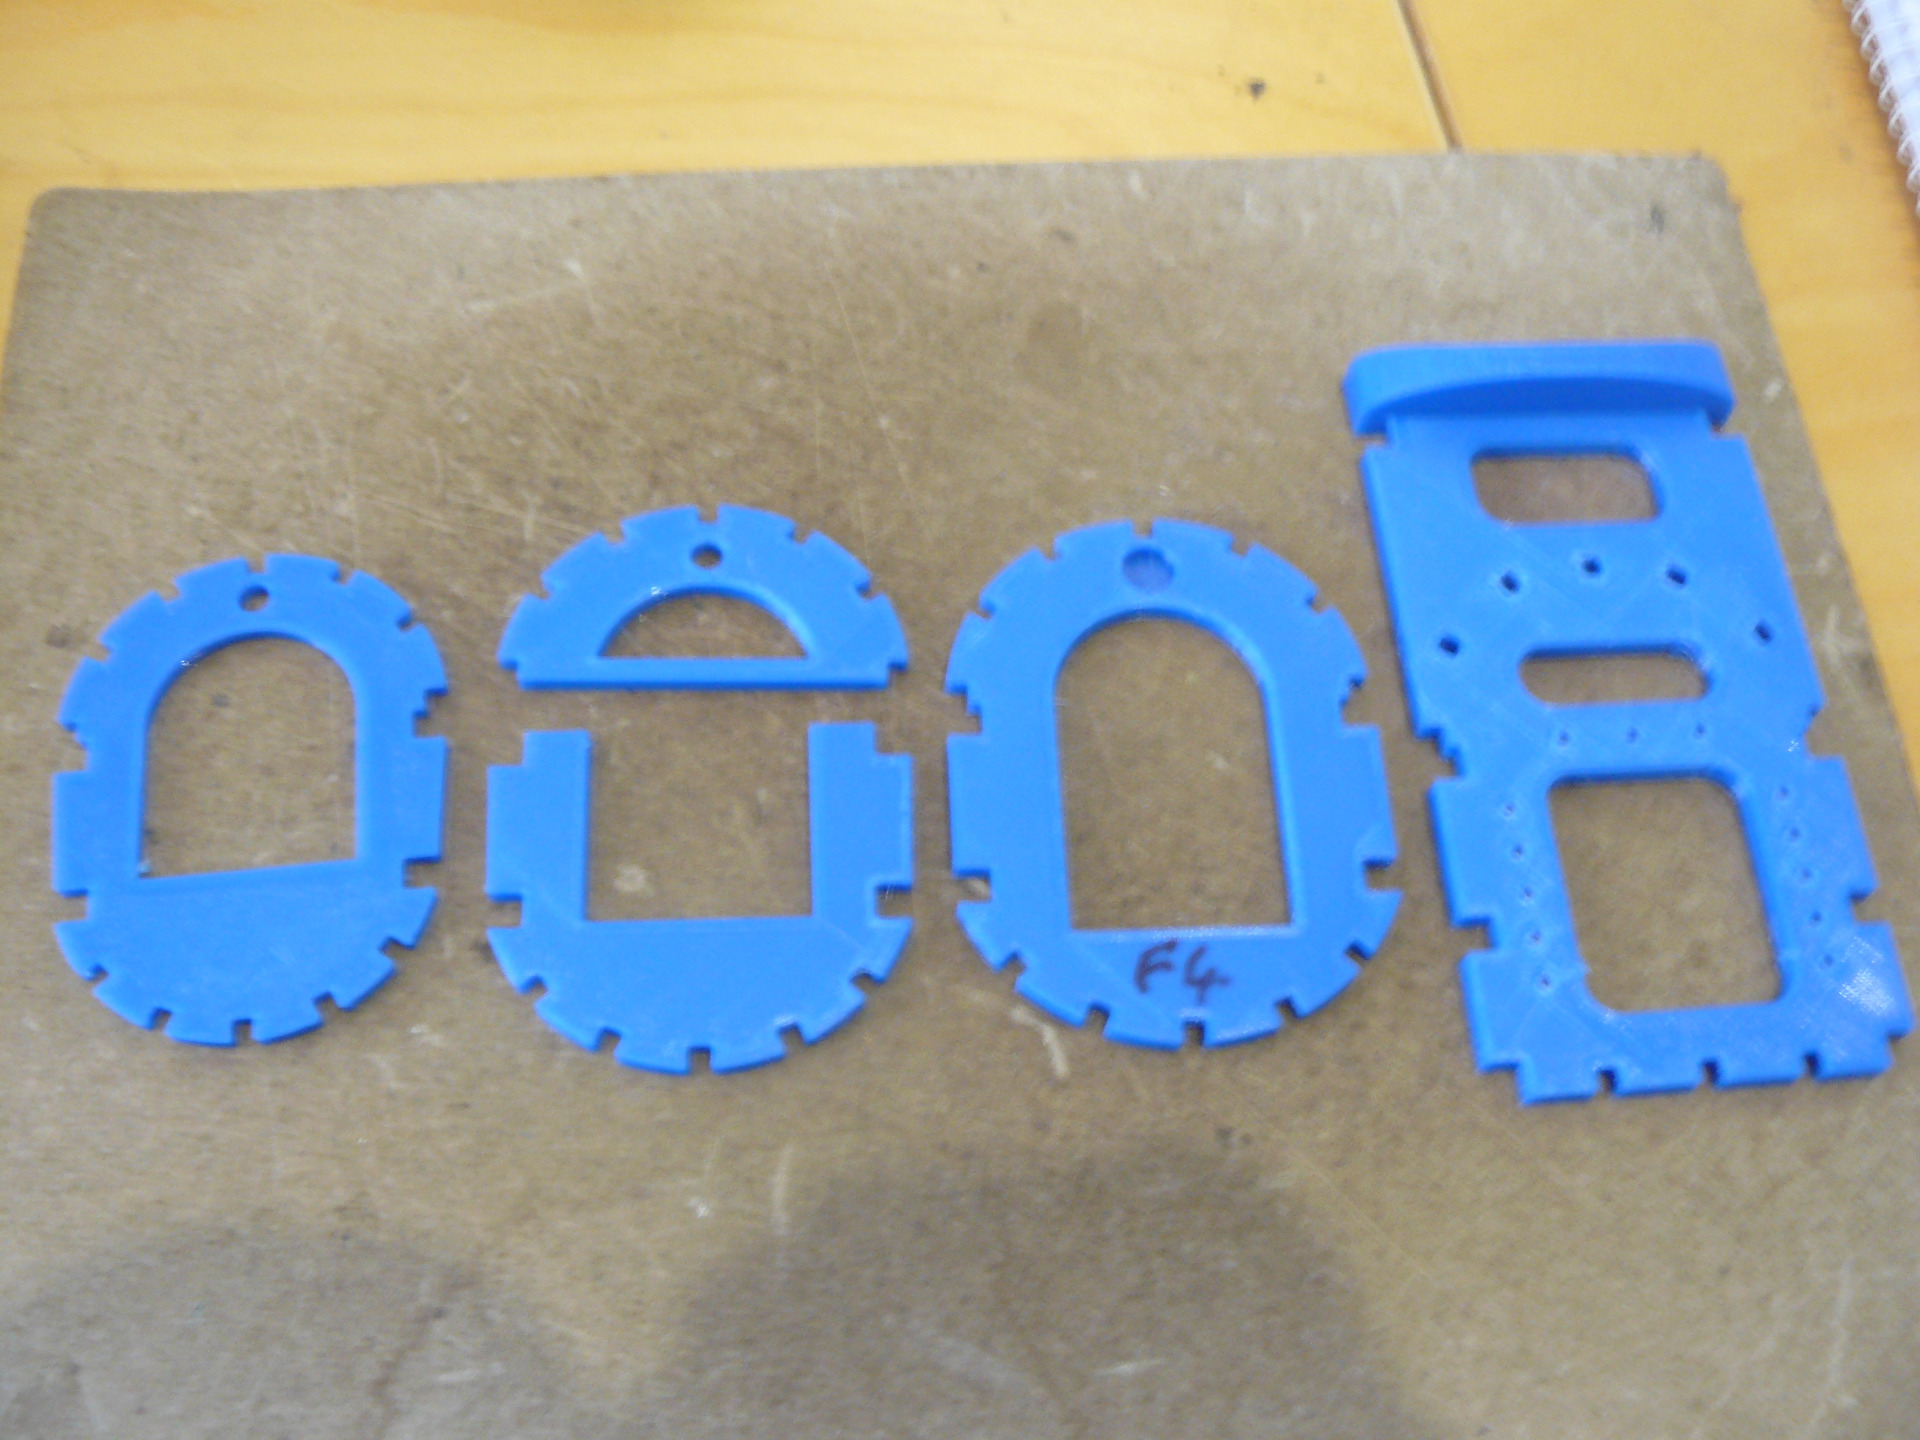
After we got clear of the covid we must have been first in the queue for the latest flu so that took another 2 or 3 weeks to run its course.
I got some 0.2mm nozzles & got some decent results on the transformer parts which actually fitted very well on the toys.
The offspring are coming round next tuesday to collect their presents so I printed some labels. They're all into Star Trek so I downloaded a Klingon font to do their names in which will keep them occupied for a little bit translating them.
Decent plant labels are like hen's teeth, they are difficult to write on & fade in no time especially as some of my plants need at least 3 years. So I printed some, the names are recessed 0.4mm. I tried filling them with coloured wax but it tended to stick on the surface so I had to resort to inking them in. At least if the ink fades the names are engraved so will persist.
I had intended to go on a course at a local community thing to learn about using laser cutters & use their machines to make some parts but they don't seem to be running any so I've printed out some formers for the nose section. I don't know how much heavier filament is than ply.
Last edit: 17 Dec 2025 12:46 by Magpie.
Thanks: Klipkopwildlife, Flytilbroke, THE BLACKBIRD, jon.in.swansea
Please Log in or Create an account to join the conversation.
- Klipkopwildlife
-
 Topic Author
- Offline
- Administrator
-

- I'm supposed to be retired!
17 Dec 2025 12:45 #334
by Klipkopwildlife
Do it now, you may never get another chance
Replied by Klipkopwildlife on topic 3D printing Widgets
Those formers look very good.
Do it now, you may never get another chance
Please Log in or Create an account to join the conversation.
- Magpie
-
- Offline
- Elite Member
-
Less
More
- Posts: 587
- Thank you received: 1048
17 Dec 2025 13:06 #335
by Magpie
Replied by Magpie on topic 3D printing Widgets
They took alot of learning!
F5 has a few bits attached to bits, only the three main cut-outs are part of the base pad, the rest are pockets. The wire frame message kept popping up & takes some clearing. Altering one pocket sketch often broke another, it kept losing the face plane & sometimes I had to revert it to the X-Y plane & alter the attachment position. Also to get the square cut-outs for the stringers evenly spaced took a bit of thinking about & a few attempts.

F5 has a few bits attached to bits, only the three main cut-outs are part of the base pad, the rest are pockets. The wire frame message kept popping up & takes some clearing. Altering one pocket sketch often broke another, it kept losing the face plane & sometimes I had to revert it to the X-Y plane & alter the attachment position. Also to get the square cut-outs for the stringers evenly spaced took a bit of thinking about & a few attempts.
Thanks: Klipkopwildlife, Quorneng, THE BLACKBIRD, jon.in.swansea
Please Log in or Create an account to join the conversation.
- Klipkopwildlife
-
Topic Author
- Offline
- Administrator
-
- I'm supposed to be retired!
17 Dec 2025 17:45 #336
by Klipkopwildlife
Do it now, you may never get another chance
Replied by Klipkopwildlife on topic 3D printing Widgets
Respect!
Do it now, you may never get another chance
Please Log in or Create an account to join the conversation.
- Magpie
-
- Offline
- Elite Member
-
Less
More
- Posts: 587
- Thank you received: 1048
02 Feb 2026 13:07 #337
by Magpie
Replied by Magpie on topic 3D printing Widgets
My 3D printer is certainly very popular. My grandaughter & son-in-law are into F1 & have these Lego ones so now I'm on printing out stands for them. I'm getting a dab hand at modifying STL files, reducing the base so it fits on my machine & removing some of the Lego studs so they fit the cars.
But the real reason for logging on is that I'm back in the temptation zone for a Laser cutter.
I've been looking at an AtomStack one. There are two versions on Aliexpress, 10W & 20W, in round numbers £215 & £300.
Would the 10W one have enough power for Balsa & thin Ply?
But the real reason for logging on is that I'm back in the temptation zone for a Laser cutter.
I've been looking at an AtomStack one. There are two versions on Aliexpress, 10W & 20W, in round numbers £215 & £300.
Would the 10W one have enough power for Balsa & thin Ply?
Thanks: Eric, Klipkopwildlife
Please Log in or Create an account to join the conversation.
- Eric
-

- Offline
- Moderator
-

Less
More
- Posts: 13726
- Thank you received: 14467
02 Feb 2026 15:59 #338
by Eric
if you are calm and collected when all about you are going berserk - you've missed something important!
Replied by Eric on topic 3D printing Widgets
Can't answer that - outside my field of knowledge.
if you are calm and collected when all about you are going berserk - you've missed something important!
Please Log in or Create an account to join the conversation.
- Klipkopwildlife
-
Topic Author
- Offline
- Administrator
-
- I'm supposed to be retired!
02 Feb 2026 16:57 #339
by Klipkopwildlife
Do it now, you may never get another chance
Replied by Klipkopwildlife on topic 3D printing Widgets
The problem with cutting balsa is getting the emitter far enough away from the work piece. About 2 to 3 metres is good, many of the professional cutters have special mirrors which send the beam up and down several times before impinging on the work. I think it's something to do with the inability to focus close up.
I have a 2.5watt one that cuts through chicken wire at 3 metres! The trick is to not have to repeat the cut because then you burn the bed, there are hone comb beds available, I guess it's all about how much, how long and how fast! ie, experience.
I bought 3 mirrors for mine but still have to get the whole thing rigid enough!
Do it now, you may never get another chance
Please Log in or Create an account to join the conversation.
- Magpie
-
- Offline
- Elite Member
-
Less
More
- Posts: 587
- Thank you received: 1048
02 Feb 2026 20:17 #340
by Magpie
Replied by Magpie on topic 3D printing Widgets
I think your experience is outside of these small ones. These are just bench-top ones.
There are honeycomb beds for underneath the material & then I've read a ceramic tile underneath that will absorb the left-over energy.
One review says to recut at lower powers for the best cut. That would obviously depend on the repeatability of the machine.
There are honeycomb beds for underneath the material & then I've read a ceramic tile underneath that will absorb the left-over energy.
One review says to recut at lower powers for the best cut. That would obviously depend on the repeatability of the machine.
Thanks: Klipkopwildlife
Please Log in or Create an account to join the conversation.
- Klipkopwildlife
-
Topic Author
- Offline
- Administrator
-
- I'm supposed to be retired!
03 Feb 2026 11:08 #341
by Klipkopwildlife
Do it now, you may never get another chance
Replied by Klipkopwildlife on topic 3D printing Widgets
After my experience with Industrial machines I find the repeatability of these small stepper motor controlled machines quite remarkable.
Do it now, you may never get another chance
Please Log in or Create an account to join the conversation.
- Magpie
-
- Offline
- Elite Member
-
Less
More
- Posts: 587
- Thank you received: 1048
03 Feb 2026 11:34 #342
by Magpie
Replied by Magpie on topic 3D printing Widgets
Stepper motors are inherently accurate as long as they aren't knocked out of sync.
I worked on metal-cutting machines & they needed alot of torque so they had servo motors & leadscrews. We did alot of retrofits on old machines so they needed to be laser calibrated.
I also worked on some roll lathes where size didn't matter much, they mainly just smoothed out the dents, & the Y-axis was controlled by feedback from the grinder wheel current.
Thanks: Klipkopwildlife, Flytilbroke
Please Log in or Create an account to join the conversation.
- Magpie
-
- Offline
- Elite Member
-
Less
More
- Posts: 587
- Thank you received: 1048
04 Feb 2026 16:55 #343
by Magpie
Replied by Magpie on topic 3D printing Widgets
I've been on with the Lego-Stands.
I printed out the downloaded version with the reduced base, & they turned out quite well. I dropped the first one on a tiled floor & it broke in half which surprised me.
I was asked if I could do them in different heights so I downloaded the small top piece with the studs and redid it all on Freecad, just using that so I could alter the different bits.
I had tried to split the original into its componts using Mesh Design but it didn't work, I just got more component objects but none of them were actual separate components.
I have run out of Black PLA so I'm using the Silky Gold left over from Christmas.
Having had the table-marking problem I've been using Scotch Blue but it lifts off the table & the thin parts warp so I changed to Mat Adhesion directly onto the bed. The original printed OK but the first redesign came loose from the mat as it got near the top.
So I made it shorter, the base slightly larger & printed it without the mat.
I've modified it on Freecad to give a steeper angle to the top & that's printing it out now.
They take about 3 hours to print & the team have six cars between them so the printer is going to be busy.
Thanks: Klipkopwildlife, Flytilbroke, Quorneng, jon.in.swansea
Please Log in or Create an account to join the conversation.
- jon.in.swansea
-
- Offline
- Elite Member
-
Less
More
- Posts: 766
- Thank you received: 1192
05 Feb 2026 07:25 #344
by jon.in.swansea
Replied by jon.in.swansea on topic 3D printing Widgets
That is a rather nice gold as a change from the black that is the default for so many of us...
Nice hybrid (bit of download, bit of your on work) CAD workflow.
Nice hybrid (bit of download, bit of your on work) CAD workflow.
Thanks: Klipkopwildlife
Please Log in or Create an account to join the conversation.
- jon.in.swansea
-
- Offline
- Elite Member
-
Less
More
- Posts: 766
- Thank you received: 1192
05 Feb 2026 07:45 #345
by jon.in.swansea
Replied by jon.in.swansea on topic 3D printing Widgets
The never-ending kitchen refurb has gotten to the worktop phase. Stuff called compact laminate - 12mm of seriously tough material into which we wanted to fit a half-sink. Deceptively simple sink form but it needed a jig that was 8mm bigger to guide the router. Sides were a 1m radius and 88mm radius. Builder was scratching head. Seemed like just the thing for FreeCAD and some PLA. Bigger than I could print on the Prusa so did it in half-sections. Did a test and suggested it needed to be wider to steady the router sotwo side pieces were added to the mix with wood to allow for it to be clamped in place. Could it have been done in plywood - yes but would need lots of sanding to get a smooth enough edge.

The finished sink....

I am so looking forward to clearing the man-cave of the building materials so that I can get back to some RC stuff...
The finished sink....
I am so looking forward to clearing the man-cave of the building materials so that I can get back to some RC stuff...
Thanks: Klipkopwildlife, Flytilbroke
Please Log in or Create an account to join the conversation.
Time to create page: 0.708 seconds