
- Posts: 9436
- Thank you received: 19043
3D printing Widgets
- Quorneng
-

- Offline
- Forum Master
-

Less
More
11 Sep 2025 13:30 #316
by Quorneng
Replied by Quorneng on topic 3D printing Widgets
"correctly positioned on a sketch"
A cone derived from the Part workbench is a 3 dimensional object. It has no associated sketch so Cura ignores it.
However a Part workbench cone on its own does export successfully into Cura.
Never done it myself but you may have to add a stand alone Cone into Cura along with the "sketch" based part and then position them correctly with X.Y,Z coordinates.
Cura doesn't mind having several prints on the bed at the same time. You just have to get them in exactly the right place if you want to print joined together.
Hope this helps
Thanks: Klipkopwildlife
Please Log in or Create an account to join the conversation.
- Magpie
-

- Offline
- Elite Member
-

Less
More
- Posts: 587
- Thank you received: 1048
13 Sep 2025 11:56 - 13 Sep 2025 12:02 #317
by Magpie
Replied by Magpie on topic 3D printing Widgets
I think I've got the temperatures right for once it gets going but I'm still getting some false starts mainly on the first print. I think the machine needs warming up for the first start. The thermistor may say its up to temperature but the rest of it may not be & the air will still be cool. I need to organize an enclosure for it, I thought about poystyrene but its probably not a good idea where heats involved.
I cracked printing the cones. Highlighting "Body" & then exporting works for most prints but to get the cones (& I guess the other things from the Part Workbench) you have to highlight Body & then go to Edit & Select All.
The machine isn't printing the cones very well, they tend to be squashed. They're only 1mm x 3mm & 8 mm high.
I spent all of yesterday trying to get an array of hexagons in the lid of my Pi Box. They kept changing angles & every change took an age, it kept saying "Not Responding" & I had to wait till it came back.
This morning I started again from scratch & cracked it in about an hour. I sketched two rows of hexagons then used the Mirror command to duplicate them.
I just need to check the two halves fit together.
Last edit: 13 Sep 2025 12:02 by Magpie.
Thanks: Klipkopwildlife, Quorneng, jon.in.swansea
Please Log in or Create an account to join the conversation.
- jon.in.swansea
-

- Offline
- Elite Member
-
Less
More
- Posts: 766
- Thank you received: 1192
14 Sep 2025 09:20 #318
by jon.in.swansea
Replied by jon.in.swansea on topic 3D printing Widgets
For a pattern of hex openings... FreeCAD has functions that turn a single entity into an array. For example to add ventilation openings to that Pi box....
Look in the Draft workbench, in the Modification pull-down menu there is an ARRAY option which supports creating
a) a rectangular array of the entity (you specify the offsets in the X, Y, Z etc and how many in each axis
b) a polar array of the entity (you specify the distance and angles and how many
Suggestion do a bit of exploration with a simple base shape and an entity to see options. You can then cut the 'array' from the base body to get the holes.
Thanks: Klipkopwildlife, Quorneng
Please Log in or Create an account to join the conversation.
- Magpie
-
- Offline
- Elite Member
-
Less
More
- Posts: 587
- Thank you received: 1048
14 Sep 2025 12:41 - 14 Sep 2025 12:47 #319
by Magpie
Replied by Magpie on topic 3D printing Widgets
I looked at Arrays & concluded that as I didn't want a simple rectangular array, as in a beer crate, but wanted what in gardening parlance is called "Pot Thick" it would have added another complexity by having to juggle with arrays.
Using the Mirror function made it relatively easy. Once I had the hexagons done & started on the side walls it was noticeable how much FreeCad had slowed.
When I started this morning the temperatures on the printer were 14degC. I put the pre-heats on, which must switch themselves off after a delay, by which time the central heating had warmed the room up so the printer temperature had risen to 20deg. which supports my theory that it needs running up to temperature before starting.
I'm getting some stray whiskers when the printer is moving across spaces in the initial layer so I've reduced the initial nozzle temperature to 205deg & the main layers to 200deg, & the table to 60deg & 55deg.
Sitting the PCB on cones isn't working. They were supposed to be 1mm dia at the top but were at least 2mm & also were too soft so I have changed to mounting the PCB using bosses & screws. Its now on printing so we'll see how it turns out.
Working in 3D on FreeCad is a major change from 2D Autocad.
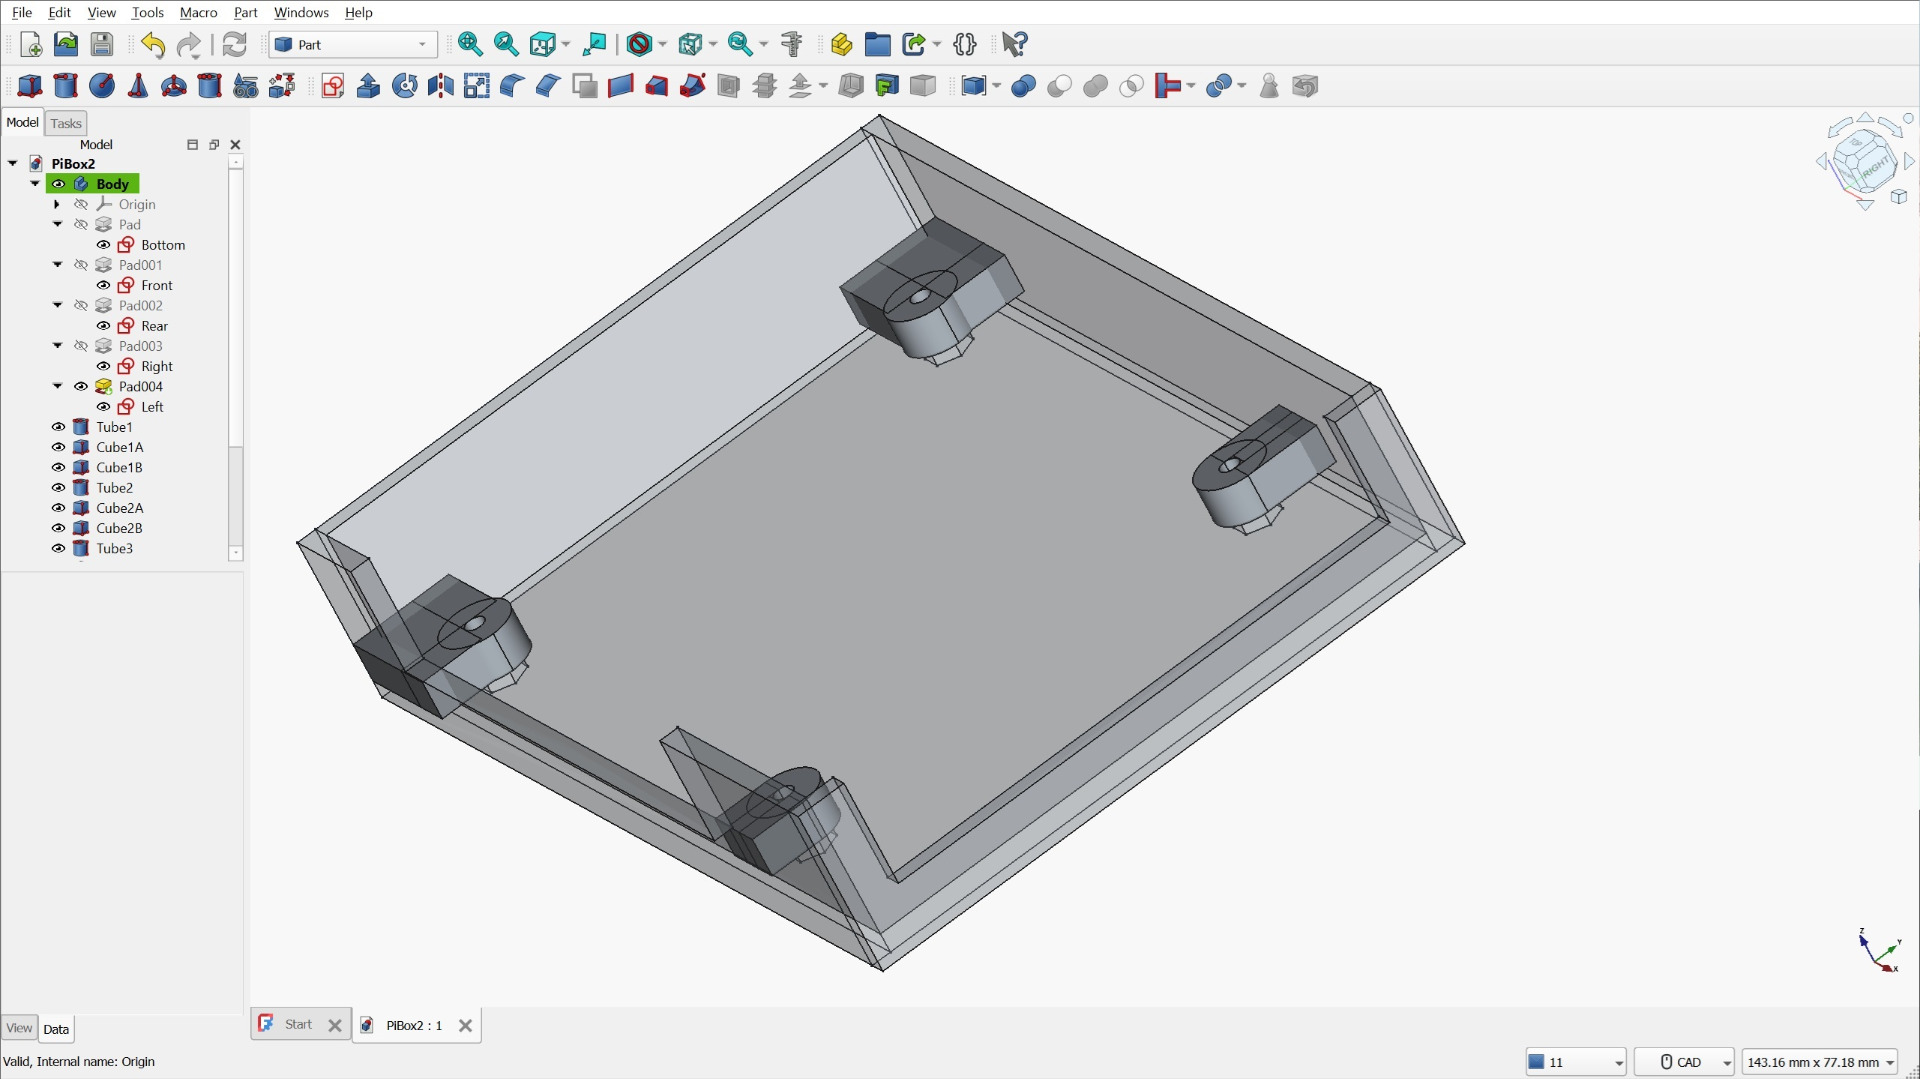
Using the Mirror function made it relatively easy. Once I had the hexagons done & started on the side walls it was noticeable how much FreeCad had slowed.
When I started this morning the temperatures on the printer were 14degC. I put the pre-heats on, which must switch themselves off after a delay, by which time the central heating had warmed the room up so the printer temperature had risen to 20deg. which supports my theory that it needs running up to temperature before starting.
I'm getting some stray whiskers when the printer is moving across spaces in the initial layer so I've reduced the initial nozzle temperature to 205deg & the main layers to 200deg, & the table to 60deg & 55deg.
Sitting the PCB on cones isn't working. They were supposed to be 1mm dia at the top but were at least 2mm & also were too soft so I have changed to mounting the PCB using bosses & screws. Its now on printing so we'll see how it turns out.
Working in 3D on FreeCad is a major change from 2D Autocad.
Last edit: 14 Sep 2025 12:47 by Magpie.
Thanks: Klipkopwildlife, Quorneng, jon.in.swansea
Please Log in or Create an account to join the conversation.
- Klipkopwildlife
-
 Topic Author
- Offline
- Administrator
-

- I'm supposed to be retired!
15 Sep 2025 10:16 #320
by Klipkopwildlife
Do it now, you may never get another chance
Replied by Klipkopwildlife on topic 3D printing Widgets
You might want to try retracting the filament by 2mm on moves of more than 2mm. Whiskering is very difficult to stop completely, there's always some filament in the nozzle even when you retract it
Do it now, you may never get another chance
Thanks: Quorneng, jon.in.swansea
Please Log in or Create an account to join the conversation.
- Magpie
-
- Offline
- Elite Member
-
Less
More
- Posts: 587
- Thank you received: 1048
18 Sep 2025 17:27 - 18 Sep 2025 17:31 #321
by Magpie
Replied by Magpie on topic 3D printing Widgets
I've been on trying to print screw threads.
I started with a 10mm dia cylinder with a 2mm pitch & 2mm depth triangular profile & it was awful. I made a series of test blocks with a profile on without making much progress. It looks to me as if when the nozzle nears the end of the layer the filament is cooling & not squashing down as it does in the middle of the part & forcing the layers up.
The schraubstock spindle has a roll type profile so I moved on to that, 4mm pitch & a 3mm radius profile.
The profile tends to be flat on the top & curved underneath, the same tendency. Looking from the front of the part as its seen on the table the profile isn't too bad but looking from the side it is distinctly flat on top.
Reducing the speed from 50 to 40mm/s improved it slightly.
I cannot visualise what is happening, there cannot be much temperatur difference across the part.
A test block
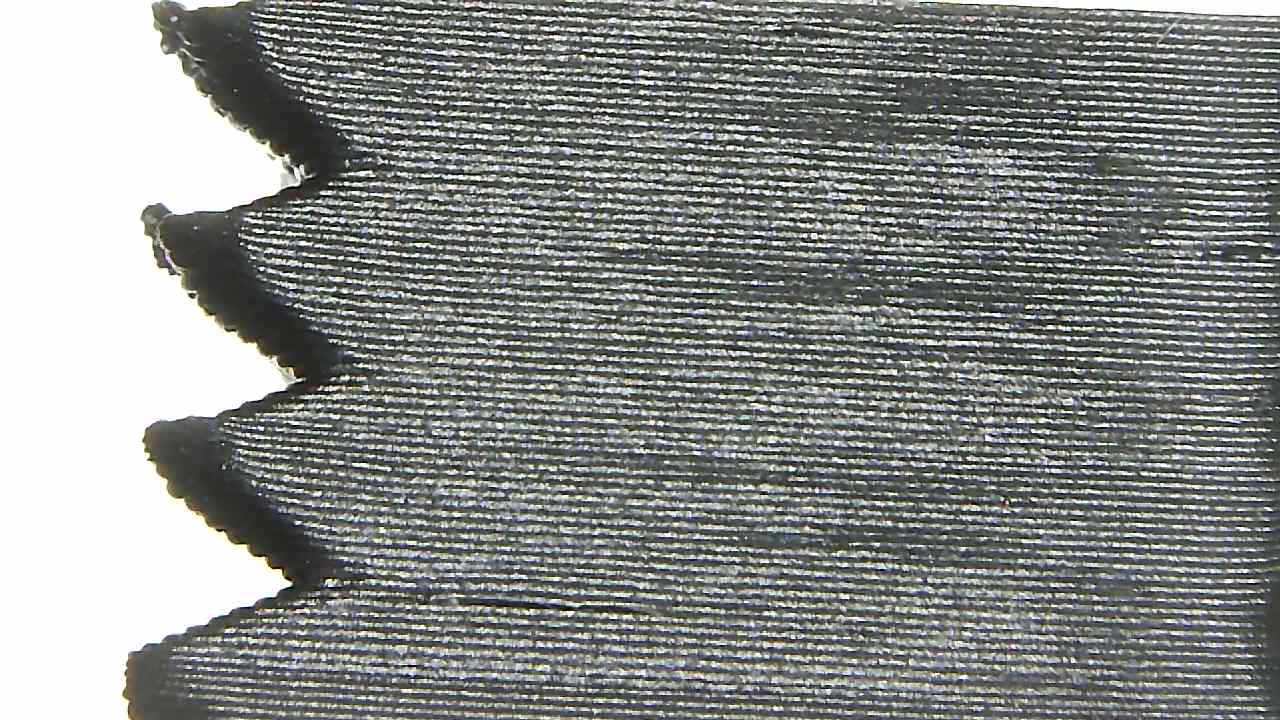
View from the front

View from the side

I started with a 10mm dia cylinder with a 2mm pitch & 2mm depth triangular profile & it was awful. I made a series of test blocks with a profile on without making much progress. It looks to me as if when the nozzle nears the end of the layer the filament is cooling & not squashing down as it does in the middle of the part & forcing the layers up.
The schraubstock spindle has a roll type profile so I moved on to that, 4mm pitch & a 3mm radius profile.
The profile tends to be flat on the top & curved underneath, the same tendency. Looking from the front of the part as its seen on the table the profile isn't too bad but looking from the side it is distinctly flat on top.
Reducing the speed from 50 to 40mm/s improved it slightly.
I cannot visualise what is happening, there cannot be much temperatur difference across the part.
A test block
View from the front
View from the side
Last edit: 18 Sep 2025 17:31 by Magpie.
Thanks: Klipkopwildlife
Please Log in or Create an account to join the conversation.
- Klipkopwildlife
-
Topic Author
- Offline
- Administrator
-
- I'm supposed to be retired!
18 Sep 2025 17:36 #322
by Klipkopwildlife
Do it now, you may never get another chance
Replied by Klipkopwildlife on topic 3D printing Widgets
Can't help I'm afraid

Do it now, you may never get another chance
Please Log in or Create an account to join the conversation.
- Quorneng
-
- Offline
- Forum Master
-
Less
More
- Posts: 9436
- Thank you received: 19043
18 Sep 2025 18:38 #323
by Quorneng
Replied by Quorneng on topic 3D printing Widgets
I fear in principle a conventional form thread will not print well. The path the nozzle takes and thus the way the bead lies on the preceding layer differs around each circle the nozzle makes.
Obviously the finer the layer height in proportion to the thread pitch the less the difference will be but remember a thread is cut with a surface finish tolerance better than 0.001 mm. A printer might get close to that for nozzle position accuracy but the final surface created is down to way the melted bead sets over the preceding layer.
There are"smoothing" operations where the hot nozzle with no filament feed passes over an already printed surface to give a "polished" surface but is is slow and I can't imagine it would work on the screw thread.
I note the schraubstock spindle has a special thread form and pitch that keeps the displacement between the bead layer to less than 50% of the print width. Any less and the beads do not stick together at all well. The result of meeting this criteria is a rather "crude" thread form with a distinctly coarse pitch.
Now if you could print in a spiral onto an existing mandrel the thread form and pitch could be whole orders better!
Thanks: Klipkopwildlife
Please Log in or Create an account to join the conversation.
- Magpie
-
- Offline
- Elite Member
-
Less
More
- Posts: 587
- Thank you received: 1048
18 Sep 2025 19:53 #324
by Magpie
Replied by Magpie on topic 3D printing Widgets
I understand & agree with what you say in your first two paragraphs & I think that is the problem I am having.
FreeCad has a Fastener workbench which I haven't managed to get into yet. The pictures show these beautifull threads!
How did you work out the special Schraustock thread information?
I might be doing what you describe in your last paragraph. I sketch a thread profile floating around the cylinder in the YZ axis then link it to some external geometry derived from the circumference of the end of the cylinder and then use an additive helix to generate the thread.
I'll post the link to the video I got it from when I find it again.
Anyway I've an important appointment at 8 oclock!
Thanks: Klipkopwildlife
Please Log in or Create an account to join the conversation.
- Quorneng
-
- Offline
- Forum Master
-
Less
More
- Posts: 9436
- Thank you received: 19043
19 Sep 2025 21:30 #325
by Quorneng
Replied by Quorneng on topic 3D printing Widgets
I tried a part of the spindle thread. It certainly does not make a good job of it!
Quite reasonable on one side with the correct thread form.

But the opposite side is very poor and badly formed.

Printed as a double wall 0.3 line width with a 0.15 layer height.
At the moment I can't see why it is doing this when the moving jaw of the vice printed almost perfectly.
Quite reasonable on one side with the correct thread form.
But the opposite side is very poor and badly formed.
Printed as a double wall 0.3 line width with a 0.15 layer height.
At the moment I can't see why it is doing this when the moving jaw of the vice printed almost perfectly.
Thanks: Klipkopwildlife
Please Log in or Create an account to join the conversation.
- jon.in.swansea
-
- Offline
- Elite Member
-
Less
More
- Posts: 766
- Thank you received: 1192
20 Sep 2025 06:51 #326
by jon.in.swansea
Replied by jon.in.swansea on topic 3D printing Widgets
I wonder if this is the progression of the 'seam' when it rises from layer to layer. If seams were toggled to random would that disperse the minor faults?
Thanks: Klipkopwildlife
Please Log in or Create an account to join the conversation.
- Klipkopwildlife
-
Topic Author
- Offline
- Administrator
-
- I'm supposed to be retired!
20 Sep 2025 09:39 - 20 Sep 2025 12:18 #327
by Klipkopwildlife
Do it now, you may never get another chance
Replied by Klipkopwildlife on topic 3D printing Widgets
I've looked on the net and I can't find anything that boasts a rope thread such as yours.
Do it now, you may never get another chance
Last edit: 20 Sep 2025 12:18 by Klipkopwildlife.
Please Log in or Create an account to join the conversation.
- Quorneng
-
- Offline
- Forum Master
-
Less
More
- Posts: 9436
- Thank you received: 19043
20 Sep 2025 15:27 - 20 Sep 2025 15:38 #328
by Quorneng
Replied by Quorneng on topic 3D printing Widgets
As jon suggests part of the problem is the printing interrupts particularly when they occur when the overlap between beads is a maximum.

Note at particular points on the thread print the bead is only just resting on the preceding layer. I fear that if the nozzle moves to do something else at exactly that point it is quite likely the print will effected when the nozzle returns to continue.
I did some experiments. Three test thread prints.
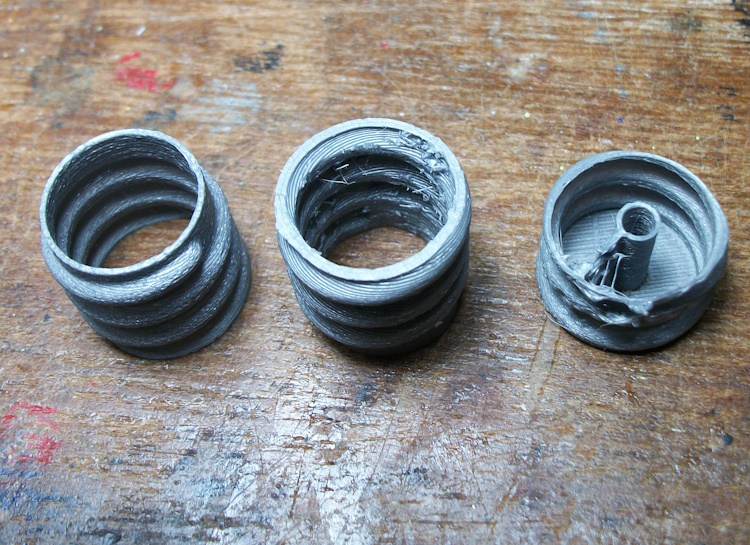
On the right a single wall print, 0.4 line width, 0.15 layer height but the Z seam alignment set to shortest so always at the same point. Clearly the print was significantly effected.
In the middle a similar but double wall print but with the Z alignment set to random. Much better but there is still some difference in the thread form over a part of the circumference.
On the left a single wall "vase" print. In this case the print has no interruption so the bead flow is continuous from the beginning to the end.

The quality and surface finish of the "vase" printed thread is very good although there is a still slight thread distortion in one area. As it is always in the same area my guess is it is down to wear effecting the accuracy.of the printer which becomes significant due to the particular requirements of a thread print.
Indeed I note on the Schraubstock print where the female thread is printed horizontally its top portion has to be omitted to be even printable!

It all does rather confirm my fear that "layer" printing is not an ideal process to create a spiral shape!
ps
On reflection it does make me wonder if "threads" male or female should be printed as separate "inserts" using suitable print parameters and added after the rest has been printed as required .
Just a thought
Note at particular points on the thread print the bead is only just resting on the preceding layer. I fear that if the nozzle moves to do something else at exactly that point it is quite likely the print will effected when the nozzle returns to continue.
I did some experiments. Three test thread prints.
On the right a single wall print, 0.4 line width, 0.15 layer height but the Z seam alignment set to shortest so always at the same point. Clearly the print was significantly effected.
In the middle a similar but double wall print but with the Z alignment set to random. Much better but there is still some difference in the thread form over a part of the circumference.
On the left a single wall "vase" print. In this case the print has no interruption so the bead flow is continuous from the beginning to the end.
The quality and surface finish of the "vase" printed thread is very good although there is a still slight thread distortion in one area. As it is always in the same area my guess is it is down to wear effecting the accuracy.of the printer which becomes significant due to the particular requirements of a thread print.
Indeed I note on the Schraubstock print where the female thread is printed horizontally its top portion has to be omitted to be even printable!
It all does rather confirm my fear that "layer" printing is not an ideal process to create a spiral shape!
ps
On reflection it does make me wonder if "threads" male or female should be printed as separate "inserts" using suitable print parameters and added after the rest has been printed as required .
Just a thought
Last edit: 20 Sep 2025 15:38 by Quorneng.
Thanks: Klipkopwildlife
Please Log in or Create an account to join the conversation.
- Quorneng
-
- Offline
- Forum Master
-
Less
More
- Posts: 9436
- Thank you received: 19043
21 Sep 2025 01:10 #329
by Quorneng
Replied by Quorneng on topic 3D printing Widgets
Not that it would help printing the full spindle but I did create a strong printed "shaft" that would fit inside the single wall "vase" printed thread.

As the inside of all the tread touches the shaft it would plenty strong enough when glued in place like this.

Sometimes printing individual parts and joining them can produces a better result than printing "all at the same time".

.
As the inside of all the tread touches the shaft it would plenty strong enough when glued in place like this.
Sometimes printing individual parts and joining them can produces a better result than printing "all at the same time".
.
Thanks: Klipkopwildlife, jon.in.swansea
Please Log in or Create an account to join the conversation.
- jon.in.swansea
-
- Offline
- Elite Member
-
Less
More
- Posts: 766
- Thank you received: 1192
07 Oct 2025 11:56 - 07 Oct 2025 11:57 #330
by jon.in.swansea
Replied by jon.in.swansea on topic 3D printing Widgets
Nice logical set of experiments. And both the sleeve and the threads have layer-lines in the same orientation.
Vase can do some great things - and it is by definition thin. Might be worth an experiment to up the flow rate so as to get
a thicker extrusion. And also bump the temperature up a couple of degrees to get a better bond between layers.
I would be stronger to have that inner sleeve printed with layer-lines running 90 degrees to the thread. Tricky for the shape.
You might be able to print the sleeve at a 45 degree tilt with only a few lower supports.
Last edit: 07 Oct 2025 11:57 by jon.in.swansea.
Thanks: Klipkopwildlife
Please Log in or Create an account to join the conversation.
Time to create page: 0.669 seconds