
- Posts: 9272
- Thank you received: 2167
×
Here's one for the serious builders. Show us your ideas
Auster mk5
- Ex-Member
- Topic Author
- Visitor
-

16 Oct 2013 17:21 - 16 Oct 2013 17:22 #61
by Ex-Member
Replied by Ex-Member on topic Auster mk5
started curving some balsa for the dash board frame.

glued a couple of uprights in and propped in place.

then we did the bungee mounts for the u/c.

and finally i covered the top of the dash, cut some panels and started the front floor.

the panels are not fixed in as they need to come out for painting and fitting of dials.
next job is to do the rear floor and take a look at some seats.
glued a couple of uprights in and propped in place.
then we did the bungee mounts for the u/c.
and finally i covered the top of the dash, cut some panels and started the front floor.
the panels are not fixed in as they need to come out for painting and fitting of dials.
next job is to do the rear floor and take a look at some seats.
Last edit: 16 Oct 2013 17:22 by Ex-Member.
Please Log in or Create an account to join the conversation.
- Garry Pollard
- Visitor
-
16 Oct 2013 19:42 #62
by Garry Pollard
Replied by Garry Pollard on topic Auster mk5
Just wish i had your skill and expertise Tony. You seem to make light of what you achieve, and decry what work you have done. Us mortals, couldnt come anywhere near this
My 2 penny worth
Garry
My 2 penny worth
Garry
Please Log in or Create an account to join the conversation.
- soloslogger
- Visitor
-
17 Oct 2013 01:31 - 17 Oct 2013 08:00 #63
by soloslogger
 Here here Garry
Replied by soloslogger on topic Auster mk5
Here here Garry
Last edit: 17 Oct 2013 08:00 by Garry Pollard.
Please Log in or Create an account to join the conversation.
- The Beard
-

- Offline
- Forum Master
-

Less
More
17 Oct 2013 04:04 #64
by The Beard
Replied by The Beard on topic Auster mk5
I agree Garry,its such craftsmanship it leaves me amazed
Please Log in or Create an account to join the conversation.
- Ex-Member
- Topic Author
- Visitor
-
17 Oct 2013 09:38 #65
by Ex-Member
Replied by Ex-Member on topic Auster mk5
you are as mad as a box of frogs. 
debating what to do today.
debating what to do today.
Please Log in or Create an account to join the conversation.
- The Beard
-
- Offline
- Forum Master
-
Less
More
- Posts: 9272
- Thank you received: 2167
17 Oct 2013 10:03 #66
by The Beard
Replied by The Beard on topic Auster mk5
Very true Tony,but your the one still married aha got you there. ![[badass]](/media/kunena/emoticons/bad_boys_20.gif "[badass]")
Please Log in or Create an account to join the conversation.
- Ex-Member
- Topic Author
- Visitor
-
17 Oct 2013 18:21 #67
by Ex-Member
Replied by Ex-Member on topic Auster mk5
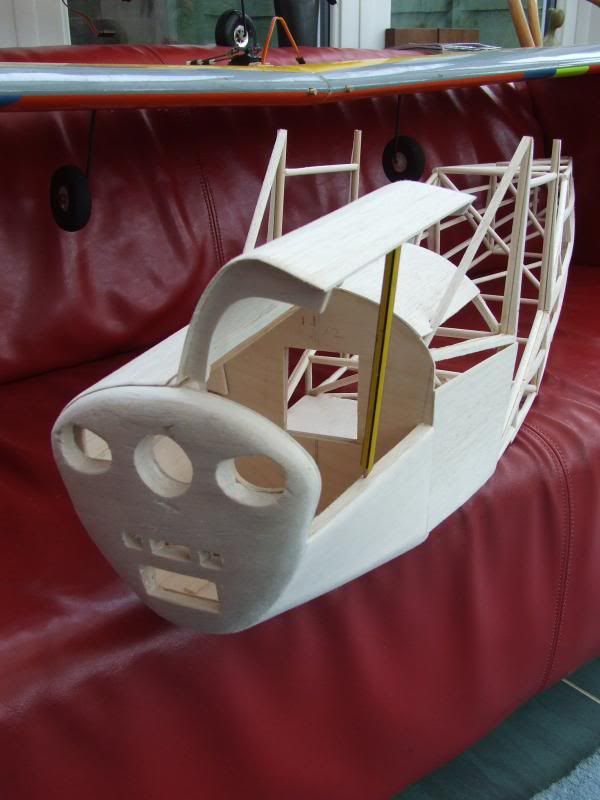
well it has been problems all the way today.
the nose area was wrong so i have had to hack it all about and start again.

the top was to narrow and i had not allowed for lipo placement.
still we are back on track again now (isn't model building fun)
ply cut for the nose and F3, F2 the motor mount still has to be sorted, need the motor first though, then i can finish the battery tray.
planked all the bottom of the engine bay as it was a nice compound shape.


i hope to look at the top of the engine bay tomorrow and sort out the battery hatch.
thinking of having it open like on the original with a lift out section to slide the battery in.
i think i have some litho plate somewhere to make up the hinged panels.
might think about hiding the motor and battery under a fake engine like wot it has in the original.
the nose area was wrong so i have had to hack it all about and start again.
the top was to narrow and i had not allowed for lipo placement.
still we are back on track again now (isn't model building fun)
ply cut for the nose and F3, F2 the motor mount still has to be sorted, need the motor first though, then i can finish the battery tray.
planked all the bottom of the engine bay as it was a nice compound shape.
i hope to look at the top of the engine bay tomorrow and sort out the battery hatch.
thinking of having it open like on the original with a lift out section to slide the battery in.
i think i have some litho plate somewhere to make up the hinged panels.
might think about hiding the motor and battery under a fake engine like wot it has in the original.
Please Log in or Create an account to join the conversation.
- old fart
-

- Offline
- Forum Veteran
-

Less
More
- Posts: 2571
- Thank you received: 705
17 Oct 2013 19:37 #68
by old fart
There is nothing like a dream to create the future.
Electrickery is the work of the devil.
Replied by old fart on topic Auster mk5
It looks like it has an angry face. 
Looking great though.
Looking great though.
There is nothing like a dream to create the future.
Electrickery is the work of the devil.
Thanks: Sarah-Jane Smith
Please Log in or Create an account to join the conversation.
- alan cantwell
-

- Offline
- Inactivated User
-

Less
More
- Posts: 2290
- Thank you received: 1918
17 Oct 2013 19:59 #69
by alan cantwell
i have 2 sides
no you dont,
yes i do,
Replied by alan cantwell on topic Auster mk5
Looks like ET, what are you using for glue, and are they balsa, or dowel, or a bit of both,
i have 2 sides
no you dont,
yes i do,
Thanks: Sarah-Jane Smith
Please Log in or Create an account to join the conversation.
- Ex-Member
- Visitor
-
17 Oct 2013 20:28 #70
by Ex-Member
The subject aircraft has a rather happy face actually....... Say otherwise and you'll incur the wrath of the owner - My Missus!
Replied by Ex-Member on topic Auster mk5
Old Fart wrote: It looks like it has an angry face.
Looking great though.
The subject aircraft has a rather happy face actually....... Say otherwise and you'll incur the wrath of the owner - My Missus!
Please Log in or Create an account to join the conversation.
- Ex-Member
- Topic Author
- Visitor
-
17 Oct 2013 21:43 #71
by Ex-Member
Replied by Ex-Member on topic Auster mk5
it look better when she has her nose and top on. i hope anyway.
Please Log in or Create an account to join the conversation.
- Ex-Member
- Topic Author
- Visitor
-
18 Oct 2013 17:09 #72
by Ex-Member
Replied by Ex-Member on topic Auster mk5
well today has been a game of two halves.
carved the nose and i think it is nearly right.

Had a think about the engine compartment doors, tried some litho plate but i could not get it to look right.
so i went back to planking.

i made up some brackets to hold a hardwood support down the middle of the area and then cut out some formers.
lots of planking later.

and they open

not the greatest of jobs, but i like them.
carved the nose and i think it is nearly right.
Had a think about the engine compartment doors, tried some litho plate but i could not get it to look right.
so i went back to planking.
i made up some brackets to hold a hardwood support down the middle of the area and then cut out some formers.
lots of planking later.
and they open
not the greatest of jobs, but i like them.
Please Log in or Create an account to join the conversation.
- The Beard
-
- Offline
- Forum Master
-
Less
More
- Posts: 9272
- Thank you received: 2167
18 Oct 2013 17:17 #73
by The Beard
Replied by The Beard on topic Auster mk5
Stop being modest for goodness sake thats brilliant,us mere mortals bow to such genius
Please Log in or Create an account to join the conversation.
- alan cantwell
-
- Offline
- Inactivated User
-
Less
More
- Posts: 2290
- Thank you received: 1918
18 Oct 2013 20:19 #74
by alan cantwell
i have 2 sides
no you dont,
yes i do,
Replied by alan cantwell on topic Auster mk5
OY answer me question about the dowel, or i will move in with you,
i have 2 sides
no you dont,
yes i do,
Please Log in or Create an account to join the conversation.
- Ex-Member
- Topic Author
- Visitor
-
18 Oct 2013 20:40 #75
by Ex-Member
Replied by Ex-Member on topic Auster mk5
you would be more than welcome Alan.
balsa dowel and spruce dowel where extra strength is needed, lets just hope it all works.
balsa dowel and spruce dowel where extra strength is needed, lets just hope it all works.
Please Log in or Create an account to join the conversation.
Time to create page: 0.332 seconds