
- Posts: 524
- Thank you received: 1476
Fairey Firefly MK5 from Vance Mosher plan
- Ralpharr2001
-
 Topic Author
- Offline
- Elite Member
-

Less
More
01 Aug 2017 13:24 - 01 Aug 2017 13:29 #1
by Ralpharr2001
I'm currently unsupervised. I know it freaks me out as well, but the possibilities are endless!!
Fairey Firefly MK5 from Vance Mosher plan was created by Ralpharr2001
Started my next project an 81" wingspan Fairey Firefly by Vance Mosher of Vanguard Plans (www.vanvan.us). Yes I know the Gannet is still under construction, as is the Curare!! :dry: But one cannot have too many projects on the go!! :P Besides the Firefly has been fully designed and I don't need to design or change anything so it should be quite straight forward. :lol: :lol:
My father was HMAS Sydney during the Korean war and worked on the Firefly. Hence my interest in this subject. I did start this model a number of years ago but had two house moves since then and what I had built has got damaged/lost/deformed. So i'm going to start afresh. It is an 81" wingspan model. I am going to install electric power rather than an oil burner.

Sadly Vance has passed away so the the plans, laser kits and parts have been taken over by Chuck Greaves. Chuck was very helpful getting my order sorted and shipped. I sent away for the plans, build instructions and the laser cut parts which arrived from the USA 2 weeks from order.The plans are on 4 sheets, very informative and detailed. Laser cut pack is very good with just a few laser burn marks. Nothing a wipe over with sandpaper won't sort.
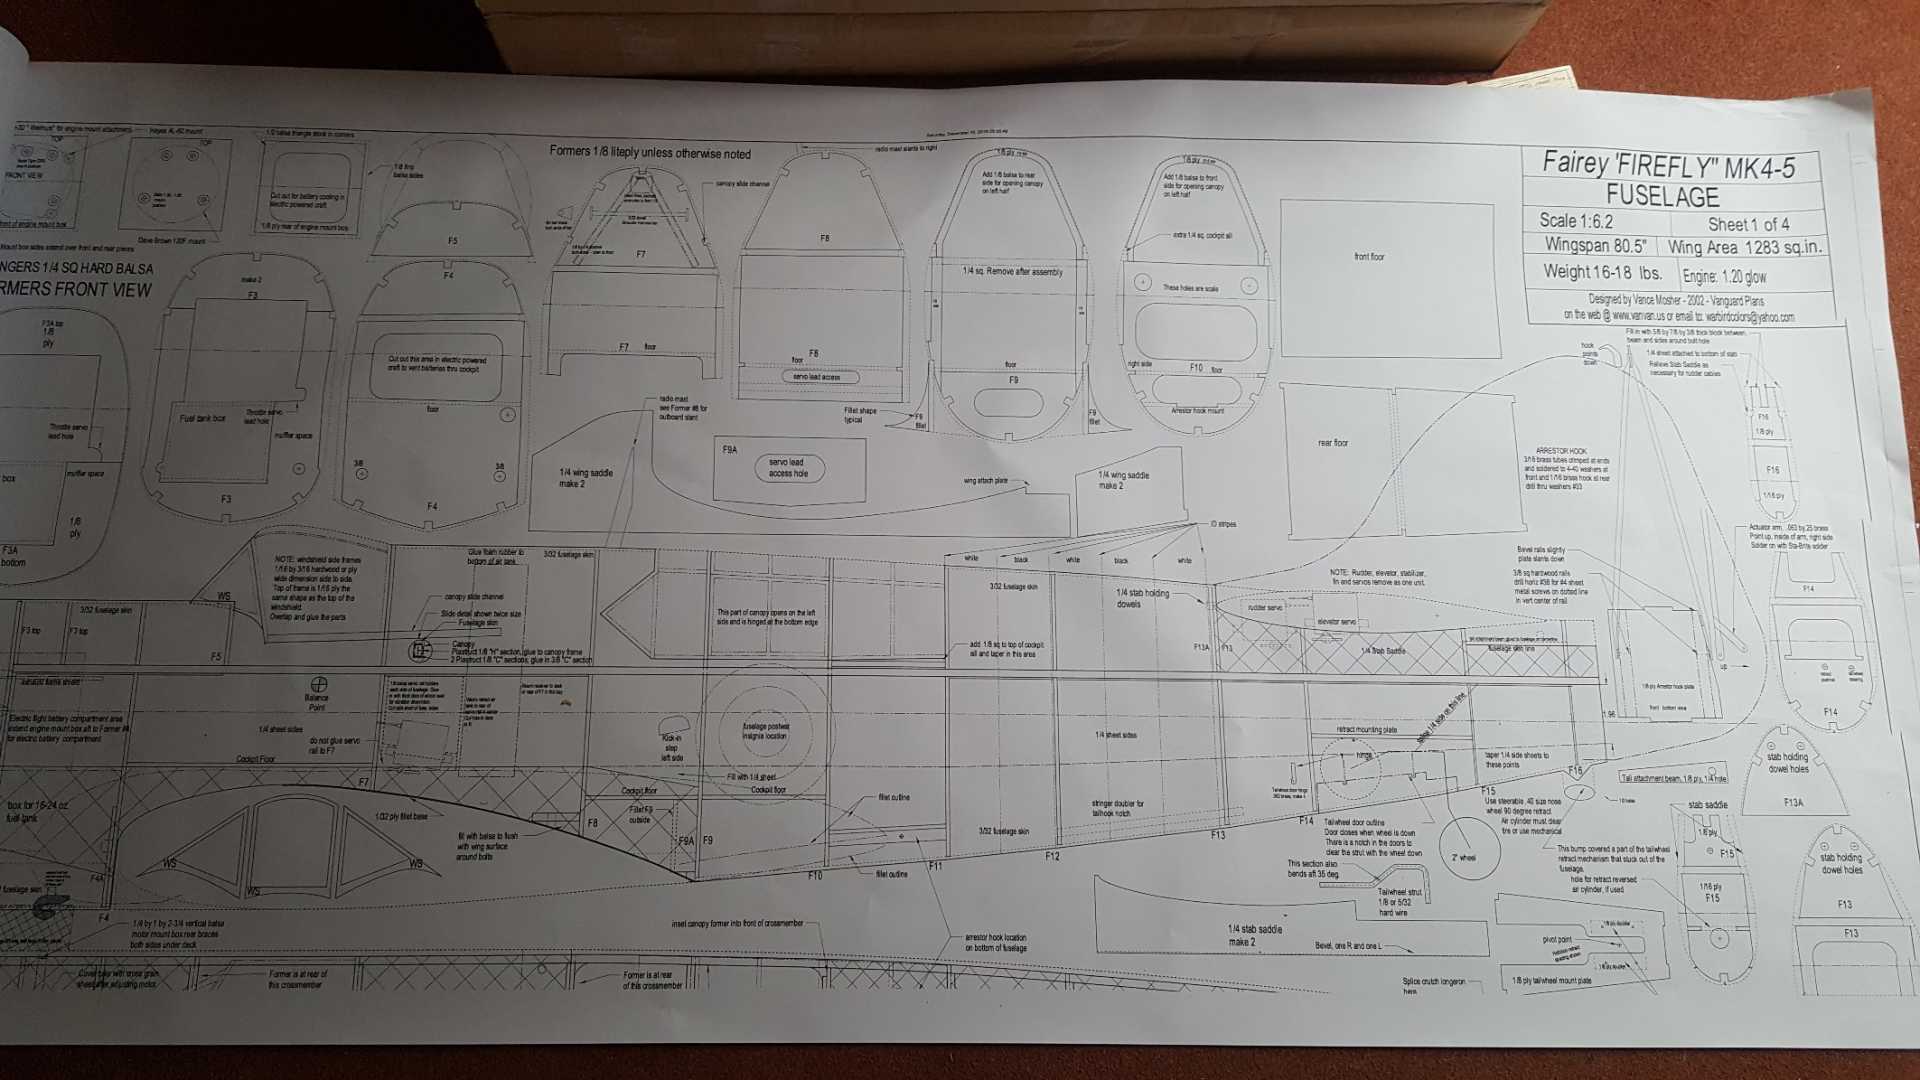
Assembled to bottom of the fuselage over the weekend. The design is a centre (1/4" sq balsa) crutch onto which the lower and upper formers are added. Then the fuselage sheeted with 1/16" balsa.

Retracts are on order. Vance has a specially designed set of air operated retracts but I prefer electric servoless type so have sourced them elswhere. I've yet to sort motor and servos.
My father was HMAS Sydney during the Korean war and worked on the Firefly. Hence my interest in this subject. I did start this model a number of years ago but had two house moves since then and what I had built has got damaged/lost/deformed. So i'm going to start afresh. It is an 81" wingspan model. I am going to install electric power rather than an oil burner.
Sadly Vance has passed away so the the plans, laser kits and parts have been taken over by Chuck Greaves. Chuck was very helpful getting my order sorted and shipped. I sent away for the plans, build instructions and the laser cut parts which arrived from the USA 2 weeks from order.The plans are on 4 sheets, very informative and detailed. Laser cut pack is very good with just a few laser burn marks. Nothing a wipe over with sandpaper won't sort.
Assembled to bottom of the fuselage over the weekend. The design is a centre (1/4" sq balsa) crutch onto which the lower and upper formers are added. Then the fuselage sheeted with 1/16" balsa.
Retracts are on order. Vance has a specially designed set of air operated retracts but I prefer electric servoless type so have sourced them elswhere. I've yet to sort motor and servos.
I'm currently unsupervised. I know it freaks me out as well, but the possibilities are endless!!
Last edit: 01 Aug 2017 13:29 by Ralpharr2001.
Thanks: Klipkopwildlife, Quorneng, blue123, Fly-Navy, one tenor, boz, Firewood, Nigel and 1 other people also said thanks.
Please Log in or Create an account to join the conversation.
- Mike Rolls
-

- Offline
- Elite Member
-
Less
More
- Posts: 698
- Thank you received: 573
01 Aug 2017 14:06 #2
by Mike Rolls
The older I get, the better I was!
Replied by Mike Rolls on topic Fairey Firefly MK5 from Vance Mosher plan
Looks good!
Mike
Mike
The older I get, the better I was!
Thanks: Ralpharr2001
Please Log in or Create an account to join the conversation.
- Ex-Member
- Visitor
-

01 Aug 2017 15:50 #3
by Ex-Member
Replied by Ex-Member on topic Fairey Firefly MK5 from Vance Mosher plan
Lovely aircraft.
should be a beauty when she is finished.
look forward to following your build thread.
Tony B
should be a beauty when she is finished.
look forward to following your build thread.
Tony B
Please Log in or Create an account to join the conversation.
- Fly-Navy
-
- Offline
- Elite Member
-
Less
More
- Posts: 355
- Thank you received: 295
01 Aug 2017 19:34 #4
by Fly-Navy
Now that I am older it seemed nice I have more patience.
Turns out "I don't give a s**t "
Replied by Fly-Navy on topic Fairey Firefly MK5 from Vance Mosher plan
Now your talking Ralph, been waiting a long time for this one to arrive in one of your builds. Beautiful looking a/c and not modelled enough in my opinion. Eagerly awaiting further posts, are you sure we cannot tempt you to install a noisy smelly thing?????????
Now that I am older it seemed nice I have more patience.
Turns out "I don't give a s**t "
Thanks: Ralpharr2001
Please Log in or Create an account to join the conversation.
- Squirrelnet
- Offline
- Elite Member
-
Less
More
- Posts: 809
- Thank you received: 2067
01 Aug 2017 21:24 #5
by Squirrelnet
Replied by Squirrelnet on topic Fairey Firefly MK5 from Vance Mosher plan
As the others have said nice interesting prototype that looks like it will make a great model, I can see your attraction to it.
Looking forward to seeing this one develop
Looking forward to seeing this one develop
Thanks: Ralpharr2001
Please Log in or Create an account to join the conversation.
- Ralpharr2001
-
Topic Author
- Offline
- Elite Member
-
Less
More
- Posts: 524
- Thank you received: 1476
01 Aug 2017 21:33 #6
by Ralpharr2001
Definitely not!! But it will have a sound system on board to make the right Griffon noises.
I'm currently unsupervised. I know it freaks me out as well, but the possibilities are endless!!
Replied by Ralpharr2001 on topic Fairey Firefly MK5 from Vance Mosher plan
Fly-Navy wrote: Now your talking Ralph, been waiting a long time for this one to arrive in one of your builds. Beautiful looking a/c and not modelled enough in my opinion. Eagerly awaiting further posts, are you sure we cannot tempt you to install a noisy smelly thing?????????
Definitely not!!
But it will have a sound system on board to make the right Griffon noises. I'm currently unsupervised. I know it freaks me out as well, but the possibilities are endless!!
Thanks: Fly-Navy
Please Log in or Create an account to join the conversation.
- Fly-Navy
-
- Offline
- Elite Member
-
Less
More
- Posts: 355
- Thank you received: 295
01 Aug 2017 22:50 - 01 Aug 2017 22:53 #7
by Fly-Navy
Now that I am older it seemed nice I have more patience.
Turns out "I don't give a s**t "
Replied by Fly-Navy on topic Fairey Firefly MK5 from Vance Mosher plan
Will let you off then, tried to put engine run up youtube in post but no joy.
Well I was a fly boy matelot, my excuse anyway
Well I was a fly boy matelot, my excuse anyway
Now that I am older it seemed nice I have more patience.
Turns out "I don't give a s**t "
Last edit: 01 Aug 2017 22:53 by Fly-Navy.
Thanks: Ralpharr2001
Please Log in or Create an account to join the conversation.
- boz
-

- Offline
- Platinum Member
-

Less
More
- Posts: 1392
- Thank you received: 1420
02 Aug 2017 04:00 #8
by boz
Replied by boz on topic Fairey Firefly MK5 from Vance Mosher plan
Looking forward to this build, along with your others, boz. 
Thanks: Ralpharr2001
Please Log in or Create an account to join the conversation.
- one tenor
-

- Offline
- Forum Veteran
-

- johnpcalex@gmail.com
02 Aug 2017 04:21 #9
by one tenor
Anything will fly given enough power
Replied by one tenor on topic Fairey Firefly MK5 from Vance Mosher plan
Likewise for me too John
Anything will fly given enough power
Thanks: Ralpharr2001
Please Log in or Create an account to join the conversation.
- Ralpharr2001
-
Topic Author
- Offline
- Elite Member
-
Less
More
- Posts: 524
- Thank you received: 1476
04 Aug 2017 21:04 - 04 Aug 2017 21:05 #10
by Ralpharr2001
I'm currently unsupervised. I know it freaks me out as well, but the possibilities are endless!!
Replied by Ralpharr2001 on topic Fairey Firefly MK5 from Vance Mosher plan
oooooh!! Look what the postman delivered today while I was at work. 
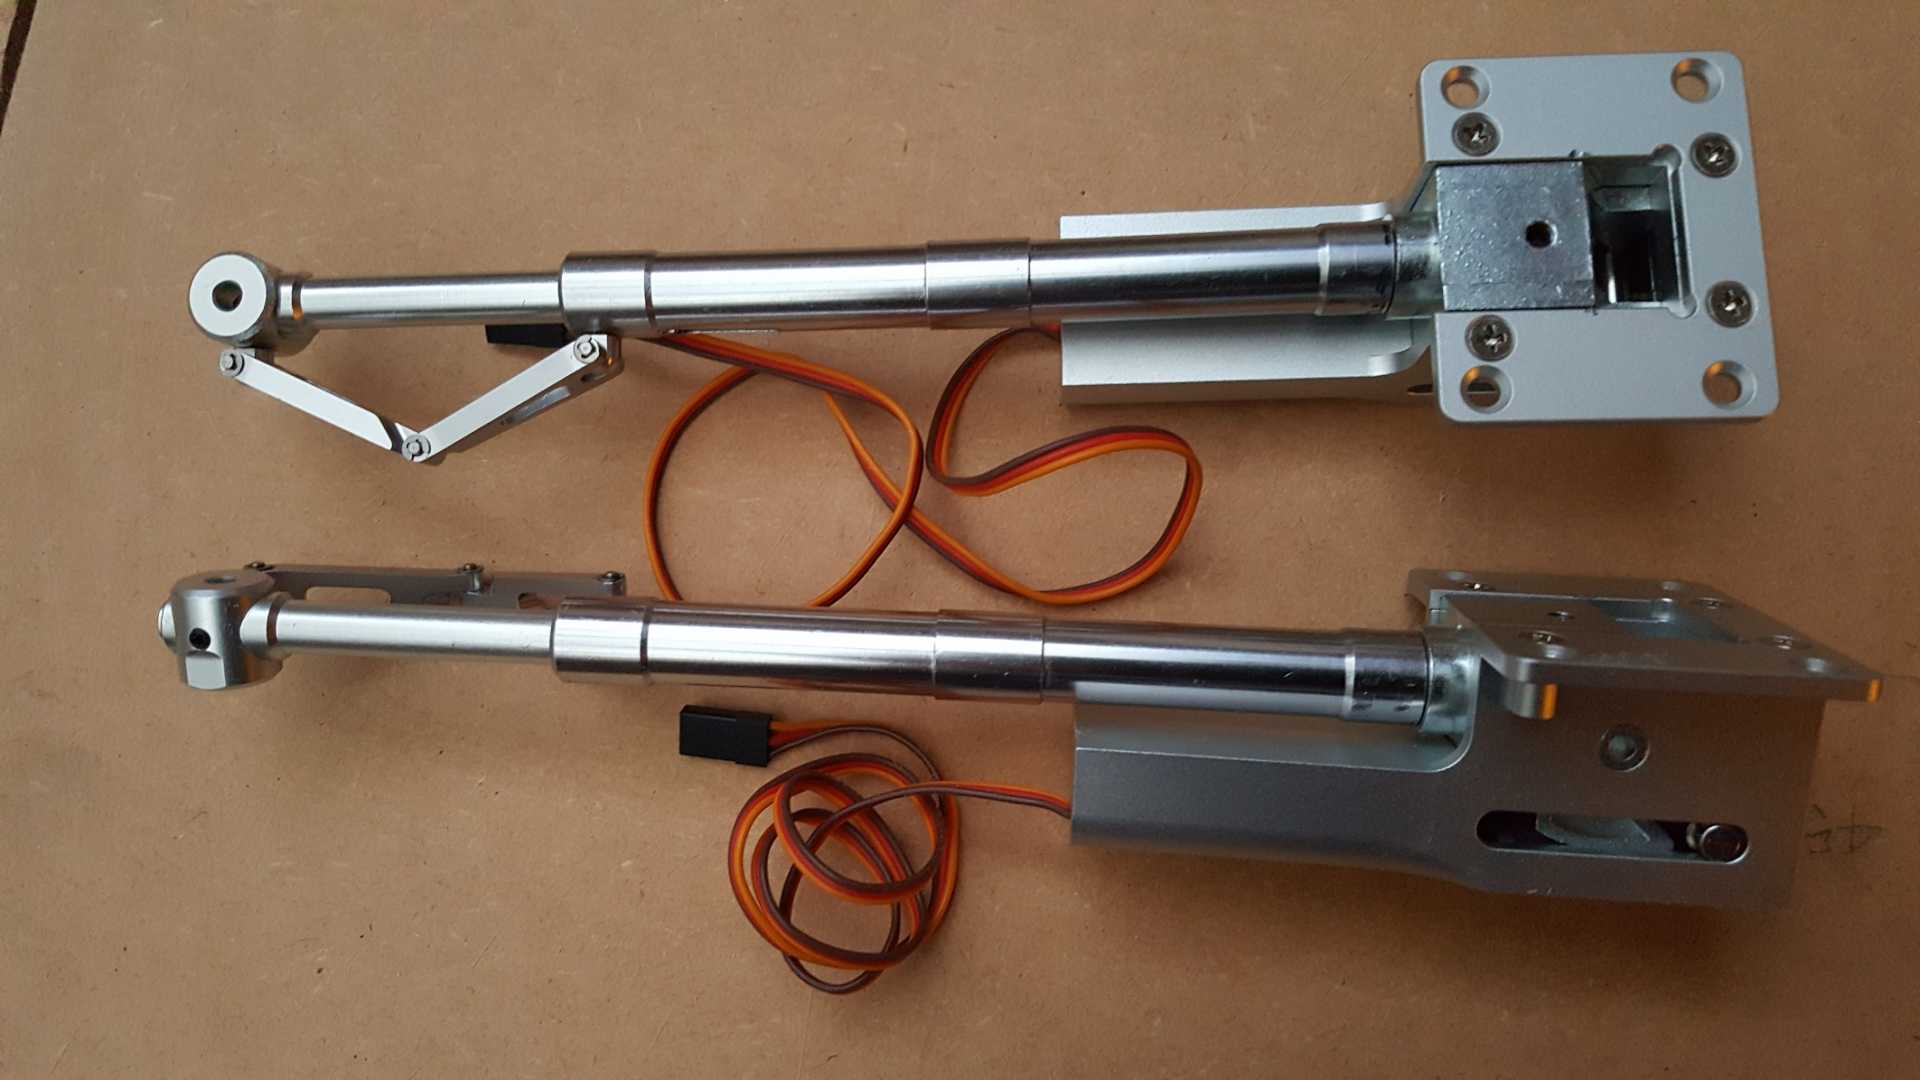
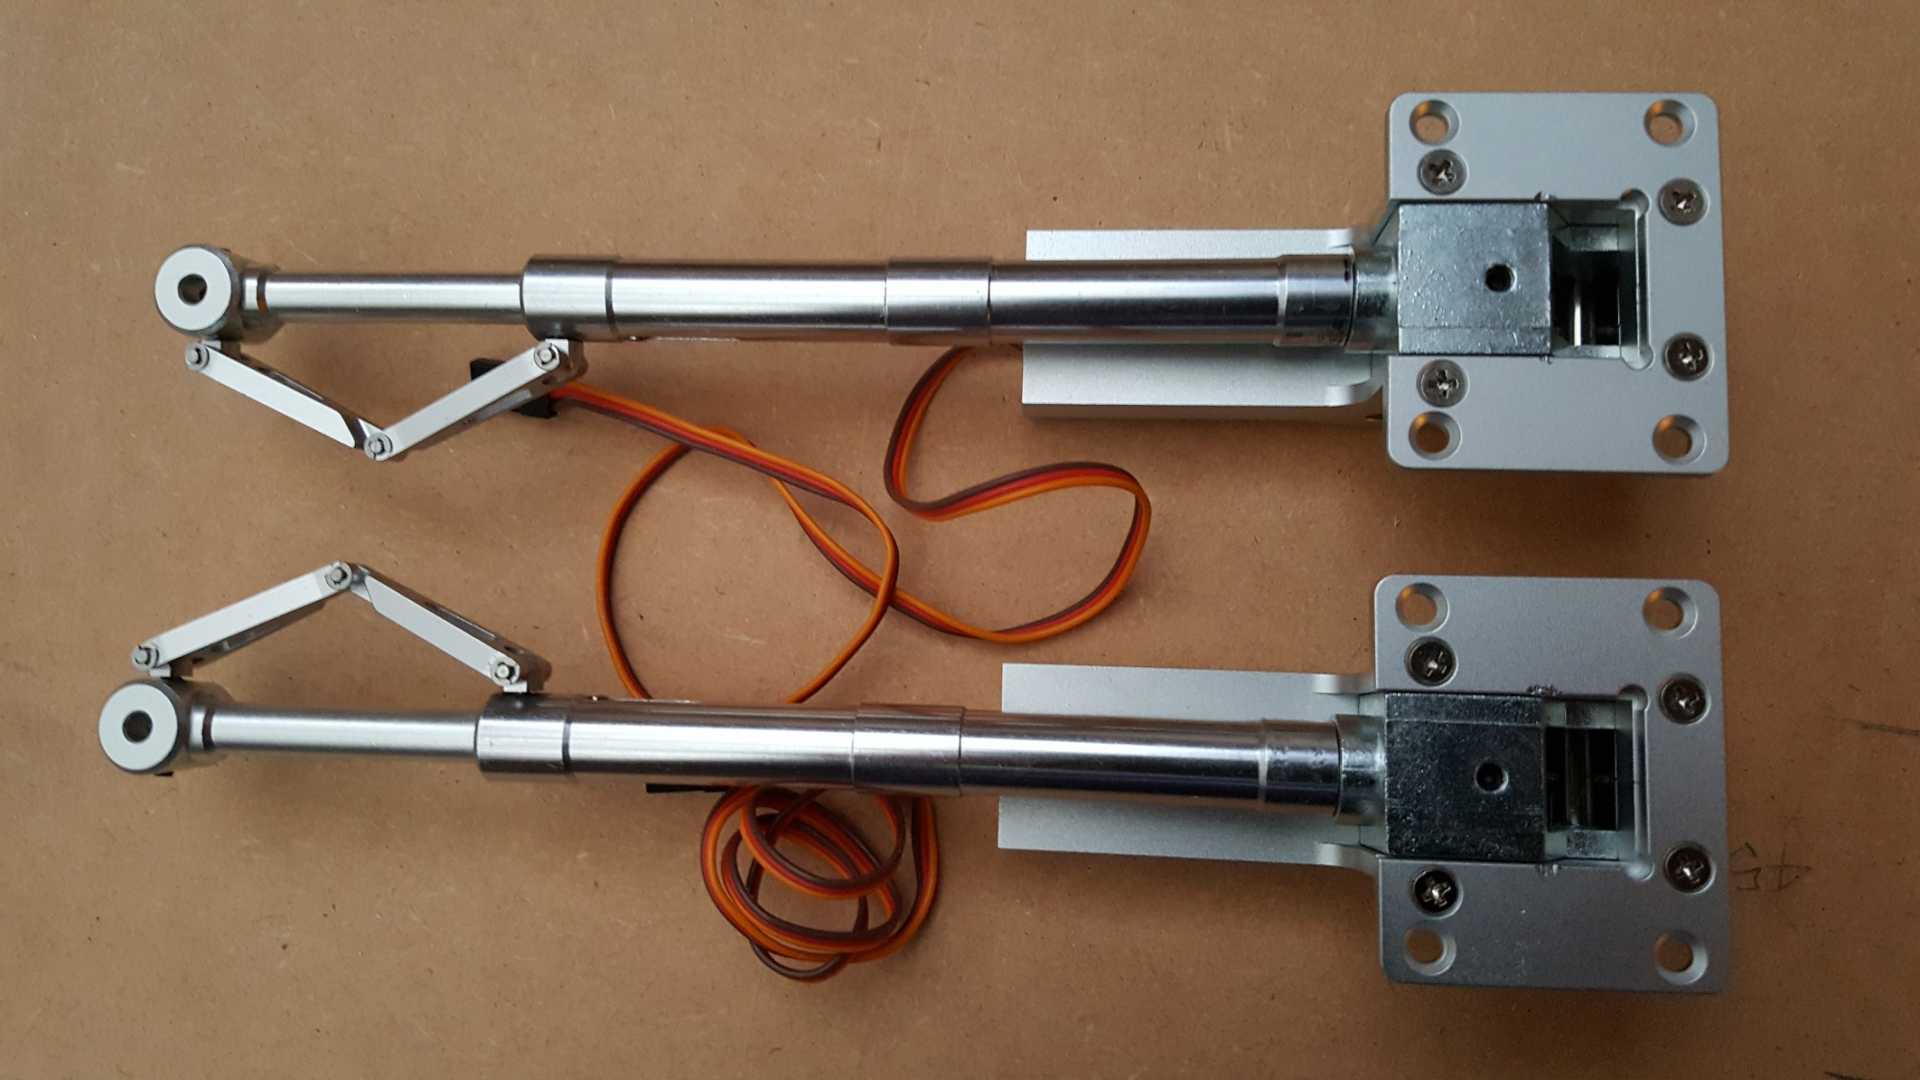
These servoless retracts are rated for 8 - 10kg models so just the ticket as the model is going to be approx 16lb. The action is very smooth. The oleo's were separate to the retract units and slightly longer than required. So I put them in the lathe tonight to get the pivot to axle length correct. Took 20 minutes but they are spot on to the plan. They will need a bit of dressing up to get the scale look but a great starting point. If ever there was an incentive to build a wing these are it.
Not working tomorrow so I can crack on with the build. My sheet balsa order has arrived from Balsa Cabin so I have everything I need to complete the air frame. Only a few things left to buy, motor and ESC and I'm not decided whether to go Hacker or something else. The sound system has been sourced and I will get that at the end of the month.
These servoless retracts are rated for 8 - 10kg models so just the ticket as the model is going to be approx 16lb. The action is very smooth. The oleo's were separate to the retract units and slightly longer than required. So I put them in the lathe tonight to get the pivot to axle length correct. Took 20 minutes but they are spot on to the plan. They will need a bit of dressing up to get the scale look but a great starting point. If ever there was an incentive to build a wing these are it.
Not working tomorrow so I can crack on with the build. My sheet balsa order has arrived from Balsa Cabin so I have everything I need to complete the air frame. Only a few things left to buy, motor and ESC and I'm not decided whether to go Hacker or something else. The sound system has been sourced and I will get that at the end of the month.
I'm currently unsupervised. I know it freaks me out as well, but the possibilities are endless!!
Last edit: 04 Aug 2017 21:05 by Ralpharr2001.
Thanks: Ex-Member, Quorneng, blue123, boz, Squirrelnet
Please Log in or Create an account to join the conversation.
- Ex-Member
- Visitor
-
04 Aug 2017 21:10 #11
by Ex-Member
Replied by Ex-Member on topic Fairey Firefly MK5 from Vance Mosher plan
They look nice young man.
now where are the build pictures.
Tony B
now where are the build pictures.
Tony B
Please Log in or Create an account to join the conversation.
- Squirrelnet
- Offline
- Elite Member
-
Less
More
- Posts: 809
- Thank you received: 2067
04 Aug 2017 21:32 #12
by Squirrelnet
Replied by Squirrelnet on topic Fairey Firefly MK5 from Vance Mosher plan
They look like very nicely made retracts Ralph, can't wait to see more 
Thanks: Ralpharr2001
Please Log in or Create an account to join the conversation.
- boz
-
- Offline
- Platinum Member
-
Less
More
- Posts: 1392
- Thank you received: 1420
05 Aug 2017 07:08 #13
by boz
Replied by boz on topic Fairey Firefly MK5 from Vance Mosher plan
Very nice teaser, (you naughty boy), post 1 picture then leave us wanting more. 
Please Log in or Create an account to join the conversation.
- Ralpharr2001
-
Topic Author
- Offline
- Elite Member
-
Less
More
- Posts: 524
- Thank you received: 1476
05 Aug 2017 17:44 #14
by Ralpharr2001
I'm currently unsupervised. I know it freaks me out as well, but the possibilities are endless!!
Replied by Ralpharr2001 on topic Fairey Firefly MK5 from Vance Mosher plan
Here's another teaser, and build photo's for Tony.
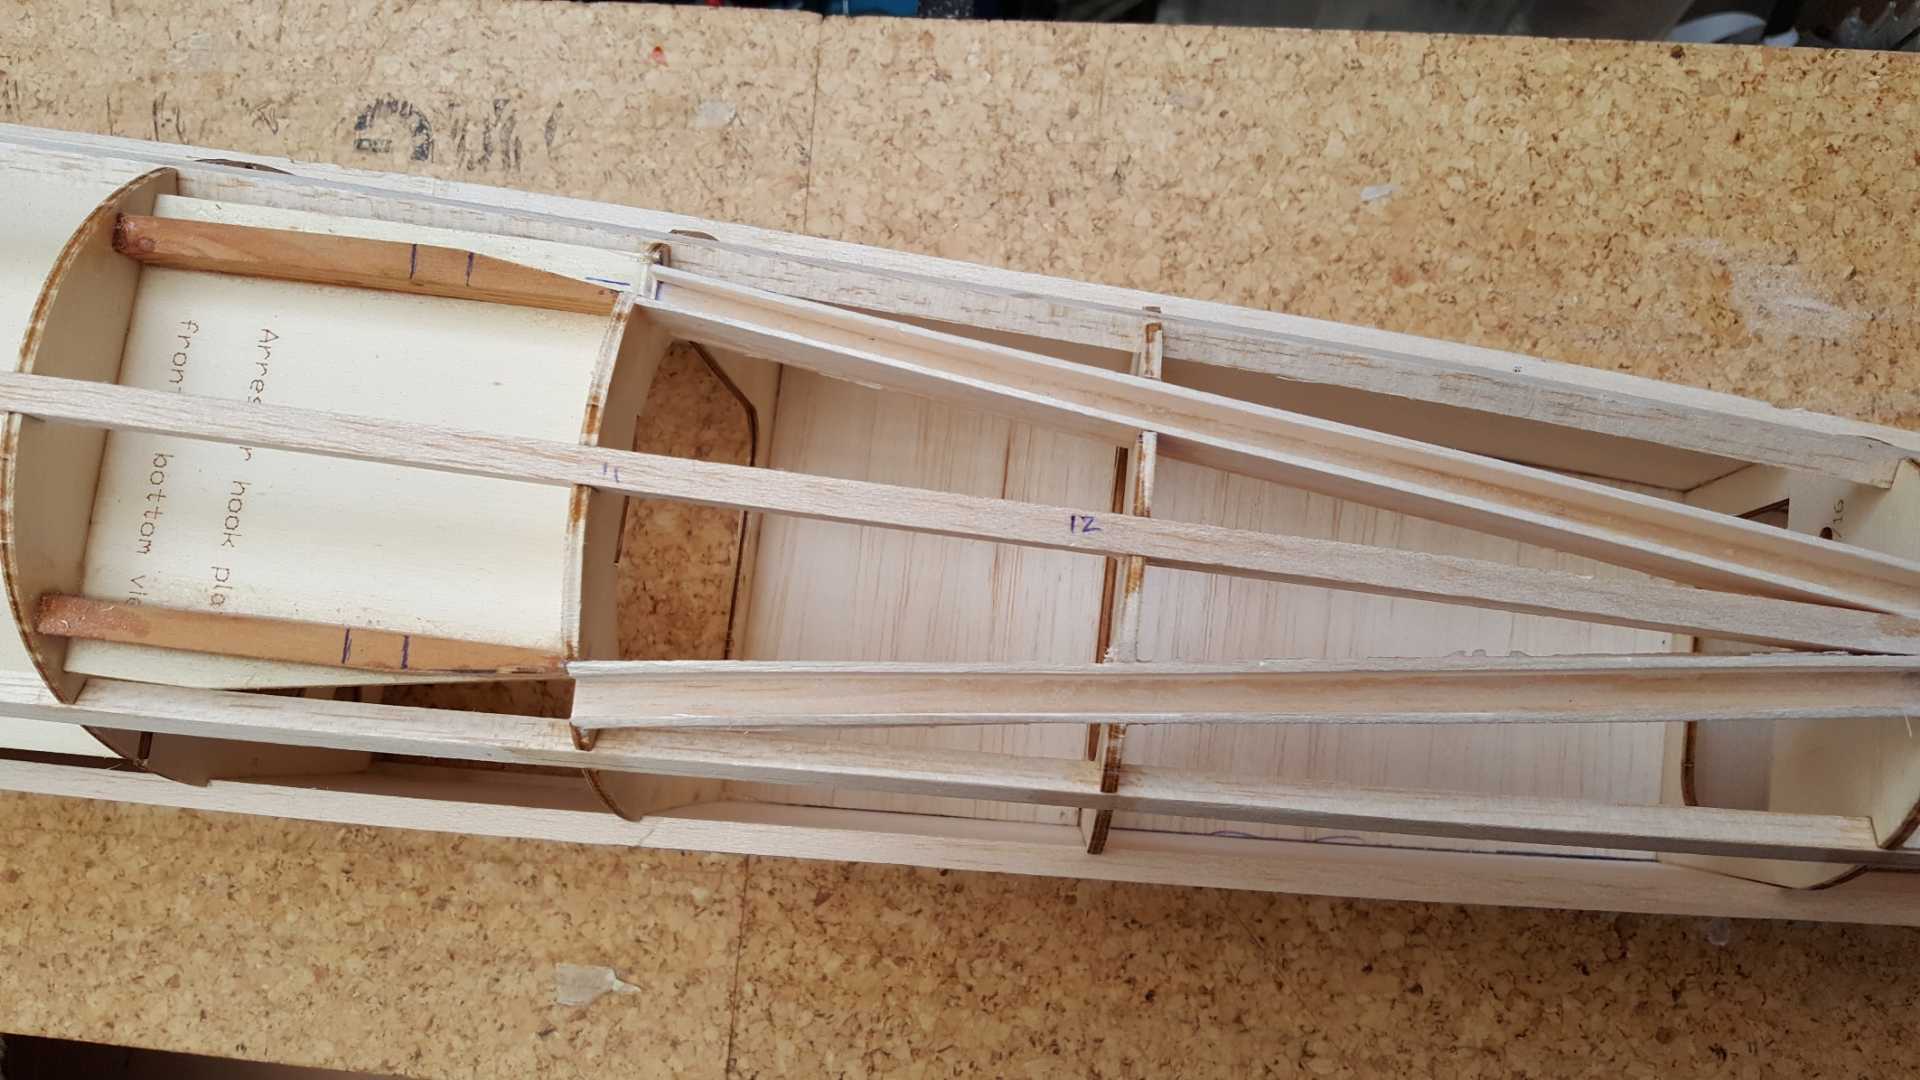
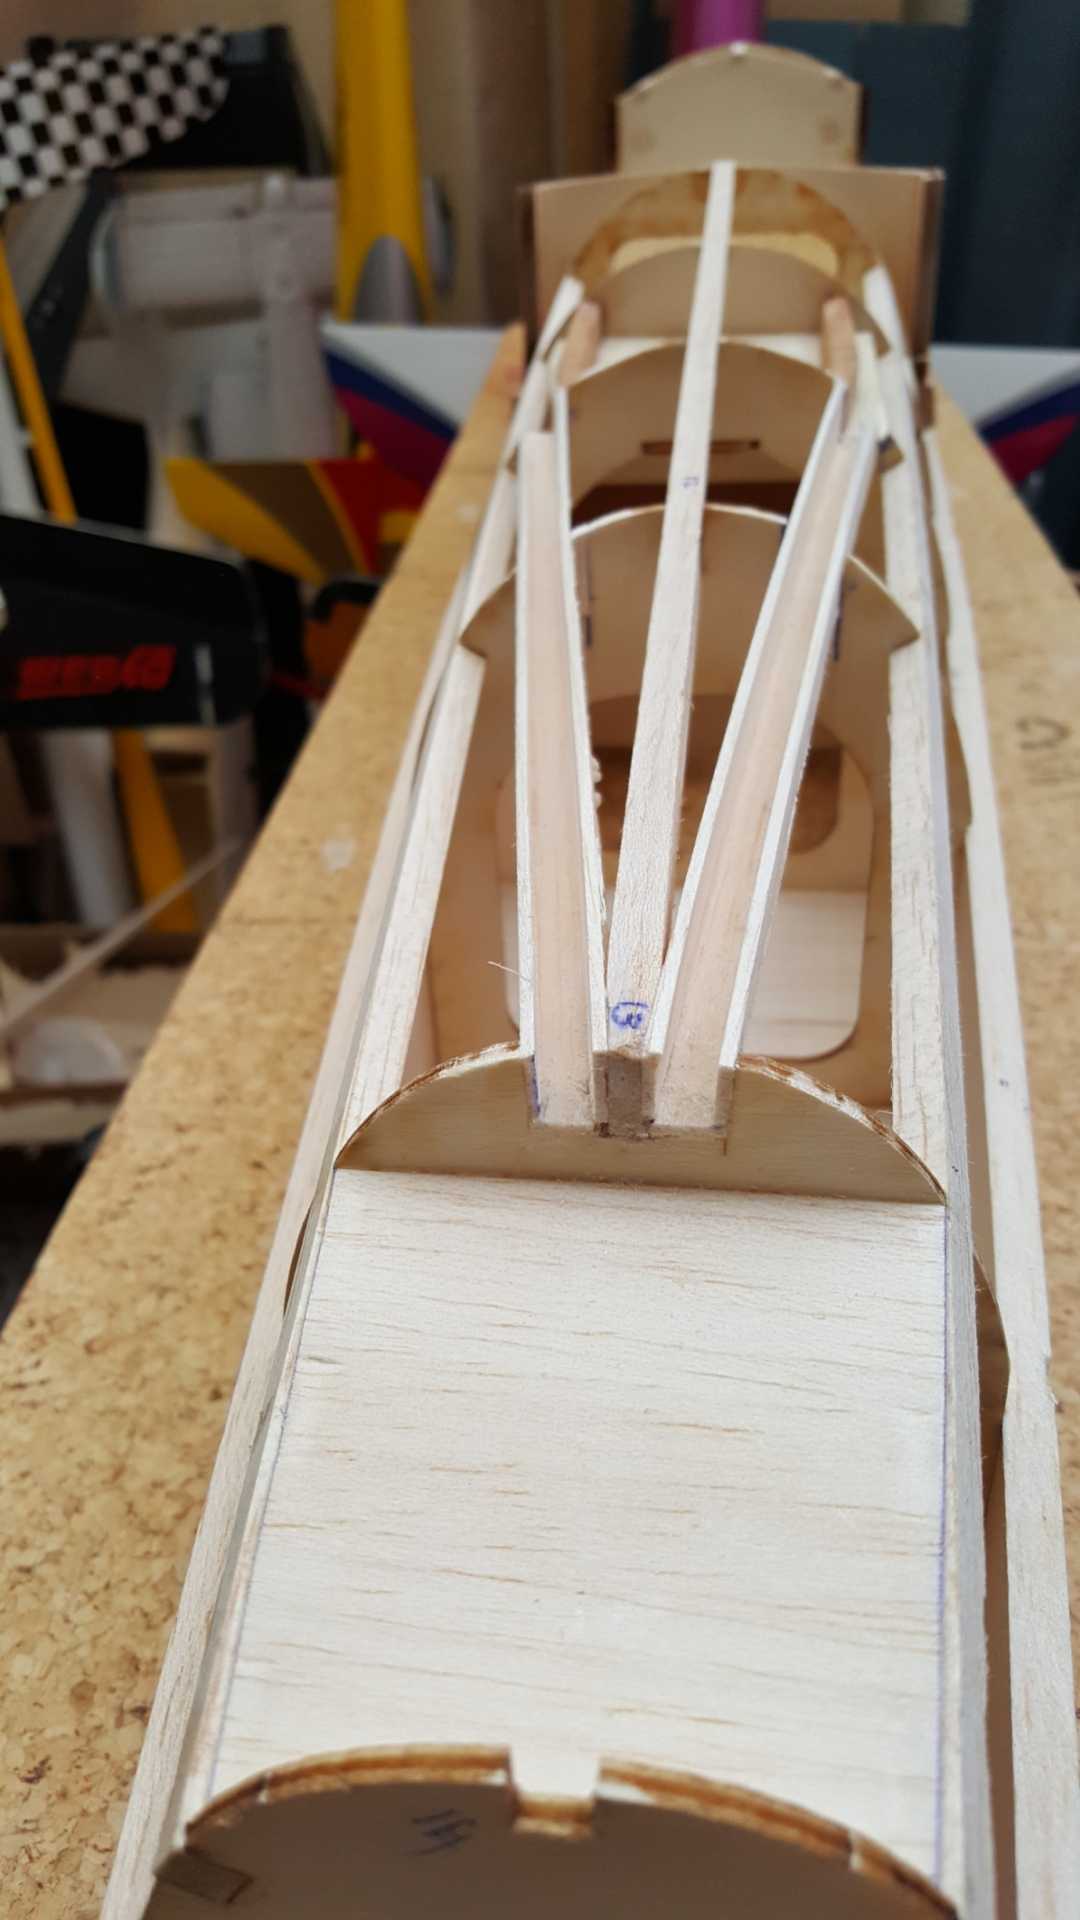
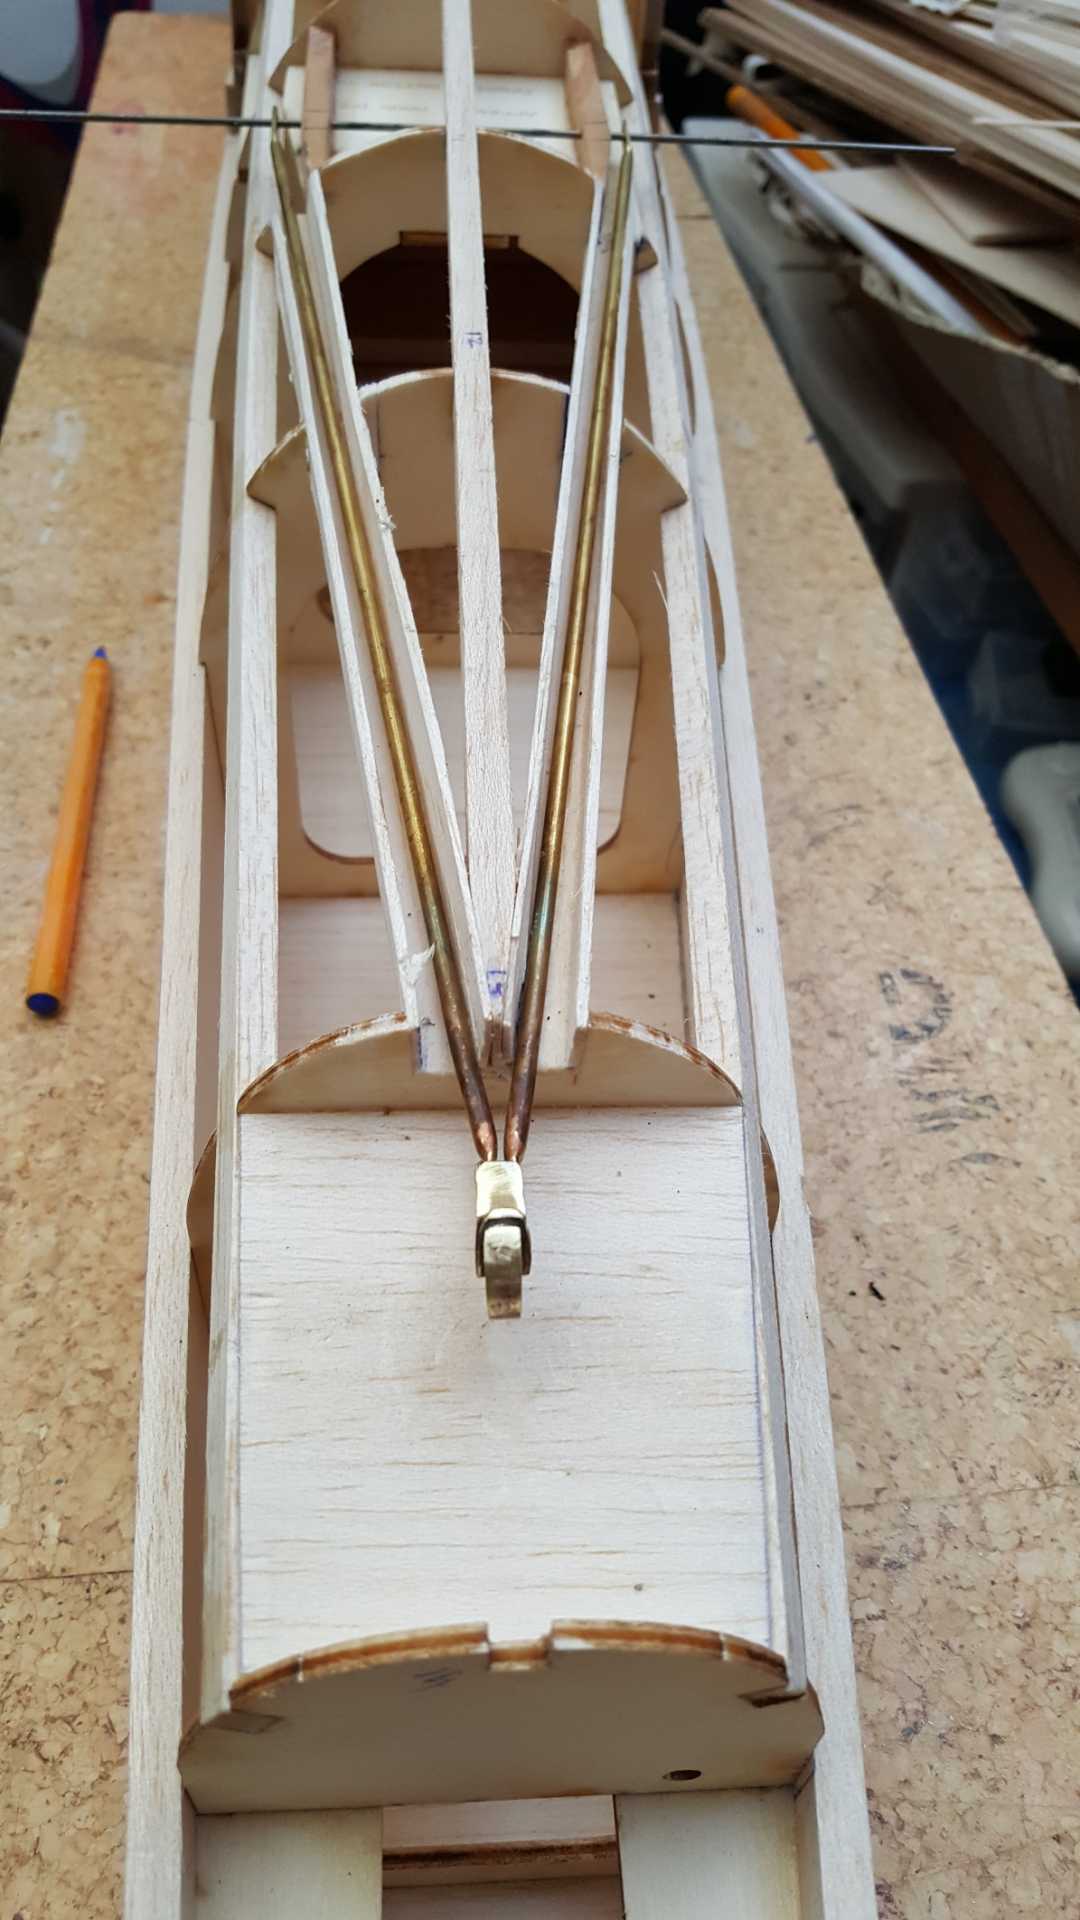
Got on well today. The bottom section of the fuse is pretty well built, just sheeting to do. As you can see the laser cut parts go together very well. Remember, the photos show the bottom half of the fuselage as first it is built upside down. When all the sheeting is done I will turn it over and build the top onto this bottom section.


As expected I have already deviated from the design!! I have built in the arrestor hook troughs that allow the arms of the hook to sit inside the fuselage. I have also modified the section where the hook sits to be more scale. Yes the hook will be operated by a servo.
This is a picture of the full size. You can see what i'm trying to replicate.

Got on well today. The bottom section of the fuse is pretty well built, just sheeting to do. As you can see the laser cut parts go together very well. Remember, the photos show the bottom half of the fuselage as first it is built upside down. When all the sheeting is done I will turn it over and build the top onto this bottom section.
As expected I have already deviated from the design!!
I have built in the arrestor hook troughs that allow the arms of the hook to sit inside the fuselage. I have also modified the section where the hook sits to be more scale. Yes the hook will be operated by a servo.
This is a picture of the full size. You can see what i'm trying to replicate.
I'm currently unsupervised. I know it freaks me out as well, but the possibilities are endless!!
Thanks: Ex-Member, Quorneng, blue123, boz, Firewood, Squirrelnet
Please Log in or Create an account to join the conversation.
- Ralpharr2001
-
Topic Author
- Offline
- Elite Member
-
Less
More
- Posts: 524
- Thank you received: 1476
08 Aug 2017 19:56 #15
by Ralpharr2001
I'm currently unsupervised. I know it freaks me out as well, but the possibilities are endless!!
Replied by Ralpharr2001 on topic Fairey Firefly MK5 from Vance Mosher plan
Had a break from balsa bashing and did a bit of brass bashing instead. Made the tail hook arms and hook.
First step was to make the arms by flattening each end, drilling holes for the pivot pins and cutting the hook. The whole assembly was then silver soldered together.

Then I added some thin brass sheet to form the inner and out flange which was soft soldered into place.
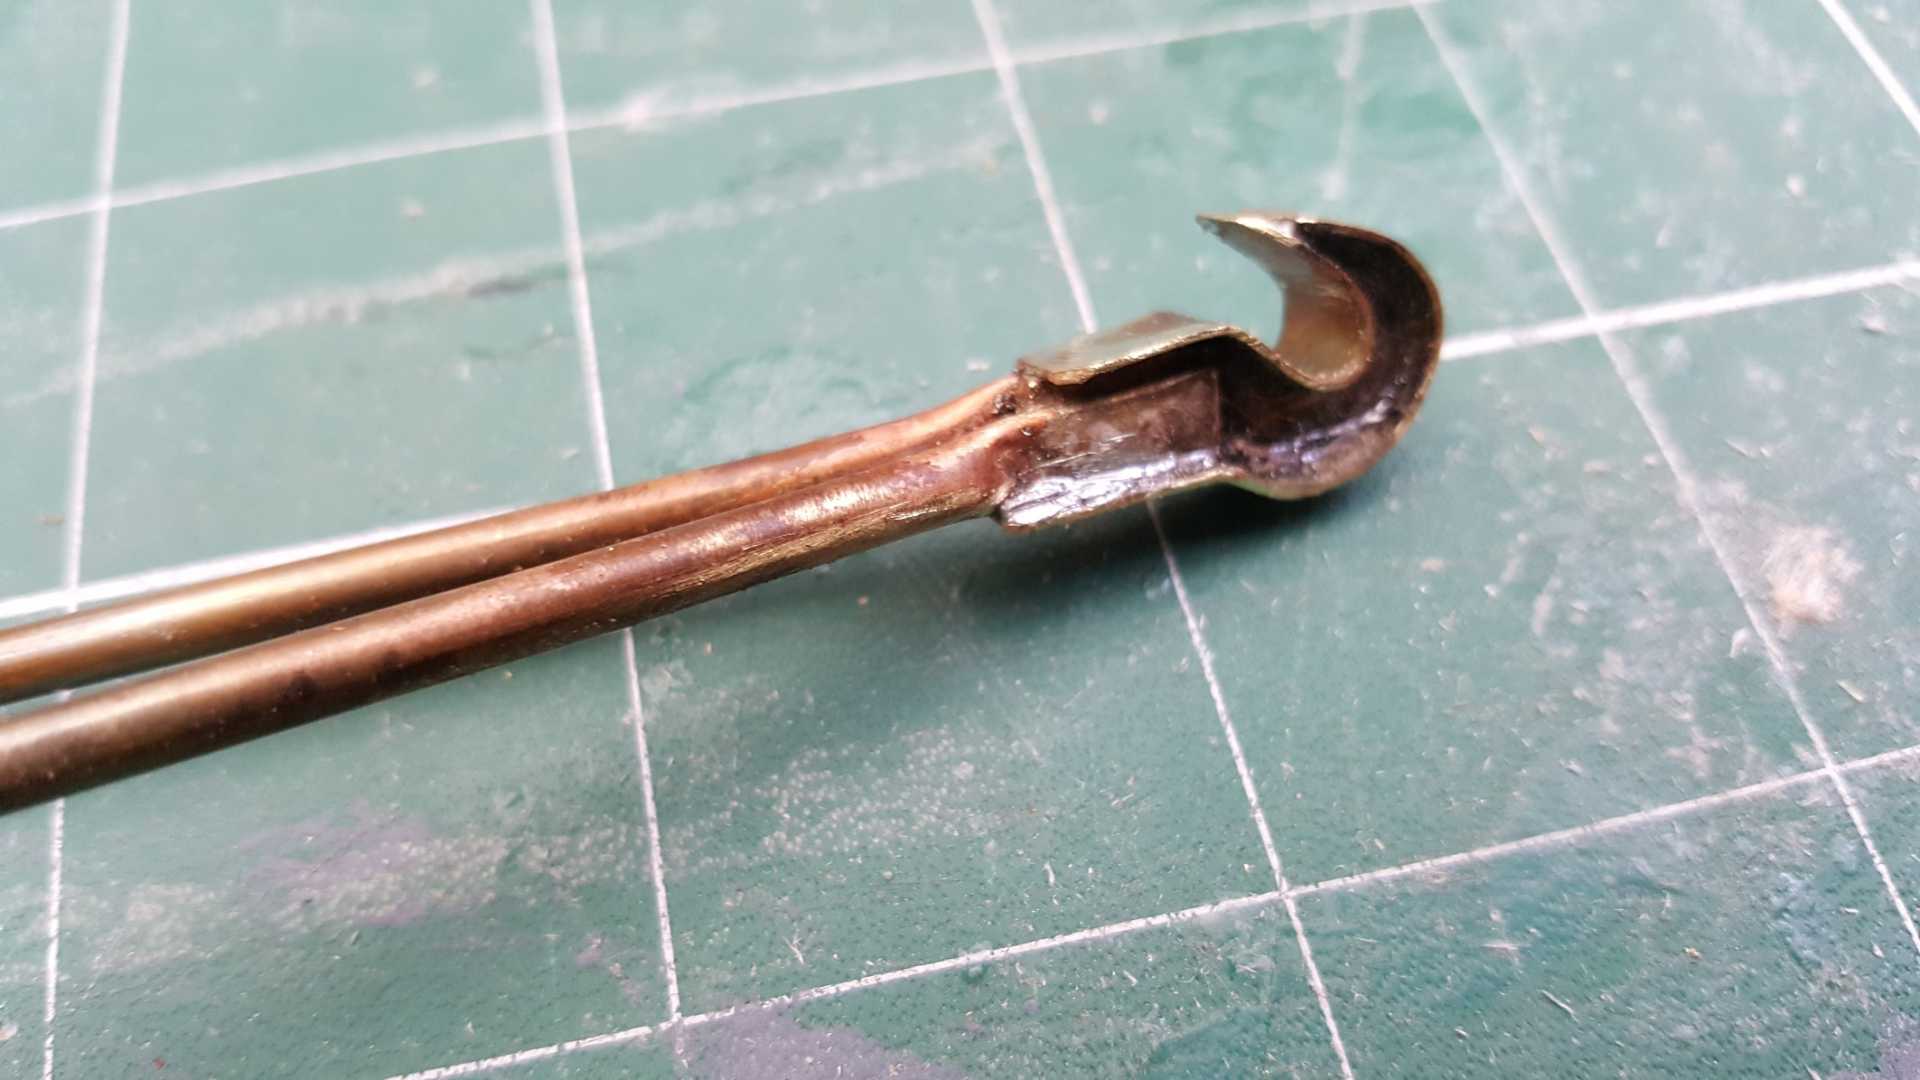
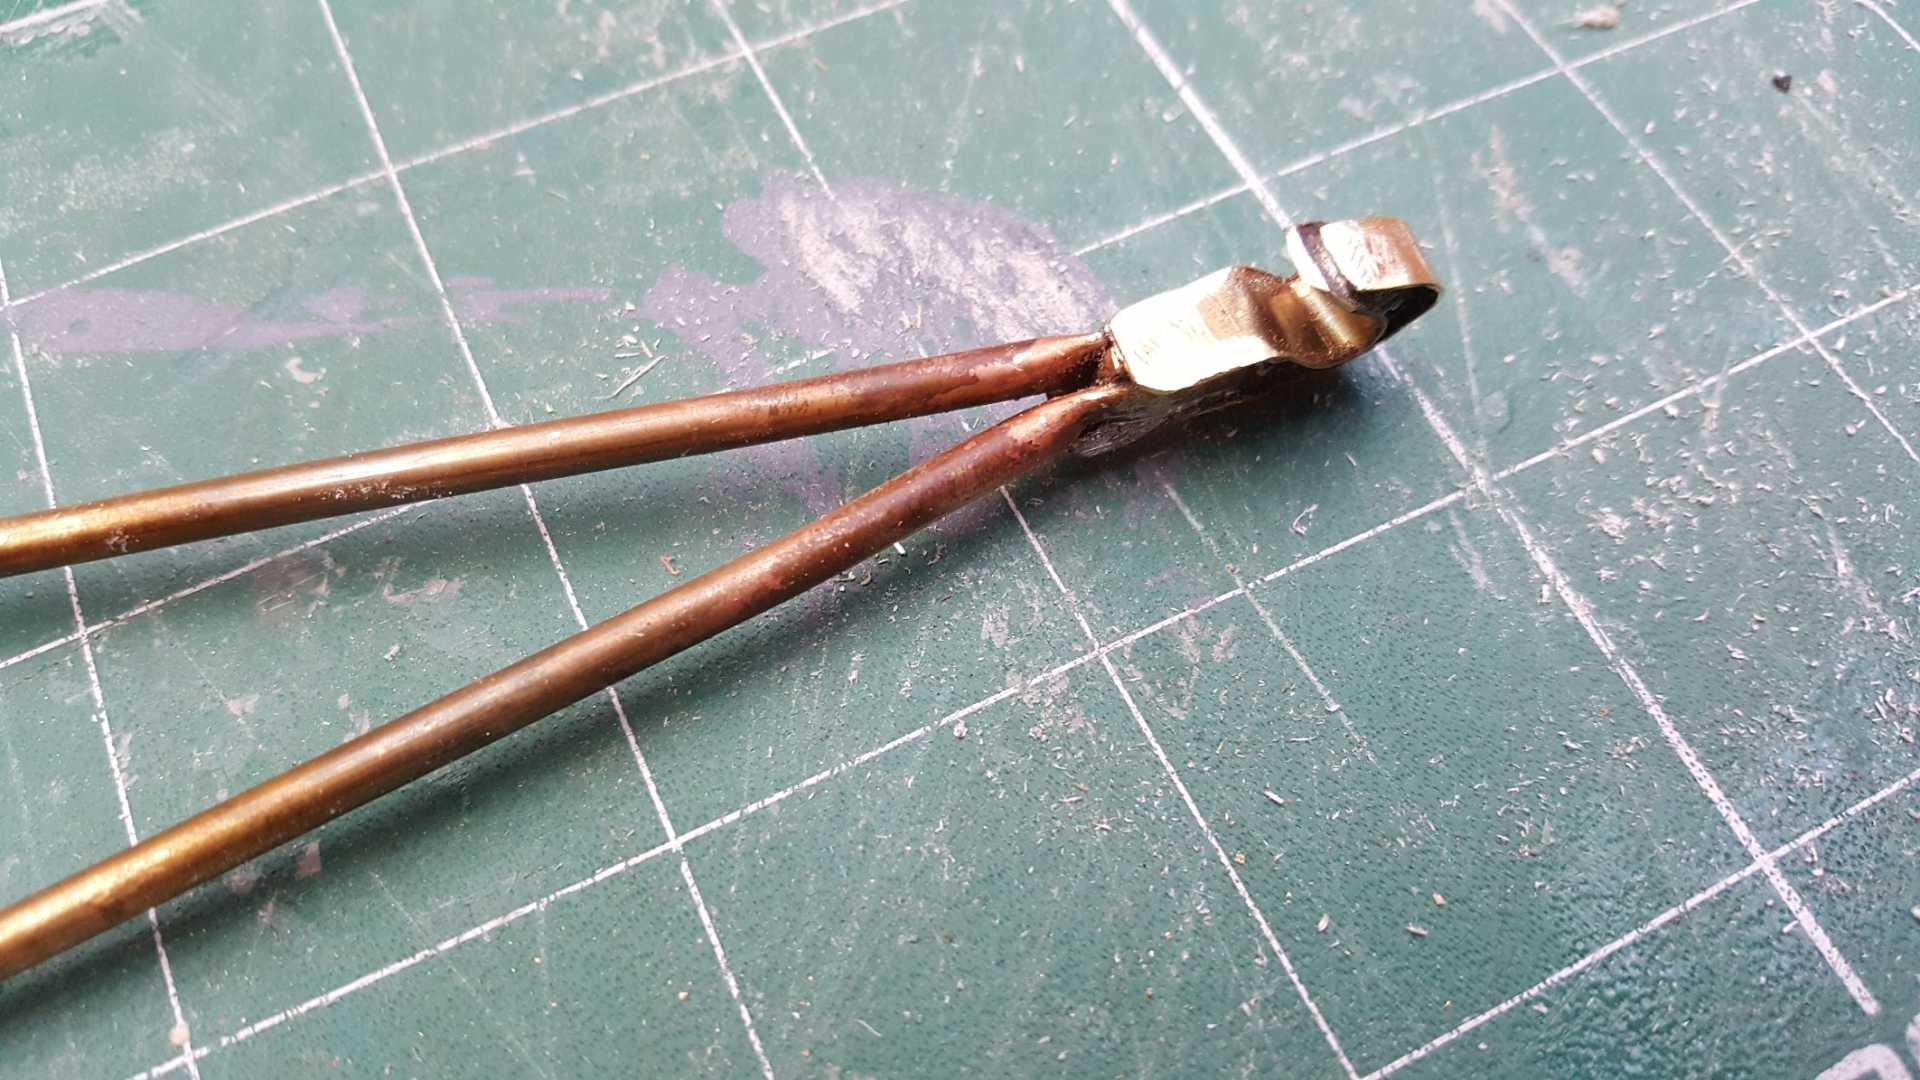
A little bit of shaping and we have a hook that is close the scale that i'm happy with. Compare it with the picture in the previous post of the real thing. I will add the internal bracing angles with a soldering iron later. With some filling, sanding and painting it will look quite good.

First step was to make the arms by flattening each end, drilling holes for the pivot pins and cutting the hook. The whole assembly was then silver soldered together.
Then I added some thin brass sheet to form the inner and out flange which was soft soldered into place.
A little bit of shaping and we have a hook that is close the scale that i'm happy with. Compare it with the picture in the previous post of the real thing. I will add the internal bracing angles with a soldering iron later. With some filling, sanding and painting it will look quite good.
I'm currently unsupervised. I know it freaks me out as well, but the possibilities are endless!!
Thanks: Ex-Member, Flytilbroke, blue123, boz, Firewood, Squirrelnet, Crashrr
Please Log in or Create an account to join the conversation.
Time to create page: 0.232 seconds