
- Posts: 6781
- Thank you received: 10722
Fairey Firefly MK5 from Vance Mosher plan
- THE BLACKBIRD
-

- Offline
- Forum Master
-

Less
More
21 Mar 2021 23:14 #136
by THE BLACKBIRD
Replied by THE BLACKBIRD on topic Fairey Firefly MK5 from Vance Mosher plan
I used to make mine with the same method, but yours look better than mine, looking good Sir
Thanks: Klipkopwildlife, Ralpharr2001
Please Log in or Create an account to join the conversation.
- crash happy
-

- Offline
- Platinum Member
-

- Oops. did I say that out loud!
Less
More
- Posts: 1250
- Thank you received: 1203
22 Mar 2021 07:35 #137
by crash happy
Replied by crash happy on topic Fairey Firefly MK5 from Vance Mosher plan
I admire your thinking, that's a very elegant solution. 
Thanks: Klipkopwildlife
Please Log in or Create an account to join the conversation.
- Klipkopwildlife
-

- Offline
- Administrator
-

- I'm supposed to be retired!
22 Mar 2021 07:46 #138
by Klipkopwildlife
Do it now, you may never get another chance
Replied by Klipkopwildlife on topic Fairey Firefly MK5 from Vance Mosher plan
I think it comes down to how flat the substrate is. Kitchen worktop MDF sounds ideal, provided you don't get caught!
Do it now, you may never get another chance
Please Log in or Create an account to join the conversation.
- Ralpharr2001
-
 Topic Author
- Offline
- Elite Member
-

Less
More
- Posts: 524
- Thank you received: 1476
22 Mar 2021 13:26 #139
by Ralpharr2001
I'm currently unsupervised. I know it freaks me out as well, but the possibilities are endless!!
Replied by Ralpharr2001 on topic Fairey Firefly MK5 from Vance Mosher plan
I don't have to worry about being caught Klippy. The wife said to me "its the models and cars or me". Needless to say I have my models and nice car!! 
I'm currently unsupervised. I know it freaks me out as well, but the possibilities are endless!!
Thanks: Eric, Klipkopwildlife, THE BLACKBIRD, crash happy
Please Log in or Create an account to join the conversation.
- Ralpharr2001
-
Topic Author
- Offline
- Elite Member
-
Less
More
- Posts: 524
- Thank you received: 1476
27 Mar 2021 12:27 #140
by Ralpharr2001
I'm currently unsupervised. I know it freaks me out as well, but the possibilities are endless!!
Replied by Ralpharr2001 on topic Fairey Firefly MK5 from Vance Mosher plan
Spent the morning trimming up the fibre glass sheet and fitting the wing fillets.
I gently heated up the glass sheet and pushed it into the wing and fuse which helped it adopt the form. Did this several times until the glass sheet took the correct form, trimmed it with a pair of scissors. Repeated for the other side, then glued them into place with resin and bulking agent to make a paste. I still had to use some pins to hold the shape. Waiting for it to all dry and see how it turns out.

I gently heated up the glass sheet and pushed it into the wing and fuse which helped it adopt the form. Did this several times until the glass sheet took the correct form, trimmed it with a pair of scissors. Repeated for the other side, then glued them into place with resin and bulking agent to make a paste. I still had to use some pins to hold the shape. Waiting for it to all dry and see how it turns out.
I'm currently unsupervised. I know it freaks me out as well, but the possibilities are endless!!
Attachments:
Thanks: Eric, Klipkopwildlife, Flytilbroke, Quorneng, THE BLACKBIRD, crash happy
Please Log in or Create an account to join the conversation.
- crash happy
-
- Offline
- Platinum Member
-
- Oops. did I say that out loud!
Less
More
- Posts: 1250
- Thank you received: 1203
28 Mar 2021 09:43 #141
by crash happy
Replied by crash happy on topic Fairey Firefly MK5 from Vance Mosher plan
I have to say your work never fails to impress Ralph !
Thanks: Klipkopwildlife, Ralpharr2001
Please Log in or Create an account to join the conversation.
- Ralpharr2001
-
Topic Author
- Offline
- Elite Member
-
Less
More
- Posts: 524
- Thank you received: 1476
28 Mar 2021 16:03 - 28 Mar 2021 16:08 #142
by Ralpharr2001
I'm currently unsupervised. I know it freaks me out as well, but the possibilities are endless!!
Replied by Ralpharr2001 on topic Fairey Firefly MK5 from Vance Mosher plan
Thanks Crash, appreciate it.
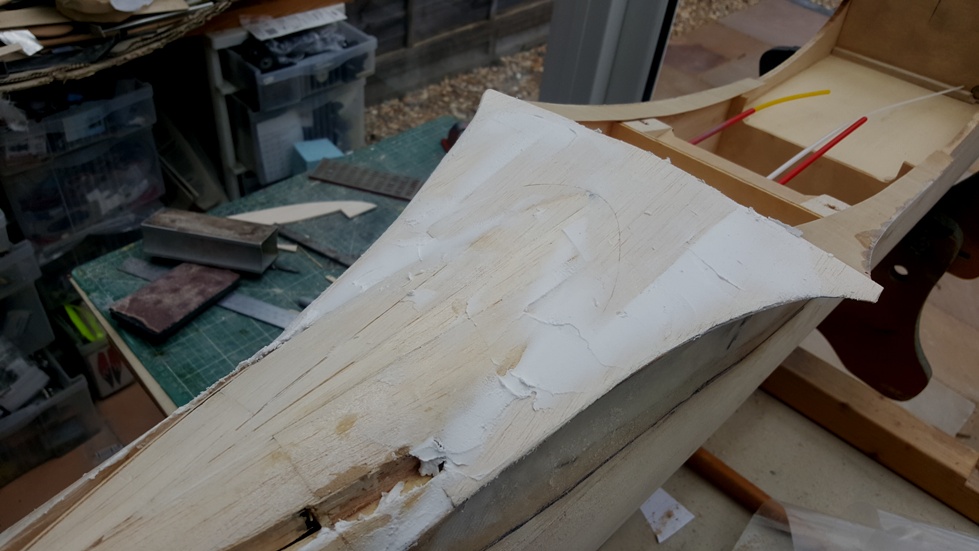
Started tidying up the section between the wing fillets on the fuselage. I cant seem to find a decent picture of the full size to get an accurate understanding of how the fuse is faired into the wing fillets. You would think some one would have thought "i'll take a picture of the fuselage fairing into the wing so that it will help Ralph when he comes to build his model". Bloody photographers, so inconsiderate!!
 So I will do what I think it should look like taking inspiration from a little 1/72 plastic kit and some not very helpful pictures. I used some 1/8 light balsa and lots of lightweight filler to create what I think it should look like. When the filler dries I will give it a good sand and see what it looks like.
Also had another bash at the flap system. Still not happy with it. So decided to reprogramme the servos. I'm using Hitec HS-5625 MG servos on the flaps and have the ability to be programmed, using a dongle on a laptop, for throw, speed, centre position, sensitivity and a few other bits.

At 6V they give 9.4kg.cm. I need about 28mm total throw and 180 degree of arm travel. So by my calcs at half throw (when the arm is at 90 degrees to servo, so maximum load, lever is 1.4cm) I will get 7kg. I think that should be enough. If my calcs are wrong let me know. So at each end of the travel I should get more than 9.4kg to pull the flap closed or hold fully open.
Started tidying up the section between the wing fillets on the fuselage. I cant seem to find a decent picture of the full size to get an accurate understanding of how the fuse is faired into the wing fillets. You would think some one would have thought "i'll take a picture of the fuselage fairing into the wing so that it will help Ralph when he comes to build his model". Bloody photographers, so inconsiderate!!
So I will do what I think it should look like taking inspiration from a little 1/72 plastic kit and some not very helpful pictures. I used some 1/8 light balsa and lots of lightweight filler to create what I think it should look like. When the filler dries I will give it a good sand and see what it looks like.
Also had another bash at the flap system. Still not happy with it. So decided to reprogramme the servos. I'm using Hitec HS-5625 MG servos on the flaps and have the ability to be programmed, using a dongle on a laptop, for throw, speed, centre position, sensitivity and a few other bits.
At 6V they give 9.4kg.cm. I need about 28mm total throw and 180 degree of arm travel. So by my calcs at half throw (when the arm is at 90 degrees to servo, so maximum load, lever is 1.4cm) I will get 7kg. I think that should be enough. If my calcs are wrong let me know. So at each end of the travel I should get more than 9.4kg to pull the flap closed or hold fully open.
I'm currently unsupervised. I know it freaks me out as well, but the possibilities are endless!!
Attachments:
Last edit: 28 Mar 2021 16:08 by Ralpharr2001.
Thanks: Klipkopwildlife, Quorneng, THE BLACKBIRD, crash happy
Please Log in or Create an account to join the conversation.
- Quorneng
-

- Offline
- Forum Master
-
Less
More
- Posts: 10058
- Thank you received: 19043
29 Mar 2021 02:17 #143
by Quorneng
Replied by Quorneng on topic Fairey Firefly MK5 from Vance Mosher plan
Powerful enough?
With 7 kg on each flap servo you would likely be able to raise the plane off the ground by simply extending the flaps.
It am pretty sure the full size couldn't do that.
With 7 kg on each flap servo you would likely be able to raise the plane off the ground by simply extending the flaps.
It am pretty sure the full size couldn't do that.
Thanks: Klipkopwildlife, Ralpharr2001
Please Log in or Create an account to join the conversation.
- THE BLACKBIRD
-
- Offline
- Forum Master
-
Less
More
- Posts: 6781
- Thank you received: 10722
29 Mar 2021 23:22 - 29 Mar 2021 23:23 #144
by THE BLACKBIRD
Replied by THE BLACKBIRD on topic Fairey Firefly MK5 from Vance Mosher plan
Ah Hitec servos, i would not even have them in the house, it was one of those that brought my SU27 down 


Last edit: 29 Mar 2021 23:23 by THE BLACKBIRD.
Thanks: Klipkopwildlife
Please Log in or Create an account to join the conversation.
- Ralpharr2001
-
Topic Author
- Offline
- Elite Member
-
Less
More
- Posts: 524
- Thank you received: 1476
30 Mar 2021 06:51 #145
by Ralpharr2001
I'm currently unsupervised. I know it freaks me out as well, but the possibilities are endless!!
Replied by Ralpharr2001 on topic Fairey Firefly MK5 from Vance Mosher plan
You've got me worried BB.  I had them both on cycle mode on the servo tester for about 3 - 4 minutes, never missed a beat.
I had them both on cycle mode on the servo tester for about 3 - 4 minutes, never missed a beat. I'm currently unsupervised. I know it freaks me out as well, but the possibilities are endless!!
Thanks: Klipkopwildlife
Please Log in or Create an account to join the conversation.
- Eric
-

- Offline
- Moderator
-

Less
More
- Posts: 15406
- Thank you received: 14306
30 Mar 2021 09:58 #146
by Eric
if you are calm and collected when all about you are going berserk - you've missed something important!
Replied by Eric on topic Fairey Firefly MK5 from Vance Mosher plan
As I've put before - even Savox make duff servos!
if you are calm and collected when all about you are going berserk - you've missed something important!
Thanks: Klipkopwildlife
Please Log in or Create an account to join the conversation.
- THE BLACKBIRD
-
- Offline
- Forum Master
-
Less
More
- Posts: 6781
- Thank you received: 10722
30 Mar 2021 11:27 #147
by THE BLACKBIRD
Replied by THE BLACKBIRD on topic Fairey Firefly MK5 from Vance Mosher plan
Mine was a 25kg one on the right hand elevator it burnt out in the full up position, we thought it was radio contact lost for a start until we fully checked the Power Box SRS box of tricks
There you go Eric never had a problem with all my Savox servos,
There you go Eric never had a problem with all my Savox servos,
Thanks: Klipkopwildlife
Please Log in or Create an account to join the conversation.
- Ralpharr2001
-
Topic Author
- Offline
- Elite Member
-
Less
More
- Posts: 524
- Thank you received: 1476
10 Apr 2021 15:50 #148
by Ralpharr2001
I'm currently unsupervised. I know it freaks me out as well, but the possibilities are endless!!
Replied by Ralpharr2001 on topic Fairey Firefly MK5 from Vance Mosher plan
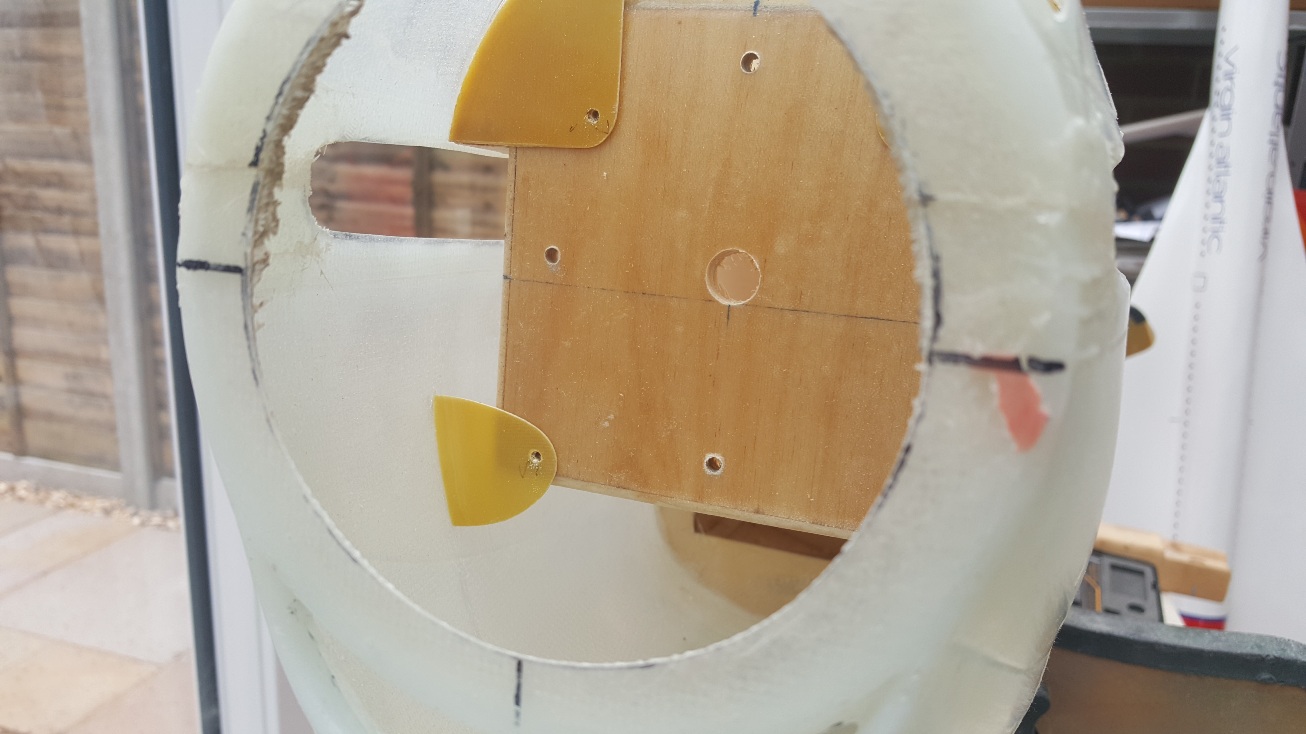
Today was front cowl mounting time. I've been trying to work out an elegant way to fix the cowl to the fuselage. Thinking about it, the cowl will only have to come off when i need to access the motor or the ESC. So bolting it in place will do the trick. The challenge was getting to the rear fixing bolts as there is a former / bulkhead in the way. This bulkhead has the holes for the wing location pins to go into which makes it a little structural. I thought of just having locating pins but decided against that as I wanted a tight fit of the rear of the cowl to the fuselage. Pins would allow the cowl to pull away leaving a big gap. So I decided to remove part of the bulkhead but leave enough meat to hold the wings which will give access to the bolts, you can see the section I removed in the photo. I will give the face of this former a coating of resin just to add a bit strength.

So, located the cowl onto the fuse, lined it all up, clamped it into place, easier said then done, and drilled two holes through the front former into the former that is glued to the cowl. Fitted a couple of 4mm T nuts to the cowl former and hey presto the cowl is secured at the back.

For the front I cut some tabs 2mm fibre glass sheet and tacked them onto the cowl and drilled through into the engine mount back plate. A wipe with Hysol epoxy and they are installed. Access to these fixings is by taking the spinner off. So the back and front of the cowl is fixed. I think it is a bit OTT but better safe than sorry. A bit of a pain to remove but as I said earlier hopefully i wont have to do it often.
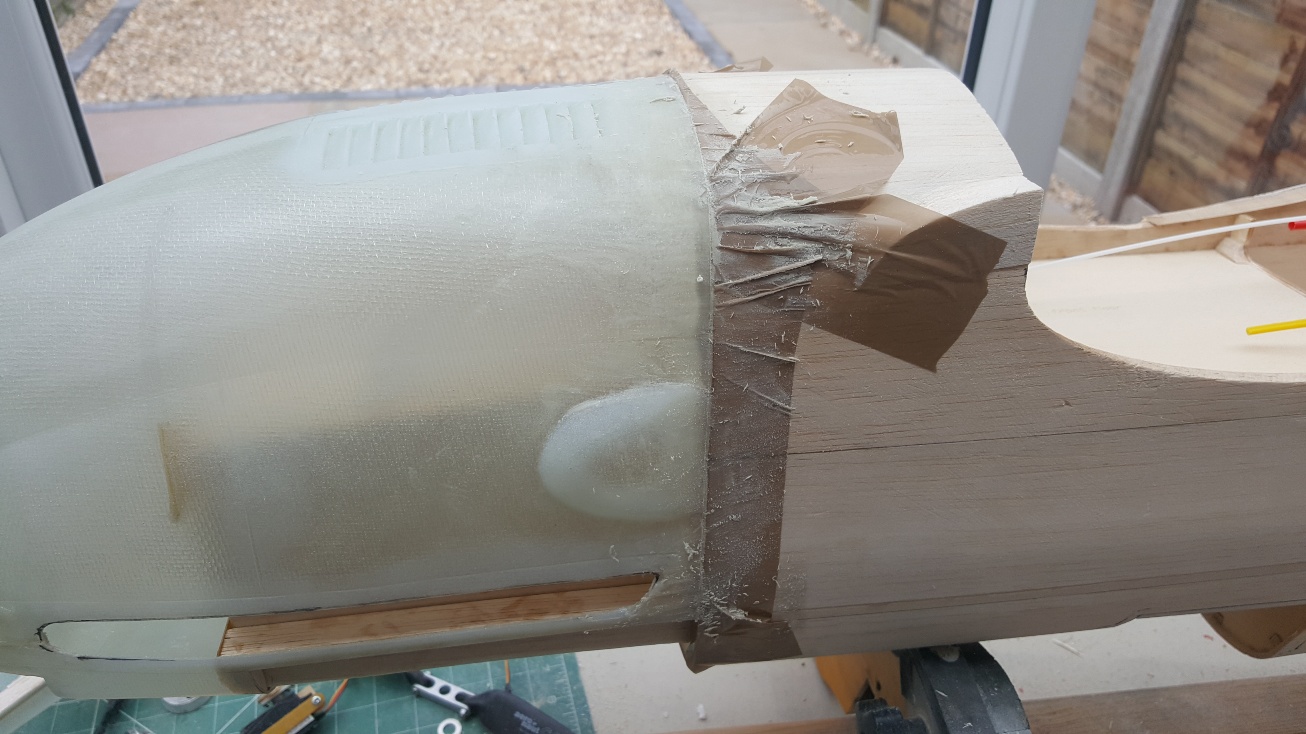
So to get a nice tight fitting between the cowl and the fuselage I put some packing tape on the fuselage where the cowl touched and coated it with release agent. Mixed up some filler and applied it to the cowl former and pulled the cowl onto the fuselage with the bolts. removed the excess filler and let it dray before trying to separate it from the fuselage. Should give a nice tight thin join line.
So, located the cowl onto the fuse, lined it all up, clamped it into place, easier said then done, and drilled two holes through the front former into the former that is glued to the cowl. Fitted a couple of 4mm T nuts to the cowl former and hey presto the cowl is secured at the back.
For the front I cut some tabs 2mm fibre glass sheet and tacked them onto the cowl and drilled through into the engine mount back plate. A wipe with Hysol epoxy and they are installed. Access to these fixings is by taking the spinner off. So the back and front of the cowl is fixed. I think it is a bit OTT but better safe than sorry. A bit of a pain to remove but as I said earlier hopefully i wont have to do it often.
So to get a nice tight fitting between the cowl and the fuselage I put some packing tape on the fuselage where the cowl touched and coated it with release agent. Mixed up some filler and applied it to the cowl former and pulled the cowl onto the fuselage with the bolts. removed the excess filler and let it dray before trying to separate it from the fuselage. Should give a nice tight thin join line.
I'm currently unsupervised. I know it freaks me out as well, but the possibilities are endless!!
Attachments:
Thanks: Klipkopwildlife, Quorneng, THE BLACKBIRD, crash happy
Please Log in or Create an account to join the conversation.
- Ralpharr2001
-
Topic Author
- Offline
- Elite Member
-
Less
More
- Posts: 524
- Thank you received: 1476
11 Apr 2021 22:35 - 11 Apr 2021 22:37 #149
by Ralpharr2001
I'm currently unsupervised. I know it freaks me out as well, but the possibilities are endless!!
Replied by Ralpharr2001 on topic Fairey Firefly MK5 from Vance Mosher plan
With the cowl sorted and the cowl to fuselage gap filled nicely I gave the fuselage a fine sanding and glassed it with 25g/m glass cloth and finishing resin. Hopefully in the coming week I can sort out the closing issue with the flaps and glass the wing next weekend.
Nice to make some good progress.
Nice to make some good progress.
I'm currently unsupervised. I know it freaks me out as well, but the possibilities are endless!!
Last edit: 11 Apr 2021 22:37 by Ralpharr2001.
Thanks: Eric, Klipkopwildlife, Quorneng, THE BLACKBIRD, crash happy
Please Log in or Create an account to join the conversation.
- paul d
-
- Offline
- Forum Veteran
-

Less
More
- Posts: 2074
- Thank you received: 2292
12 Apr 2021 07:45 #150
by paul d
balsa is best.
Replied by paul d on topic Fairey Firefly MK5 from Vance Mosher plan
lovely work Ralph!
balsa is best.
Thanks: Klipkopwildlife, Ralpharr2001
Please Log in or Create an account to join the conversation.
Time to create page: 0.253 seconds