
- Posts: 750
- Thank you received: 1147
3D printing Widgets
- jon.in.swansea
-

- Offline
- Elite Member
-

Less
More
21 Mar 2022 14:39 #16
by jon.in.swansea
Replied by jon.in.swansea on topic 3D printing Widgets
I do not have the option of exponential on my current Futaba T6L Sport. I never quite got the hang of Klippies T6EX menus. So calm light finger motions are my preference for now. I might be forced to re-consider.
Thanks: Klipkopwildlife
Please Log in or Create an account to join the conversation.
- Klipkopwildlife
-
 Topic Author
- Offline
- Administrator
-

- I'm supposed to be retired!
21 Mar 2022 17:12 #17
by Klipkopwildlife
Do it now, you may never get another chance
Replied by Klipkopwildlife on topic 3D printing Widgets
Didn't I send you a manual?
Do it now, you may never get another chance
Please Log in or Create an account to join the conversation.
- jon.in.swansea
-
- Offline
- Elite Member
-
Less
More
- Posts: 750
- Thank you received: 1147
21 Mar 2022 17:28 #18
by jon.in.swansea
Replied by jon.in.swansea on topic 3D printing Widgets
I have a copy of the manual. It tried to explain but my brain cells just didn't seem to absorb. Perhaps if I gave it another try it would make more sense 
Thanks: Klipkopwildlife
Please Log in or Create an account to join the conversation.
- Klipkopwildlife
-
Topic Author
- Offline
- Administrator
-
- I'm supposed to be retired!
21 Mar 2022 17:41 #19
by Klipkopwildlife
Do it now, you may never get another chance
Replied by Klipkopwildlife on topic 3D printing Widgets
Perhaps we can sit on the phone sometime and I'll talk you through it.
Do it now, you may never get another chance
Thanks: jon.in.swansea
Please Log in or Create an account to join the conversation.
- jon.in.swansea
-
- Offline
- Elite Member
-
Less
More
- Posts: 750
- Thank you received: 1147
25 Mar 2022 17:37 #20
by jon.in.swansea
Replied by jon.in.swansea on topic 3D printing Widgets
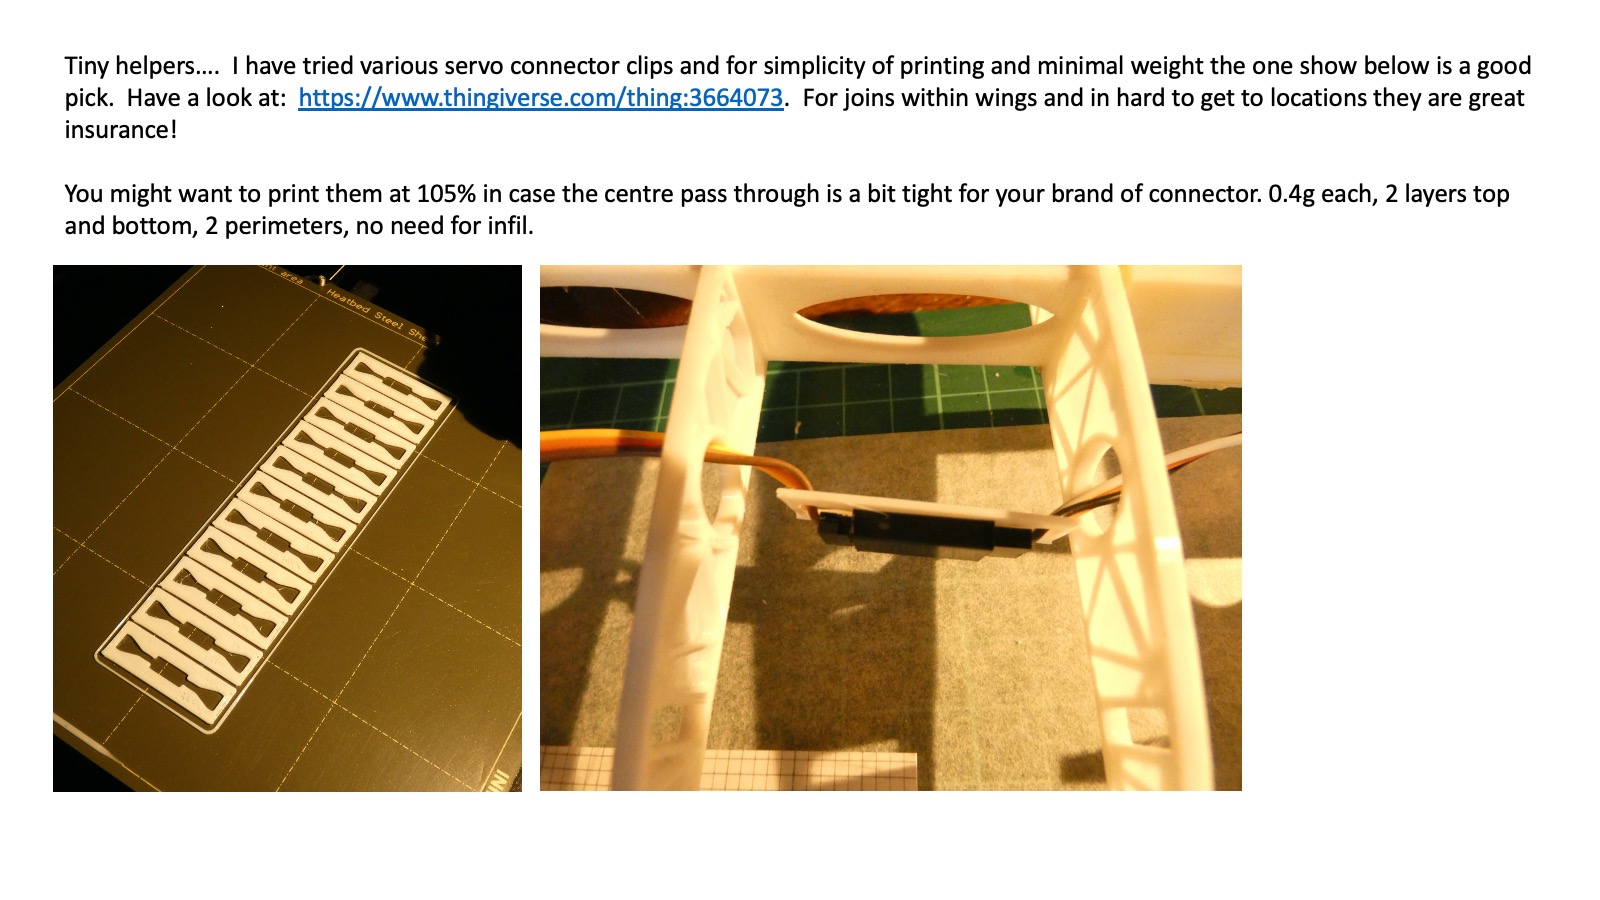
And here is another tiny printed beastie that saves lots of frustration and ripping into the depths of models....
-Jon
-Jon
Attachments:
Thanks: Klipkopwildlife
Please Log in or Create an account to join the conversation.
- jon.in.swansea
-
- Offline
- Elite Member
-
Less
More
- Posts: 750
- Thank you received: 1147
30 Apr 2022 13:01 #21
by jon.in.swansea
Replied by jon.in.swansea on topic 3D printing Widgets
Some of my models mount the elevator servo on the tail and others have the elevator servo in the body of the fuselage. The latter case is helped with the occasional guide for the linkage wire. Callipers on the boom and wire and an offset opinion are needed. My preference is a friction fit on the boom so that these guides can be positioned where they will do the most good.


As usual, a zipped version of the freeCAD file and an STL can be found below. The boom is 8mm and the wire channel is 2mm. -Jon
As usual, a zipped version of the freeCAD file and an STL can be found below. The boom is 8mm and the wire channel is 2mm. -Jon
This attachment is hidden for guests.
Please log in or register to see it.
Please log in or register to see it.
This attachment is hidden for guests.
Please log in or register to see it.
Please log in or register to see it.
Attachments:
Thanks: Klipkopwildlife, Quorneng
Please Log in or Create an account to join the conversation.
- jon.in.swansea
-
- Offline
- Elite Member
-
Less
More
- Posts: 750
- Thank you received: 1147
02 May 2022 10:31 - 02 May 2022 10:43 #22
by jon.in.swansea
Replied by jon.in.swansea on topic 3D printing Widgets
To save weight at tail I attempted to rig a spring pull for the elevator using some bent piano wire as the torsion spring.
After many tries I ground to a halt. The 'spring' was either so stiff that the servo struggled to hold or it was not enough to pull the elevator to its full extent. Then Tony suggested I try a rubber band as the spring. I have scores of those, of all sizes and strengths (I got in the habit of picking up what the post leaves on the street).
So I printed another horn and mounted it opposed to the control horn, found a small print that I had used to fix a band to and gave it a try.
The clip is short, rather than upload to Youtube I am attempting to add it as an attachment.
And that didn't work (.mp4 in not allowed and it was a tiny bit over 2MB). I could see and play it in the preview but not after submission.
Would the administrators chat amongst themselves to see if it would be possible for the site to host SMALLish .mp4 video files (say less than 20MB) for quick shorts? It would be nice not to have to rely on YouTube.
Anyway here is the YouTube link.... -Jon
After many tries I ground to a halt. The 'spring' was either so stiff that the servo struggled to hold or it was not enough to pull the elevator to its full extent. Then Tony suggested I try a rubber band as the spring. I have scores of those, of all sizes and strengths (I got in the habit of picking up what the post leaves on the street).
So I printed another horn and mounted it opposed to the control horn, found a small print that I had used to fix a band to and gave it a try.
The clip is short, rather than upload to Youtube I am attempting to add it as an attachment.
And that didn't work (.mp4 in not allowed and it was a tiny bit over 2MB). I could see and play it in the preview but not after submission.
Would the administrators chat amongst themselves to see if it would be possible for the site to host SMALLish .mp4 video files (say less than 20MB) for quick shorts? It would be nice not to have to rely on YouTube.
Anyway here is the YouTube link.... -Jon
Last edit: 02 May 2022 10:43 by jon.in.swansea.
Thanks: Klipkopwildlife
Please Log in or Create an account to join the conversation.
- Klipkopwildlife
-
Topic Author
- Offline
- Administrator
-
- I'm supposed to be retired!
02 May 2022 10:59 #23
by Klipkopwildlife
Do it now, you may never get another chance
Replied by Klipkopwildlife on topic 3D printing Widgets
I'm sure you're going to change it Jon, but the servo crank needs to be at right angles to the servo when the stick is centre. eg, if the long length of the servo is 0 and 180, then the width is 90 and 270. With your servo tester on neutral your crank needs to be pointing straight down (90 or 270). Anything other than this will give very strange control responses. In cases where the aileron servos are connected with a 'Y' lead you can use other angles to create mechanical differential.
Nice demonstration of alternative weight saving.
Nice demonstration of alternative weight saving.
Do it now, you may never get another chance
Thanks: jon.in.swansea
Please Log in or Create an account to join the conversation.
- Eric
-

- Offline
- Moderator
-

Less
More
- Posts: 15337
- Thank you received: 14148
02 May 2022 13:52 - 02 May 2022 14:03 #24
by Eric
if you are calm and collected when all about you are going berserk - you've missed something important!
Replied by Eric on topic 3D printing Widgets
As klippy put, the servo arm needs altering.
BUT
As you are using a wire push-rod, why do you need an elastic band to pull on? All that will do is load up the servo, leading to rapid gear wear AND increase battery drain as well!
With that set-up of the servo arm, you will get a LOT more down ele than you will up (ie differential throw!)
If you look at it carefully, you will see that as the servo rotates to the up ele position, a lot of the rod movement is not fore and aft, but up - due to the rotary action. The effort of bending the rod is also absorbing servo power!
-
Your crash/arrival in the flying vid looks exactly like an insufficient airspeed stall!
Until your skill level is up to it - NEVER try to turn at low height - the floor ALWAYS gets in the way! (Remember - three mistakes high!)
BUT
As you are using a wire push-rod, why do you need an elastic band to pull on? All that will do is load up the servo, leading to rapid gear wear AND increase battery drain as well!
With that set-up of the servo arm, you will get a LOT more down ele than you will up (ie differential throw!)
If you look at it carefully, you will see that as the servo rotates to the up ele position, a lot of the rod movement is not fore and aft, but up - due to the rotary action. The effort of bending the rod is also absorbing servo power!
-
Your crash/arrival in the flying vid looks exactly like an insufficient airspeed stall!
Until your skill level is up to it - NEVER try to turn at low height - the floor ALWAYS gets in the way! (Remember - three mistakes high!)
if you are calm and collected when all about you are going berserk - you've missed something important!
Last edit: 02 May 2022 14:03 by Eric. Reason: added a comment
Thanks: Klipkopwildlife, jon.in.swansea
Please Log in or Create an account to join the conversation.
- jon.in.swansea
-
- Offline
- Elite Member
-
Less
More
- Posts: 750
- Thank you received: 1147
02 May 2022 17:46 #25
by jon.in.swansea
Replied by jon.in.swansea on topic 3D printing Widgets
To clarify - the linkage wire is about half the diameter as I usually use - it has almost no push capability. It's a limp noodle. It probably should be fishing line or some other non-stretchy fibre.
Well spotted on the angle of the servo arm. I agree that the servo arm needs to be rotated.
One of the new bits of information on a first flight with a new wing is to get indicators of stall speed. And finding that out higher up would have been preferable. -Jon
Well spotted on the angle of the servo arm. I agree that the servo arm needs to be rotated.
One of the new bits of information on a first flight with a new wing is to get indicators of stall speed. And finding that out higher up would have been preferable. -Jon
Thanks: Klipkopwildlife
Please Log in or Create an account to join the conversation.
- Quorneng
-

- Offline
- Forum Master
-

Less
More
- Posts: 10058
- Thank you received: 19043
02 May 2022 22:09 #26
by Quorneng
Replied by Quorneng on topic 3D printing Widgets
I hate giving a servo any more work than the minimum required to move the surface against the air stream.
That includes stiff hinges, friction in the linkage and worst of all a spring return. If the spring is set to give the same effort as the servo does the other way then the load on the servo is doubled.
Do without a spring return and you can use a smaller lighter servo and still achieve the same force on the control surface.
My 'go to' if a servo right at the tail is not possible is a pull/pull arrangement using mono filament nylon fishing line. Yes mono filament is a bit 'stretchy' but I use that feature to tension the lines slightly at the neutral position so there is no 'slop'. I then arrange the horn positoin such that as the surface deflects the tension is reduced. At full deflection the 'give' line is virtually slack so I know all the servo force is being used to move the suface.
On my lightweight planes I am quite happy to use 5lb line. It is cheap, weighs nothing at all and its breaking strain is 3 times the maximum pull a 5g micro servo can deliver.
The elevator pull/pull used on the sub 200 g Cheetah powered RC foam glider.
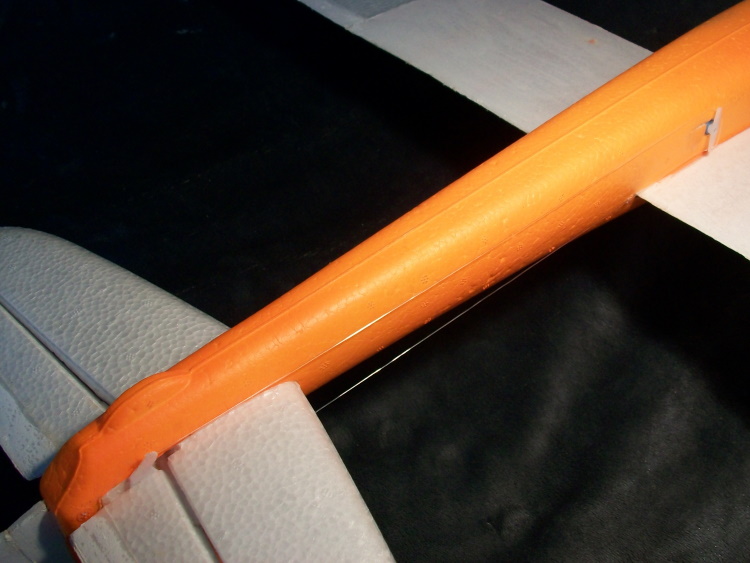
The 3.7 g servo arm and elevator horn are obvious enough but you are hard put to actually see the 1.7lb lines unless you get a 'glint' from a light source.
However I do still prefer the elegent simplicity of a servo adjacent to the control surface it moves with a short simple link.
That includes stiff hinges, friction in the linkage and worst of all a spring return. If the spring is set to give the same effort as the servo does the other way then the load on the servo is doubled.
Do without a spring return and you can use a smaller lighter servo and still achieve the same force on the control surface.
My 'go to' if a servo right at the tail is not possible is a pull/pull arrangement using mono filament nylon fishing line.
Yes mono filament is a bit 'stretchy' but I use that feature to tension the lines slightly at the neutral position so there is no 'slop'. I then arrange the horn positoin such that as the surface deflects the tension is reduced. At full deflection the 'give' line is virtually slack so I know all the servo force is being used to move the suface.On my lightweight planes I am quite happy to use 5lb line. It is cheap, weighs nothing at all and its breaking strain is 3 times the maximum pull a 5g micro servo can deliver.
The elevator pull/pull used on the sub 200 g Cheetah powered RC foam glider.
The 3.7 g servo arm and elevator horn are obvious enough but you are hard put to actually see the 1.7lb lines unless you get a 'glint' from a light source.
However I do still prefer the elegent simplicity of a servo adjacent to the control surface it moves with a short simple link.
Attachments:
Thanks: Klipkopwildlife
Please Log in or Create an account to join the conversation.
- jon.in.swansea
-
- Offline
- Elite Member
-
Less
More
- Posts: 750
- Thank you received: 1147
03 May 2022 10:12 - 03 May 2022 10:13 #27
by jon.in.swansea
Replied by jon.in.swansea on topic 3D printing Widgets
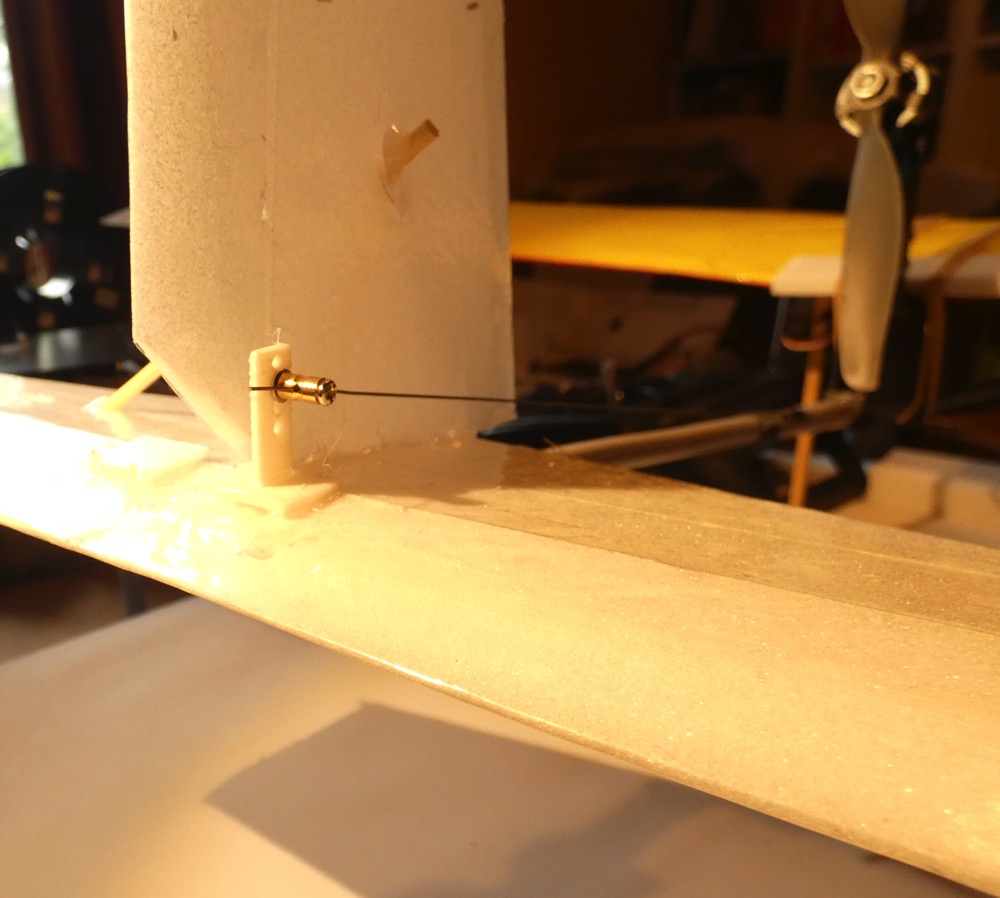
I appreciated the comments. I have revised the design:
Band on the bottom to address Tony's ' you want to fail better'.
I found a much finer wire for the pull (my earlier comment about the original wire being a lesser diameter was incorrect).
I think I found a combination that results in less overall travel for the elevator which might result in a less skittish flight.
I centred the servo - actually that servo is one Tony sent me from SA and this is the 3rd fuselage it has been associated with - does have a hum even when not stressed. I might need to retire it because the arm is fitting less well and will need checking after each flight.
I shifted the COG forward - it is now 45mm in the 155mm chord.
I take the comments about servo stress with a spring pull. I was intrigued about whether there was an alternative to a torsion spring. The band is slightly adjustable. I like the idea of a push-pull - it is simpler - but there is no clearance for that with the pusher prop.


The video is:
Band on the bottom to address Tony's ' you want to fail better'.
I found a much finer wire for the pull (my earlier comment about the original wire being a lesser diameter was incorrect).
I think I found a combination that results in less overall travel for the elevator which might result in a less skittish flight.
I centred the servo - actually that servo is one Tony sent me from SA and this is the 3rd fuselage it has been associated with - does have a hum even when not stressed. I might need to retire it because the arm is fitting less well and will need checking after each flight.
I shifted the COG forward - it is now 45mm in the 155mm chord.
I take the comments about servo stress with a spring pull. I was intrigued about whether there was an alternative to a torsion spring. The band is slightly adjustable. I like the idea of a push-pull - it is simpler - but there is no clearance for that with the pusher prop.
The video is:
Attachments:
Last edit: 03 May 2022 10:13 by jon.in.swansea.
Thanks: Eric, Klipkopwildlife
Please Log in or Create an account to join the conversation.
- jon.in.swansea
-
- Offline
- Elite Member
-
Less
More
- Posts: 750
- Thank you received: 1147
03 May 2022 10:23 #28
by jon.in.swansea
Replied by jon.in.swansea on topic 3D printing Widgets
Reading the comments again...
I do have variants that use a wire linkage from the fuselage to the elevator control horn. And that works ok and the little printed wire-guides help. I also have mounted the servo at the tail with a short linkage and that worked well for me - and there is a portion of the community that avoid servos at the tail. Exploring if there are workable alternatives is an interesting excursion. In the end this latest variant might not save all that much weight. -Jon
I do have variants that use a wire linkage from the fuselage to the elevator control horn. And that works ok and the little printed wire-guides help. I also have mounted the servo at the tail with a short linkage and that worked well for me - and there is a portion of the community that avoid servos at the tail. Exploring if there are workable alternatives is an interesting excursion. In the end this latest variant might not save all that much weight. -Jon
Thanks: Eric, Klipkopwildlife
Please Log in or Create an account to join the conversation.
- Klipkopwildlife
-
Topic Author
- Offline
- Administrator
-
- I'm supposed to be retired!
03 May 2022 11:52 #29
by Klipkopwildlife
Do it now, you may never get another chance
Replied by Klipkopwildlife on topic 3D printing Widgets
Looks good Jon, you will save a small amount of tail weight by turning the wire around, put the Z bend at the tail and the post at the servo if you can.
29% CoG, much better.
29% CoG, much better.
Do it now, you may never get another chance
Thanks: Eric, jon.in.swansea
Please Log in or Create an account to join the conversation.
- jon.in.swansea
-
- Offline
- Elite Member
-
Less
More
- Posts: 750
- Thank you received: 1147
26 Jun 2022 18:41 #30
by jon.in.swansea
Replied by jon.in.swansea on topic 3D printing Widgets
After a few weeks of Zoom workshops and a much needed holiday I am getting back to AeroModellers....
This 3D printed widget is a prop saver for a Flight Text 1806 motor which has a threaded shaft arrangement which is problematic for prop savers. I haven't found any for this type of motor shaft. And although I would use it in a pusher, such an inflexible mounting will shorten the life of my props given my models don't have landing wheels.

So open up freeCAD and get working. It was constrained by the length of the shaft, the size of the retaining nut and the need to keep it from unraveling if torque was applied quickly. Here is the design I came up with...

And a preview in the 'slicer' software...

Here it is tightened down on the threaded shaft and with the band-bolts in place.

And with the printed prop in place and using an 'O' ring. I used M3 bolts (the bolt hole is sized to self-thread a M3).

Here is the STL file. It takes about 10 minutes to print. 2 perimeters, 25% gyroid fill, 4 layers top and bottom.
Here is the freeCAD file. It should be straightforward to tweak the parameters for a different threaded shaft or a different thickness.
Enjoy, Jon
This 3D printed widget is a prop saver for a Flight Text 1806 motor which has a threaded shaft arrangement which is problematic for prop savers. I haven't found any for this type of motor shaft. And although I would use it in a pusher, such an inflexible mounting will shorten the life of my props given my models don't have landing wheels.
So open up freeCAD and get working. It was constrained by the length of the shaft, the size of the retaining nut and the need to keep it from unraveling if torque was applied quickly. Here is the design I came up with...
And a preview in the 'slicer' software...
Here it is tightened down on the threaded shaft and with the band-bolts in place.
And with the printed prop in place and using an 'O' ring. I used M3 bolts (the bolt hole is sized to self-thread a M3).
Here is the STL file. It takes about 10 minutes to print. 2 perimeters, 25% gyroid fill, 4 layers top and bottom.
This attachment is hidden for guests.
Please log in or register to see it.
Please log in or register to see it.
Here is the freeCAD file. It should be straightforward to tweak the parameters for a different threaded shaft or a different thickness.
This attachment is hidden for guests.
Please log in or register to see it.
Please log in or register to see it.
Enjoy, Jon
Attachments:
Thanks: Klipkopwildlife
Please Log in or Create an account to join the conversation.
Time to create page: 0.314 seconds